Index 页面:模拟调用controller. 实际应用中应该是各个外部系统。
@{
    ViewData["Title"] = "Home Page";
}

<div class="text-center">
    <h1 class="display-4">Welcome</h1>
    <p>Learn about <a href="https://docs.microsoft.com/aspnet/core">building Web apps with ASP.NET Core</a>.</p>
</div>


<div id="editor"></div>


<script src="https://apps.bdimg.com/libs/jquery/2.1.4/jquery.min.js"></script>
<script src="https://unpkg.com/wangeditor/release/wangEditor.min.js"></script>

<script type="text/javascript">
    $(document).ready(function () {

        InitEditor();
    });
    function InitEditor() {
        var E = window.wangEditor
        var editor = new E('#editor')
        editor.customConfig.menus = [
            'head', // 标题
            'bold', // 粗体
            'fontSize', // 字号
            'fontName', // 字体
            'italic', // 斜体
            'underline', // 下划线
            'strikeThrough', // 删除线
            'foreColor', // 文字颜色
            'backColor', // 背景颜色
            'link', // 插入链接
            'list', // 列表
            'justify', // 对齐方式
            'quote', // 引用
            //'emoticon',  // 表情
            'image',  // 插入图片
            'table', // 表格
            //'video',  // 插入视频
            'code', // 插入代码
            'undo', // 撤销
            'redo' // 重复
        ]

        editor.customConfig.uploadImgMaxSize = 3 * 1024 * 1024;
        editor.customConfig.uploadImgMaxLength = 5;


        editor.customConfig.customUploadImg = function (files, insert) {
            // files 是 input 中选中的文件列表
            // insert 是获取图片 url 后,插入到编辑器的方法
            var uploadData = new FormData();
            for (var i = 0; i < files.length; i++) {
                uploadData.append(files[i].name, files[i]);
            }

            $.ajax({
                type: "POST",
                url: "http://X.X.X.X/FileUpload/ImagesUpload",
                beforeSend: function (xhr) {
                    xhr.setRequestHeader("XSRF-TOKEN",
                        $('input:hidden[name="__RequestVerificationToken"]').val());
                },
                data: uploadData,
                processData: false,
                contentType: false,
                async: false,
                success: function (response) {

                    for (var i = 0; i < response.length; i++) {
                        insert(response[i].url);
                    }
                },
                failure: function (response) {

                    alert(response);
                }
            });
        }

        editor.create();


    }

</script>
Controller:
using System;
using System.Collections.Generic;
using System.IO;
using System.Linq;
using System.Threading.Tasks;
using Microsoft.AspNetCore.Hosting;
using Microsoft.AspNetCore.Mvc;

namespace FileUpload.Controllers
{
    public class FileUploadController : Controller
    {
        public IActionResult Index()
        {
            return View();
        }

        [HttpPost]
        public async Task<IActionResult> ImagesUpload([FromServices]IHostingEnvironment environment)
        {
            List<URLTvm> list = new List<URLTvm>();
            var files = Request.Form.Files;
            string webRootPath = environment.WebRootPath;
            string contentRootPath = environment.ContentRootPath;
            foreach (var formFile in files)
            {
                if (formFile.Length > 0)
                {
                    var str_directory =  DateTime.Now.ToString("yyyyMMdd");
                    if (!Directory.Exists("D:\Images\upload\" + str_directory))//如果不存在就创建file文件夹
                    {
                        Directory.CreateDirectory("D:\Images\upload\" + str_directory);
                    }
                    var fileName = Guid.NewGuid().ToString() + ".jpg";
                    var path = Path.Combine("D:\Images\upload\" + str_directory, fileName);
                    using (var stream = new FileStream(path, FileMode.CreateNew))
                    {
                        await formFile.CopyToAsync(stream);
                        URLTvm st = new URLTvm();
                        st.url = @"http://X.X.X.X/wwwroot/Upload/" + str_directory+ "/"+ fileName;
                        list.Add(st);
                    }
                }
            }

            return new JsonResult(list);

        }

    }
}
其中:
1.需要设置跨域。
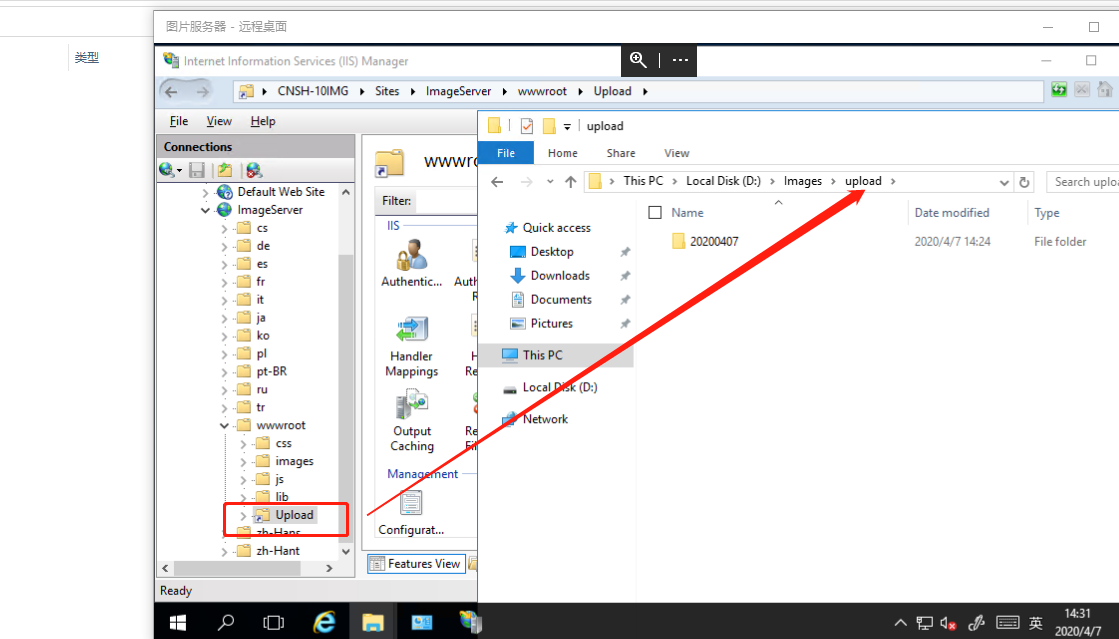
2.IIS文件 结构为:
代码部署在C盘,网站下新建一个虚拟目录指向D盘(方便后期文件备份和拓展)。
