原文地址:http://blog.csdn.net/luoshengyang/article/details/6747696
Android应用程序框架层创建的应用程序进程具有两个特点,一是进程的入口函数是ActivityThread.main,二是进程天然支持Binder进程间通信机制;这两个特点都是在进程的初始化过程中实现的,本文将详细分析Android应用程序进程创建过程中是如何实现这两个特点的。
Android应用程序框架层创建的应用程序进程的入口函数是ActivityThread.main比较好理解,即进程创建完成之后,Android应用程序框架层就会在这个进程中将ActivityThread类加载进来,然后执行它的main函数,这个main函数就是进程执行消息循环的地方了。Android应用程序框架层创建的应用程序进程天然支持Binder进程间通信机制这个特点应该怎么样理解呢?前面我们在学习Android系统的Binder进程间通信机制时说到,它具有四个组件,分别是驱动程序、守护进程、Client以及Server,其中Server组件在初始化时必须进入一个循环中不断地与Binder驱动程序进行到交互,以便获得Client组件发送的请求,具体可参考Android系统进程间通信(IPC)机制Binder中的Server启动过程源代码分析一文,但是,当我们在Android应用程序中实现Server组件的时候,我们并没有让进程进入一个循环中去等待Client组件的请求,然而,当Client组件得到这个Server组件的远程接口时,却可以顺利地和Server组件进行进程间通信,这就是因为Android应用程序进程在创建的时候就已经启动了一个线程池来支持Server组件和Binder驱动程序之间的交互了,这样,极大地方便了在Android应用程序中创建Server组件。
在Android应用程序框架层中,是由ActivityManagerService组件负责为Android应用程序创建新的进程的,它本来也是运行在一个独立的进程之中,不过这个进程是在系统启动的过程中创建的。ActivityManagerService组件一般会在什么情况下会为应用程序创建一个新的进程呢?当系统决定要在一个新的进程中启动一个Activity或者Service时,它就会创建一个新的进程了,然后在这个新的进程中启动这个Activity或者Service,具体可以参考Android系统在新进程中启动自定义服务过程(startService)的原理分析、Android应用程序启动过程源代码分析和Android应用程序在新的进程中启动新的Activity的方法和过程分析这三篇文章。
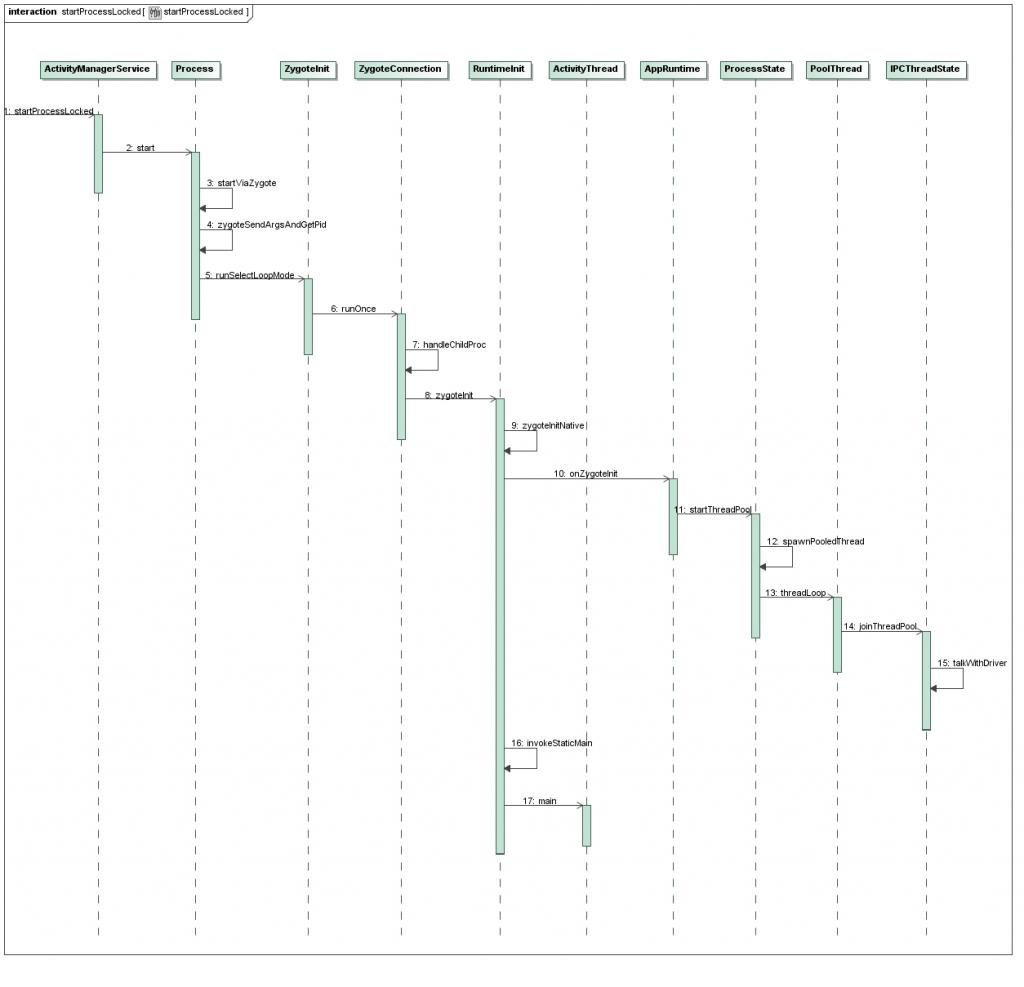
ActivityManagerService启动新的进程是从其成员函数startProcessLocked开始的,在深入分析这个过程之前,我们先来看一下进程创建过程的序列图,然后再详细分析每一个步骤。
Step 1. ActivityManagerService.startProcessLocked
这个函数定义在frameworks/base/services/java/com/android/server/am/ActivityManagerService.java文件中:
- public final class ActivityManagerService extends ActivityManagerNative
- implements Watchdog.Monitor, BatteryStatsImpl.BatteryCallback {
- ......
- private final void startProcessLocked(ProcessRecord app,
- String hostingType, String hostingNameStr) {
- ......
- try {
- int uid = app.info.uid;
- int[] gids = null;
- try {
- gids = mContext.getPackageManager().getPackageGids(
- app.info.packageName);
- } catch (PackageManager.NameNotFoundException e) {
- ......
- }
- ......
- int debugFlags = 0;
- ......
- int pid = Process.start("android.app.ActivityThread",
- mSimpleProcessManagement ? app.processName : null, uid, uid,
- gids, debugFlags, null);
- ......
- } catch (RuntimeException e) {
- ......
- }
- }
- ......
- }
它调用了Process.start函数开始为应用程序创建新的进程,注意,它传入一个第一个参数为"android.app.ActivityThread",这就是进程初始化时要加载的Java类了,把这个类加载到进程之后,就会把它里面的静态成员函数main作为进程的入口点,后面我们会看到。
Step 2. Process.start
这个函数定义在frameworks/base/core/java/android/os/Process.java文件中:
- public class Process {
- ......
- public static final int start(final String processClass,
- final String niceName,
- int uid, int gid, int[] gids,
- int debugFlags,
- String[] zygoteArgs)
- {
- if (supportsProcesses()) {
- try {
- return startViaZygote(processClass, niceName, uid, gid, gids,
- debugFlags, zygoteArgs);
- } catch (ZygoteStartFailedEx ex) {
- ......
- }
- } else {
- ......
- return 0;
- }
- }
- ......
- }
这里的supportsProcesses函数返回值为true,它是一个Native函数,实现在frameworks/base/core/jni/android_util_Process.cpp文件中:
- jboolean android_os_Process_supportsProcesses(JNIEnv* env, jobject clazz)
- {
- return ProcessState::self()->supportsProcesses();
- }
ProcessState::supportsProcesses函数定义在frameworks/base/libs/binder/ProcessState.cpp文件中:
- bool ProcessState::supportsProcesses() const
- {
- return mDriverFD >= 0;
- }
这里的mDriverFD是设备文件/dev/binder的打开描述符,如果成功打开了这个设备文件,那么它的值就会大于等于0,因此,它的返回值为true。
回到Process.start函数中,它调用startViaZygote函数进一步操作。
Step 3. Process.startViaZygote
这个函数定义在frameworks/base/core/java/android/os/Process.java文件中:
- public class Process {
- ......
- private static int startViaZygote(final String processClass,
- final String niceName,
- final int uid, final int gid,
- final int[] gids,
- int debugFlags,
- String[] extraArgs)
- throws ZygoteStartFailedEx {
- int pid;
- synchronized(Process.class) {
- ArrayList<String> argsForZygote = new ArrayList<String>();
- // --runtime-init, --setuid=, --setgid=,
- // and --setgroups= must go first
- argsForZygote.add("--runtime-init");
- argsForZygote.add("--setuid=" + uid);
- argsForZygote.add("--setgid=" + gid);
- if ((debugFlags & Zygote.DEBUG_ENABLE_SAFEMODE) != 0) {
- argsForZygote.add("--enable-safemode");
- }
- if ((debugFlags & Zygote.DEBUG_ENABLE_DEBUGGER) != 0) {
- argsForZygote.add("--enable-debugger");
- }
- if ((debugFlags & Zygote.DEBUG_ENABLE_CHECKJNI) != 0) {
- argsForZygote.add("--enable-checkjni");
- }
- if ((debugFlags & Zygote.DEBUG_ENABLE_ASSERT) != 0) {
- argsForZygote.add("--enable-assert");
- }
- //TODO optionally enable debuger
- //argsForZygote.add("--enable-debugger");
- // --setgroups is a comma-separated list
- if (gids != null && gids.length > 0) {
- StringBuilder sb = new StringBuilder();
- sb.append("--setgroups=");
- int sz = gids.length;
- for (int i = 0; i < sz; i++) {
- if (i != 0) {
- sb.append(',');
- }
- sb.append(gids[i]);
- }
- argsForZygote.add(sb.toString());
- }
- if (niceName != null) {
- argsForZygote.add("--nice-name=" + niceName);
- }
- argsForZygote.add(processClass);
- if (extraArgs != null) {
- for (String arg : extraArgs) {
- argsForZygote.add(arg);
- }
- }
- pid = zygoteSendArgsAndGetPid(argsForZygote);
- }
- }
- ......
- }
这个函数将创建进程的参数放到argsForZygote列表中去,如参数"--runtime-init"表示要为新创建的进程初始化运行时库,然后调用zygoteSendAndGetPid函数进一步操作。
Step 4. Process.zygoteSendAndGetPid
这个函数定义在frameworks/base/core/java/android/os/Process.java文件中:
- public class Process {
- ......
- private static int zygoteSendArgsAndGetPid(ArrayList<String> args)
- throws ZygoteStartFailedEx {
- int pid;
- openZygoteSocketIfNeeded();
- try {
- /**
- * See com.android.internal.os.ZygoteInit.readArgumentList()
- * Presently the wire format to the zygote process is:
- * a) a count of arguments (argc, in essence)
- * b) a number of newline-separated argument strings equal to count
- *
- * After the zygote process reads these it will write the pid of
- * the child or -1 on failure.
- */
- sZygoteWriter.write(Integer.toString(args.size()));
- sZygoteWriter.newLine();
- int sz = args.size();
- for (int i = 0; i < sz; i++) {
- String arg = args.get(i);
- if (arg.indexOf(' ') >= 0) {
- throw new ZygoteStartFailedEx(
- "embedded newlines not allowed");
- }
- sZygoteWriter.write(arg);
- sZygoteWriter.newLine();
- }
- sZygoteWriter.flush();
- // Should there be a timeout on this?
- pid = sZygoteInputStream.readInt();
- if (pid < 0) {
- throw new ZygoteStartFailedEx("fork() failed");
- }
- } catch (IOException ex) {
- ......
- }
- return pid;
- }
- ......
- }
这里的sZygoteWriter是一个Socket写入流,是由openZygoteSocketIfNeeded函数打开的:
- public class Process {
- ......
- /**
- * Tries to open socket to Zygote process if not already open. If
- * already open, does nothing. May block and retry.
- */
- private static void openZygoteSocketIfNeeded()
- throws ZygoteStartFailedEx {
- int retryCount;
- if (sPreviousZygoteOpenFailed) {
- /*
- * If we've failed before, expect that we'll fail again and
- * don't pause for retries.
- */
- retryCount = 0;
- } else {
- retryCount = 10;
- }
- /*
- * See bug #811181: Sometimes runtime can make it up before zygote.
- * Really, we'd like to do something better to avoid this condition,
- * but for now just wait a bit...
- */
- for (int retry = 0
- ; (sZygoteSocket == null) && (retry < (retryCount + 1))
- ; retry++ ) {
- if (retry > 0) {
- try {
- Log.i("Zygote", "Zygote not up yet, sleeping...");
- Thread.sleep(ZYGOTE_RETRY_MILLIS);
- } catch (InterruptedException ex) {
- // should never happen
- }
- }
- try {
- sZygoteSocket = new LocalSocket();
- sZygoteSocket.connect(new LocalSocketAddress(ZYGOTE_SOCKET,
- LocalSocketAddress.Namespace.RESERVED));
- sZygoteInputStream
- = new DataInputStream(sZygoteSocket.getInputStream());
- sZygoteWriter =
- new BufferedWriter(
- new OutputStreamWriter(
- sZygoteSocket.getOutputStream()),
- 256);
- Log.i("Zygote", "Process: zygote socket opened");
- sPreviousZygoteOpenFailed = false;
- break;
- } catch (IOException ex) {
- ......
- }
- }
- ......
- }
- ......
- }
这个Socket由frameworks/base/core/java/com/android/internal/os/ZygoteInit.java文件中的ZygoteInit类在runSelectLoopMode函数侦听的。
Step 5. ZygoteInit.runSelectLoopMode
这个函数定义在frameworks/base/core/java/com/android/internal/os/ZygoteInit.java文件中:
- public class ZygoteInit {
- ......
- /**
- * Runs the zygote process's select loop. Accepts new connections as
- * they happen, and reads commands from connections one spawn-request's
- * worth at a time.
- *
- * @throws MethodAndArgsCaller in a child process when a main() should
- * be executed.
- */
- private static void runSelectLoopMode() throws MethodAndArgsCaller {
- ArrayList<FileDescriptor> fds = new ArrayList();
- ArrayList<ZygoteConnection> peers = new ArrayList();
- FileDescriptor[] fdArray = new FileDescriptor[4];
- fds.add(sServerSocket.getFileDescriptor());
- peers.add(null);
- int loopCount = GC_LOOP_COUNT;
- while (true) {
- int index;
- /*
- * Call gc() before we block in select().
- * It's work that has to be done anyway, and it's better
- * to avoid making every child do it. It will also
- * madvise() any free memory as a side-effect.
- *
- * Don't call it every time, because walking the entire
- * heap is a lot of overhead to free a few hundred bytes.
- */
- if (loopCount <= 0) {
- gc();
- loopCount = GC_LOOP_COUNT;
- } else {
- loopCount--;
- }
- try {
- fdArray = fds.toArray(fdArray);
- index = selectReadable(fdArray);
- } catch (IOException ex) {
- throw new RuntimeException("Error in select()", ex);
- }
- if (index < 0) {
- throw new RuntimeException("Error in select()");
- } else if (index == 0) {
- ZygoteConnection newPeer = acceptCommandPeer();
- peers.add(newPeer);
- fds.add(newPeer.getFileDesciptor());
- } else {
- boolean done;
- done = peers.get(index).runOnce();
- if (done) {
- peers.remove(index);
- fds.remove(index);
- }
- }
- }
- }
- ......
- }
当Step 4将数据通过Socket接口发送出去后,就会下面这个语句:
- done = peers.get(index).runOnce();
这里从peers.get(index)得到的是一个ZygoteConnection对象,表示一个Socket连接,因此,接下来就是调用ZygoteConnection.runOnce函数进一步处理了。
Step 6. ZygoteConnection.runOnce
这个函数定义在frameworks/base/core/java/com/android/internal/os/ZygoteConnection.java文件中:
- class ZygoteConnection {
- ......
- boolean runOnce() throws ZygoteInit.MethodAndArgsCaller {
- String args[];
- Arguments parsedArgs = null;
- FileDescriptor[] descriptors;
- try {
- args = readArgumentList();
- descriptors = mSocket.getAncillaryFileDescriptors();
- } catch (IOException ex) {
- ......
- return true;
- }
- ......
- /** the stderr of the most recent request, if avail */
- PrintStream newStderr = null;
- if (descriptors != null && descriptors.length >= 3) {
- newStderr = new PrintStream(
- new FileOutputStream(descriptors[2]));
- }
- int pid;
- try {
- parsedArgs = new Arguments(args);
- applyUidSecurityPolicy(parsedArgs, peer);
- applyDebuggerSecurityPolicy(parsedArgs);
- applyRlimitSecurityPolicy(parsedArgs, peer);
- applyCapabilitiesSecurityPolicy(parsedArgs, peer);
- int[][] rlimits = null;
- if (parsedArgs.rlimits != null) {
- rlimits = parsedArgs.rlimits.toArray(intArray2d);
- }
- pid = Zygote.forkAndSpecialize(parsedArgs.uid, parsedArgs.gid,
- parsedArgs.gids, parsedArgs.debugFlags, rlimits);
- } catch (IllegalArgumentException ex) {
- ......
- } catch (ZygoteSecurityException ex) {
- ......
- }
- if (pid == 0) {
- // in child
- handleChildProc(parsedArgs, descriptors, newStderr);
- // should never happen
- return true;
- } else { /* pid != 0 */
- // in parent...pid of < 0 means failure
- return handleParentProc(pid, descriptors, parsedArgs);
- }
- }
- ......
- }
真正创建进程的地方就是在这里了:
- pid = Zygote.forkAndSpecialize(parsedArgs.uid, parsedArgs.gid,
- parsedArgs.gids, parsedArgs.debugFlags, rlimits);
有Linux开发经验的读者很容易看懂这个函数调用,这个函数会创建一个进程,而且有两个返回值,一个是在当前进程中返回的,一个是在新创建的进程中返回,即在当前进程的子进程中返回,在当前进程中的返回值就是新创建的子进程的pid值,而在子进程中的返回值是0。因为我们只关心创建的新进程的情况,因此,我们沿着子进程的执行路径继续看下去:
- if (pid == 0) {
- // in child
- handleChildProc(parsedArgs, descriptors, newStderr);
- // should never happen
- return true;
- } else { /* pid != 0 */
- ......
- }
这里就是调用handleChildProc函数了。
Step 7. ZygoteConnection.handleChildProc
这个函数定义在frameworks/base/core/java/com/android/internal/os/ZygoteConnection.java文件中:
- class ZygoteConnection {
- ......
- private void handleChildProc(Arguments parsedArgs,
- FileDescriptor[] descriptors, PrintStream newStderr)
- throws ZygoteInit.MethodAndArgsCaller {
- ......
- if (parsedArgs.runtimeInit) {
- RuntimeInit.zygoteInit(parsedArgs.remainingArgs);
- } else {
- ......
- }
- }
- ......
- }
由于在前面的Step 3中,指定了"--runtime-init"参数,表示要为新创建的进程初始化运行时库,因此,这里的parseArgs.runtimeInit值为true,于是就继续执行RuntimeInit.zygoteInit进一步处理了。
Step 8. RuntimeInit.zygoteInit
这个函数定义在frameworks/base/core/java/com/android/internal/os/RuntimeInit.java文件中:
- public class RuntimeInit {
- ......
- public static final void zygoteInit(String[] argv)
- throws ZygoteInit.MethodAndArgsCaller {
- // TODO: Doing this here works, but it seems kind of arbitrary. Find
- // a better place. The goal is to set it up for applications, but not
- // tools like am.
- System.setOut(new AndroidPrintStream(Log.INFO, "System.out"));
- System.setErr(new AndroidPrintStream(Log.WARN, "System.err"));
- commonInit();
- zygoteInitNative();
- int curArg = 0;
- for ( /* curArg */ ; curArg < argv.length; curArg++) {
- String arg = argv[curArg];
- if (arg.equals("--")) {
- curArg++;
- break;
- } else if (!arg.startsWith("--")) {
- break;
- } else if (arg.startsWith("--nice-name=")) {
- String niceName = arg.substring(arg.indexOf('=') + 1);
- Process.setArgV0(niceName);
- }
- }
- if (curArg == argv.length) {
- Slog.e(TAG, "Missing classname argument to RuntimeInit!");
- // let the process exit
- return;
- }
- // Remaining arguments are passed to the start class's static main
- String startClass = argv[curArg++];
- String[] startArgs = new String[argv.length - curArg];
- System.arraycopy(argv, curArg, startArgs, 0, startArgs.length);
- invokeStaticMain(startClass, startArgs);
- }
- ......
- }
这里有两个关键的函数调用,一个是zygoteInitNative函数调用,一个是invokeStaticMain函数调用,前者就是执行Binder驱动程序初始化的相关工作了,正是由于执行了这个工作,才使得进程中的Binder对象能够顺利地进行Binder进程间通信,而后一个函数调用,就是执行进程的入口函数,这里就是执行startClass类的main函数了,而这个startClass即是我们在Step 1中传进来的"android.app.ActivityThread"值,表示要执行android.app.ActivityThread类的main函数。
我们先来看一下zygoteInitNative函数的调用过程,然后再回到RuntimeInit.zygoteInit函数中来,看看它是如何调用android.app.ActivityThread类的main函数的。
step 9. RuntimeInit.zygoteInitNative
这个函数定义在frameworks/base/core/java/com/android/internal/os/RuntimeInit.java文件中:
- public class RuntimeInit {
- ......
- public static final native void zygoteInitNative();
- ......
- }
这里可以看出,函数zygoteInitNative是一个Native函数,实现在frameworks/base/core/jni/AndroidRuntime.cpp文件中:
- static void com_android_internal_os_RuntimeInit_zygoteInit(JNIEnv* env, jobject clazz)
- {
- gCurRuntime->onZygoteInit();
- }
这里它调用了全局变量gCurRuntime的onZygoteInit函数,这个全局变量的定义在frameworks/base/core/jni/AndroidRuntime.cpp文件开头的地方:
- static AndroidRuntime* gCurRuntime = NULL;
这里可以看出,它的类型为AndroidRuntime,它是在AndroidRuntime类的构造函数中初始化的,AndroidRuntime类的构造函数也是定义在frameworks/base/core/jni/AndroidRuntime.cpp文件中:
- AndroidRuntime::AndroidRuntime()
- {
- ......
- assert(gCurRuntime == NULL); // one per process
- gCurRuntime = this;
- }
那么这个AndroidRuntime类的构造函数又是什么时候被调用的呢?AndroidRuntime类的声明在frameworks/base/include/android_runtime/AndroidRuntime.h文件中,如果我们打开这个文件会看到,它是一个虚拟类,也就是我们不能直接创建一个AndroidRuntime对象,只能用一个AndroidRuntime类的指针来指向它的某一个子类,这个子类就是AppRuntime了,它定义在frameworks/base/cmds/app_process/app_main.cpp文件中:
- int main(int argc, const char* const argv[])
- {
- ......
- AppRuntime runtime;
- ......
- }
而AppRuntime类继续了AndroidRuntime类,它也是定义在frameworks/base/cmds/app_process/app_main.cpp文件中:
- class AppRuntime : public AndroidRuntime
- {
- ......
- };
因此,在前面的com_android_internal_os_RuntimeInit_zygoteInit函数,实际是执行了AppRuntime类的onZygoteInit函数。
Step 10. AppRuntime.onZygoteInit
这个函数定义在frameworks/base/cmds/app_process/app_main.cpp文件中:
- class AppRuntime : public AndroidRuntime
- {
- ......
- virtual void onZygoteInit()
- {
- sp<ProcessState> proc = ProcessState::self();
- if (proc->supportsProcesses()) {
- LOGV("App process: starting thread pool. ");
- proc->startThreadPool();
- }
- }
- ......
- };
这里它就是调用ProcessState::startThreadPool启动线程池了,这个线程池中的线程就是用来和Binder驱动程序进行交互的了。
Step 11. ProcessState.startThreadPool
这个函数定义在frameworks/base/libs/binder/ProcessState.cpp文件中:
- void ProcessState::startThreadPool()
- {
- AutoMutex _l(mLock);
- if (!mThreadPoolStarted) {
- mThreadPoolStarted = true;
- spawnPooledThread(true);
- }
- }
ProcessState类是Binder进程间通信机制的一个基础组件,它的作用可以参考浅谈Android系统进程间通信(IPC)机制Binder中的Server和Client获得Service Manager接口之路、Android系统进程间通信(IPC)机制Binder中的Server启动过程源代码分析和Android系统进程间通信(IPC)机制Binder中的Client获得Server远程接口过程源代码分析这三篇文章。这里它调用spawnPooledThread函数进一步处理。
Step 12. ProcessState.spawnPooledThread
这个函数定义在frameworks/base/libs/binder/ProcessState.cpp文件中:
- void ProcessState::spawnPooledThread(bool isMain)
- {
- if (mThreadPoolStarted) {
- int32_t s = android_atomic_add(1, &mThreadPoolSeq);
- char buf[32];
- sprintf(buf, "Binder Thread #%d", s);
- LOGV("Spawning new pooled thread, name=%s ", buf);
- sp<Thread> t = new PoolThread(isMain);
- t->run(buf);
- }
- }
这里它会创建一个PoolThread线程类,然后执行它的run函数,最终就会执行PoolThread类的threadLoop函数了。
Step 13. PoolThread.threadLoop
这个函数定义在frameworks/base/libs/binder/ProcessState.cpp文件中:
- class PoolThread : public Thread
- {
- public:
- PoolThread(bool isMain)
- : mIsMain(isMain)
- {
- }
- protected:
- virtual bool threadLoop()
- {
- IPCThreadState::self()->joinThreadPool(mIsMain);
- return false;
- }
- const bool mIsMain;
- };
这里它执行了IPCThreadState::joinThreadPool函数进一步处理。IPCThreadState也是Binder进程间通信机制的一个基础组件,它的作用可以参考浅谈Android系统进程间通信(IPC)机制Binder中的Server和Client获得Service Manager接口之路、Android系统进程间通信(IPC)机制Binder中的Server启动过程源代码分析和Android系统进程间通信(IPC)机制Binder中的Client获得Server远程接口过程源代码分析这三篇文章。
Step 14. IPCThreadState.joinThreadPool
这个函数定义在frameworks/base/libs/binder/IPCThreadState.cpp文件中:
- void IPCThreadState::joinThreadPool(bool isMain)
- {
- ......
- mOut.writeInt32(isMain ? BC_ENTER_LOOPER : BC_REGISTER_LOOPER);
- ......
- status_t result;
- do {
- int32_t cmd;
- ......
- // now get the next command to be processed, waiting if necessary
- result = talkWithDriver();
- if (result >= NO_ERROR) {
- size_t IN = mIn.dataAvail();
- if (IN < sizeof(int32_t)) continue;
- cmd = mIn.readInt32();
- ......
- result = executeCommand(cmd);
- }
- ......
- } while (result != -ECONNREFUSED && result != -EBADF);
- ......
- mOut.writeInt32(BC_EXIT_LOOPER);
- talkWithDriver(false);
- }
这个函数首先告诉Binder驱动程序,这条线程要进入循环了:
- mOut.writeInt32(isMain ? BC_ENTER_LOOPER : BC_REGISTER_LOOPER);
然后在中间的while循环中通过talkWithDriver不断与Binder驱动程序进行交互,以便获得Client端的进程间调用:
- result = talkWithDriver();
获得了Client端的进程间调用后,就调用excuteCommand函数来处理这个请求:
- result = executeCommand(cmd);
最后,线程退出时,也会告诉Binder驱动程序,它退出了,这样Binder驱动程序就不会再在Client端的进程间调用分发给它了:
- mOut.writeInt32(BC_EXIT_LOOPER);
- talkWithDriver(false);
我们再来看看talkWithDriver函数的实现。
Step 15. talkWithDriver
这个函数定义在frameworks/base/libs/binder/IPCThreadState.cpp文件中:
- status_t IPCThreadState::talkWithDriver(bool doReceive)
- {
- ......
- binder_write_read bwr;
- // Is the read buffer empty?
- const bool needRead = mIn.dataPosition() >= mIn.dataSize();
- // We don't want to write anything if we are still reading
- // from data left in the input buffer and the caller
- // has requested to read the next data.
- const size_t outAvail = (!doReceive || needRead) ? mOut.dataSize() : 0;
- bwr.write_size = outAvail;
- bwr.write_buffer = (long unsigned int)mOut.data();
- // This is what we'll read.
- if (doReceive && needRead) {
- bwr.read_size = mIn.dataCapacity();
- bwr.read_buffer = (long unsigned int)mIn.data();
- } else {
- bwr.read_size = 0;
- }
- ......
- // Return immediately if there is nothing to do.
- if ((bwr.write_size == 0) && (bwr.read_size == 0)) return NO_ERROR;
- bwr.write_consumed = 0;
- bwr.read_consumed = 0;
- status_t err;
- do {
- ......
- #if defined(HAVE_ANDROID_OS)
- if (ioctl(mProcess->mDriverFD, BINDER_WRITE_READ, &bwr) >= 0)
- err = NO_ERROR;
- else
- err = -errno;
- #else
- err = INVALID_OPERATION;
- #endif
- ......
- }
- } while (err == -EINTR);
- ....
- if (err >= NO_ERROR) {
- if (bwr..write_consumed > 0) {
- if (bwr.write_consumed < (ssize_t)mOut.dataSize())
- mOut.remove(0, bwr.write_consumed);
- else
- mOut.setDataSize(0);
- }
- if (bwr.read_consumed > 0) {
- mIn.setDataSize(bwr.read_consumed);
- mIn.setDataPosition(0);
- }
- ......
- return NO_ERROR;
- }
- return err;
- }
这个函数的具体作用可以参考Android系统进程间通信(IPC)机制Binder中的Server启动过程源代码分析一文,它只要就是通过ioctl文件操作函数来和Binder驱动程序交互的了:
- ioctl(mProcess->mDriverFD, BINDER_WRITE_READ, &bwr)
有了这个线程池之后,我们在开发Android应用程序的时候,当我们要和其它进程中进行通信时,只要定义自己的Binder对象,然后把这个Binder对象的远程接口通过其它途径传给其它进程后,其它进程就可以通过这个Binder对象的远程接口来调用我们的应用程序进程的函数了,它不像我们在C++层实现Binder进程间通信机制的Server时,必须要手动调用IPCThreadState.joinThreadPool函数来进入一个无限循环中与Binder驱动程序交互以便获得Client端的请求,这样就实现了我们在文章开头处说的Android应用程序进程天然地支持Binder进程间通信机制。
细心的读者可能会发现,从Step 1到Step 9,都是在Android应用程序框架层运行的,而从Step 10到Step 15,都是在Android系统运行时库层运行的,这两个层次中的Binder进程间通信机制的接口一个是用Java来实现的,而别一个是用C++来实现的,这两者是如何协作的呢?这就是通过JNI层来实现的了,具体可以参考Android系统进程间通信Binder机制在应用程序框架层的Java接口源代码分析一文。
回到Step 8中的RuntimeInit.zygoteInit函数中,在初始化完成Binder进程间通信机制的基础设施后,它接着就要进入进程的入口函数了。
Step 16. RuntimeInit.invokeStaticMain
这个函数定义在frameworks/base/core/java/com/android/internal/os/RuntimeInit.java文件中:
- public class ZygoteInit {
- ......
- static void invokeStaticMain(ClassLoader loader,
- String className, String[] argv)
- throws ZygoteInit.MethodAndArgsCaller {
- Class<?> cl;
- try {
- cl = loader.loadClass(className);
- } catch (ClassNotFoundException ex) {
- ......
- }
- Method m;
- try {
- m = cl.getMethod("main", new Class[] { String[].class });
- } catch (NoSuchMethodException ex) {
- ......
- } catch (SecurityException ex) {
- ......
- }
- int modifiers = m.getModifiers();
- ......
- /*
- * This throw gets caught in ZygoteInit.main(), which responds
- * by invoking the exception's run() method. This arrangement
- * clears up all the stack frames that were required in setting
- * up the process.
- */
- throw new ZygoteInit.MethodAndArgsCaller(m, argv);
- }
- ......
- }
前面我们说过,这里传进来的参数className字符串值为"android.app.ActivityThread",这里就通ClassLoader.loadClass函数将它加载到进程中:
- cl = loader.loadClass(className);
然后获得它的静态成员函数main:
- m = cl.getMethod("main", new Class[] { String[].class });
函数最后并没有直接调用这个静态成员函数main,而是通过抛出一个异常ZygoteInit.MethodAndArgsCaller,然后让ZygoteInit.main函数在捕获这个异常的时候再调用android.app.ActivityThread类的main函数。为什么要这样做呢?注释里面已经讲得很清楚了,它是为了清理堆栈的,这样就会让android.app.ActivityThread类的main函数觉得自己是进程的入口函数,而事实上,在执行android.app.ActivityThread类的main函数之前,已经做了大量的工作了。
我们看看ZygoteInit.main函数在捕获到这个异常的时候做了什么事:
- public class ZygoteInit {
- ......
- public static void main(String argv[]) {
- try {
- ......
- } catch (MethodAndArgsCaller caller) {
- caller.run();
- } catch (RuntimeException ex) {
- ......
- }
- }
- ......
- }
它执行MethodAndArgsCaller的run函数:
- public class ZygoteInit {
- ......
- public static class MethodAndArgsCaller extends Exception
- implements Runnable {
- /** method to call */
- private final Method mMethod;
- /** argument array */
- private final String[] mArgs;
- public MethodAndArgsCaller(Method method, String[] args) {
- mMethod = method;
- mArgs = args;
- }
- public void run() {
- try {
- mMethod.invoke(null, new Object[] { mArgs });
- } catch (IllegalAccessException ex) {
- ......
- } catch (InvocationTargetException ex) {
- ......
- }
- }
- }
- ......
- }
这里的成员变量mMethod和mArgs都是在前面构造异常对象时传进来的,这里的mMethod就对应android.app.ActivityThread类的main函数了,于是最后就通过下面语句执行这个函数:
- mMethod.invoke(null, new Object[] { mArgs });
这样,android.app.ActivityThread类的main函数就被执行了。
Step 17. ActivityThread.main
这个函数定义在frameworks/base/core/java/android/app/ActivityThread.java文件中:
- public final class ActivityThread {
- ......
- public static final void main(String[] args) {
- SamplingProfilerIntegration.start();
- Process.setArgV0("<pre-initialized>");
- Looper.prepareMainLooper();
- if (sMainThreadHandler == null) {
- sMainThreadHandler = new Handler();
- }
- ActivityThread thread = new ActivityThread();
- thread.attach(false);
- if (false) {
- Looper.myLooper().setMessageLogging(new
- LogPrinter(Log.DEBUG, "ActivityThread"));
- }
- Looper.loop();
- if (Process.supportsProcesses()) {
- throw new RuntimeException("Main thread loop unexpectedly exited");
- }
- thread.detach();
- String name = (thread.mInitialApplication != null)
- ? thread.mInitialApplication.getPackageName()
- : "<unknown>";
- Slog.i(TAG, "Main thread of " + name + " is now exiting");
- }
- ......
- }
从这里我们可以看出,这个函数首先会在进程中创建一个ActivityThread对象:
- ActivityThread thread = new ActivityThread();
然后进入消息循环中:
- Looper.loop();
这样,我们以后就可以在这个进程中启动Activity或者Service了。
至此,Android应用程序进程启动过程的源代码就分析完成了,它除了指定新的进程的入口函数是ActivityThread的main函数之外,还为进程内的Binder对象提供了Binder进程间通信机制的基础设施,由此可见,Binder进程间通信机制在Android系统中是何等的重要,而且是无处不在,想进一步学习Android系统的Binder进程间通信机制,请参考Android进程间通信(IPC)机制Binder简要介绍和学习计划一文。