0、集群部署
Deploy Sharded Cluster using Hashed Sharding
Deploy Sharded Cluster using Ranged Sharding
我使用了三台服务器系统:
| 角色 | replicaSetName | 10.96.180.204 | 10.98.200.197 | 10.98.200.198 | 端口 |
|---|---|---|---|---|---|
| Config Server | config | PRIMARY | SECONDARY | SECONDARY | 21000 |
| Shard Server 1 | shard1 | SECONDARY | PRIMARY | SECONDARY | 27001 |
| Shard Server 2 | shard2 | PRIMARY | SECONDARY | SECONDARY | 27002 |
| Shard Server 3 | shard3 | SECONDARY | SECONDARY | PRIMARY | 27003 |
另外,每台服务器上都启动了一个 mongos,端口号为 20000;
因此,每台服务器上都启动了 4 个 mongod 进程和 1 个 mongos 进程;
下表是我列出的操作命令和结果检查命令,一一对应;
| 登入 | 执行命令 | 检查命令 | 描述 |
|---|---|---|---|
| ./bin/mongo 127.0.0.1:27001/admin ./bin/mongo 127.0.0.1:27002/admin ./bin/mongo 127.0.0.1:27003/admin ./bin/mongo 127.0.0.1:21000/admin |
rs.initiate() | rs.status(),members数组其中一个成员的stateStr是PRIMARY | 初始化副本集 |
| ./bin/mongo 127.0.0.1:20000/admin | sh.addShard() | sh.status(),关注 shards: 变化 | 添加分片到集群 |
| ./bin/mongo 127.0.0.1:20000/admin | sh.enableSharding() | sh.status(),关注 databases: 变化 | 为数据库启用分片 |
| ./bin/mongo 127.0.0.1:20000/<collection_name> | sh.shardCollection() | db.<collection_name>.getShardDistribution(),可以看到每个分片所包含的数据量 | 使用哈希/范围切分对集合进行分片 |
1、初始化副本集
比如,用 MONGODB_HOME 下的 ./bin/mongo 登入分片服务器 shard1 并连接到 admin 库:
./bin/mongo 127.0.0.1:27001/admin
接着,用 rs.initiate() 初始化 shard1 副本集:
rs.initiate(
  {
    _id : shard1,
    members: [
      { _id : 0, host : "10.98.200.198:27001" },
      { _id : 1, host : "10.98.200.197:27001" },
      { _id : 2, host : "10.96.180.204:27001" }
    ]
  }
)
类似地,初始化 shard2 集群的副本集:
- 把
./bin/mongo 127.0.0.1:27001/admin中的端口替换为 27002 - 把 rs.initiate 括号中的
_id和host中的 27001 端口替换为 shard2 和 27001;
初始化 shard3 集群的副本集也是同理:
- 把
./bin/mongo 127.0.0.1:27001/admin中的端口 27001 替换为 27003 - 把 rs.initiate 括号中的
_id和host中的 27001 端口替换为 shard3 和 27003;
初始化 config 集群的副本集操作也类似:
- 把
./bin/mongo 127.0.0.1:21000/admin中的端口 27001 替换为 21000 - 把 rs.initiate 括号中的
_id和host中的 27001 端口替换为 config 和 21000;
查看副本集状态 members
经过选举,会从三台中选出一台 PRIMARY,另外两台没选上的则是 SECONDARY,可以通过 rs.status() 命令查看谁才是“主”;
经测试发现,如果你在哪台服务器上执行“初始化副本集”操作,大概率就是这台被选为“主”;
2、添加分片到集群
首先确保你已经启动了路由层(mongos进程),接着仍然是用 ./bin/mongo 登录路由层:
./bin/mongo 127.0.0.1:20000/admin
20000 是在启动 mongos 指定的端口
登陆后执行 sh.addShard() 命令来为集群添加分片
sh.addShard( "<replSetName>/10.96.180.204:<port>,10.98.200.197:<port>,10.98.200.198:<port>")
可以替换的 replSetName 和 port 的组合如下三个:
| replSetName | port |
|---|---|
| shard1 | 27001 |
| shard2 | 27002 |
| shard3 | 27003 |
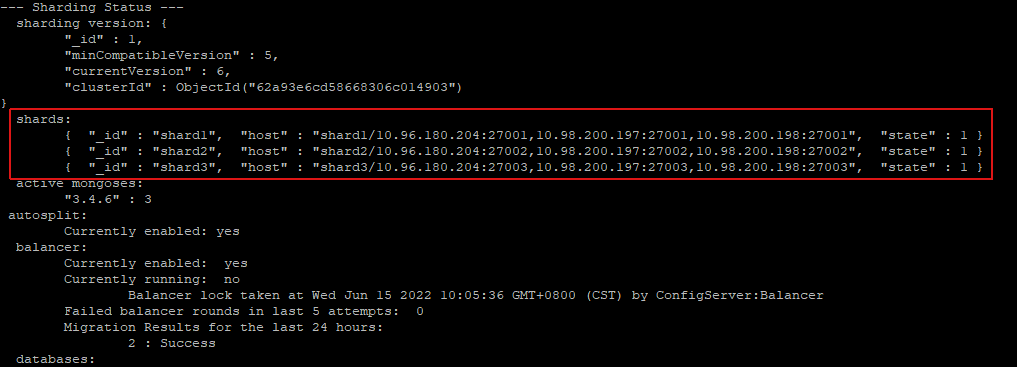
查看副本集状态 shards:
可以使用 sh.status() 或者 db.printShardingStatus() 命令打印出的 shards: 查看所有分片的情况:

3、为数据库启用分片
sh.enableSharding 是在 ./bin/mongo 登入路由层后操作的:
./bin/mongo 127.0.0.1:20000/admin
接着就是通过 sh.enableSharding("<database>") 为数据库开启分片,执行之后,副本集状态 databases: 会新增一条记录:
{ "_id" : "<database>", "primary" : "<replicaSetName>", "partitioned" : true }
自然是 shards: 所列的分片中一个分片的 _id,partitioned 表示已分区或者已分片的意思。
4、使用哈希/范围切分对集合进行分片
https://www.mongodb.com/docs/v3.4/tutorial/deploy-sharded-cluster-hashed-sharding/#shard-a-collection-using-hashed-sharding
https://www.mongodb.com/docs/v3.4/tutorial/deploy-sharded-cluster-ranged-sharding/#shard-a-collection-using-ranged-sharding
如果你仔细读 MongoDB Sharding 中以上两小节,不难发现sh.shardCollection("<database>.<collection>", { <key> : <direction> } )是需要先有索引的!
具体操作是:
sh.shardCollection("<database>.<collection>", { <key> : <direction> } )
如果集合还没有数据
在集合设计之初,就考虑分片的话,可以直接执行 sh.shardCollection
sh.shardCollection("<database>.<collection>", { <key> : <direction> } )
例如,以下是我的一次执行结果:
mongos> sh.shardCollection("ott_shms_prd.temp_user_scale_data", {"custNum":"hashed"})
{ "collectionsharded" : "ott_shms_prd.temp_user_scale_data", "ok" : 1 }
使用 db.<collection_name>.getIndexes() 查询该集合上的索引,系统自动为我们创建了索引 custNum_hashed:
mongos> db.temp_user_scale_data.getIndexes()
[
        {
                "v" : 2,
                "key" : {
                        "_id" : 1
                },
                "name" : "_id_",
                "ns" : "ott_shms_prd.temp_user_scale_data"
        },
        {
                "v" : 2,
                "key" : {
                        "custNum" : "hashed"
                },
                "name" : "custNum_hashed",
                "ns" : "ott_shms_prd.temp_user_scale_data"
        }
]
如果集合为空,MongoDB 会在执行 sh.shardCollection() 时创建索引。
使用 db.<collection_name>.getShardDistribution() 看一下分片的数据情况:
mongos> db.temp_user_scale_data.getShardDistribution()

Shard shard1 at shard1/10.96.180.204:27001,10.98.200.197:27001,10.98.200.198:27001
 data : 0B docs : 0 chunks : 2
 estimated data per chunk : 0B
 estimated docs per chunk : 0

Shard shard2 at shard2/10.96.180.204:27002,10.98.200.197:27002,10.98.200.198:27002
 data : 0B docs : 0 chunks : 2
 estimated data per chunk : 0B
 estimated docs per chunk : 0

Shard shard3 at shard3/10.96.180.204:27003,10.98.200.197:27003,10.98.200.198:27003
 data : 0B docs : 0 chunks : 2
 estimated data per chunk : 0B
 estimated docs per chunk : 0

Totals
 data : 0B docs : 0 chunks : 6
 Shard shard1 contains NaN% data, NaN% docs in cluster, avg obj size on shard : NaNGiB
 Shard shard2 contains NaN% data, NaN% docs in cluster, avg obj size on shard : NaNGiB
 Shard shard3 contains NaN% data, NaN% docs in cluster, avg obj size on shard : NaNGiB
如果集合中已经有数据了
那么,你直接调用 sh.shardCollection 会报错,因为你需要先创建索引 db.collection.createIndex() :
- 创建一个与你要进行分片的 key 相同的索引,即
db.<collection_name>.createIndex( { <key> : <direction> } ), key 和 direction 都相同; - 另一种方式,就是你创建的索引,需以你要分片的 key 为前缀,即
db.<collection_name>.createIndex( { <key> : <direction>, <other_key> : <other_direction> } )
先创建索引,再对集合执行分片,操作结果如下:
mongos> db.user_scale_data.createIndex({"custNum" : 1,"uuid" : 1})
{
        "raw" : {
                "shard1/10.96.180.204:27001,10.98.200.197:27001,10.98.200.198:27001" : {
                        "createdCollectionAutomatically" : false,
                        "numIndexesBefore" : 2,
                        "numIndexesAfter" : 3,
                        "ok" : 1,
                        "$gleStats" : {
                                "lastOpTime" : {
                                        "ts" : Timestamp(1655282005, 1),
                                        "t" : NumberLong(1)
                                },
                                "electionId" : ObjectId("7fffffff0000000000000001")
                        }
                }
        },
        "ok" : 1
}
mongos> sh.shardCollection("ott_shms_prd.user_scale_data",{"custNum" : 1})
{ "collectionsharded" : "ott_shms_prd.user_scale_data", "ok" : 1 }
执行完分片命令后,第一次查看分片情况:
mongos> db.user_scale_data.getShardDistribution()

Shard shard1 at shard1/10.96.180.204:27001,10.98.200.197:27001,10.98.200.198:27001
 data : 923.18MiB docs : 89322 chunks : 29
 estimated data per chunk : 31.83MiB
 estimated docs per chunk : 3080

Shard shard2 at shard2/10.96.180.204:27002,10.98.200.197:27002,10.98.200.198:27002
 data : 131.88MiB docs : 12301 chunks : 4
 estimated data per chunk : 32.97MiB
 estimated docs per chunk : 3075

Shard shard3 at shard3/10.96.180.204:27003,10.98.200.197:27003,10.98.200.198:27003
 data : 129.74MiB docs : 12283 chunks : 4
 estimated data per chunk : 32.43MiB
 estimated docs per chunk : 3070

Totals
 data : 1.15GiB docs : 113906 chunks : 37
 Shard shard1 contains 77.91% data, 78.41% docs in cluster, avg obj size on shard : 10KiB
 Shard shard2 contains 11.13% data, 10.79% docs in cluster, avg obj size on shard : 10KiB
 Shard shard3 contains 10.95% data, 10.78% docs in cluster, avg obj size on shard : 10KiB
第二次查看分片情况:
mongos> db.temp_user_scale_data.getShardDistribution()

Shard shard1 at shard1/10.96.180.204:27001,10.98.200.197:27001,10.98.200.198:27001
 data : 399.14MiB docs : 38596 chunks : 13
 estimated data per chunk : 30.7MiB
 estimated docs per chunk : 2968

Shard shard2 at shard2/10.96.180.204:27002,10.98.200.197:27002,10.98.200.198:27002
 data : 385.91MiB docs : 36909 chunks : 12
 estimated data per chunk : 32.15MiB
 estimated docs per chunk : 3075

Shard shard3 at shard3/10.96.180.204:27003,10.98.200.197:27003,10.98.200.198:27003
 data : 384.55MiB docs : 36913 chunks : 12
 estimated data per chunk : 32.04MiB
 estimated docs per chunk : 3076

Totals
 data : 1.14GiB docs : 112418 chunks : 37
 Shard shard1 contains 34.12% data, 34.33% docs in cluster, avg obj size on shard : 10KiB
 Shard shard2 contains 32.99% data, 32.83% docs in cluster, avg obj size on shard : 10KiB
 Shard shard3 contains 32.87% data, 32.83% docs in cluster, avg obj size on shard : 10KiB
观察结论一:为有数据的集合创建分片后,MongoDB 会“渐进式”地把单个分片上的数据转移到其他分片上,并且最终,各个分片上的数据量和文档数都趋于平均值;
观察结论二:如果多个有数据的集合,都执行了 sh.shardCollection,不会同时发生迁移,会按照“先后顺序”依次进行数据迁移。