前情回顾:
一、LocalStreamEnvironment::execute
《入门Flink的第一个程序——WordCount》 真正意义上开始是从这里:
env.execute("Java WordCount from SocketTextStream Example");
远程模式和本地模式有一点不同,我们先按本地模式来调试。 我们跟进源码,(在本地调试模式下)会启动一个miniCluster,然后开始执行代码:
@Override
public JobExecutionResult execute(String jobName) throws Exception {
        (省略...)
	MiniCluster miniCluster = new MiniCluster(cfg);
	try {
		miniCluster.start();
		configuration.setInteger(RestOptions.PORT, miniCluster.getRestAddress().get().getPort());
                // 提交任务到 JobMaster
		return miniCluster.executeJobBlocking(jobGraph);
	}
	finally {
		transformations.clear();
		miniCluster.close();
	}
}
1.1 MiniCluster::executeJobBlocking
miniCluster.start() 执行完之后,用户定义的函数并未被执行,而 miniCluster.executeJobBlocking(jobGraph) 执行后,才执行了用户定义的函数。因此,跟踪executeJobBlocking:
@Override
public JobExecutionResult executeJobBlocking(JobGraph job) throws JobExecutionException, InterruptedException {
	checkNotNull(job, "job is null");
        // 异步提交任务,获取一个Future对象
	final CompletableFuture<JobSubmissionResult> submissionFuture = submitJob(job);
        // 异步请求 JobResult
	final CompletableFuture<JobResult> jobResultFuture = submissionFuture.thenCompose(
		(JobSubmissionResult ignored) -> requestJobResult(job.getJobID()));
	final JobResult jobResult;
	try {
                // 阻塞等待取得结果
		jobResult = jobResultFuture.get();
	} catch (ExecutionException e) {
		throw new JobExecutionException(job.getJobID(), "Could not retrieve JobResult.", ExceptionUtils.stripExecutionException(e));
	}
	try {
                // 处理执行结果
		return jobResult.toJobExecutionResult(Thread.currentThread().getContextClassLoader());
	} catch (IOException | ClassNotFoundException e) {
		throw new JobExecutionException(job.getJobID(), e);
	}
}
1.2 MiniCluster::submitJob
executeJobBlocking最核心的部分就是 submitJob,其他的都是用异步编程的常见写法来获取提交任务的最终结果。因此,跟踪 submitJob:
public CompletableFuture<JobSubmissionResult> submitJob(JobGraph jobGraph) {
        // 异步获取 Dispatcher组件对象
	final CompletableFuture<DispatcherGateway> dispatcherGatewayFuture = getDispatcherGatewayFuture();
	// we have to allow queued scheduling in Flip-6 mode because we need to request slots
	// from the ResourceManager
	jobGraph.setAllowQueuedScheduling(true);
        // 异步获取Dispatcher组件中的BlobServer的监听地址
	final CompletableFuture<InetSocketAddress> blobServerAddressFuture = createBlobServerAddress(dispatcherGatewayFuture);
        // 异步上传任务的jar包
	final CompletableFuture<Void> jarUploadFuture = uploadAndSetJobFiles(blobServerAddressFuture, jobGraph);
        // 异步提交任务
	final CompletableFuture<Acknowledge> acknowledgeCompletableFuture = jarUploadFuture
		.thenCombine(
			dispatcherGatewayFuture,
			(Void ack, DispatcherGateway dispatcherGateway) -> dispatcherGateway.submitJob(jobGraph, rpcTimeout))
		.thenCompose(Function.identity());
        // 异步返回提交任务的结果
	return acknowledgeCompletableFuture.thenApply(
		(Acknowledge ignored) -> new JobSubmissionResult(jobGraph.getJobID()));
}
关键代码就是 dispatcherGateway.submitJob(jobGraph, rpcTimeout),而这里 DispatcherGateway 就是 Dispatcher 组件的接口。
这里的 Dispatcher 是一个接收job,然后指派JobMaster去启动任务的类,我们可以看看它的 类结构,有两个实现。在本地环境下启动的是 MiniDispatcher ,在集群上提交任务时,集群 上启动的是 StandaloneDispatcher 。

1.3 Dispatcher::internalSubmitJob
基类 Dispatcher 的 submitJob 方法比较简单,代码就不贴了,重点看 Dispatcher 的 internalSubmitJob 方法:
private CompletableFuture<Acknowledge> internalSubmitJob(JobGraph jobGraph) {
	log.info("Submitting job {} ({}).", jobGraph.getJobID(), jobGraph.getName());
        // 重点是 persistAndRunJob 方法
	final CompletableFuture<Acknowledge> persistAndRunFuture = waitForTerminatingJobManager(jobGraph.getJobID(), jobGraph, this::persistAndRunJob)
		.thenApply(ignored -> Acknowledge.get());
        // 异步处理任务的执行结果
	return persistAndRunFuture.handleAsync((acknowledge, throwable) -> {
		if (throwable != null) {
			cleanUpJobData(jobGraph.getJobID(), true);
			final Throwable strippedThrowable = ExceptionUtils.stripCompletionException(throwable);
			log.error("Failed to submit job {}.", jobGraph.getJobID(), strippedThrowable);
			throw new CompletionException(
				new JobSubmissionException(jobGraph.getJobID(), "Failed to submit job.", strippedThrowable));
		} else {
			return acknowledge;
		}
	}, getRpcService().getExecutor());
}
我们可以看一下 waitForTerminatingJobManager 这个方法:
//
private CompletableFuture<Void> waitForTerminatingJobManager(JobID jobId, JobGraph jobGraph, FunctionWithException<JobGraph, CompletableFuture<Void>, ?> action) {
        // 查看一下有没有相同jobId的任务
	final CompletableFuture<Void> jobManagerTerminationFuture = getJobTerminationFuture(jobId)
		.exceptionally((Throwable throwable) -> {
			throw new CompletionException(
				new DispatcherException(
					String.format("Termination of previous JobManager for job %s failed. Cannot submit job under the same job id.", jobId),
					throwable)); });
        // 异步执行任务
	return jobManagerTerminationFuture.thenComposeAsync(
		FunctionUtils.uncheckedFunction((ignored) -> {
			jobManagerTerminationFutures.remove(jobId);
                        // 这里就是关键,执行内容取决于传入的 action 参数
			return action.apply(jobGraph);
		}),
		getMainThreadExecutor());
}
1.4 Dispatcher::persistAndRunJob
所以,任务的执行逻辑还是在 persistAndRunJob 之中:
private CompletableFuture<Void> persistAndRunJob(JobGraph jobGraph) throws Exception {
        // 记录一下提交了的JobGraph
	submittedJobGraphStore.putJobGraph(new SubmittedJobGraph(jobGraph));
        // 执行任务
	final CompletableFuture<Void> runJobFuture = runJob(jobGraph);
        // 当任务完成时,异步清理刚刚提交的JobGraph
	return runJobFuture.whenComplete(BiConsumerWithException.unchecked((Object ignored, Throwable throwable) -> {
		if (throwable != null) {
			submittedJobGraphStore.removeJobGraph(jobGraph.getJobID());
		}
	}));
}
1.5 Dispatcher::runJob
Dispatcher组件的 runJob 方法:
private CompletableFuture<Void> runJob(JobGraph jobGraph) {
        // 出现JobID相同的重复任务就抛出异常
	Preconditions.checkState(!jobManagerRunnerFutures.containsKey(jobGraph.getJobID()));
        // 异步创建 JobManagerRunner
	final CompletableFuture<JobManagerRunner> jobManagerRunnerFuture = createJobManagerRunner(jobGraph);
        // 先保存一下这个异步的Future
	jobManagerRunnerFutures.put(jobGraph.getJobID(), jobManagerRunnerFuture);
        // 当任务执行结果返回时,异步清除Future
	return jobManagerRunnerFuture
		.thenApply(FunctionUtils.nullFn())
		.whenCompleteAsync(
			(ignored, throwable) -> {
				if (throwable != null) {
					jobManagerRunnerFutures.remove(jobGraph.getJobID());
				}
			},
			getMainThreadExecutor());
}
1.6 Dispatcher::createJobManagerRunner
Dispatcher组件创建并启动了一个 JobManagerRunner:
private CompletableFuture<JobManagerRunner> createJobManagerRunner(JobGraph jobGraph) {
	final RpcService rpcService = getRpcService();
        // 异步创建JobManagerRunner对象
	final CompletableFuture<JobManagerRunner> jobManagerRunnerFuture = CompletableFuture.supplyAsync(
		CheckedSupplier.unchecked(() ->
			jobManagerRunnerFactory.createJobManagerRunner(
				jobGraph,
				configuration,
				rpcService,
				highAvailabilityServices,
				heartbeatServices,
				jobManagerSharedServices,
				new DefaultJobManagerJobMetricGroupFactory(jobManagerMetricGroup),
				fatalErrorHandler)),
		rpcService.getExecutor());
        // 异步调用 JobManagerRunner 的 start 方法
	return jobManagerRunnerFuture.thenApply(FunctionUtils.uncheckedFunction(this::startJobManagerRunner));
}
1.7 JobManagerRunner::start
start 源码如下:
public void start() throws Exception {
	try {
		leaderElectionService.start(this);
	} catch (Exception e) {
		log.error("Could not start the JobManager because the leader election service did not start.", e);
		throw new Exception("Could not start the leader election service.", e);
	}
}
接口 LeaderElectionService 是选举服务,作用是在一组竞争者中选出领导者。它的类层次结构如下图所示:

- SingleLeaderElectionService 适用于只有一个“领导者”“竞争者”;
- EmbeddedLeaderService 是一个简单的“领导者”选举服务,其内部类 EmbeddedLeaderElectionService 实现了 LeaderElectionService 接口;
- StandaloneLeaderElectionService 适用于单机服务,因为只有一个竞争者,因此在启动时可以直接授权为“领导者”
- ZooKeeperLeaderElectionService 使用 Zookeeper 来辅助选举
本地调试时,进入的是 EmbededLeaderService::start :
// EmbededLeaderService内部类EmbeddedLeaderElectionService
@Override
public void start(LeaderContender contender) throws Exception {
	checkNotNull(contender);
        // 这个 contender 此时是 JobManagerRunner
	addContender(this, contender);
}
继续跟踪 addContender :
// EmbeddedLeaderService
private void addContender(EmbeddedLeaderElectionService service, LeaderContender contender) {
	synchronized (lock) {
		(省略...)
		try {
			(省略...)
                        // 关注 updateLeader()
			updateLeader().whenComplete((aVoid, throwable) -> {
				if (throwable != null) {
					fatalError(throwable);
				}
			});
		}
		catch (Throwable t) {
			fatalError(t);
		}
	}
}
继续跟踪 updateLeader:
// EmbeddedLeaderService
private CompletableFuture<Void> updateLeader() {
	// this must be called under the lock
	assert Thread.holdsLock(lock);
	if (currentLeaderConfirmed == null && currentLeaderProposed == null) {
		// we need a new leader
		if (allLeaderContenders.isEmpty()) {
			// no new leader available, tell everyone that there is no leader currently
			return notifyAllListeners(null, null);
		}
		else {
			// propose a leader and ask it
			final UUID leaderSessionId = UUID.randomUUID();
			EmbeddedLeaderElectionService leaderService = allLeaderContenders.iterator().next();
			currentLeaderSessionId = leaderSessionId;
			currentLeaderProposed = leaderService;
			currentLeaderProposed.isLeader = true;
			LOG.info("Proposing leadership to contender {} @ {}",
					leaderService.contender, leaderService.contender.getAddress());
                        // 异步执行选举
			return execute(new GrantLeadershipCall(leaderService.contender, leaderSessionId, LOG));
		}
	} else {
		return CompletableFuture.completedFuture(null);
	}
}
接着执行到 GrantLeadershipCall::run 方法里面:
// GrantLeadershipCall
@Override
public void run() {
	try {
                // 此时,这个contender 就是 JobManangerRunner
		contender.grantLeadership(leaderSessionId);
	}
	catch (Throwable t) {
		logger.warn("Error granting leadership to contender", t);
		contender.handleError(t instanceof Exception ? (Exception) t : new Exception(t));
	}
}
1.8 JobManagerRunner::grantLeadership
@Override
public void grantLeadership(final UUID leaderSessionID) {
	synchronized (lock) {
		if (shutdown) {
			log.info("JobManagerRunner already shutdown.");
			return;
		}
		leadershipOperation = leadershipOperation.thenCompose(
			(ignored) -> {
				synchronized (lock) {
					return verifyJobSchedulingStatusAndStartJobManager(leaderSessionID);
				}
			});
		handleException(leadershipOperation, "Could not start the job manager.");
	}
}
1.9 JobManagerrRunner::startJobMaster
verifyJobSchedulingStatusAndStartJobManager 的代码比较简单:
private CompletableFuture<Void> verifyJobSchedulingStatusAndStartJobManager(UUID leaderSessionId) {
	final CompletableFuture<JobSchedulingStatus> jobSchedulingStatusFuture = getJobSchedulingStatus();
	return jobSchedulingStatusFuture.thenCompose(
		jobSchedulingStatus -> {
			if (jobSchedulingStatus == JobSchedulingStatus.DONE) {
				return jobAlreadyDone();
			} else {
                                // 启动JobMaster
				return startJobMaster(leaderSessionId);
			}
		});
}
再接着看 startJobMaster 的代码:
// JobManangerRunner
private CompletionStage<Void> startJobMaster(UUID leaderSessionId) {
	log.info("JobManager runner for job {} ({}) was granted leadership with session id {} at {}.",
		jobGraph.getName(), jobGraph.getJobID(), leaderSessionId, getAddress());
        // 设置任务正在运行中
	try {
		runningJobsRegistry.setJobRunning(jobGraph.getJobID());
	} catch (IOException e) {
		return FutureUtils.completedExceptionally(
			new FlinkException(
				String.format("Failed to set the job %s to running in the running jobs registry.", jobGraph.getJobID()),
				e));
	}
        // 重点在这个start方法
	final CompletableFuture<Acknowledge> startFuture;
	try {
		startFuture = jobMasterService.start(new JobMasterId(leaderSessionId));
	} catch (Exception e) {
		return FutureUtils.completedExceptionally(new FlinkException("Failed to start the JobMaster.", e));
	}
        // 结束部分
	final CompletableFuture<JobMasterGateway> currentLeaderGatewayFuture = leaderGatewayFuture;
	return startFuture.thenAcceptAsync(
		(Acknowledge ack) -> confirmLeaderSessionIdIfStillLeader(leaderSessionId, currentLeaderGatewayFuture),
		executor);
}
1.10 JobMaster::start
JobMasterService 是接口,JobMaster 就是他的实现:
// JobMaster
public CompletableFuture<Acknowledge> start(final JobMasterId newJobMasterId) throws Exception {
	// make sure we receive RPC and async calls
	start();
	return callAsyncWithoutFencing(() -> startJobExecution(newJobMasterId), RpcUtils.INF_TIMEOUT);
}
1.11 JobMaster::startJobExecution
// JobMaster

private Acknowledge startJobExecution(JobMasterId newJobMasterId) throws Exception {
        // 验证方法调用是否在RPC端点的主线程中发生
	validateRunsInMainThread();
	checkNotNull(newJobMasterId, "The new JobMasterId must not be null.");
        // 任务已启动
	if (Objects.equals(getFencingToken(), newJobMasterId)) {
		log.info("Already started the job execution with JobMasterId {}.", newJobMasterId);
		return Acknowledge.get();
	}
	setNewFencingToken(newJobMasterId);
        // 启动JobMaster服务
	startJobMasterServices();
	log.info("Starting execution of job {} ({}) under job master id {}.", jobGraph.getName(), jobGraph.getJobID(), newJobMasterId);
        // 重点来了,ExecutionGraph 的生成
	resetAndScheduleExecutionGraph();
	return Acknowledge.get();
}
1.12 JobMaster::resetAndScheduleExecutionGraph
resetAndScheduleExecutionGraph 包含首次直接schedule和重复schedule的逻辑
private void resetAndScheduleExecutionGraph() throws Exception {
	validateRunsInMainThread();
	final CompletableFuture<Void> executionGraphAssignedFuture;
        // 初次执行的任务一般是进入前一个if分支
	if (executionGraph.getState() == JobStatus.CREATED) {
		executionGraphAssignedFuture = CompletableFuture.completedFuture(null);
		executionGraph.start(getMainThreadExecutor());
	} else {
		suspendAndClearExecutionGraphFields(new FlinkException("ExecutionGraph is being reset in order to be rescheduled."));
		final JobManagerJobMetricGroup newJobManagerJobMetricGroup = jobMetricGroupFactory.create(jobGraph);
                // 这一步创建ExecutionGraph
		final ExecutionGraph newExecutionGraph = createAndRestoreExecutionGraph(newJobManagerJobMetricGroup);
		executionGraphAssignedFuture = executionGraph.getTerminationFuture().handle(
			(JobStatus ignored, Throwable throwable) -> {
				newExecutionGraph.start(getMainThreadExecutor());
				assignExecutionGraph(newExecutionGraph, newJobManagerJobMetricGroup);
				return null;
			});
	}
        // 提交ExecutionGraph
	executionGraphAssignedFuture.thenRun(this::scheduleExecutionGraph);
}
1.13 JobMaster::scheduleExecutionGraph
JobMaster 经过了一堆方法嵌套之后,执行到了这里 :
private void scheduleExecutionGraph() {
	checkState(jobStatusListener == null);
	// register self as job status change listener
	jobStatusListener = new JobManagerJobStatusListener();
	executionGraph.registerJobStatusListener(jobStatusListener);
	try {
                //这里调用了ExecutionGraph的启动方法
		executionGraph.scheduleForExecution();
	}
	catch (Throwable t) {
		executionGraph.failGlobal(t);
	}
}
1.14 ExecutionGraph的后续执行:
接下来展示一下ExecutionGraph 执行时,是如何一步步执行到 User-Defined Function 的 run 方法的。
立即执行的代码依次经过:
- ExecutionGraph::scheduleForExecution
- ExecutionGraph::scheduleEager (以立即执行为例)
- Execution::deploy
// Execution
// submitTask 是核心
CompletableFuture.supplyAsync(() -> taskManagerGateway.submitTask(deployment, rpcTimeout), executor)...
- RpcTaskManagerGateway::submitTask (RpcTaskManagerGateway是接口TaskManagerGateway的一个实现类)
// RpcTaskManagerGateway.java

@Override
public CompletableFuture<Acknowledge> submitTask(TaskDeploymentDescriptor tdd, Time timeout) {
	return taskExecutorGateway.submitTask(tdd, jobMasterId, timeout);
}
- TaskExecutor::submitTask (TaskExecutor是接口TaskExecutorGateway的实现类)
// TaskExecutor.java

try {
        // 添加任务到TaskSlotTable
	taskAdded = taskSlotTable.addTask(task);
} catch (SlotNotFoundException | SlotNotActiveException e) {
	throw new TaskSubmissionException("Could not submit task.", e);
}
if (taskAdded) {
        // 启动了Task的线程
	task.startTaskThread();
	return CompletableFuture.completedFuture(Acknowledge.get());
} else {
	final String message = "TaskManager already contains a task for id " +
		task.getExecutionId() + '.';
	log.debug(message);
	throw new TaskSubmissionException(message);
}
- 启动Task的执行线程
// Task.java

/**
 * Starts the task's thread.
 */
public void startTaskThread() {
	executingThread.start();
}
- Task的run方法最终执行任务:
// Task.java
// now load and instantiate the task's invokable code
invokable = loadAndInstantiateInvokable(userCodeClassLoader, nameOfInvokableClass, env);

// run the invokable
invokable.invoke();
- StreamTask的invoke方法,StreamTask 继承了 AbstractInvokable:
// StreamTask.java

@Override
public final void invoke() throws Exception {
    (省略...)
    // task specific initialization
    init();

    (省略...)
    // let the task do its work
    isRunning = true;
    run();

    (省略...)
    // we must! perform this cleanup
    try {
	cleanup();
    }
    catch (Throwable t) {
	// catch and log the exception to not replace the original exception
	LOG.error("Error during cleanup of stream task", t);
    }
}
- 以 SourceStreamTask为例,执行run方法:
// SourceStreamTask.java
@Override
protected void run() throws Exception {
	headOperator.run(getCheckpointLock(), getStreamStatusMaintainer());
}
- 接着就执行 SourceStream的run方法:
// SourceStream.java
public void run(final Object lockingObject,
		final StreamStatusMaintainer streamStatusMaintainer,
		final Output<StreamRecord<OUT>> collector) throws Exception {
    	try {
                // 执行用户定义的函数
		userFunction.run(ctx);
		// if we get here, then the user function either exited after being done (finite source)
		// or the function was canceled or stopped. For the finite source case, we should emit
		// a final watermark that indicates that we reached the end of event-time
		if (!isCanceledOrStopped()) {
			ctx.emitWatermark(Watermark.MAX_WATERMARK);
		}
	} finally {
		// make sure that the context is closed in any case
		ctx.close();
		if (latencyEmitter != null) {
			latencyEmitter.close();
		}
	}
}
- 最后执行用户定义的函数的run方法,比如本例中SocketTextStreamFunction的run方法:
// SocketTextStreamFunction.java
@Override
public void run(SourceContext<String> ctx) throws Exception {
   (省略... 这里的代码主要就是创建 Socket,并与目标服务通信,有兴趣的可以自行前往阅读)
}
二、ExecutionGraph
上面的 1.12 JobMaster::resetAndScheduleExecutionGraph中 createAndRestoreExecutionGraph 的作用就是由 JobGraph 创建 ExecutionGraph:
2.1 JobMaster::createAndRestoreExecutionGraph
// JobMaster.java

private ExecutionGraph createAndRestoreExecutionGraph(JobManagerJobMetricGroup currentJobManagerJobMetricGroup) throws Exception {
	ExecutionGraph newExecutionGraph = createExecutionGraph(currentJobManagerJobMetricGroup);
        (省略...)
        return newExecutionGraph;
}
2.2 JobMaster::createExecutionGraph
// JobMaster.java

private ExecutionGraph createExecutionGraph(JobManagerJobMetricGroup currentJobManagerJobMetricGroup) throws JobExecutionException, JobException {
	return ExecutionGraphBuilder.buildGraph( ... );

}
2.3 ExecutionGraph::attachJobGraph
创建 ExecutionJobVertex 顶点和 ExecutionEdge 的代码则在 ExecutionGraph#attachJobGraph 中:
public void attachJobGraph(List<JobVertex> topologiallySorted) throws JobException {
	assertRunningInJobMasterMainThread();
	LOG.debug("Attaching {} topologically sorted vertices to existing job graph with {} " +
			"vertices and {} intermediate results.",
		topologiallySorted.size(),
		tasks.size(),
		intermediateResults.size());
	final ArrayList<ExecutionJobVertex> newExecJobVertices = new ArrayList<>(topologiallySorted.size());
	final long createTimestamp = System.currentTimeMillis();
	for (JobVertex jobVertex : topologiallySorted) {
		if (jobVertex.isInputVertex() && !jobVertex.isStoppable()) {
			this.isStoppable = false;
		}
                // 创建顶点并加入到图中
		// create the execution job vertex and attach it to the graph
		ExecutionJobVertex ejv = new ExecutionJobVertex(
			this,
			jobVertex,
			1,
			rpcTimeout,
			globalModVersion,
			createTimestamp);
                // 连接到前驱
		ejv.connectToPredecessors(this.intermediateResults);
		ExecutionJobVertex previousTask = this.tasks.putIfAbsent(jobVertex.getID(), ejv);
		if (previousTask != null) {
			throw new JobException(String.format("Encountered two job vertices with ID %s : previous=[%s] / new=[%s]",
				jobVertex.getID(), ejv, previousTask));
		}
		for (IntermediateResult res : ejv.getProducedDataSets()) {
			IntermediateResult previousDataSet = this.intermediateResults.putIfAbsent(res.getId(), res);
			if (previousDataSet != null) {
				throw new JobException(String.format("Encountered two intermediate data set with ID %s : previous=[%s] / new=[%s]",
					res.getId(), res, previousDataSet));
			}
		}
		this.verticesInCreationOrder.add(ejv);
		this.numVerticesTotal += ejv.getParallelism();
		newExecJobVertices.add(ejv);
	}
	terminationFuture = new CompletableFuture<>();
	failoverStrategy.notifyNewVertices(newExecJobVertices);
}
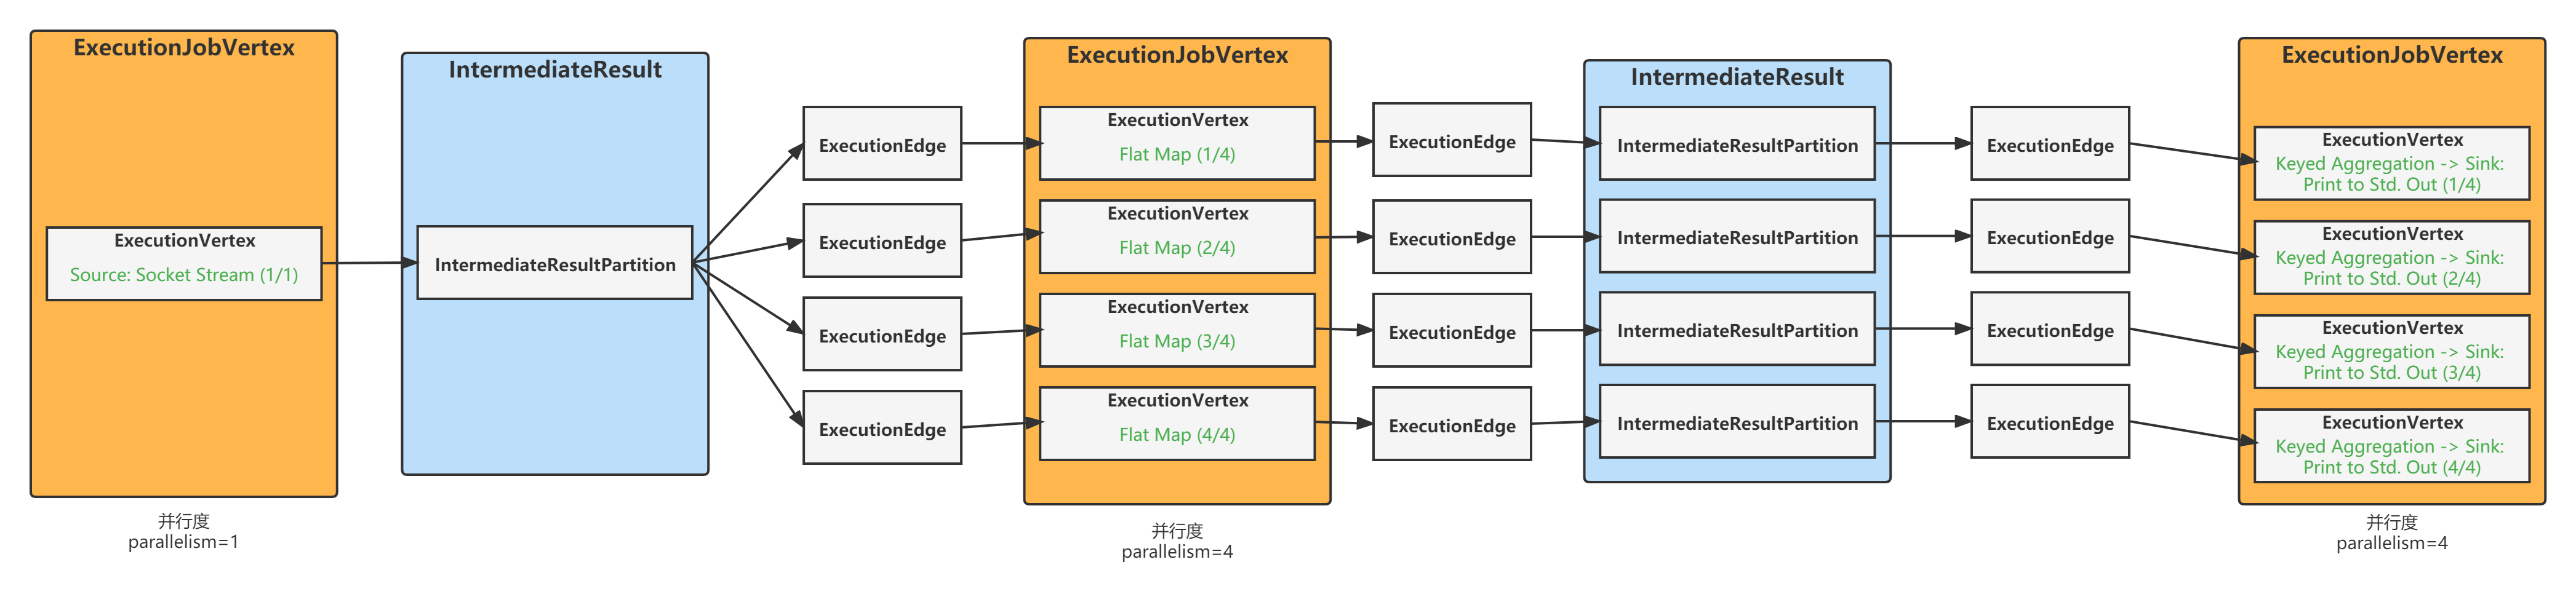
本文中生成的图如下图所示: