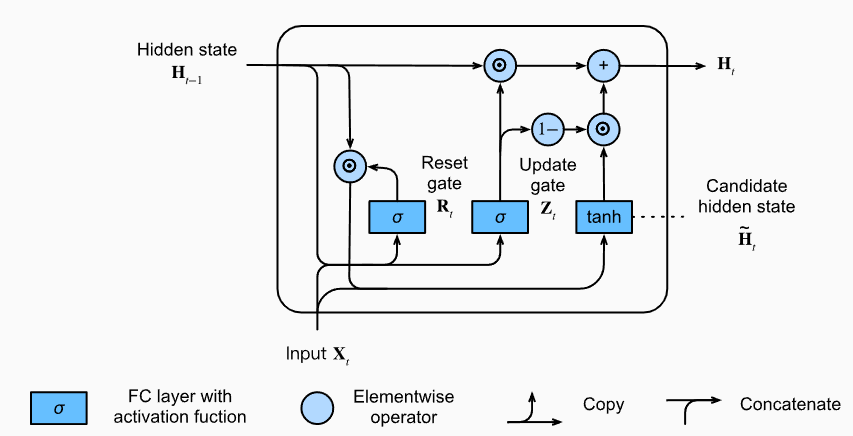
GRU说白了就是加了两个门,这两个门控制最终隐藏状态的输出,其中还是那一套换汤不换药。

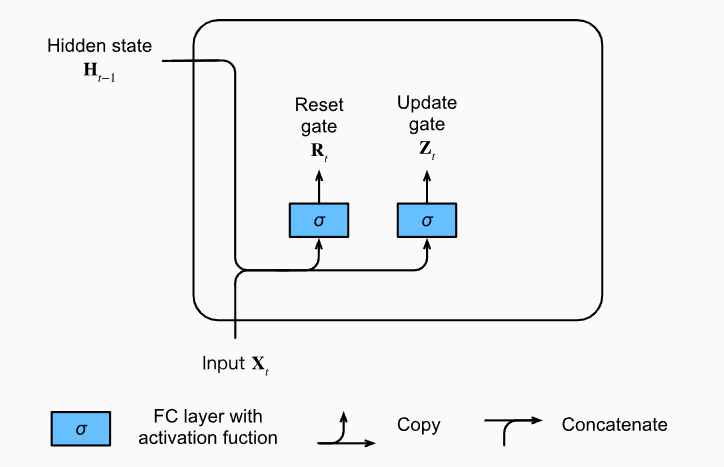
R是重置门,决定上一个时间步(h_{t-1})是否要被重置,如果R元素全为0,很显然我们就丢掉了上一个时间步的h信息。
S是更新门,决定了这个时刻的候选隐藏状态(h_{t}^{prime})应该怎么输出。
注意,因为这是两个阀门,阀门控制肯定取值只有(0~1),所以这个的激活函数是sigmod函数。
公式:
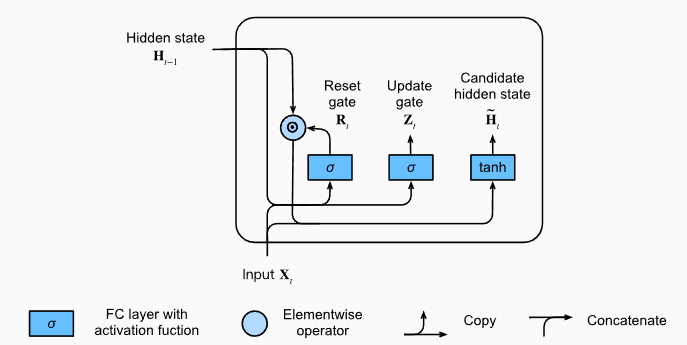
候选隐藏状态
值得注意的是,这里因为R和Z都是起到了阀门的作用,所有很显然它是直接做哈达玛乘积的,即对应元素相乘。

可以看到,通过重置门,我们得到了候选隐藏状态,这个做的好处是可以减少一万状态的影响。
更新隐藏状态
通过更新门实现了对隐藏状态的更新。
如果Z接近1,那么(h_{t-1})就会被保留,而如果整个子序列的所有时间步的更新门,也就是 Z 都接近1,那么我们可以保留从序列起始时间步开始的所有隐藏状态。

重置门有利于捕获序列中的短期依赖关系。
更新门有助于补货序列中的长期依赖关系。
从零开始实现
import torch
import torch.nn as nn
import torch.nn.functional as F
import math
class GRU(nn.Module):
    def __init__(self,indim, hidim, outdim):
        super(GRU, self).__init__()
        self.indim = indim
        self.hidim = hidim
        self.outdim = outdim
        self.W_zh, self.W_zx, self.b_z = self.get_three_parameters()
        self.W_rh, self.W_rx, self.b_r = self.get_three_parameters()
        self.W_hh, self.W_hx, self.b_h = self.get_three_parameters()
        self.Linear = nn.Linear(hidim, outdim) # 全连接层做输出
        self.reset()

    def forward(self, input, state):
        input = input.type(torch.float32)
        if torch.cuda.is_available():
            input = input.cuda()
        Y = []
        h = state
        h = h.cuda()
        for x in input:
            z = F.sigmoid(h @ self.W_zh + x @ self.W_zx + self.b_z)
            r = F.sigmoid(h @ self.W_rh + x @ self.W_rx + self.b_r)
            ht = F.tanh((h * r) @ self.W_hh + x @ self.W_hx + self.b_h)
            h = (1 - z) * h + z * ht
            y = self.Linear(h)
            Y.append(y)
        return torch.cat(Y, dim=0), h

    def get_three_parameters(self):
        indim, hidim, outdim = self.indim, self.hidim, self.outdim
        return nn.Parameter(torch.FloatTensor(hidim, hidim)),
            nn.Parameter(torch.FloatTensor(indim, hidim)),
                nn.Parameter(torch.FloatTensor(hidim))

    def reset(self):
        stdv = 1.0 / math.sqrt(self.hidim)
        for param in self.parameters():
            nn.init.uniform_(param, -stdv, stdv)
就是按公式原原本本写了一遍,没什么特点,就像搭积木一样。
框架实现
import torch
import torch.nn as nn
import torch.nn.functional as F
import math
from RNN import *
setup_seed(916)

class GRU(nn.Module):
    def __init__(self, indim, hidim, outdim):
        super(GRU, self).__init__()
        self.GRU = nn.GRU(indim, hidim)
        self.Linear = nn.Linear(hidim, outdim)

    def forward(self, input, state):
        input = input.type(torch.float32)
        h = state.unsqueeze(0)
        if torch.cuda.is_available():
            input = input.cuda()
            h = h.cuda()
        y, state = self.GRU(input, h)
        output = self.Linear(y.reshape(-1, y.shape[-1]))
        return output, state
这里有个值得注意的点,由于框架它实际上是可以定义多层RNN的,所以它输入和输出张量的维度不一样。
gru(input, h_0)
输入 input 就是(time_step, batch_size, feature_dim),在模型初始化nn.GRU()传入参数batch_first,那么input的shape就是(batch_size, time_step,feature_dim),这一点需要当心。
对于h_0,它的shape简单(D* num_layers, N, H_{hidim}) , 这里的D是看我们在初始化的时候是否设置了bidirectional, 如果true,代表我们要用双向的rnn,于是D就为2.不过大部分情况下我们都只用单向的rnn,于是一般来说它的shape就是(num_layers, N, H_{hidim}) ,如果不显式地给出h0,框架会自动用全0来构造这个h0,如果只是训练的话,是没必要自己初始化一个h0的,当然预测肯定要传入h0。
对于这个输出的结果,我们需要更加注意。
(output,h_n) = ouputs
其中output的shape为(L, N, D * H_{out}),如果设置了batch_first = True, 就颠倒一下,一个重要的点:如果我们设置了双向的RNN,那么我们最后是将两个隐藏层结果concat起来了,所以,最后一维就是D * H_{out}这是一个需要留心的点。
h_n也需要注意,他是最后一个时间步的每一层的隐藏状态(D * num_layers, N, H_{out}),如果我们设置层数为1,并且不使用双向的rnn,那么输出的结果就是(1, N, h_out)
这些维度挺绕的,所以一定要留心一点。