一、volatile
volatile是java虚拟机提供的轻量级的同步机制;
三大特性:保证可见性,不保证原子性,禁止指令重排
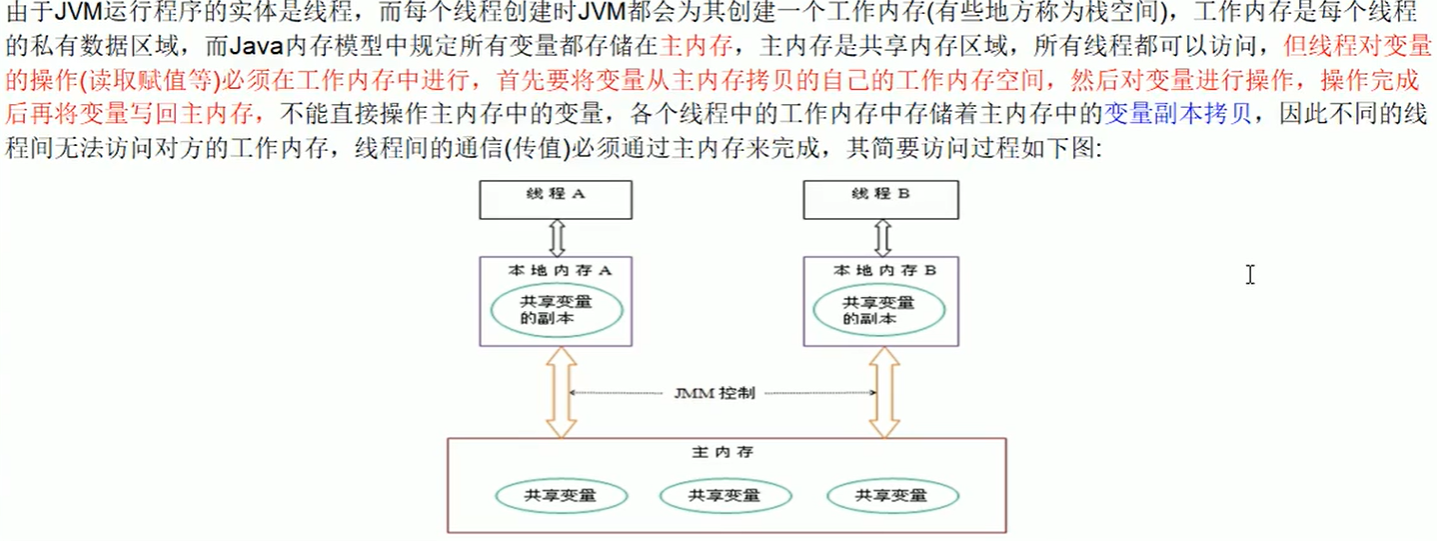
JMM(Java内存模型)-->(三大特性:可见性,原子性,有序性)
- 可见性

验证可见性代码
//volatile可以保证可见性,及时通知其他线程,主物理内存的值已经被修改
protected static void seeOKByVolatile() {
	MyData myData = new MyData();
	new Thread(()->{
		System.out.println(Thread.currentThread().getName() + "	 come in");
		try {
			TimeUnit.SECONDS.sleep(3);
		} catch (InterruptedException e) {
			// TODO Auto-generated catch block
			e.printStackTrace();
		}
		myData.addTO60();
		System.out.println(Thread.currentThread().getName() + "	 updated number value:" + myData.number);
	},"AAA").start();

	//第二个线程就是我们main线程
	while(myData.number == 0) {
		//main线程一直在这里等待循环,直到number值不在等于0
	}

	System.out.println(Thread.currentThread().getName() + "	 mission is over,main get number value:" + myData.number);
}
- 不保证原子性
class MyData{
	volatile int number = 0;

	public void addTO60(){
		this.number = 60;
	}

	//number ++在多线程环境下是非线程安全的
	public void addPlusPlus() {
		number ++;
	}

	//默认是0
	AtomicInteger atomicInteger = new AtomicInteger();

	public void addMyAtomic() {
		atomicInteger.getAndIncrement();
	}
}
/**
 * 1验证volatile的可见性
 * 	1.1,假如int number = 0;number变量之前根本没有添加volatile关键字修饰,没有可见性
 *  1.2,添加了volatile,可以解决可见性问题
 * 2验证volatile不保证原子性
 * 	2.1,原子性指的是不可分割,完整性,也即某个线程正在做某个具体业务时,中间不可以被加塞或者被分割,需要整体完整。
 * 		要么同时成功,要么同时失败。
 * 	2.2,volatile不保证原子性的案例演示
 * 	2.3,why
 * 	2.4,如何解决原子性?
 * 		*加Synchronized
 * 		*使用我们juc下的atomicInteger
 * @author Administrator
 *
 */
public class VolatileDemo {

	public static void main(String[] args) {
//		seeOKByVolatile();
		MyData myData = new MyData();
		for (int i = 1; i <= 20; i++) {
			new Thread(() ->{
				for (int j = 1; j <= 1000; j++) {
					myData.addPlusPlus();
					myData.addMyAtomic();
				}
			},"线程" + i).start();
		}

		//需要等待上面20个线程都全部计算完成后,再用main线程取得最终的结果
		while(Thread.activeCount() > 2) {
			Thread.yield();
		}
		System.out.println(Thread.currentThread().getName() + "	 int type, finally number value:" + myData.number);
		System.out.println(Thread.currentThread().getName() + "	 AtomicInteger type, finally number value:" + myData.atomicInteger);
	}
}
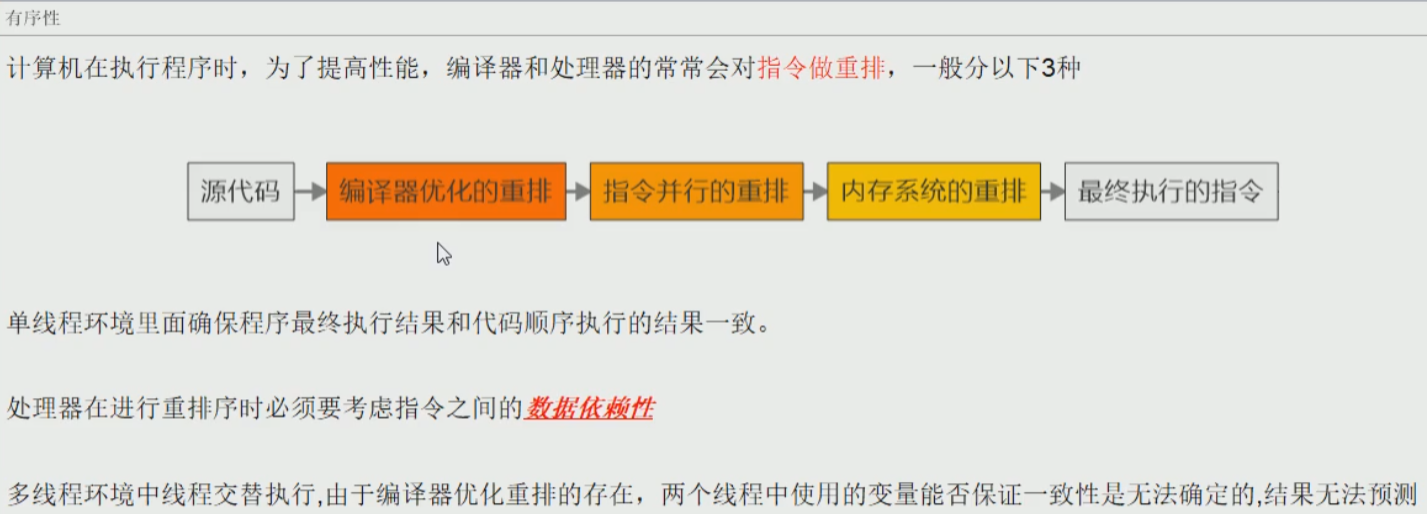
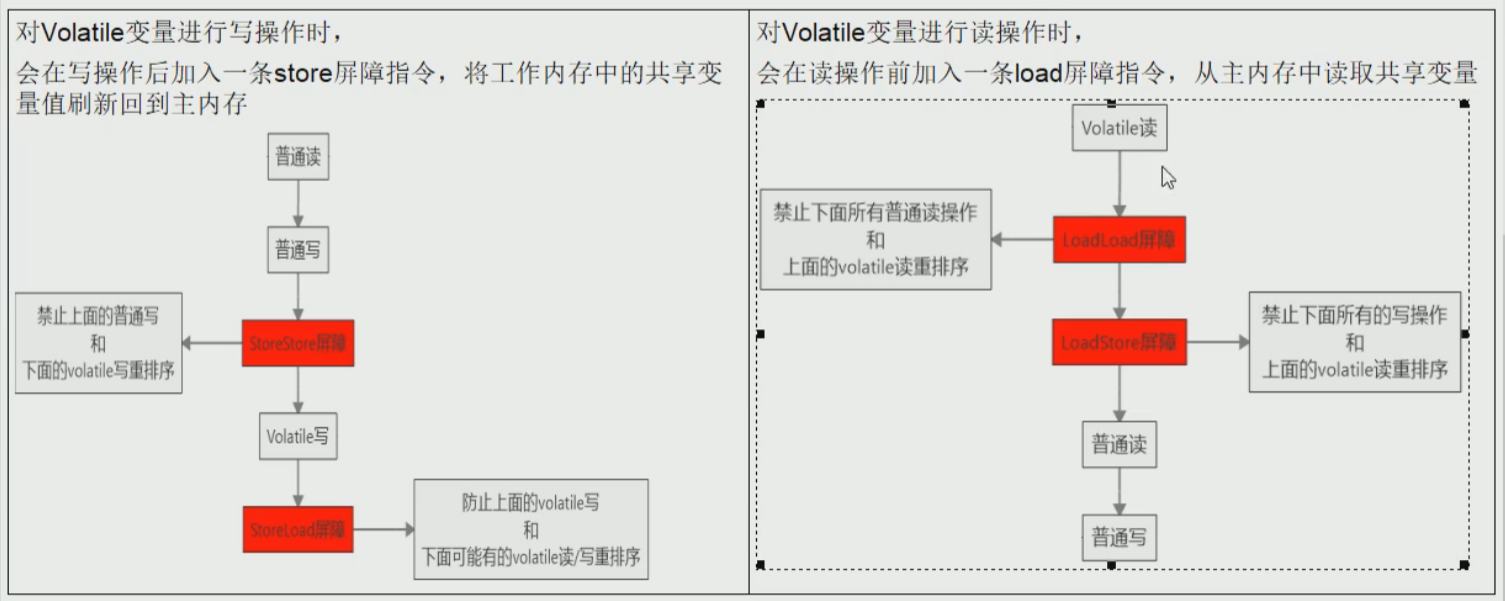
- 禁止指令重排
public class ReSortSeqDemo {

	int a = 0;
	boolean flag = false;

	public void method1() {
		a = 1;
		flag = true;
	}
	public void method2() {
		if(flag) {
			a = a + 5;
			System.out.println("a的值是:"+ a);
		}
	}
}
同时开启多个线程执行method1和method2,可能method1中的flag=true先执行,然后就执行method2,那么a此时就是5,之后才执行a=1,这就是指令重排了,那么为了禁止指令重排,为了防止flag=true先执行,那么就用volatile修饰。
禁止指令重排小结


二、多线程下的单例模式
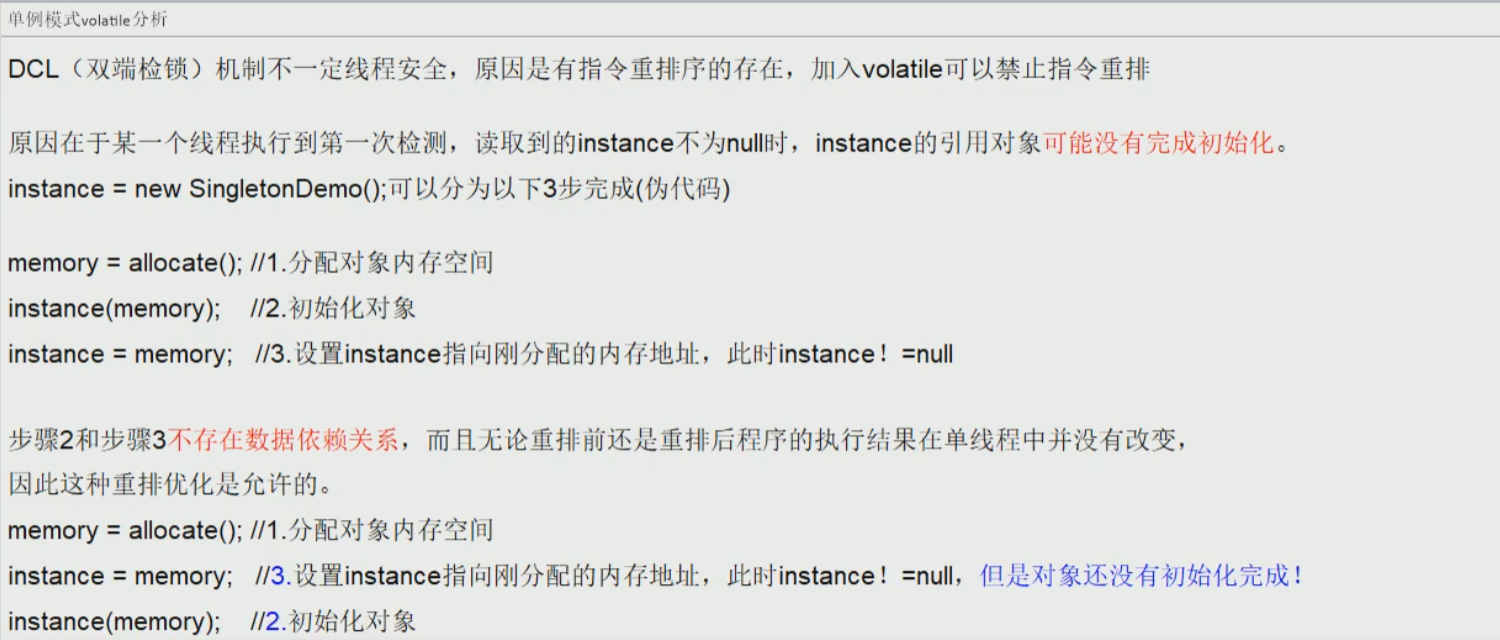

public class SingletonDemo {

	private volatile static SingletonDemo instance = null;

	private SingletonDemo() {
		System.out.println("构造器被调用");
	}

	public static SingletonDemo getInstance() {
		if(instance == null) {
			synchronized (SingletonDemo.class) {
				if(instance == null) {
					instance = new SingletonDemo();
				}
			}
		}
		return instance;
	}
}
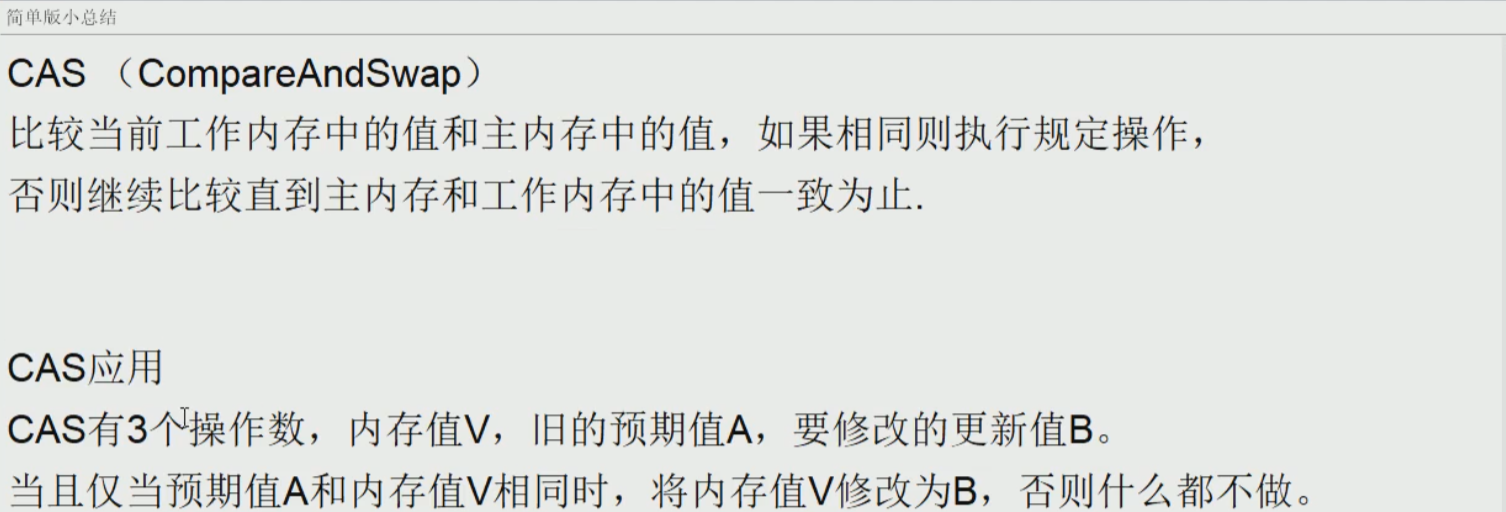
三、CAS(CompareAndSet)比较并交换
public class CASDemo {

	public static void main(String[] args) {
		AtomicInteger atomicInteger = new AtomicInteger(5);
		System.out.println(atomicInteger.compareAndSet(5, 2021) + "	 current data:" + atomicInteger.get());
		System.out.println(atomicInteger.compareAndSet(5, 2021) + "	 current data:" + atomicInteger.get());
	}
}
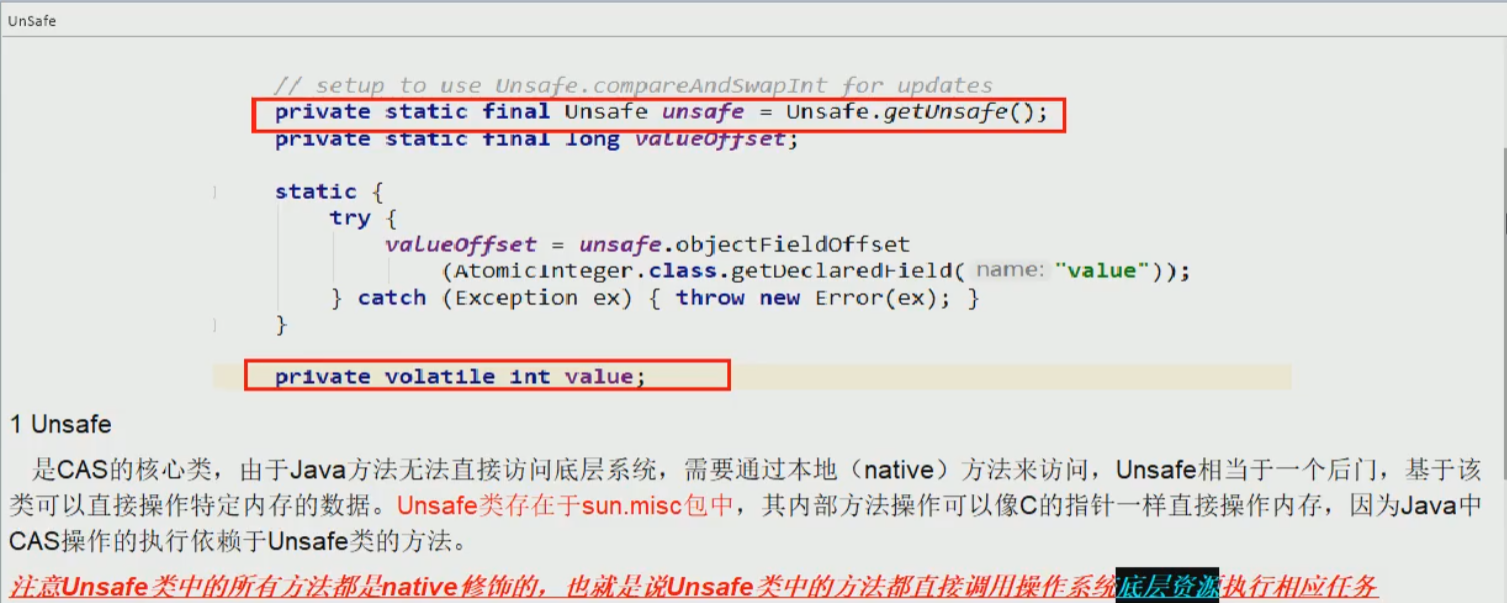
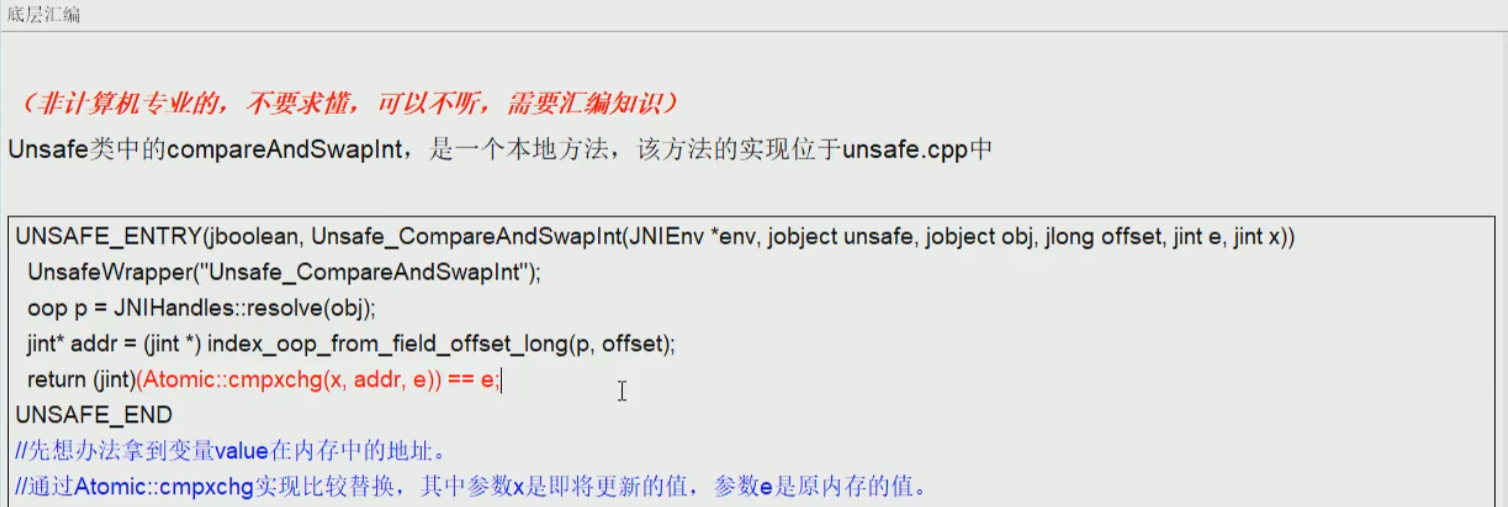
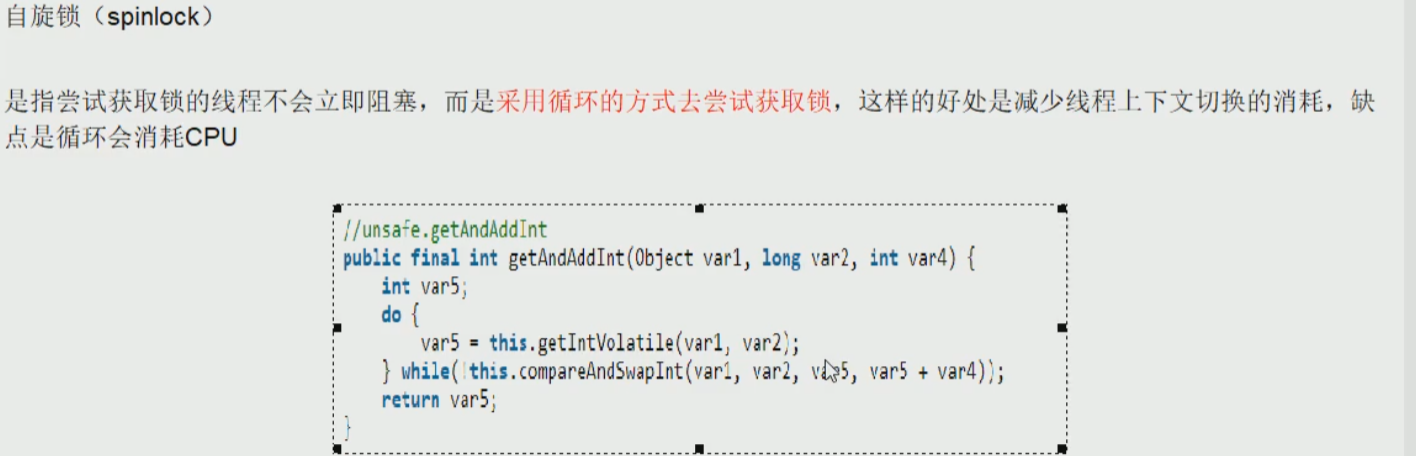
底层原理(unsafe的理解)unsafe位于rt.jar/sun/misc/unsafe.class---自旋
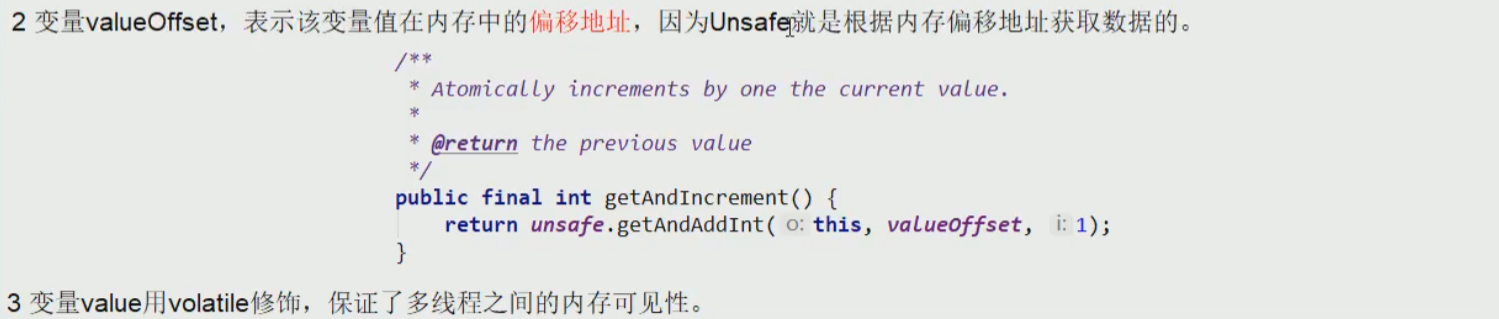

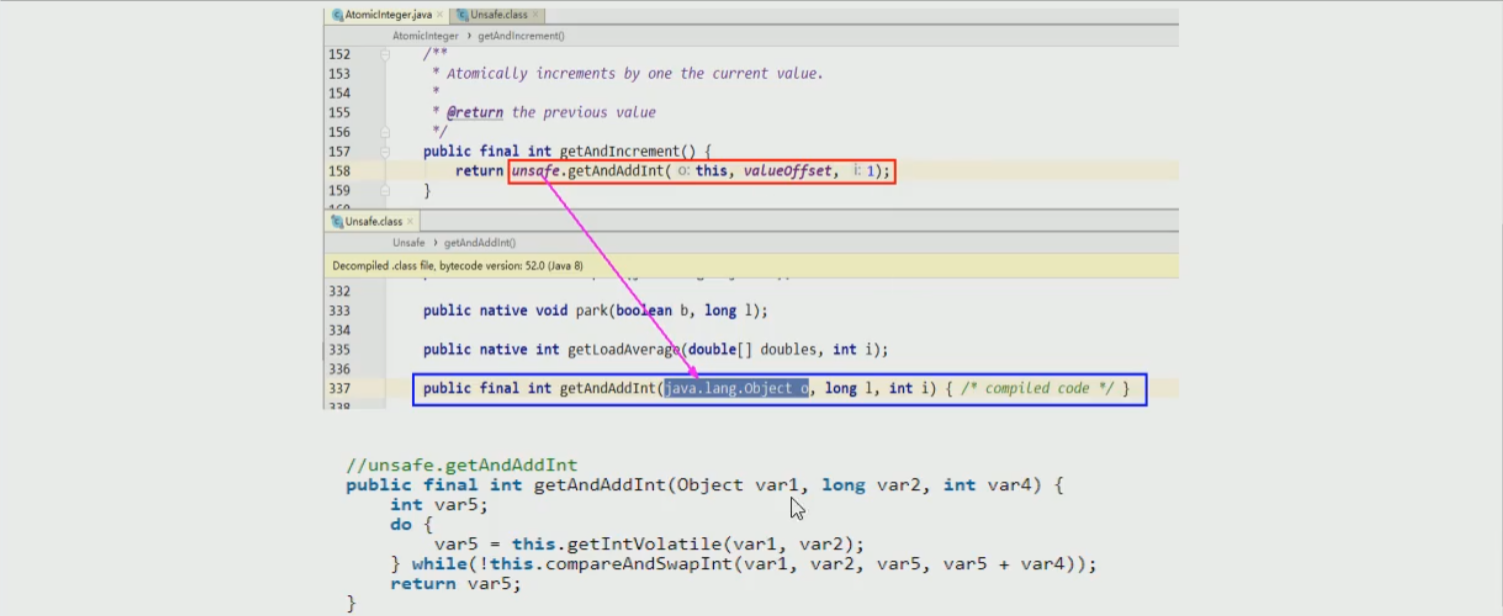

- 调用getAndIncrement(),实则是调用getAndAddInt(),然后打开该方法的源码;
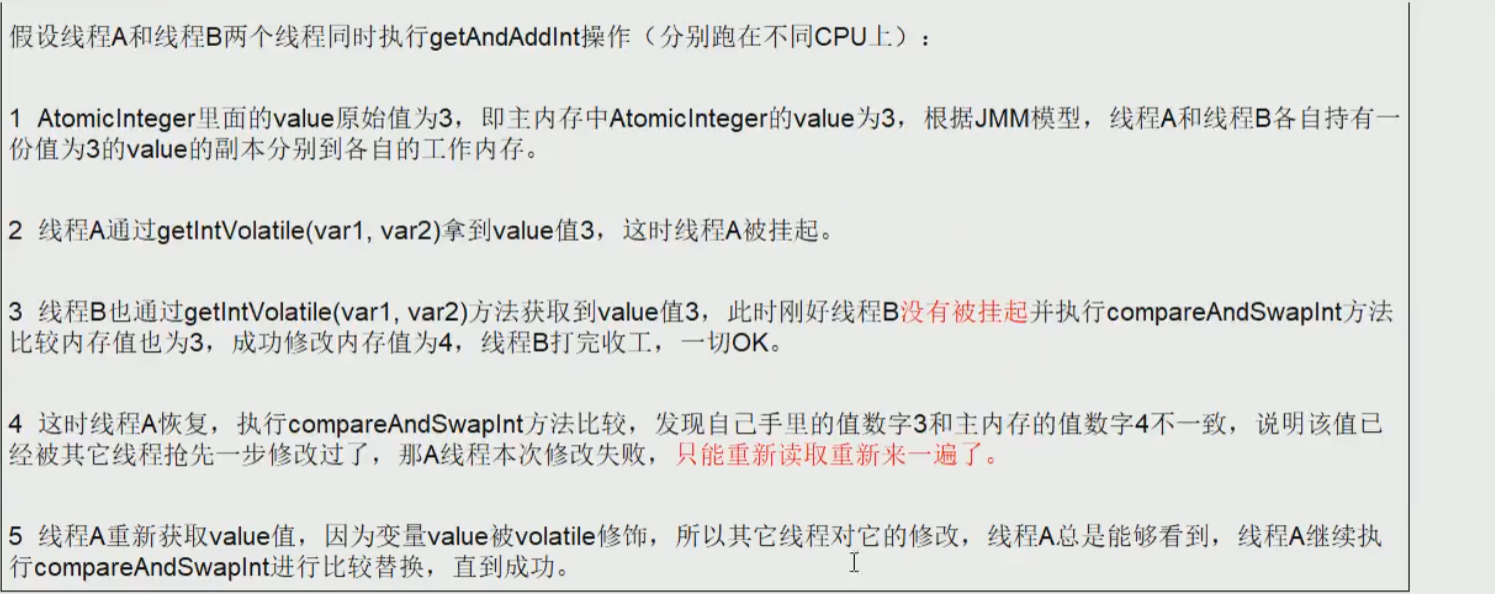
- 首先是通过getIntVolatile()取得主内存的值var5,然后调用compareAndSwapInt()方法,意思就是比较当前对象var1和内存地址偏移量var2下的值和var5做比较,如果相等,那么执行var5+var4,否则的话,继续循环;直到相等为止,退出循环。
- 退出循环的条件是this.compareAndSwapInt()方法返回true(也是值相等,而且已经var5+var4加完了),然后取反,则退出do-while循环。
cas缺点
- 1.循环时间长,开销大

- 2.只能保证一个共享变量的原子操作

- 3.可能产生ABA问题

原子引用Demo
public class AtomicReferenceDemo {

	public static void main(String[] args) {

		User user1 = new User("张三",13);
		User user2 = new User("李四",13);

		AtomicReference<User> atomicReference = new AtomicReference<User>();
		atomicReference.set(user1);
		System.out.println(atomicReference.compareAndSet(user1, user2) + "	" + atomicReference.get().toString());
		System.out.println(atomicReference.compareAndSet(user1, user2) + "	" + atomicReference.get().toString());
	}
}

class User{
	String username;
	int age;
	//省略get,set,tostring
}
ABA问题的解决
public class ABADemo {

	static AtomicReference<Integer> atomicReference = new AtomicReference<Integer>(100);
	static AtomicStampedReference<Integer> atomicStampedReference = new AtomicStampedReference<Integer>(100, 1);

	public static void main(String[] args) {

		System.out.println("==========以下是ABA问题的产生===========");
		new Thread(()->{
			atomicReference.compareAndSet(100, 101);
			atomicReference.compareAndSet(101, 100);
		},"T1").start();

		new Thread(()->{
			try {//暂停1秒钟t2线程,保证t1线程完成一次ABA
				TimeUnit.SECONDS.sleep(1);
			} catch (InterruptedException e) {
				e.printStackTrace();
			}
			System.out.println(atomicReference.compareAndSet(100, 2021) + "	" + atomicReference.get());
		},"T2").start();

		try {
			TimeUnit.SECONDS.sleep(2);
		} catch (InterruptedException e) {
			e.printStackTrace();
		}
		System.out.println("==========以下是ABA问题的解决===========");
		new Thread(()->{
			int stamp = atomicStampedReference.getStamp();
			System.out.println(Thread.currentThread().getName() + "	第一次版本号:" + stamp);
			try {
				//暂停1秒钟t3线程,保证t3和t4线程同时拿到1这个版本号
				TimeUnit.SECONDS.sleep(1);
			} catch (InterruptedException e) {
				e.printStackTrace();
			}
			atomicStampedReference.compareAndSet(100, 101, atomicStampedReference.getStamp(), atomicStampedReference.getStamp() + 1);
			System.out.println(Thread.currentThread().getName() + "	第二次版本号:" + atomicStampedReference.getStamp());
			atomicStampedReference.compareAndSet(101, 100, atomicStampedReference.getStamp(), atomicStampedReference.getStamp() + 1);
			System.out.println(Thread.currentThread().getName() + "	第三次版本号:" + atomicStampedReference.getStamp());
		},"T3").start();

		new Thread(()->{
			int stamp = atomicStampedReference.getStamp();
			System.out.println(Thread.currentThread().getName() + "	第一次版本号:" + stamp);
			try {
				//暂停3秒钟t4线程,保证上面的t3线程完成了一次ABA操作
				TimeUnit.SECONDS.sleep(3);
			} catch (InterruptedException e) {
				e.printStackTrace();
			}
			boolean result = atomicStampedReference.compareAndSet(100, 2021, stamp, stamp + 1);
			System.out.println(Thread.currentThread().getName() + "	 修改成功否:" + result + "当前最终实际版本号:" + atomicStampedReference.getStamp());
			System.out.println(Thread.currentThread().getName() + "	当前实际最新值" + atomicStampedReference.getReference());
		},"T4").start();
	}
}
四、集合类不安全问题
故障现象
- 目前用了三个线程,还没有报错。
public class ContainerNotSafeDemo {
	public static void main(String[] args) {
		List<Integer> list = new ArrayList<Integer>();
		for (int i = 0; i < 3; i++) {
			new Thread(()->{
				list.add(new Random().nextInt(100));
				System.out.println(list);
			},"线程" + i).start();
		}
	}
}
- 当用了30个线程的时候,就会报错了(ConcurrentModificationException)
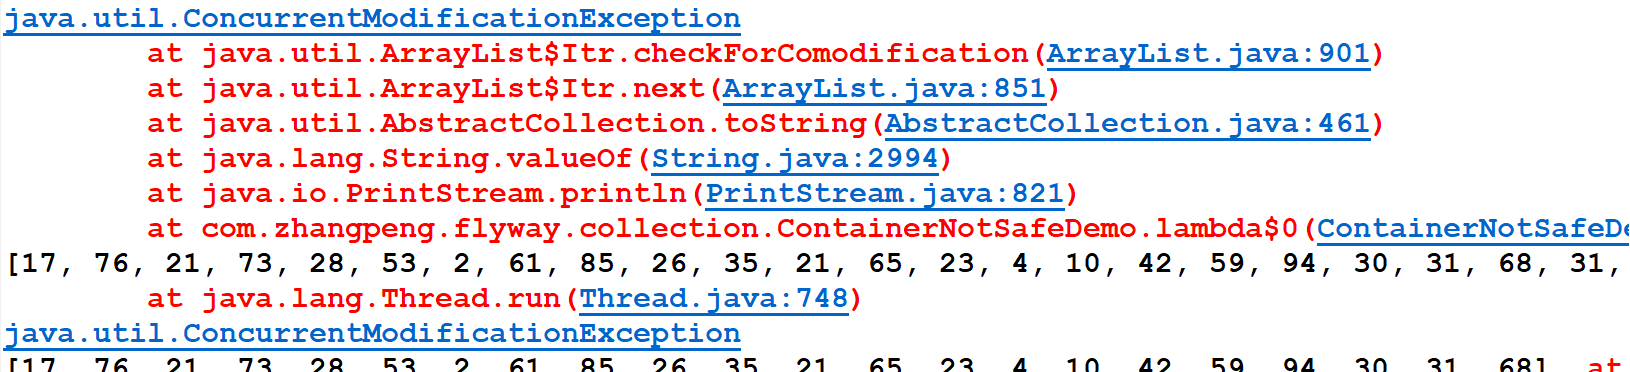
导致原因
并发争抢导致修改失败,参考我们的花名册签名情况;
一个人正在写入,另外一个同学过来争抢,导致数据不一致异常,并发修改异常。
解决方案
针对List集合
- new Vector
()可以解决; - Collections.synchronizedList(new ArrayList
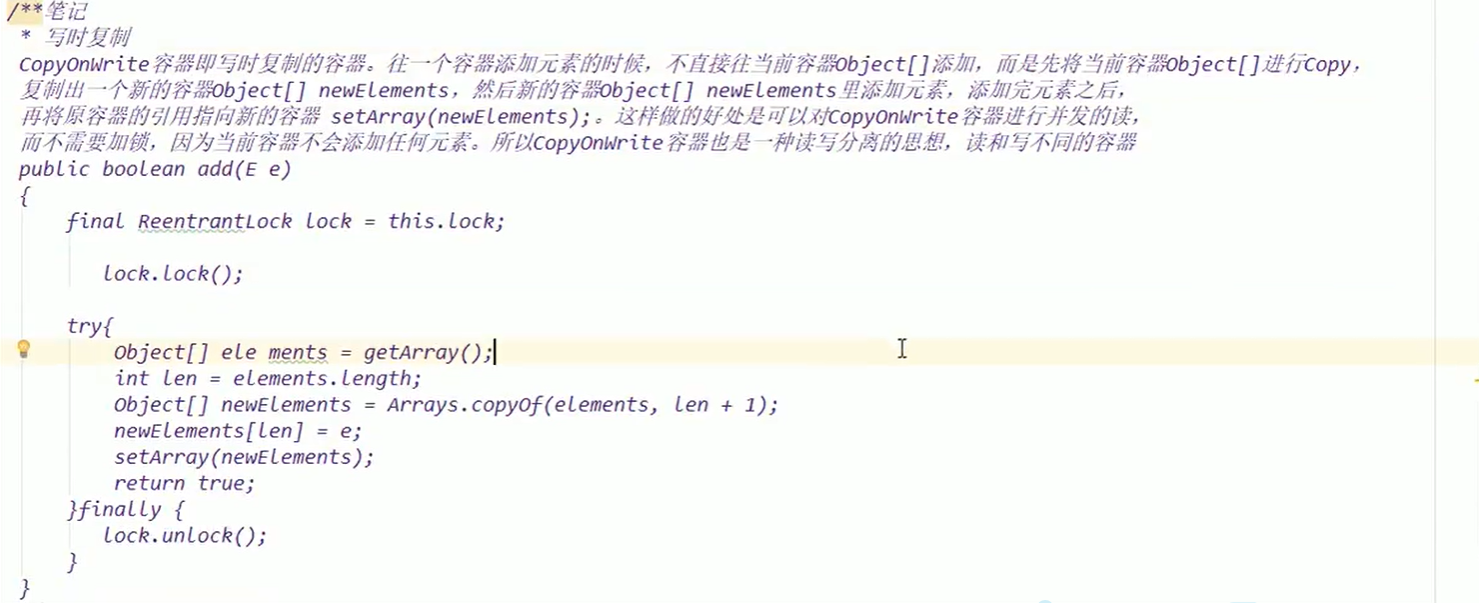
())可以解决; - new CopyOnWriteArrayList
()可以解决;
针对Set集合
- Collections.synchronizedSet(new HashSet
())可以解决; - new CopyOnWriteArraySet
()可以解决,底层依然是CopyOnWriteArrayList;
针对Map集合
- Collections.synchronizedMap(new HashMap<String,String>())可以解决;
- new ConcurrentHashMap<String, String>()可以解决;
五、锁
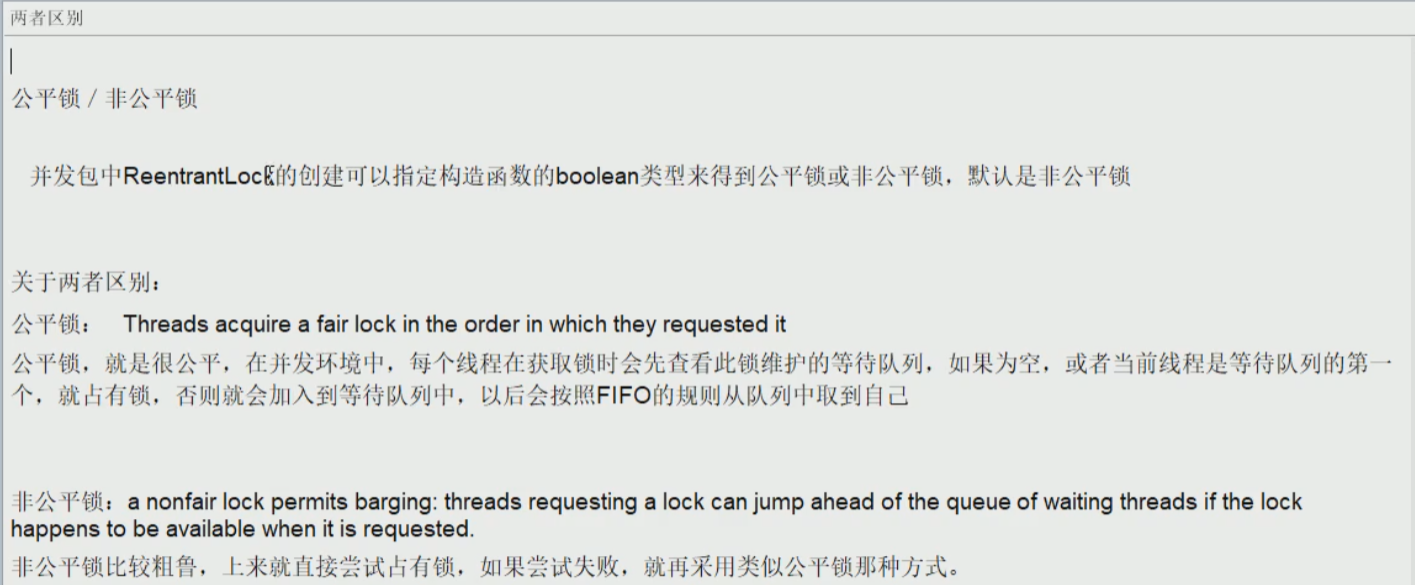
公平锁与非公平锁
Lock lock = new ReentrantLock();默认非公平锁

- 区别

可重入锁(递归锁)
- 介绍
可重入锁最大的作用是避免死锁。

ReentrantLock和synchronized就是一个典型的可重入锁 - 代码
class Phone implements Runnable{
	public synchronized void sendSMS() {
		System.out.println(Thread.currentThread().getName() + "	 invoked sendSMS()");
		sendEmail();
	}

	public synchronized void sendEmail() {
		System.out.println(Thread.currentThread().getName() + "	 invoked sendEmail()");
	}

	Lock lock = new ReentrantLock();

	@Override
	public void run() {
		get();
	}

	public void get() {
		//lock.lock();加几次锁,就需要减一次锁(lock.unlock())
		lock.lock();
		try {
			System.out.println(Thread.currentThread().getName() + "	 invoked get()");
			set();
		}finally {
			lock.unlock();
		}
	}
	public void set() {
		lock.lock();
		try {
			System.out.println(Thread.currentThread().getName() + "	 invoked set()");
		}finally {
			lock.unlock();
		}
	}
}

/**
 * case1-->synchronized是典型的可重入锁;
 * ********控制台输出************
 *  T1	 invoked sendSMS()
 *	T1	 invoked sendEmail()
 *	T2	 invoked sendSMS()
 *	T2	 invoked sendEmail()
 *  ********************
 *  case2-->ReentrantLock是典型的可重入锁;
 * ********控制台输出************
 *  T4	 invoked get()
 *  T4	 invoked set()
 *  T3	 invoked get()
 *  T3	 invoked set()
 *
 */
public class ReentrantLockDemo {

	public static void main(String[] args) {

		Phone phone = new Phone();

		new Thread(() -> {
			phone.sendSMS();
		},"T1").start();

		new Thread(() -> {
			phone.sendSMS();
		},"T2").start();

		try {
			TimeUnit.SECONDS.sleep(1);
		} catch (InterruptedException e) {
			// TODO Auto-generated catch block
			e.printStackTrace();
		}
		System.out.println();
		System.out.println();
		System.out.println();

		Thread t3 = new Thread(phone,"T3");
		Thread t4 = new Thread(phone,"T4");
		t3.start();
		t4.start();
	}
}
自旋锁
- 介绍
- 代码(自己实现自旋锁)
/**
 * TODO 实现一个自旋锁
 * 自旋锁好处:循环比较获取直到成功为止,没有类似wait的阻塞;
 *
 * 通过CAS操作完成自旋锁,A线程先进来调用myLock方法自己持有锁5秒钟,B随后进来发现
 * 当前有线程持有锁,不是null,所以只能通过自旋等待,直到A释放锁后B随后抢到。
 *
 * @author kakaluote
 * @date 2021年6月29日 上午9:29:43
 */
public class SpinLockDemo {

	AtomicReference<Thread> atomicReference = new AtomicReference<Thread>();

	public void myLock(){
		Thread thread = Thread.currentThread();
		System.out.println(thread.getName() + "	 come in");
		//如果设置值成功,那么退出while
		while(!atomicReference.compareAndSet(null, thread)){

		}
	}
	public void myUnLock(){
		Thread thread = Thread.currentThread();
		atomicReference.compareAndSet(thread, null);
		System.out.println(thread.getName() + "	 invoked myUnLock()");
	}

	public static void main(String[] args) {
		SpinLockDemo spinLockDemo = new SpinLockDemo();

		new Thread(() -> {
			spinLockDemo.myLock();
			try {
				TimeUnit.SECONDS.sleep(5);
			} catch (Exception e) {
				// TODO Auto-generated catch block
				e.printStackTrace();
			}
			spinLockDemo.myUnLock();
		},"T1").start();

		try {
			TimeUnit.SECONDS.sleep(1);
		} catch (Exception e) {
			// TODO Auto-generated catch block
			e.printStackTrace();
		}

		new Thread(() -> {
			spinLockDemo.myLock();
			try {
				TimeUnit.SECONDS.sleep(1);
			} catch (Exception e) {
				// TODO Auto-generated catch block
				e.printStackTrace();
			}
			spinLockDemo.myUnLock();
		},"T2").start();
	}
}

输出解释:
T1先执行,1s后T2执行,但是T1已经执行完compareAndSet,已经成功设置值为thread,t2只能阻塞,然后T1执行5s之后,t1执行unlock,设置值为null,退出,然后t2就执行compareAndSet,1s之后,t2执行完。
独占锁(写锁)/共享锁(读锁)/互斥锁
- 介绍

- 代码
/**
 * TODO 读读可以共存,读写,写读不能共存
 *
 * @author kakaluote 写操作:原子加独占,整个过程必须是一个完整的统一体,中间不许被分割,被打断。
 * @date 2021年6月29日 下午2:13:38
 */
public class ReadWriteLockDemo {

	public static void main(String[] args) {
		MyCache myCache = new MyCache();

		for (int i = 1; i <= 5; i++) {
			final int tem = i;
			new Thread(() -> {
				myCache.put(tem + "", tem + "");
			},"线程" + i).start();
		}

		for (int i = 1; i <= 5; i++) {
			final int tem = i;
			new Thread(() -> {
				myCache.get(tem + "");
			},"线程" + i).start();
		}
	}
}

class MyCache{
	private volatile Map<String,Object> map = new HashMap<String,Object>();
	private ReentrantReadWriteLock rwLock = new ReentrantReadWriteLock();

	//写操作独占,不可中断
	public void put(String key,Object value){

		rwLock.writeLock().lock();
		try{
			System.out.println(Thread.currentThread().getName() + "	 正在写入:" + key);
			try {
				//模拟网络拥堵
				TimeUnit.MILLISECONDS.sleep(300);
			} catch (InterruptedException e) {
				// TODO Auto-generated catch block
				e.printStackTrace();
			}
			map.put(key, value);
			System.out.println(Thread.currentThread().getName() + "	 写入完成:");
		}catch(Exception e){

		}finally{
			rwLock.writeLock().unlock();
		}
	}

	public void get(String key){

		rwLock.readLock().lock();
		try{
			System.out.println(Thread.currentThread().getName() + "	 正在读取:");
			try {
				TimeUnit.MILLISECONDS.sleep(300);
			} catch (InterruptedException e) {
				// TODO Auto-generated catch block
				e.printStackTrace();
			}
			Object result = map.get(key);
			System.out.println(Thread.currentThread().getName() + "	 读取完成:" + result);
		}catch(Exception e){

		}finally{
			rwLock.readLock().unlock();
		}
	}
}
输出结果:
线程3	 正在写入:3
线程3	 写入完成:
线程2	 正在写入:2
线程2	 写入完成:
线程1	 正在写入:1
线程1	 写入完成:
线程4	 正在写入:4
线程4	 写入完成:
线程5	 正在写入:5
线程5	 写入完成:
线程2	 正在读取:
线程1	 正在读取:
线程3	 正在读取:
线程5	 正在读取:
线程4	 正在读取:
线程3	 读取完成:3
线程4	 读取完成:4
线程2	 读取完成:2
线程1	 读取完成:1
线程5	 读取完成:5