beego 官网的教程已经整理的非常详细了,但作为一个刚接触的学习者,还是有必要做一下整理,这样在后面使用的时候遇到了不太熟悉的地方,还能反过头来看下自己整理的内容,快速的把知识再捞回来,下面是对官网的一个精简整理,同时结合一些例子,更好的理解和使用 beego 这个框架去做一些 web 开发
beego 官网地址:https://beego.me
beego 与 bee 的安装
//beego 框架
go get github.com/astaxie/beego
//bee工具
go get github.com/beego/bee
bee 工具是一个为了协助快速开发 beego 项目而创建的项目工具,通过 bee 可以很容易的进行 beego 项目的创建,热编译,开发,测试和部署。
当我们安装好 bee 工具后,bee 命令默认是放在 GOPATH/bin 目录下
bee 常用命令
1)bee new <项目名>
创建一个项目,这样的项目一般是 web 项目
bee new MyWeb
需要注意的是,这个命令会在 $GOPATH/src 目录下生成框架代码,目录结构是:
├── conf
│   └── app.conf
├── controllers
│   └── default.go
├── main.go
├── models
├── routers
│   └── router.go
├── static
│   ├── css
│   ├── img
│   └── js
│       └── reload.min.js
├── tests
│   └── default_test.go
└── views
    └── index.tpl
2)bee api <api项目名>
bee api MyAPI
创建一个 api 项目,目录结构是:
├── conf
│   └── app.conf
├── controllers
│   ├── object.go
│   └── user.go
├── main.go
├── models
│   ├── object.go
│   └── user.go
├── routers
│   └── router.go
└── tests
    └── default_test.go
3)bee run
这个命令是监控 beego 的项目,通过 fsnotify 监控文件系统,但是注意该命令必须在 $GOPATH/src/appname 目录下执行,否则提示:Failed to build the application
这样当我们在开发过程中,beego 可以实时监测我们的代码文件发生变化,这样我们就不用重新编译运行,非常方便调试
通过 bee run 运行上面创建的 MyWeb 项目:
D:golang_workspaceprojectsrcMyWeb>bee run
______
| ___
| |_/ /  ___   ___
| ___  / _  / _
| |_/ /|  __/|  __/
\____/  \___| \___| v1.10.0
2019/07/15 22:43:59 INFO     ▶ 0001 Using 'MyWeb' as 'appname'
2019/07/15 22:43:59 INFO     ▶ 0002 Initializing watcher...
github.com/shiena/ansicolor
github.com/astaxie/beego/config
github.com/astaxie/beego/vendor/gopkg.in/yaml.v2
github.com/astaxie/beego/toolbox
github.com/astaxie/beego/utils
github.com/astaxie/beego/grace
github.com/astaxie/beego/vendor/golang.org/x/crypto/acme
github.com/astaxie/beego/logs
github.com/astaxie/beego/session
github.com/astaxie/beego/vendor/golang.org/x/crypto/acme/autocert
github.com/astaxie/beego/context
github.com/astaxie/beego/context/param
github.com/astaxie/beego
MyWeb/controllers
MyWeb/routers
MyWeb
2019/07/15 22:44:02 SUCCESS  ▶ 0003 Built Successfully!
2019/07/15 22:44:02 INFO     ▶ 0004 Restarting 'MyWeb.exe'...
2019/07/15 22:44:02 SUCCESS  ▶ 0005 './MyWeb.exe' is running...
2019/07/15 22:44:02.644 [I] [asm_amd64.s:1337]  http server Running on http://:8080
通过浏览器访问:http:127.0.0.1:8080,可以看到下图所示:
beego 架构
1)beego 架构图
这是 beego 的 8 个独立的模块:
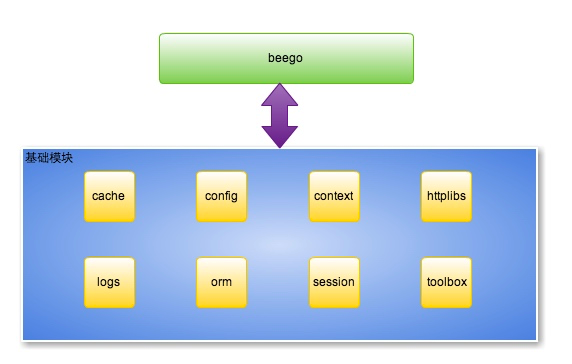
2)beego 执行逻辑
由图可知,beego 是一个典型的 MVC 架构,
从上面的 MyWeb 的目录接口也可以看出来,M(models)、V(views)和 C(controllers)的结构

beego 路由设置
1)beego main
package main

import (
	_ "MyWeb/routers"
	"github.com/astaxie/beego"
)

func main() {
	beego.Run()
}
引入了一个包 "MyWeb/routers",下面看一下这个包的内容
2)routers
这里仅仅做了一个优化,路由包里面我们看到了 beego.Router() 方法执行了路由注册,这个方法是映射 url 到 controller
第一个参数是 url(用户的请求地址),这里注册的是 "/",也就是我们访问的根路由,第二个参数是对应的 controller,也就是即将把请求分发到哪个控制器来执行相应的逻辑
package routers

import (
	"MyWeb/controllers"
	"github.com/astaxie/beego"
)

func init() {
    beego.Router("/", &controllers.MainController{})
}
对路由设置的一个小结:
- Router() 方法设置 url 和 controller
- 程序启动时,路由配置加载好,保存在 map 中
- 请求处理时,通过请求的 url 进行查找对应的 controller,把请求分发到 controller 执行
- 我们的要做的是在 controller 中编写业务代码即可
3)controller
对下面代码进行简单分析:
- 用户的 controller 嵌套 beego.Controller,继承 beego.Controller 所有属性和方法
- Controller 默认使用 restful 的风格,Get 请求对应 Get() 方法
- 通过对应的业务处理之后,把数据赋值给 Controller.Data 这个 map 即可
c.TplName = "index.tpl" 会默认到 views 目录下查找模板文件
package controllers

import (
	"github.com/astaxie/beego"
)

type MainController struct {
	beego.Controller  //这里可以看做是继承
}

func (c *MainController) Get() {
	c.Data["Website"] = "beego.me"
	c.Data["Email"] = "astaxie@gmail.com"
	c.TplName = "index.tpl"
}
除了上面的 c.Data 这种方法之外,还有其它方法返回响应数据,如常用的 c.ServerJson() 方法,这样就会去 c.Data 中寻找 key 为 json 的值
用户设置了模板之后系统会自动调用 Render() 函数(这个函数是在 beego.Controller 中实现的),所以无需用户自己来调用渲染
当然也可以不使用模板,直接用 c.Ctx.WriteString() 方法输出字符串,如:
func (c *MainController) Get() {
        c.Ctx.WriteString("hello")
}
4)正则路由
beego.Router("/api/?:id", &controllers.RController{}) 默认匹配 //匹配 /api/123 :id = 123 可以匹配 /api/ 这个URL
beego.Router("/api/:id", &controllers.RController{}) 默认匹配 //匹配 /api/123 :id = 123 不可以匹配 /api/ 这个URL
beego.Router("/api/:id([0-9]+)", &controllers.RController{}) 自定义正则匹配 //匹配 /api/123 :id = 123
beego.Router("/user/:username([w]+)", &controllers.RController{}) 正则字符串匹配 //匹配 /user/astaxie :username = astaxie
beego.Router("/download/*.*", &controllers.RController{}) *匹配方式 //匹配 /download/file/api.xml :path= file/api :ext=xml
beego.Router("/download/ceshi/*", &controllers.RController{}) *全匹配方式 //匹配 /download/ceshi/file/api.json :splat=file/api.json
beego.Router("/:id:int", &controllers.RController{}) int 类型设置方式,匹配 :id为int 类型,框架帮你实现了正则 ([0-9]+)
beego.Router("/:hi:string", &controllers.RController{}) string 类型设置方式,匹配 :hi 为 string 类型。框架帮你实现了正则 ([w]+)
beego.Router("/cms_:id([0-9]+).html", &controllers.CmsController{}) 带有前缀的自定义正则 //匹配 :id 为正则类型。匹配 cms_123.html 这样的 url :id = 123
可以在 Controller 中通过如下方式获取上面的变量:
this.Ctx.Input.Param(":id")
this.Ctx.Input.Param(":username")
this.Ctx.Input.Param(":splat")
this.Ctx.Input.Param(":path")
this.Ctx.Input.Param(":ext")
自定义方法及 RESTful 规则:
beego.Router("/", &IndexController{}, "*:Index")
使用第三个参数,第三个参数就是用来设置对应 method 到函数名,定义如下
- *表示任意的 method 都执行该函数
- 使用 httpmethod:funcname 格式来展示
- 多个不同的格式使用 ; 分割
- 多个 method 对应同一个 funcname,method 之间通过 , 来分割
beego.Router("/api",&RestController{},"get,post:ApiFunc")
可用的 HTTP Method:
- *: 包含以下所有的函数
- get: GET 请求
- post: POST 请求
- put: PUT 请求
- delete: DELETE 请求
- patch: PATCH 请求
- options: OPTIONS 请求
- head: HEAD 请求
如果同时存在 * 和对应的 HTTP Method,那么优先执行 HTTP Method 的方法
beego model
web 应用中用的最多的就是数据库操作,而 model 层一般用来做这些操作,bee new 例子不存在 model 的演示,但是 bee api 应用中存在 model 的应用,说的简单一点,如果你的应用足够简单,那么 Controller 可以处理一切的逻辑,如果你的逻辑里面存在着可以复用的东西,那么就抽取出来变成一个模块,因此 model 是逐步抽象的过程
beego views
beego 模板默认支持 .tpl 和 .html 两种后缀
beego.AddTemplateExt() 方法增加新的模板后缀
beego 模板用的就是 Go 官网自带的模板
beego static
beego 默认注册了 static 目录为静态处理的目录
注册样式:url 前缀和映射的目录(在 /main.go 文件中 beego.Run() 之前加入)
StaticDir["/static"] = "static"
beego 默认使用 static 目录作为静态文件目录
beego.SetStaticPath() 方法增加新的静态文件目录
beego conf(配置文件)
默认的配置文件内容:
appname = MyWeb
httpport = 8080
runmode = dev
增加配置文件内容:
appname = MyWeb
httpport = 8080
runmode = dev

mysqlhost = 127.0.0.1
mysqlport = 3308
username = root
passwd = 123
获取配置文件中变量的值:
beego.AppConfig.String("mysqlhost")
beego.AppConfig.String("mysqlport")
可以通过 [命名] 的方式将配置文件进行分组,然后在获取变量时,可以通过下面的方式获取
设置变量的值:
appname = MyWeb
httpport = 8080
runmode = dev

[dbconfig]
mysqlhost = 127.0.0.1
mysqlport = 3308
username = root
passwd = 123
获取变量的值:
beego.AppConfig.String("dbconfig::mysqlhost")
beego.AppConfig.String("dbconfig::mysqlport")
Appconfig 的方法如下:
Set(key, val string) error
String(key string) string
Strings(key string) []string
Int(key string) (int, error)
Int64(key string) (int64, error)
Bool(key string) (bool, error)
Float(key string) (float64, error)
DefaultString(key string, defaultVal string) string
DefaultStrings(key string, defaultVal []string)
DefaultInt(key string, defaultVal int) int
DefaultInt64(key string, defaultVal int64) int64
DefaultBool(key string, defaultVal bool) bool
DefaultFloat(key string, defaultVal float64) float64
DIY(key string) (interface{}, error)
GetSection(section string) (map[string]string, error)
SaveConfigFile(filename string) error
获取用户请求参数
Controller 中的方法获取(不论是 post 还是 get 的请求方式,都可以通过上面的方式获取)
- GetString(key string) string
- GetStrings(key string) []string
- GetInt(key string) (int64, error)
- GetBool(key string) (bool, error)
- GetFloat(key string) (float64, error)
如果在平常开发中肯定涉及到 json 格式的数据,那么获取 json 格式的数据可以通过下面的方法:
Ctx.Input.RequestBody //获取原始数据
配置文件里设置 copyrequestbody = true,这样就可以通过 c.Ctx.Input.RequestBody 获取了
参考链接:https://www.cnblogs.com/zhaof/p/8620635.html
ending ~