转:https://www.cnblogs.com/zwwhnly/p/11777653.html
1. 为什么要使用多线程?
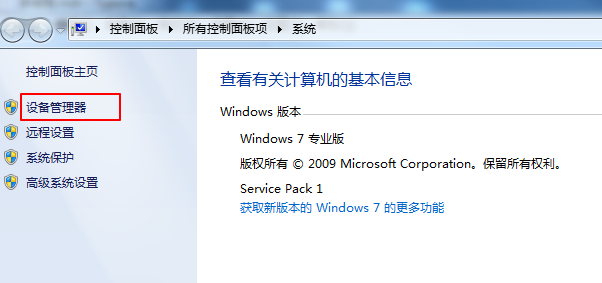
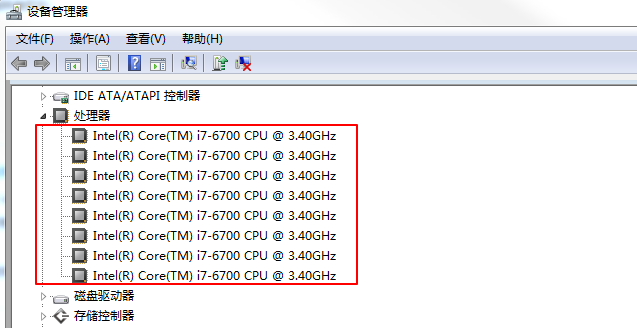
随着科技的进步,现在的电脑及服务器的处理器数量都比较多,以后可能会越来越多,比如我的工作电脑的处理器有8个,怎么查看呢?
计算机右键--属性--设备管理器,打开属性窗口,然后点击“设备管理器”,在“处理器”下可看到所有的处理器:


也可以通过以下Java代码获取到处理器的个数:
System.out.println("CPU个数:" + Runtime.getRuntime().availableProcessors());运行结果如下所示:
CPU个数:8
既然处理器的个数增加了,如果还使用传统的串行编程,就有点浪费资源了,因此,为了提高资源利用率,让各个处理器都忙碌起来,就需要引入并发编程,要引入并发编程,就引入了多线程。
可以说,使用多线程的最直接目的就是为了提高资源利用率,资源的利用率提高了,系统的吞吐率也就相应提高了。
2. 为什么要使用线程池?
在一定的范围内,增加线程可以提高应用程序的吞吐率,但线程并不是越多越好(因为线程的创建与销毁都需要很大的开销),如果超过了某个范围,不仅会降低应用程序的执行速度,严重的话,应用程序甚至会崩溃,以至于不得不重启应用程序。
为了避免这种问题,就需要对应用程序可以创建的线程数量进行限制,确保在线程数量达到限制时,程序也不会耗尽资源,线程池就是为了解决这种问题而出现的。
线程池:管理一组工作线程的资源池。
线程池与工作队列密切相关,工作队列中保存了所有等待执行的任务。
工作者线程的任务就是从工作队列中获取一个任务,执行任务,然后返回线程池并等待下一个任务。
使用线程池可以带来以下好处:
- 通过重用现有的线程而不是创建新线程,可以在处理多个任务时减少在线程创建与销毁过程中产生的巨大开销。
- 当任务到达时,工作线程通常已经存在,因此不会由于等待创建线程而延迟任务的执行,从而提高了响应性。
- 可以通过调整线程池的大小,创建足够多的线程使处理器保持忙碌状态,同时还可以防止过多线程相互竞争资源而使应用程序耗尽内存或崩溃。
3. 创建线程池
3.1 使用Executors静态方法创建(不推荐)
Executors类提供了以下4个静态方法来快速的创建线程池:
- newFixedThreadPool
- newCachedThreadPool
- newSingleThreadExecutor
- newScheduledThreadPool
首先看下newFixedThreadPool()方法的使用方式:
ExecutorService threadPool = Executors.newFixedThreadPool(10);
它的源码为:
public static ExecutorService newFixedThreadPool(int nThreads) {
    return new ThreadPoolExecutor(nThreads, nThreads,
                                  0L, TimeUnit.MILLISECONDS,
                                  new LinkedBlockingQueue<Runnable>());
}
说明:newFixedThreadPool将创建一个固定长度的线程池,每当提交一个任务时就创建一个线程,直到达到线程池的最大数量,这时线程池的规模将不再变化(如果某个线程由于发生了未预期的Exception而结束,那么线程池会补充一个新的线程)。
然后看下newCachedThreadPool()方法的使用方式:
ExecutorService threadPool = Executors.newCachedThreadPool();
它的源码为:
public static ExecutorService newCachedThreadPool() {
    return new ThreadPoolExecutor(0, Integer.MAX_VALUE,
                                  60L, TimeUnit.SECONDS,
                                  new SynchronousQueue<Runnable>());
}
说明:newCachedThreadPool将创建一个可缓存的线程池,如果线程池的规模超过了处理需求时,那么将回收空闲的线程,而当需求增加时,则添加新的线程,线程池的最大规模为Integer.MAX_VALUE。
然后看下newSingleThreadExecutor()方法的使用方式:
ExecutorService threadPool = Executors.newSingleThreadExecutor();
它的源码为:
public static ExecutorService newSingleThreadExecutor() {
    return new FinalizableDelegatedExecutorService
        (new ThreadPoolExecutor(1, 1,
                                0L, TimeUnit.MILLISECONDS,
                                new LinkedBlockingQueue<Runnable>()));
}
说明:newSingleThreadExecutor是一个单线程的Executor,它创建单个工作者线程来执行任务,如果这个线程异常结束,就创建一个新的线程来替代。
newSingleThreadExecutor可以确保依照任务在队列中的顺序来串行执行。
最后看下newScheduledThreadPool()方法的使用方式:
ExecutorService threadPool = Executors.newScheduledThreadPool(10);
它的源码为:
public static ScheduledExecutorService newScheduledThreadPool(int corePoolSize) {
    return new ScheduledThreadPoolExecutor(corePoolSize);
}

public ScheduledThreadPoolExecutor(int corePoolSize) {
    super(corePoolSize, Integer.MAX_VALUE, 0, NANOSECONDS,
          new DelayedWorkQueue());
}
super指向如下代码:
public ThreadPoolExecutor(int corePoolSize,
                          int maximumPoolSize,
                          long keepAliveTime,
                          TimeUnit unit,
                          BlockingQueue<Runnable> workQueue) {
    this(corePoolSize, maximumPoolSize, keepAliveTime, unit, workQueue,
         Executors.defaultThreadFactory(), defaultHandler);
}
说明:newScheduledThreadPool将创建一个固定长度的线程池,而且以延迟或者定时的方式来执行任务,类似于Timer。
可以发现,以上4种方式最终都指向了ThreadPoolExecutor的以下构造函数,只是很多参数没让你指定,传递了默认值而已:
public ThreadPoolExecutor(int corePoolSize,
                          int maximumPoolSize,
                          long keepAliveTime,
                          TimeUnit unit,
                          BlockingQueue<Runnable> workQueue,
                          ThreadFactory threadFactory,
                          RejectedExecutionHandler handler) {
    // 省略具体的代码
}
虽然使用这4个方法可以快速的创建线程池,但还是不推荐使用,第一,很多参数都设置了默认值,不便于你理解各个参数的具体含义,第二,参数的默认值可能会造成一定的问题,最好是由使用者根据自己的需求自行指定。
那么这7个参数分别代表什么含义呢?请接着往下看。
3.2 使用ThreadPoolExecutor构造函数创建(推荐)
ThreadPoolExecutor共有以下4个构造函数,推荐使用这种方式来创建线程池:
public ThreadPoolExecutor(int corePoolSize,
                          int maximumPoolSize,
                          long keepAliveTime,
                          TimeUnit unit,
                          BlockingQueue<Runnable> workQueue) {
    this(corePoolSize, maximumPoolSize, keepAliveTime, unit, workQueue,
         Executors.defaultThreadFactory(), defaultHandler);
}

public ThreadPoolExecutor(int corePoolSize,
                          int maximumPoolSize,
                          long keepAliveTime,
                          TimeUnit unit,
                          BlockingQueue<Runnable> workQueue,
                          ThreadFactory threadFactory) {
    this(corePoolSize, maximumPoolSize, keepAliveTime, unit, workQueue,
         threadFactory, defaultHandler);
}

public ThreadPoolExecutor(int corePoolSize,
                          int maximumPoolSize,
                          long keepAliveTime,
                          TimeUnit unit,
                          BlockingQueue<Runnable> workQueue,
                          RejectedExecutionHandler handler) {
    this(corePoolSize, maximumPoolSize, keepAliveTime, unit, workQueue,
         Executors.defaultThreadFactory(), handler);
}
以上3个也都指向参数最全的第4个构造函数:

public ThreadPoolExecutor(int corePoolSize,
                          int maximumPoolSize,
                          long keepAliveTime,
                          TimeUnit unit,
                          BlockingQueue<Runnable> workQueue,
                          ThreadFactory threadFactory,
                          RejectedExecutionHandler handler) {
    // 省略具体的代码
}
以下为各个参数的讲解:
-
corePoolSize:核心线程数。
-
maximumPoolSize:最大线程数。
最大线程数=核心线程数+非核心线程数。
-
keepAliveTime:非核心线程闲置超时时间。
一个非核心线程,如果不干活(闲置状态)的时长超过这个参数所设定的时长,就会被销毁掉,如果设置了allowCoreThreadTimeOut = true,则会作用于核心线程。
-
unit:参数keepAliveTime的时间单位,如秒、分、小时。
-
workQueue:工作队列,即要执行的任务队列,里面存储等待执行的任务。
这里的阻塞队列可选择的有:LinkedBlockingQueue、ArrayBlockingQueue、SynchronousQueue、DelayedWorkQueue。
newFixedThreadPool()方法默认使用的LinkedBlockingQueue,
newCachedThreadPool()方法默认使用的SynchronousQueue,
newSingleThreadExecutor()方法默认使用的LinkedBlockingQueue,
newScheduledThreadPool()方法默认使用的DelayedWorkQueue。
-
threadFactory:线程工厂,用来用来创建线程。
-
handler:饱和策略/拒绝处理任务时的策略。
当workQueue已满,并且线程池的线程数已达到maximumPoolSize,此时新提交的任务会交由RejectedExecutionHandler handler处理,主要有以下4种策略:
AbortPolicy:中止策略,抛弃任务并抛出未检查的RejectedExecutionException,这也是默认的饱和策略。
DiscardPolicy:抛弃策略,直接抛弃任务,但不抛出异常。
DiscardOldestPolicy:抛弃最旧的策略,抛弃下一个将被执行的任务,然后尝试重新提交新的任务。
CallerRunsPolicy:调用者运行策略,将任务回退到调用者,在调用者所在的线程执行该任务。
4. 线程池的运行原理
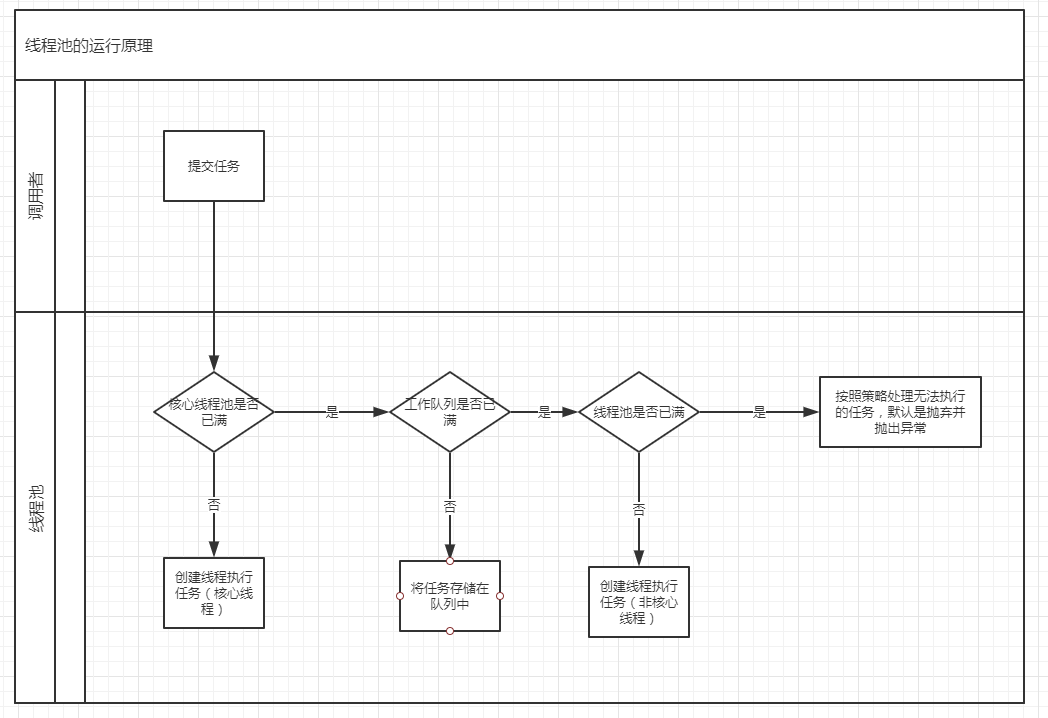
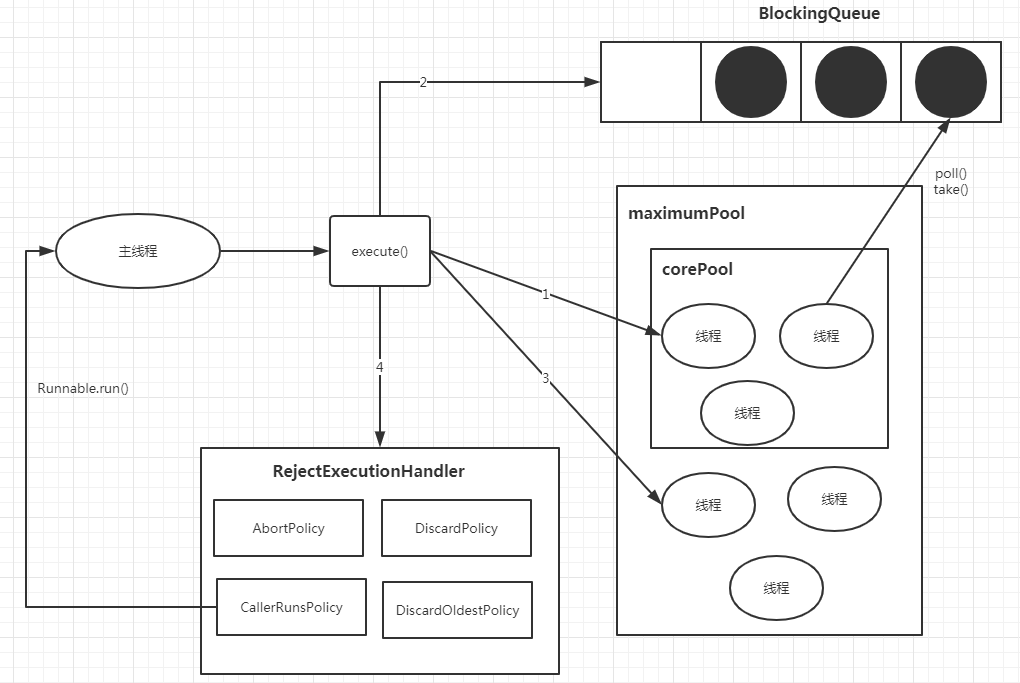
可以通过下面2张图来理解线程池的运行原理:


1)如果线程池中的线程小于corePoolSize,则创建新线程来处理任务,这时创建的线程为核心线程。
2)如果线程中的线程等于或者大于corePoolSize,则将任务放到工作队列中,即上图中的BlockingQueue。
3)如果工作队列已满,无法将任务加入到BlockingQueue,则创建新的线程来处理任务,这时创建的线程为非核心线程,非核心线程在空闲一段时间后会被回收销毁掉(keepAliveTime和unit就是用来定义这个空闲的时间是多少)。
4)如果创建新线程导致线程池中的线程数超过了maximumPoolSize,任务将被拒绝,并调用RejectedExecutionHandler.rejectedExecution()方法。
5. ThreadPoolExecutor示例
新建如下示例代码,创建1个corePoolSize为2,maximumPoolSize为3的线程池:
import java.util.concurrent.*;

public class ThreadPoolExecutorTest {
    public static void main(String[] args) {
        ThreadPoolExecutor threadPoolExecutor = new ThreadPoolExecutor(2, 3, 60L, TimeUnit.SECONDS,
                new LinkedBlockingQueue<>(1));

        threadPoolExecutor.execute(() -> {
            try {
                Thread.sleep(3 * 1000);
                System.out.println("任务1执行线程:" + Thread.currentThread().getName());
            } catch (InterruptedException e) {
                e.printStackTrace();
            }
        });

        threadPoolExecutor.execute(() -> {
            System.out.println("任务2执行线程:" + Thread.currentThread().getName());
        });
    }
}
运行结果为:
任务2执行线程:pool-1-thread-2
任务1执行线程:pool-1-thread-1
可以看出,因为线程池中的线程数小于corePoolSize,线程池创建了2个核心线程来分别执行任务1和任务2。
修改代码为如下所示,开启3个任务:
import java.util.concurrent.*;

public class ThreadPoolExecutorTest {
    public static void main(String[] args) {
        ThreadPoolExecutor threadPoolExecutor = new ThreadPoolExecutor(2, 3, 60L, TimeUnit.SECONDS,
                new LinkedBlockingQueue<>(1));

        threadPoolExecutor.execute(() -> {
            try {
                Thread.sleep(3 * 1000);
                System.out.println("任务1执行线程:" + Thread.currentThread().getName());
            } catch (InterruptedException e) {
                e.printStackTrace();
            }
        });

        threadPoolExecutor.execute(() -> {
            try {
                Thread.sleep(5 * 1000);
                System.out.println("任务2执行线程:" + Thread.currentThread().getName());
            } catch (InterruptedException e) {
                e.printStackTrace();
            }
        });

        threadPoolExecutor.execute(() -> System.out.println("任务3执行线程:" + Thread.currentThread().getName()));
    }
}
运行结果为:
任务1执行线程:pool-1-thread-1
任务3执行线程:pool-1-thread-1
任务2执行线程:pool-1-thread-2
可以看出,执行任务3时并没有新建线程,而是先放入了工作队列,最后由线程1执行完成。
在上面的代码中新增个任务4:
threadPoolExecutor.execute(() -> System.out.println("任务4执行线程:" + Thread.currentThread().getName()));
此时运行结果为:
任务4执行线程:pool-1-thread-3
任务3执行线程:pool-1-thread-3
任务1执行线程:pool-1-thread-1
任务2执行线程:pool-1-thread-2
可以看出,任务3是先放入了工作队列,任务4放不到工作队列(空间已满),所以创建了第3个线程来执行,执行完毕后从队列里获取到任务3执行,任务1和任务2分别由线程1和线程2执行。
修改下任务4的代码,并添加任务5:
threadPoolExecutor.execute(() -> {
    try {
        Thread.sleep(2 * 1000);
        System.out.println("任务4执行线程:" + Thread.currentThread().getName());
    } catch (InterruptedException e) {
        e.printStackTrace();
    }
});

threadPoolExecutor.execute(() -> System.out.println("任务5执行线程:" + Thread.currentThread().getName()));
此时运行结果为:
Exception in thread "main" java.util.concurrent.RejectedExecutionException: Task ThreadPoolExecutorTest$$Lambda$5/935044096@179d3b25 rejected from java.util.concurrent.ThreadPoolExecutor@254989ff[Running, pool size = 3, active threads = 3, queued tasks = 1, completed tasks = 0]
at java.util.concurrent.ThreadPoolExecutor$AbortPolicy.rejectedExecution(ThreadPoolExecutor.java:2063)
at java.util.concurrent.ThreadPoolExecutor.reject(ThreadPoolExecutor.java:830)
at java.util.concurrent.ThreadPoolExecutor.execute(ThreadPoolExecutor.java:1379)
at ThreadPoolExecutorTest.main(ThreadPoolExecutorTest.java:37)
任务4执行线程:pool-1-thread-3任务3执行线程:pool-1-thread-3
任务1执行线程:pool-1-thread-1
任务2执行线程:pool-1-thread-2
可以看出,当提交任务5时,由于工作队列已满, 且线程池中的线程数已经为3,所以该任务被抛弃并抛出了java.util.concurrent.RejectedExecutionException异常。
