1、Host SMbus controller not enabled
解决方法: 在 /etc/modprobe.d/blacklist.conf 文件里添加
blacklist i2c_piix4
2、intel_rapl: no valid rapl domains found in package 0
解决方法: 在 /etc/modprobe.d/blacklist.conf 文件里添加
blacklist intel_rapl
3、修改开机等待时间
在 /boot/grub2/grub.cfg 找到并修改下面的代码
terminal_output console
if [ x$feature_timeout_style = xy ] ; then
set timeout_style=menu
set timeout=5 (建议修改成1,不要修改成0,修改完成后,重启即可看到效果)
# Fallback normal timeout code in case the timeout_style feature is
# unavailable.
else
set timeout=5
fi
### END /etc/grub.d/00_header ###
4、选定默认启动内核,及删除无用内核
#使用cat /boot/grub2/grub.cfg |grep menuentry 查看系统可用内核
[root@bigapp-slave27 ~]# cat /boot/grub2/grub.cfg |grep menuentry
if [ x"${feature_menuentry_id}" = xy ]; then
menuentry_id_option="--id"
menuentry_id_option=""
export menuentry_id_option
menuentry 'CentOS Linux (3.10.0-514.16.1.el7.x86_64) 7 (Core)' --class centos --class gnu-linux --class gnu --class os --unrestricted $menuentry_id_option 'gnulinux-3.10.0-327.el7.x86_64-advanced-6f5840d0-55ac-4d3b-899b-61c0297c5347' {
menuentry 'CentOS Linux (3.10.0-327.el7.x86_64) 7 (Core)' --class centos --class gnu-linux --class gnu --class os --unrestricted $menuentry_id_option 'gnulinux-3.10.0-327.el7.x86_64-advanced-6f5840d0-55ac-4d3b-899b-61c0297c5347' {
menuentry 'CentOS Linux (0-rescue-d57307c454c0437d91c309347178cdf5) 7 (Core)' --class centos --class gnu-linux --class gnu --class os --unrestricted $menuentry_id_option 'gnulinux-0-rescue-d57307c454c0437d91c309347178cdf5-advanced-6f5840d0-55ac-4d3b-899b-61c0297c5347' {
#查看当前内核
[root@bigapp-slave27 ~]# uname -r
3.10.0-514.16.1.el7.x86_64
#修改开机时默认使用的内核
grub2-set-default 'CentOS Linux (3.10.0-327.el7.x86_64) 7 (Core)'
#查看内核修改结果
[root@bigapp-slave27 ~]# grub2-editenv list
saved_entry=CentOS Linux (3.10.0-327.el7.x86_64) 7 (Core)
#查看系统安装了哪些内核包
[root@bigapp-slave27 ~]# rpm -qa |grep kernel
kernel-3.10.0-327.el7.x86_64
kernel-headers-3.10.0-514.6.1.el7.x86_64
kernel-tools-libs-3.10.0-327.el7.x86_64
kernel-3.10.0-514.16.1.el7.x86_64
kernel-tools-3.10.0-327.el7.x86_64
#使用yum remove 或rpm -e 删除无用内核
yum remove kernel-3.10.0-327.el7.x86_64
5、中断ping命令
ctrl+c是可以的。不然也可以ctrl+z,然后kill %1
最好的方法还是 ping -c 3 192.168.1.1 ,-c 3表示ping 3次
6、关闭防火墙
CentOS 7.0默认使用的是firewall作为防火墙
systemctl stop firewalld.service #停止firewall
systemctl disable firewalld.service #禁止firewall开机启动
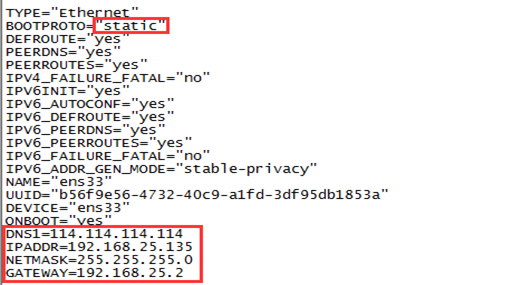
7、修改虚拟机配置文件,设置固定IP
cd /etc/sysconfig/network-scripts
vi ifcfg-ens33
注意:ONBOOT="yes"
修改:BOOTPROTO="static"
添加:
DNS1=114.114.114.114 #这个是国内的DNS,是固定的,当然还有个8.8.8.8,是国外谷歌的IPADDR=192.168.25.135 # 设置一个和原来动态分配的ip在同一子网的IP
NETMASK=255.255.255.0 #子网掩码
GATEWAY=192.168.25.2 #网关,vmvare的nat模式网关为x.x.x.2
重启网络服务
service network restart

