官方定义
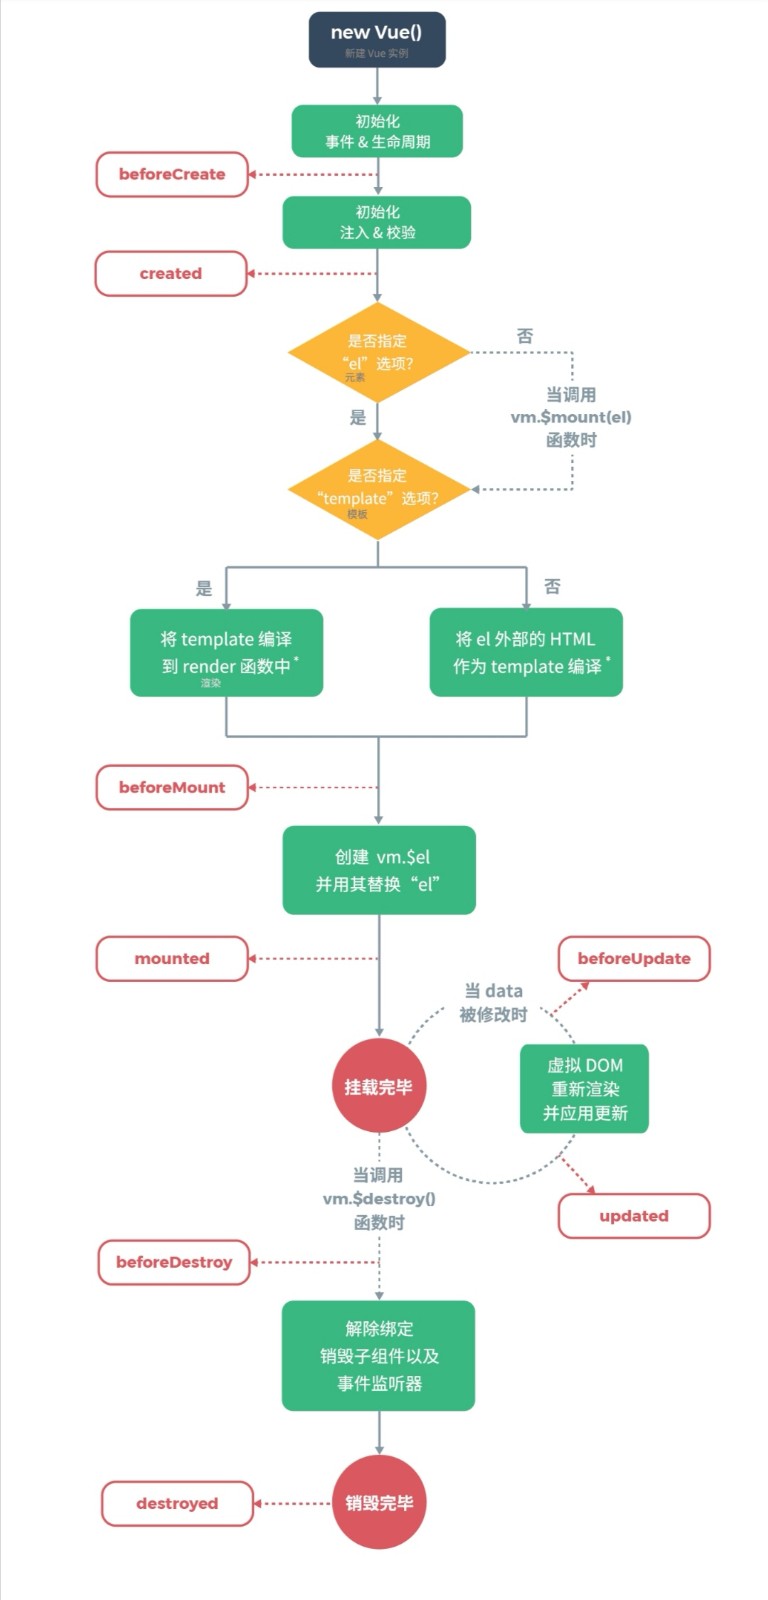
每个Vue实例在被创建时都要经过一系列的初始化过程——例如,需要设置数据监听、编译模板、将实例挂载到DOM并在数据变化时更新DOM等。同时在这个过程中也会运行一些叫做生命周期钩子的函数,这给了用户在不同阶段添加自己的代码的机会。
生命周期流程

Vue生命周期可以分为8个阶段,分别是
- beforeCreate(创建前)
- 在实例初始化之后,此时的数据观察和事件机制都未形成,不能获得DOM节点
- created(创建后)
- 实例已经创建完成之后被调用。在这一步,实例已经完成以下的配置:数据观测(data observer),属性和方法的运算,watch/event 事件回调。然而,挂载阶段还没开始。
- beforeMount(载入前)
- 在挂载开始之前被调用:这个过程是在模板已经在内存中编译完成,render 函数首次被调用,此时完成了虚拟DOM的构建,但未被渲染。
- mounted(载入后)
- 这个过程在模板挂载之后被调用,页面完成渲染,所以在这之后,我们可以操作和访问DOM元素。
- beforeUpdate(更新前)
- 当数据更新时调用,这一阶段DOM会和更改过的内容同步。
- updated(更新后)
- 由于数据更改导致的虚拟DOM重新渲染和打补丁,在这之后会调用该钩子。
- 当这个钩子被调用时,组件DOM已经更新,所以现在可以执行依赖于DOM的操作。然而在大多数情况下,应该避免在此期间更新状态,因为这可能会导致更新无限循环。
- beforeDestroy(销毁前)
- 实例销毁之前调用。在这一步,实例仍然完全可用。
- destroyed(销毁后)
- Vue实例销毁后调用。调用后,Vue实例指示的所有东西都会解绑,所有的事件监听器会被移除,所有的子实例也会被销毁。
示例代码:
<!DOCTYPE html>
<html lang="en">
<head>
  <meta charset="UTF-8">
  <meta name="viewport" content="width=device-width, initial-scale=1.0">
  <meta http-equiv="X-UA-Compatible" content="ie=edge">
  <title>Document</title>
</head>
<body>
  <div id = "app">
    {{ name }}
    <button @click="updateName">更新</button>
    <button @click="destroy">销毁</button>
  </div>
</body>
<script src="https://unpkg.com/vue/dist/vue.js"></script>
<script type = "text/javascript">
  var vm = new Vue({
    el: '#app',
    data: {
      name:'hello !'
    },
    methods : {
      updateName() {
        console.log('准备修改名字啦!')
        this.name = 'hello world!'
      },
      destroy(){
        vm.$destroy()
      }
    },
    beforeCreate() {
      // 此时页面数据未初始化
      console.log('beforeCreate:' + this.name) // beforeCreate: undefined
    },
    created() {
      // 页面数据已经初始化
      console.log('created:' + this.name) // beforeCreate: hello !
    },
    beforeMount() {
      console.log('beforeMount:' + this.name) // beforeCreate: hello !
    },
    mounted() {
      console.log('mounted:' + this.name) // beforeCreate: hello !
    },
    // 点击更新按钮后会先触发 beforeUpdate
    beforeUpdate() {
      console.log('beforeUpdate:' + this.name) // beforeCreate: hello world!
    },
    updated() {
      console.log('updated:' + this.name) // updated hello world !
    },
    // 点击销毁按钮后会先触发 beforeDestroy
    beforeDestroy(){
      console.log('beforeDestroy: before destroy') // beforeDestroy: before destroy
    },
    destroyed(){
      console.log('destroyed: success') // destroyed: success
      // 在这之后点击页面 更新 按钮将无任何效果
    }
  });
</script>
</html>