前言
上一篇文章,我们来给矩阵添加一些常用方法,这篇文章将讲解图像的虚拟边缘。
虚拟边缘
虚拟边缘就是按照一定映射关系,给图像添加边缘。
那么虚拟边缘有什么用呢?比如可以很容易做一个倒影的效果:

当然这只是附带效果了,虚拟边缘主要用在图像卷积运算(例如平滑操作)时候,由于卷积运算的特点,需要将图片扩大才能对边角进行卷积运算,这时候就需要对图片进行预处理,添加虚拟边缘。
说白了,就是在一些图片处理前进行预处理。
边缘类型
这里参考OpenCV相关文档的边缘描述:
/*
 Various border types, image boundaries are denoted with '|'

 * BORDER_REPLICATE:     aaaaaa|abcdefgh|hhhhhhh
 * BORDER_REFLECT:       fedcba|abcdefgh|hgfedcb
 * BORDER_REFLECT_101:   gfedcb|abcdefgh|gfedcba
 * BORDER_WRAP:          cdefgh|abcdefgh|abcdefg
 * BORDER_CONSTANT:      iiiiii|abcdefgh|iiiiiii  with some specified 'i'
 */
举个例子BODER_REFLECT就是对于某一行或某一列像素点:
abcdefgh
其左的虚拟边缘对应为fedcba,右边对应为hgfedcb,也就是反射映射。上图就是通过对图片底部进行添加BORDER_REFLECT类型的虚拟边缘得到的。
而BORDER_CONSTANT则是所有边缘都是固定值i。
实现
因为BORDER_CONSTANT比较特殊,所以和其他类型分开处理。
function copyMakeBorder(__src, __top, __left, __bottom, __right, __borderType, __value){
    if(__src.type != "CV_RGBA"){
        console.error("不支持类型!");
    }
    if(__borderType === CV_BORDER_CONSTANT){
        return copyMakeConstBorder_8U(__src, __top, __left, __bottom, __right, __value);
    }else{
        return copyMakeBorder_8U(__src, __top, __left, __bottom, __right, __borderType);
    }
};
这个函数接受一个输入矩阵src,每个方向要添加的像素大小top,left,bottom,right,边缘的类型borderType,还有一个数组value,即如果是常数边缘时候添加的常数值。
然后我们引入一个边缘的映射关系函数borderInterpolate。
function borderInterpolate(__p, __len, __borderType){
    if(__p < 0 || __p >= __len){
        switch(__borderType){
            case CV_BORDER_REPLICATE:
                __p = __p < 0 ? 0 : __len - 1;
                break;
            case CV_BORDER_REFLECT:
            case CV_BORDER_REFLECT_101:
                var delta = __borderType == CV_BORDER_REFLECT_101;
                if(__len == 1)
                    return 0;
                do{
                    if(__p < 0)
                        __p = -__p - 1 + delta;
                    else
                        __p = __len - 1 - (__p - __len) - delta;
                }while(__p < 0 || __p >= __len)
                break;
            case CV_BORDER_WRAP:
                if(__p < 0)
                    __p -= (((__p - __len + 1) / __len) | 0) * __len;
                if(__p >= __len)
                    __p %= __len;
                break;
            case CV_BORDER_CONSTANT:
                __p = -1;
            default:
                error(arguments.callee, UNSPPORT_BORDER_TYPE/* {line} */);
        }
    }
    return __p;
};
这个函数的意义是对于原长度为len的某一行或者某一列的虚拟像素点p(p一般是负数或者大于或等于该行原长度的数,负数则表示该行左边的像素点,大于或等于原长度则表示是右边的像素点),映射成这一行的哪一个像素点。我们拿CV_BORDER_REPLICATE分析一下,其表达式是:
__p = __p < 0 ? 0 : __len - 1;
也就是说p为负数时(也就是左边)的时候映射为0,否则映射成len - 1。
然后我们来实现copyMakeBorder_8U函数:
function copyMakeBorder_8U(__src, __top, __left, __bottom, __right, __borderType){
    var i, j;
    var width = __src.col,
        height = __src.row;
    var top = __top,
        left = __left || __top,
        right = __right || left,
        bottom = __bottom || top,
        dstWidth = width + left + right,
        dstHeight = height + top + bottom,
        borderType = borderType || CV_BORDER_REFLECT;
    var buffer = new ArrayBuffer(dstHeight * dstWidth * 4),
        tab = new Uint32Array(left + right);

    for(i = 0; i < left; i++){
        tab[i] = borderInterpolate(i - left, width, __borderType);
    }
    for(i = 0; i < right; i++){
        tab[i + left] = borderInterpolate(width + i, width, __borderType);
    }

    var tempArray, data;

    for(i = 0; i < height; i++){
        tempArray = new Uint32Array(buffer, (i + top) * dstWidth * 4, dstWidth);
        data = new Uint32Array(__src.buffer, i * width * 4, width);
        for(j = 0; j < left; j++)
            tempArray[j] = data[tab[j]];
        for(j = 0; j < right; j++)
            tempArray[j + width + left] = data[tab[j + left]];
        tempArray.set(data, left);
    }

    var allArray = new Uint32Array(buffer);
    for(i = 0; i < top; i++){
        j = borderInterpolate(i - top, height, __borderType);
        tempArray = new Uint32Array(buffer, i * dstWidth * 4, dstWidth);
        tempArray.set(allArray.subarray((j + top) * dstWidth, (j + top + 1) * dstWidth));
    }
    for(i = 0; i < bottom; i++){
        j = borderInterpolate(i + height, height, __borderType);
        tempArray = new Uint32Array(buffer, (i + top + height) * dstWidth * 4, dstWidth);
        tempArray.set(allArray.subarray((j + top) * dstWidth, (j + top + 1) * dstWidth));
    }

    return new Mat(dstHeight, dstWidth, new Uint8ClampedArray(buffer));
}
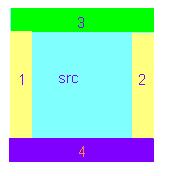
这里需要解释下,边缘的复制顺序是:先对每行的左右进行扩展,然后在此基础上进行上下扩展,如图所示。
然后我们根据ArrayBuffer的性质,将数据转成无符号32位整数来操作,这样每个操作单位就对应了每个像素点了。什么意思?
比如对于某个像素点:RGBA,由于某个通道是用无符号8为整数来存储的,所以实际上一个像素点则对应了32位的存储大小,由于ArrayBuffer的性质,可以将数据转成任意类型来处理,这样我们就可以通过转成Uint32Array类型,将数据变成每个像素点的数据数组。
那么copyMakeConstBorder_8U就比较容易实现了:
function copyMakeConstBorder_8U(__src, __top, __left, __bottom, __right, __value){
    var i, j;
    var width = __src.col,
        height = __src.row;
    var top = __top,
        left = __left || __top,
        right = __right || left,
        bottom = __bottom || top,
        dstWidth = width + left + right,
        dstHeight = height + top + bottom,
        value = __value || [0, 0, 0, 255];
    var constBuf = new ArrayBuffer(dstWidth * 4),
        constArray = new Uint8ClampedArray(constBuf);
        buffer = new ArrayBuffer(dstHeight * dstWidth * 4);

    for(i = 0; i < dstWidth; i++){
        for( j = 0; j < 4; j++){
            constArray[i * 4 + j] = value[j];
        }
    }

    constArray = new Uint32Array(constBuf);
    var tempArray;

    for(i = 0; i < height; i++){
        tempArray = new Uint32Array(buffer, (i + top) * dstWidth * 4, left);
        tempArray.set(constArray.subarray(0, left));
        tempArray = new Uint32Array(buffer, ((i + top + 1) * dstWidth - right) * 4, right);
        tempArray.set(constArray.subarray(0, right));
        tempArray = new Uint32Array(buffer, ((i + top) * dstWidth + left) * 4, width);
        tempArray.set(new Uint32Array(__src.buffer, i * width * 4, width));
    }

    for(i = 0; i < top; i++){
        tempArray = new Uint32Array(buffer, i * dstWidth * 4, dstWidth);
        tempArray.set(constArray);
    }

    for(i = 0; i < bottom; i++){
        tempArray = new Uint32Array(buffer, (i + top + height) * dstWidth * 4, dstWidth);
        tempArray.set(constArray);
    }

    return new Mat(dstHeight, dstWidth, new Uint8ClampedArray(buffer));
}
效果图
CV_BORDER_REPLICATE
CV_BORDER_REFLECT

CV_BORDER_WRAP

CV_BORDER_CONSTANT
更多的例子
系列目录
参考资料
在OpenCV中图像边界扩展 copyMakeBorder 的实现 . viewcode . 2012-12-13 09:28