我们在上一篇文章中介绍了图层的相关设置,今天我们介绍一下地图的组织。在MapGuide中,地图也和图层一样,也是一种资源,可以用Xml文档表示。说到地图,我们就会无法避免的提到坐标系。
我们先简单说说地图投影和地图坐标系。大家知道,地图是地球在平面上的表示方法。那么地球是个球体,而球面是不能完全展开成一个平面的,就像我们无法把一个橘子皮完全摊开到桌面上一样,总会有裂缝或者褶皱。于是对于平面地图表示的地球表面,我们只能是近似的模拟。于是就通过投影的方法把球面上的地物表示在平面地图上,好像和皮影戏有点像 :) 灯光放置的位置不同,屏风的位置和形状不同等等因素,投影也有很多种,当然类似的坐标系也有很多种。我这里就这么通俗的打个比方说说,地图投影和坐标系是很科学的东西,完全可以写一本大部头了。你如果对此感兴趣可以参考相关书籍,得到更学术性的解释。
我们可以用WKT(Well-known Text)来表示坐标系,这是一种文本表示法。比如我们常见的经纬度坐标系LL84的WKT表示为:
GEOGCS["LL84",DATUM["WGS84",SPHEROID["WGS84",6378137.000,298.25722293]],PRIMEM["Greenwich",0],UNIT["Degree",0.01745329251994]]
然后我们回到我们的MapGuide Studio,在MapGuide Studio中新建一个地图(New—> Map)
需要我们指定所采用的坐标系统,底图颜色和初始视口。如果您对地图的坐标范围不熟悉的话,手工指定初始视口肯定不是件容易的事。不过我们可以在后续步骤添加图层时让MapGuide Studio来帮我们自动指定。
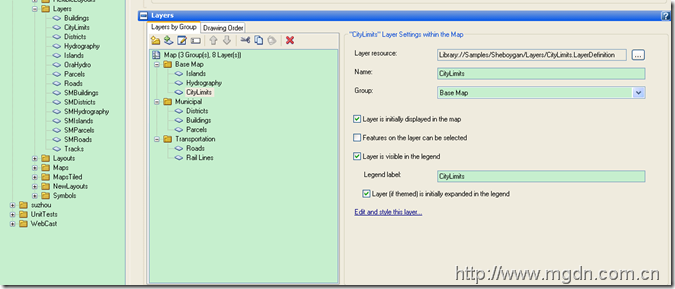
在这里,我们需要指定地图中包含的图层,方便的方法就是直接从左边的Site Explorer中把图层拖过来。注意,为了能自动生成合适的地图初始视口(Initinal View), 峻祁连在这里建立你首先加入最大的那个底图图层,比如城市边界图、行政区划图等等,这样MapGuide Studio会按照第一个加入的图层来自动设定地图初始视口。
为了组织方便,可以为图层分组,比如表示交通的公路、铁路、乡村路什么的放在一个组中,此外还可以设置他们的可见性和可选择性。另外,还需要注意的是图层的绘图顺序,如果你把面图层放在最上面,很可能就会把其他的点图层和线图层覆盖住了。
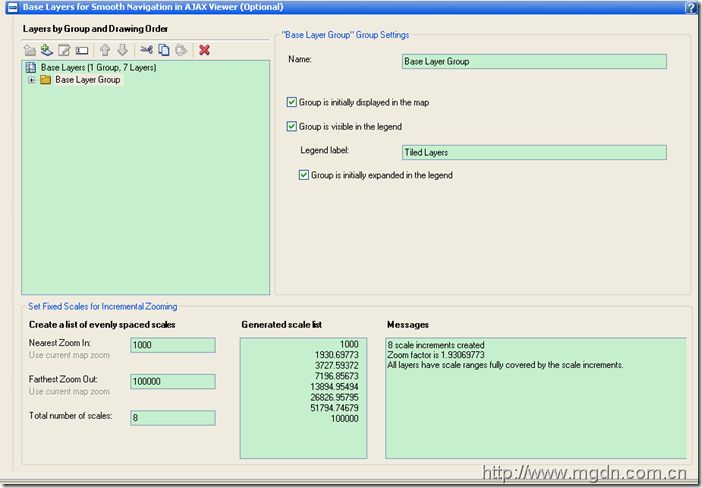
下面我们来说说基础图层组(Base Layer Group),您一定对Google Map不陌生,在Google Map中放大缩小时,你就发现地图有几个固定的缩放级别,而且地图是一块一块加载的。而我们采用上面的地图组织方式是不是这样的,我们可以缩放到任意的比例尺,每次缩放地图都会重新渲染。那么MapGuide能否实现和Google Map一样的效果呢? 可以的,这就是基本图层组的作用。如果你把需要切片的图层放置到基础图层组中,在第一次访问时,MapGuide会自动渲染并切片,存放到服务器的缓存中,下载再访问时就不用重新渲染,直接从缓存中读取,这样就提高了地图加载速度。
界面设置如下,知道最大和最小比例尺,MapGuide按照一定的熟悉规则计算出几个基本,形成基础图层组。MapGuide会在第一次访问时来渲染切片。
关于基础图层组,在Maestro中还有个有用的功能MgCooker,能帮助你自动运行切片,我们下次再说。
好了,地图设置完毕就可以保存你的结果并预览看看效果了。我们后续的WebLayout中将会使用这个地图资源。
我们还是看一下Map的 XML表示
这里是坐标系部分:
<CoordinateSystem>GEOGCS["LL84",DATUM["WGS84",SPHEROID["WGS84",6378137.000,298.25722293]],PRIMEM["Greenwich",0],UNIT["Degree",0.01745329251994]]</CoordinateSystem>
这是我们的初始视口设置
<Extents><MinX>-87.771081085404276</MinX>
<MaxX>-87.652554319814229</MaxX>
<MinY>43.714087045457106</MinY>
<MaxY>43.809041883931684</MaxY>
</Extents>
然后是多个图层
<MapLayer><Name>Roads</Name>
<ResourceId>Library://Samples/Sheboygan/Layers/Roads.LayerDefinition</ResourceId>
<Selectable>false</Selectable>
<ShowInLegend>true</ShowInLegend>
<LegendLabel>Roads</LegendLabel>
<ExpandInLegend>true</ExpandInLegend>
<Visible>true</Visible>
<Group>Transportation</Group>
</MapLayer>
<MapLayer>
…….
</MapLayer>
这是完整的xml表示, 你可以通过File,save as xml来查看具体内容。他对于的schema 文件 MapDefinition-1.0.0.xsd在C:\Program Files\Autodesk\MapGuideEnterprise2010\Server\Schema目录下。
<?xml version="1.0" encoding="utf-8"?>
<MapDefinition xmlns:xsi="http://www.w3.org/2001/XMLSchema-instance" xmlns:xsd="http://www.w3.org/2001/XMLSchema" xsi:noNamespaceSchemaLocation="MapDefinition-1.0.0.xsd">
<Name>Sheboygan Map</Name>
<CoordinateSystem>GEOGCS["LL84",DATUM["WGS84",SPHEROID["WGS84",6378137.000,298.25722293]],PRIMEM["Greenwich",0],UNIT["Degree",0.01745329251994]]</CoordinateSystem>
<Extents>
<MinX>-87.771081085404276</MinX>
<MaxX>-87.652554319814229</MaxX>
<MinY>43.714087045457106</MinY>
<MaxY>43.809041883931684</MaxY>
</Extents>
<BackgroundColor>ffcdbd9c</BackgroundColor>
<Metadata />
<MapLayer>
<Name>Roads</Name>
<ResourceId>Library://Samples/Sheboygan/Layers/Roads.LayerDefinition</ResourceId>
<Selectable>false</Selectable>
<ShowInLegend>true</ShowInLegend>
<LegendLabel>Roads</LegendLabel>
<ExpandInLegend>true</ExpandInLegend>
<Visible>true</Visible>
<Group>Transportation</Group>
</MapLayer>
<MapLayer>
<Name>Rail Lines</Name>
<ResourceId>Library://Samples/Sheboygan/Layers/Tracks.LayerDefinition</ResourceId>
<Selectable>false</Selectable>
<ShowInLegend>true</ShowInLegend>
<LegendLabel>Rail Lines</LegendLabel>
<ExpandInLegend>true</ExpandInLegend>
<Visible>false</Visible>
<Group>Transportation</Group>
</MapLayer>
<MapLayer>
<Name>Districts</Name>
<ResourceId>Library://Samples/Sheboygan/Layers/Districts.LayerDefinition</ResourceId>
<Selectable>false</Selectable>
<ShowInLegend>true</ShowInLegend>
<LegendLabel>Districts</LegendLabel>
<ExpandInLegend>true</ExpandInLegend>
<Visible>true</Visible>
<Group>Municipal</Group>
</MapLayer>
<MapLayer>
<Name>Buildings</Name>
<ResourceId>Library://Samples/Sheboygan/Layers/Buildings.LayerDefinition</ResourceId>
<Selectable>false</Selectable>
<ShowInLegend>true</ShowInLegend>
<LegendLabel>Buildings</LegendLabel>
<ExpandInLegend>true</ExpandInLegend>
<Visible>true</Visible>
<Group>Municipal</Group>
</MapLayer>
<MapLayer>
<Name>Parcels</Name>
<ResourceId>Library://Samples/Sheboygan/Layers/Parcels.LayerDefinition</ResourceId>
<Selectable>true</Selectable>
<ShowInLegend>true</ShowInLegend>
<LegendLabel>Parcels</LegendLabel>
<ExpandInLegend>true</ExpandInLegend>
<Visible>true</Visible>
<Group>Municipal</Group>
</MapLayer>
<MapLayer>
<Name>Islands</Name>
<ResourceId>Library://Samples/Sheboygan/Layers/Islands.LayerDefinition</ResourceId>
<Selectable>false</Selectable>
<ShowInLegend>true</ShowInLegend>
<LegendLabel>Islands</LegendLabel>
<ExpandInLegend>true</ExpandInLegend>
<Visible>true</Visible>
<Group>Base Map</Group>
</MapLayer>
<MapLayer>
<Name>Hydrography</Name>
<ResourceId>Library://Samples/Sheboygan/Layers/Hydrography.LayerDefinition</ResourceId>
<Selectable>false</Selectable>
<ShowInLegend>true</ShowInLegend>
<LegendLabel>Hydrography</LegendLabel>
<ExpandInLegend>true</ExpandInLegend>
<Visible>true</Visible>
<Group>Base Map</Group>
</MapLayer>
<MapLayer>
<Name>CityLimits</Name>
<ResourceId>Library://Samples/Sheboygan/Layers/CityLimits.LayerDefinition</ResourceId>
<Selectable>false</Selectable>
<ShowInLegend>true</ShowInLegend>
<LegendLabel>CityLimits</LegendLabel>
<ExpandInLegend>true</ExpandInLegend>
<Visible>true</Visible>
<Group>Base Map</Group>
</MapLayer>
<MapLayerGroup>
<Name>Base Map</Name>
<Visible>true</Visible>
<ShowInLegend>true</ShowInLegend>
<ExpandInLegend>true</ExpandInLegend>
<LegendLabel>Base Map</LegendLabel>
<Group />
</MapLayerGroup>
<MapLayerGroup>
<Name>Municipal</Name>
<Visible>true</Visible>
<ShowInLegend>true</ShowInLegend>
<ExpandInLegend>true</ExpandInLegend>
<LegendLabel>Municipal</LegendLabel>
<Group />
</MapLayerGroup>
<MapLayerGroup>
<Name>Transportation</Name>
<Visible>true</Visible>
<ShowInLegend>true</ShowInLegend>
<ExpandInLegend>true</ExpandInLegend>
<LegendLabel>Transportation</LegendLabel>
<Group />
</MapLayerGroup>
<BaseMapDefinition />
</MapDefinition>
好了,今天到此为止,您有任何看法的话可以在下面发表评论,或者到MGDN论坛交流。
转载请注明出处和作者: 峻祁连(Daniel Du)


