一:校验
1.校验的步骤
使用JSP 303验证标准
加入Hibernate validator的jar
在springmvc配置文件中加入<mvc:annotation-driven/>
需要在bean的属性上添加@Valid注解
2.添加lib
hibernate的lib
然后需要添加hibernate需要的required中的lib包
3.添加验证的注解
  1 package com.spring.it.enties;
  2
  3 import java.util.Date;
  4
  5 import javax.validation.constraints.Past;
  6
  7 import org.hibernate.validator.constraints.Email;
  8 import org.hibernate.validator.constraints.NotEmpty;
  9 import org.springframework.format.annotation.DateTimeFormat;
 10 import org.springframework.format.annotation.NumberFormat;
 11
 12 public class Employee {
 13
 14     private Integer id;
 15     @NotEmpty
 16     private String lastName;
 17     @Email
 18     private String email;
 19     //1 male, 0 female
 20     private Integer gender;
 21     private Department department;
 22     //birth
 23     @Past
 24     @DateTimeFormat(pattern="yyyy-MM-dd")
 25     private Date birth;
 26     //salary
 27     @NumberFormat(pattern="###.#")
 28     private Float salary;
 29
 30     public Employee(Integer id, String lastName, String email, Integer gender,
 31             Department department) {
 32         this.id = id;
 33         this.lastName = lastName;
 34         this.email = email;
 35         this.gender = gender;
 36         this.department = department;
 37     }
 38
 39     public Employee() {
 40
 41     }
 42     public Integer getId() {
 43         return id;
 44     }
 45
 46     public void setId(Integer id) {
 47         this.id = id;
 48     }
 49
 50     public String getLastName() {
 51         return lastName;
 52     }
 53
 54     public void setLastName(String lastName) {
 55         this.lastName =lastName;
 56     }
 57
 58     public String getEmail() {
 59         return email;
 60     }
 61
 62     public void setEmail(String email) {
 63         this.email = email;
 64     }
 65
 66     public Integer getGender() {
 67         return gender;
 68     }
 69
 70     public void setGender(Integer gender) {
 71         this.gender = gender;
 72     }
 73
 74     public Department getDepartment() {
 75         return department;
 76     }
 77
 78     public void setDepartment(Department department) {
 79         this.department = department;
 80     }
 81
 82     public Date getBirth() {
 83         return birth;
 84     }
 85
 86     public void setBirth(Date birth) {
 87         this.birth = birth;
 88     }
 89 //
 90
 91     public Float getSalary() {
 92         return salary;
 93     }
 94
 95     public void setSalary(Float salary) {
 96         this.salary = salary;
 97     }
 98
 99     @Override
100     public String toString() {
101         return "Employee [id=" + id + ", lastName=" + lastName + ", email=" + email + ", gender=" + gender
102                 + ", department=" + department + ", birth=" + birth + ", salary=" + salary + "]";
103     }
104
105 }
4.保存上添加@Valid注解
 1 /**
 2      * 保存,是submit提交过来的请求,属于Post请求
 3      */
 4     @RequestMapping(value="/emp",method=RequestMethod.POST)
 5     public String save(@Valid Employee employee,BindingResult result) {
 6         System.out.println(employee);
 7         if(result.getErrorCount()>0) {
 8             System.out.println("has error");
 9             for(FieldError error:result.getFieldErrors()) {
10                 System.out.println(error.getField()+":"+error.getDefaultMessage());
11             }
12         }
13         employeeDao.save(employee);
14         return "redirect:/emps";
15     }
二:出错跳转页面
1.程序
这个主要的逻辑是save之后的处理。
要将department回显,所以save函数中要添加map。
 1 /**
 2      * 保存,是submit提交过来的请求,属于Post请求
 3      */
 4     @RequestMapping(value="/emp",method=RequestMethod.POST)
 5     public String save(@Valid Employee employee,BindingResult result,Map<String,Object> map) {
 6         System.out.println(employee);
 7         if(result.getErrorCount()>0) {
 8             System.out.println("has error");
 9             for(FieldError error:result.getFieldErrors()) {
10                 System.out.println(error.getField()+":"+error.getDefaultMessage());
11             }
12             //如果出错,则转向定制的页面
13             map.put("department", departmentDao.getDepartments());
14             return "input";
15         }
16         employeeDao.save(employee);
17         return "redirect:/emps";
18     }
2.效果
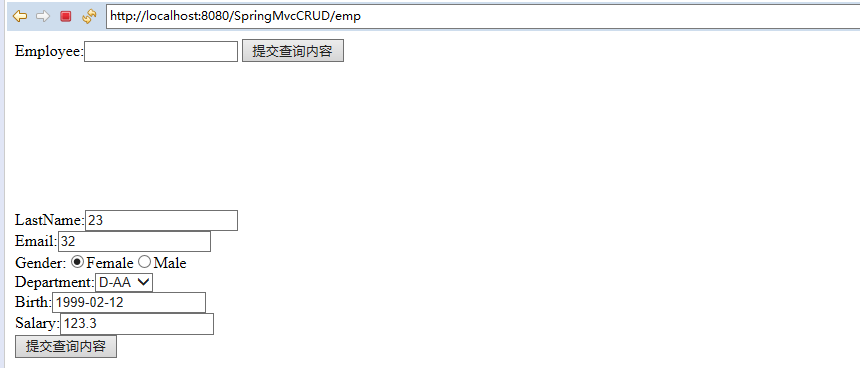
就是提交之后,还是这个页面

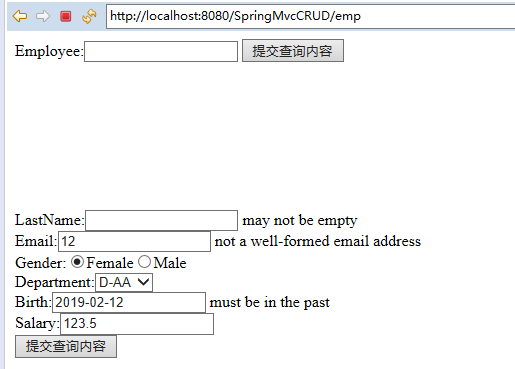
三:在页面上显示这个错误信息
1.input程序
在每一个要验证的字段后面写上:<form:errors path="birth"></form:errors><br>
 1 <%@ page language="java" contentType="text/html; charset=utf-8"
 2     pageEncoding="utf-8"%>
 3 <%@ taglib prefix="form" uri="http://www.springframework.org/tags/form"%>
 4 <%@ page import="java.util.Map"%>
 5 <%@ page import="java.util.HashMap"%>
 6 <%@ taglib prefix="c" uri="http://java.sun.com/jsp/jstl/core" %>
 7 <!DOCTYPE html PUBLIC "-//W3C//DTD HTML 4.01 Transitional//EN" "http://www.w3.org/TR/html4/loose.dtd">
 8 <html>
 9 <head>
10 <meta http-equiv="Content-Type" content="text/html; charset=utf-8">
11 <title>Insert title here</title>
12 </head>
13 <body>
14     <form action="testConversionServiceConver" method="POST">
15
16         <!-- lastname-email-gender-department.id -->
17         <!-- GG-gg@123.com-0-105 -->
18         Employee:<input type="text" name="employee"/>
19         <input type="submit" values="Submit">
20     </form>
21     <br><br>
22     <br><br><br><br><br><br>
23
24
25     <!-- id lastName email  gender department -->
26     <!-- modelAttribute默认的bean是command,需要改成对应的bean -->
27     <form:form action="${pageContext.request.contextPath}/emp" method="POST" modelAttribute="employee">
28         <!-- lastName在修改的时候,不能被显示 -->
29         <c:if test="${employee.id == null}">
30             LastName:<form:input path="lastName"/>
31             <form:errors path="lastName"></form:errors><br>
32         </c:if>
33         <c:if test="${employee.id != null}">
34             <form:hidden path="id"/>
35             <!-- 不能使用form标签,因为modelAttribute对应的bean中没有_method这个属性,只能使用input -->
36             <input type="hidden" name="_method" value="PUT"/>
37         </c:if>
38
39         Email:<form:input path="email"/>
40         <form:errors path="email"></form:errors><br>
41         <%
42             Map<String,String> genders=new HashMap();
43             genders.put("1", "Male");
44             genders.put("0", "Female");
45             request.setAttribute("genders", genders);
46         %>
47         Gender:<form:radiobuttons path="gender" items="${genders}"/><br>
48         Department:<form:select path="department.id"
49                         items="${department}" itemLabel="departmentName" itemValue="id"></form:select><br>
50
51         <!-- 演示格式化 -->
52         Birth:<form:input path="birth"/>
53         <form:errors path="birth"></form:errors><br>
54         Salary:<form:input path="salary"/><br>
55         <input type="submit" values="Submit">
56     </form:form>
57 </body>
58 </html>
2.效果

四:国际化资源文件
1.添加I18n.properties
注意写法:

1 NotEmpty.employee.lastName=u4E0Du80FDu4E3Au7A7A
2 Email.employee.email=u4E0Du662Fu5408u6CD5u7684u90AEu4EF6
3 Past.employee.birth=u4E0Du80FDu662Fu672Au6765u7684u4E00u4E2Au65F6u95F4
2.springmvc.xml中配置国际化
 1 <?xml version="1.0" encoding="UTF-8"?>
 2 <beans xmlns="http://www.springframework.org/schema/beans"
 3     xmlns:xsi="http://www.w3.org/2001/XMLSchema-instance"
 4     xmlns:context="http://www.springframework.org/schema/context"
 5     xmlns:mvc="http://www.springframework.org/schema/mvc"
 6     xsi:schemaLocation="http://www.springframework.org/schema/beans
 7     http://www.springframework.org/schema/beans/spring-beans.xsd
 8         http://www.springframework.org/schema/context
 9         http://www.springframework.org/schema/context/spring-context-4.0.xsd
10         http://www.springframework.org/schema/mvc
11         http://www.springframework.org/schema/mvc/spring-mvc-4.0.xsd">
12     <!-- 配置自定义扫描的包 -->
13     <context:component-scan base-package="com.spring.it" ></context:component-scan>
14
15     <!-- 配置视图解析器 -->
16     <bean class="org.springframework.web.servlet.view.InternalResourceViewResolver">
17         <property name="prefix" value="/WEB-INF/views/" />
18           <property name="suffix" value=".jsp" />
19     </bean>
20
21     <mvc:annotation-driven></mvc:annotation-driven>
22
23     <!-- 转换器 -->
24     <bean id="conversionService" class="org.springframework.format.support.FormattingConversionServiceFactoryBean">
25         <property name="converters">
26             <set>
27                 <ref bean="employeeConverter"/>
28             </set>
29         </property>
30     </bean>
31     <mvc:annotation-driven conversion-service="conversionService"></mvc:annotation-driven>
32
33     <mvc:default-servlet-handler/>
34     <mvc:annotation-driven ignore-default-model-on-redirect="true"></mvc:annotation-driven>
35
36     <!-- 国家化 -->
37     <bean id="messageSource" class="org.springframework.context.support.ResourceBundleMessageSource">
38         <property name="basename" value="i18n"></property>
39     </bean>
40 </beans>
3.效果
