这篇文章的数据库操作方式是使用JPA。
而且是简单的说明,更多的介绍,在本标签下,后续会再说明一些细节。
一:操作数据库起步
1.Spring-Data-Jpa
JPA定义了对象持久化的标准。
目前实现了有Hibernate,TopLink
2.pom添加依赖
1         <dependency>
2             <groupId>org.springframework.boot</groupId>
3             <artifactId>spring-boot-starter-data-jpa</artifactId>
4         </dependency>
5
6         <dependency>
7             <groupId>mysql</groupId>
8             <artifactId>mysql-connector-java</artifactId>
9         </dependency>
3.对jps进行配置
 1 spring:
 2   profiles:
 3     active: dev
 4   datasource:
 5     driver-class-name: com.mysql.jdbc.Driver
 6     url: jdbc:mysql://127.0.0.1:3308/people?useSSL=false
 7     username: root
 8     password: 123456
 9   jpa:
10     hibernate:
11       ddl-auto: create
12     show-sql: true
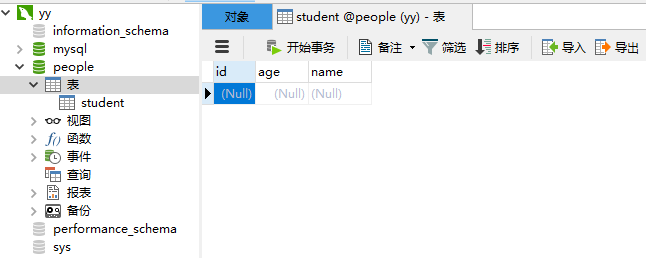
4.新建一个people的数据库
CREATE DATABASE IF NOT EXISTS yiibaidb DEFAULT CHARSET utf8 COLLATE utf8_general_ci;
不然,程序会报未发现数据库。
但是,表不需要新建,这个通过类就可以生成。
5.student的类
可以映射成数据库的字段。
Entity注解表示:类对应一个数据库的一个表。
 1 package com.caojun.springboot;
 2
 3 import javax.persistence.Entity;
 4 import javax.persistence.GeneratedValue;
 5 import javax.persistence.Id;
 6
 7 @Entity
 8 public class Student {
 9
10     @Id
11     @GeneratedValue
12     private Integer id;
13     private String name;
14     private Integer age;
15
16     public Student(){
17
18     }
19
20     public Integer getId() {
21         return id;
22     }
23
24     public void setId(Integer id) {
25         this.id = id;
26     }
27
28     public String getName() {
29         return name;
30     }
31
32     public void setName(String name) {
33         this.name = name;
34     }
35
36     public Integer getAge() {
37         return age;
38     }
39
40     public void setAge(Integer age) {
41         this.age = age;
42     }
43 }
6.自动生成数据库
7.注意点
配置文件的ddi-auto:create
意思的每次启动的时候都会把数据库清空。
ddl-auto:update
如果没有表,会自动创建,但是如果里面有数据,就不会清空数据。
二:操作数据的API
1.新建类(继续使用上面的Student.java类)
2.新建接口
1 package com.caojun.springboot;
2
3 import org.springframework.data.jpa.repository.JpaRepository;
4
5 public interface StudentResitory extends JpaRepository<Student,Integer> {
6 }
3.新建controller类
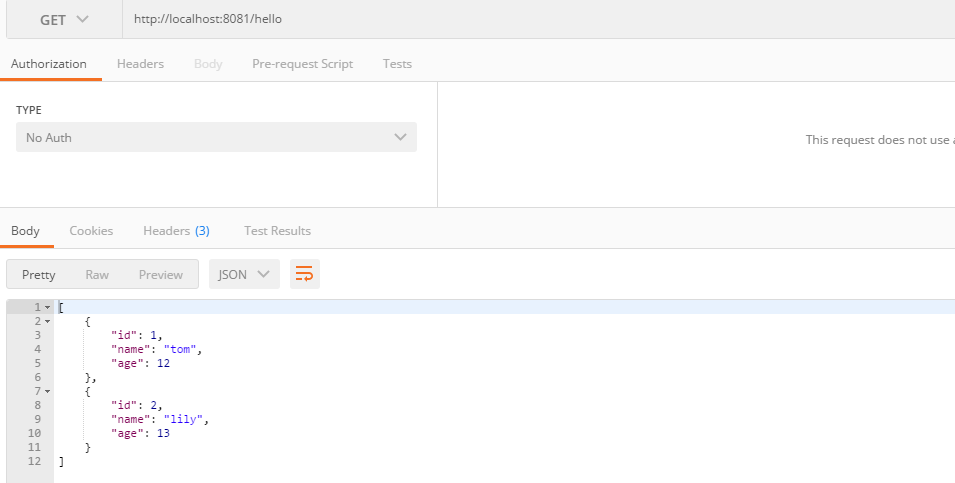
查询数据库中的所有
 1 package com.caojun.springboot;
 2
 3 import org.springframework.beans.factory.annotation.Autowired;
 4 import org.springframework.web.bind.annotation.GetMapping;
 5 import org.springframework.web.bind.annotation.RestController;
 6
 7 import java.util.List;
 8
 9 @RestController
10 public class StudentController {
11
12     @Autowired
13     private StudentResitory studentResitory;
14
15     /**
16      * 查询数据库中的所有
17      * @return
18      */
19     @GetMapping(value = "/hello")
20     public List<Student> getStuList(){
21         return studentResitory.findAll();
22     }
23 }
4.效果
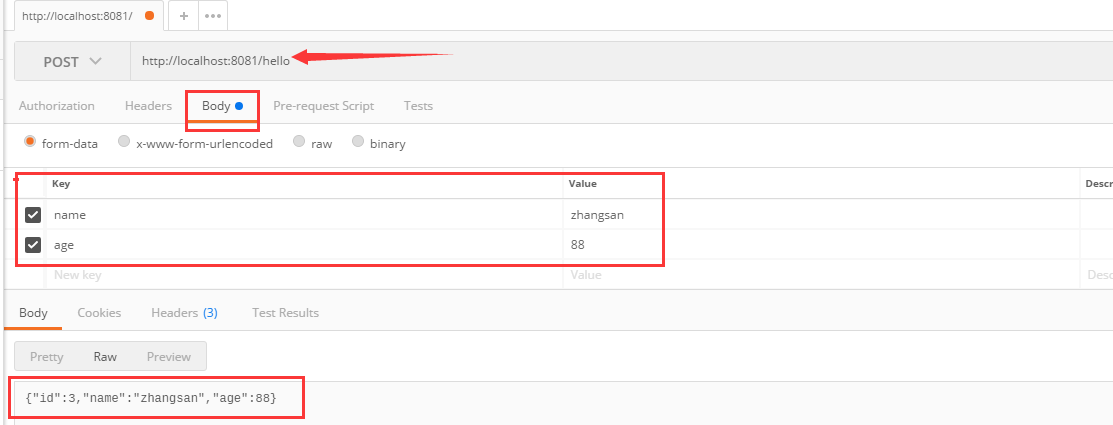
5.添加一个学生记录
 1     /**
 2      * 添加一个学生记录
 3      */
 4     @PostMapping(value = "/hello")
 5     public Student addStu(@RequestParam("name") String name,@RequestParam("age") Integer age){
 6         Student stu=new Student();
 7         stu.setName(name);
 8         stu.setAge(age);
 9         return studentResitory.save(stu);
10     }
6.效果
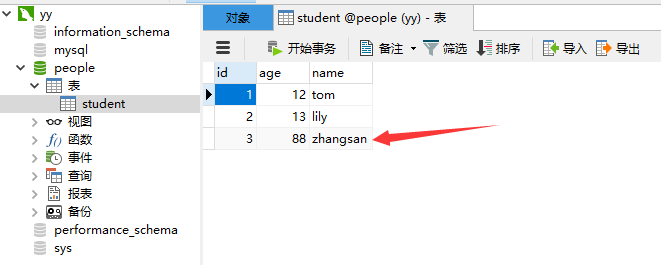
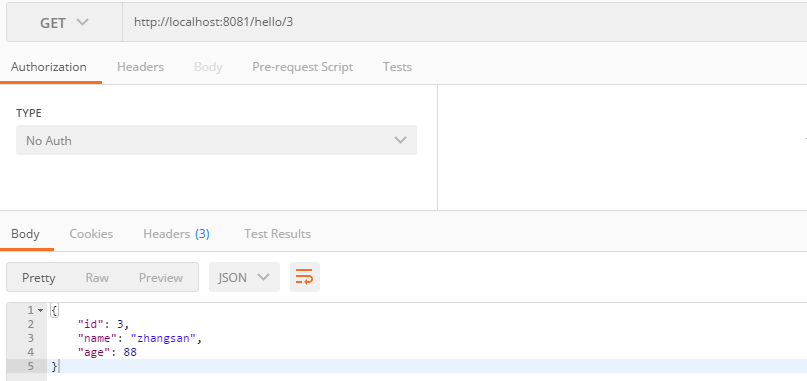
7.查询一个人,根据id
1 /**
2      * 查询一个学生,根据字段id
3      */
4     @GetMapping(value = "/hello/{id}")
5     public Student getStu(@PathVariable("id") Integer id){
6         return studentResitory.findOne(id);
7     }
8.效果
9.更新
 1 /**
 2      * 更新数据库
 3      */
 4     @PutMapping(value = "/hello/{id}")
 5     public Student updateStu(@PathVariable("id") Integer id,
 6                              @RequestParam("name") String name,
 7                              @RequestParam("age") Integer age ){
 8         Student stu=new Student();
 9         stu.setId(id);
10         stu.setName(name);
11         stu.setAge(age);
12         return studentResitory.save(stu);
13     }
10.效果

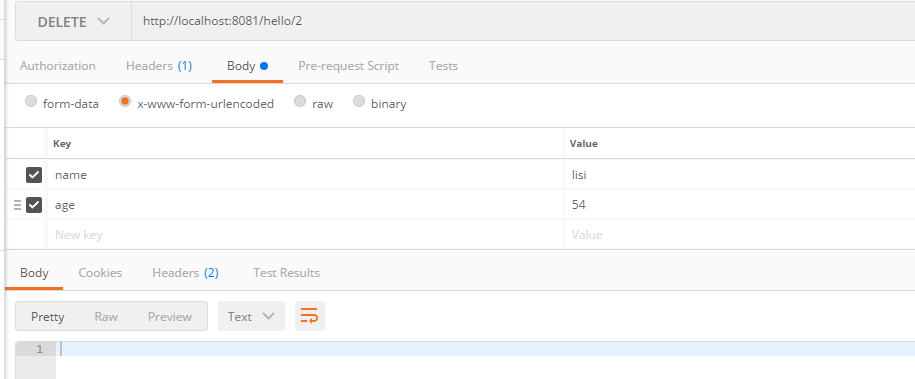
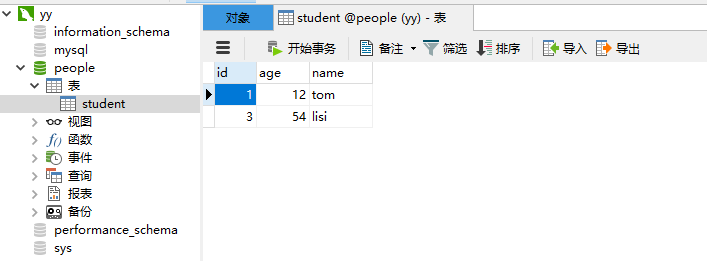
11.删除
1 /**
2      * 删除数据
3      */
4     @DeleteMapping(value = "/hello/{id}")
5     public void deleteStu(@PathVariable("id") Integer id){
6         studentResitory.delete(id);
7     }
12.效果
三:扩展
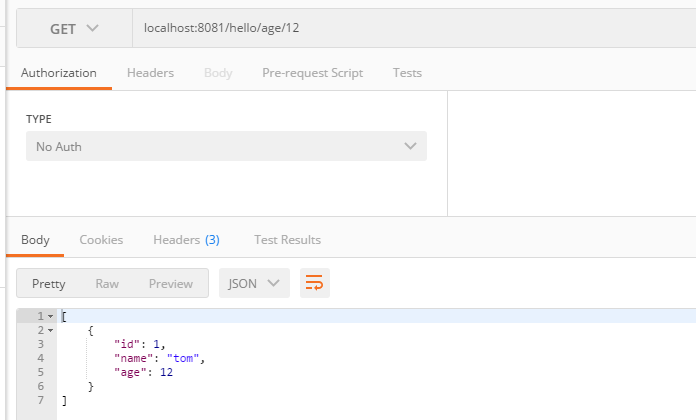
1.通过年龄还来查询
2.扩展接口
这个方法名比较有讲究。
 1 package com.caojun.springboot;
 2
 3 import org.springframework.data.jpa.repository.JpaRepository;
 4
 5 import java.util.List;
 6
 7 public interface StudentResitory extends JpaRepository<Student,Integer> {
 8
 9     //根据年龄来查询数据
10     public List<Student> findByAge(Integer age);
11 }
3.程序
1 /**
2      * 根据年龄进行查询
3      */
4     @GetMapping(value = "/hello/age/{age}")
5     public List<Student> getStuList(@PathVariable("age") Integer age){
6         return studentResitory.findByAge(age);
7     }
4.效果