• 自定义信号


    1、使用的是Component+自定义信号+Connections

    import QtQuick 2.6
    import QtQuick.Window 2.2
    import QtQuick.Controls 1.4
    Window {
        visible: true
         640
        height: 480
        title: qsTr("Hello World")
        Text {
            id: text;
            text: qsTr("text");
            anchors.centerIn: parent;
            font.pixelSize: 20;
            color:"black";
        }
        Component{
            id:btnComponent;
            Rectangle{
                id:colorPicker;
                 50;
                height: 30;
                signal colorPicked(color clr);
                MouseArea{
                    anchors.fill: parent;
                    onPressed: colorPicker.colorPicked(colorPicker.color);
                }
            }
        }
    
        Loader{
            id:loader1;
            anchors.left: parent.left;
            anchors.bottom: parent.bottom;
            anchors.leftMargin: 10;
            anchors.bottomMargin: 10;
            sourceComponent: btnComponent;
            onLoaded: {
                item.color = "red";
            }
        }
    
        Connections{
            target: loader1.item;//这里为什么是item?
            onColorPicked: {
                text.color = clr;
            }
        }
    }

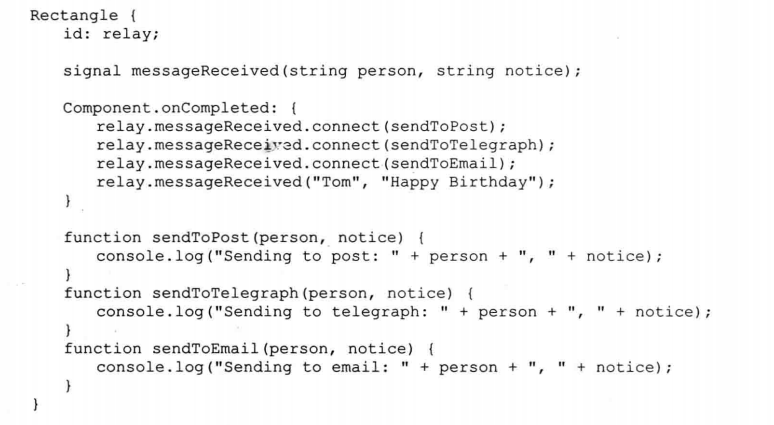
     2、在任意地方定义信号
  • 相关阅读:
    Applet
    Tutorial中代码的区别及不同效果
    Session
    代码解析&Filter用户授权例子
    Web的后台运作过程
    XML
    数据库
    spring常用注解
    spring mvc 常用注解
    @requestMapping
  • 原文地址:https://www.cnblogs.com/judes/p/9432334.html
Copyright © 2020-2023  润新知