titching模块中对特征提取的封装解析(以ORB特性为例)
OpenCV中Stitching模块(图像拼接模块)的拼接过程可以用PipeLine来进行描述,是一个比较复杂的过程。在这个过程中,特征提取是重要的一个部分。由于OpenCV发展到了3.X以后,Stitching模块的相关函数进行了重新封装,所以对于学习研究造成了一定困难。这里通过解析代码,研究Stitching模块中的特征提取部分,并且和直接进行特征提取的相关函数进行比对。
采用的图片为 parliament2.bmp 和 parliament3.bmp


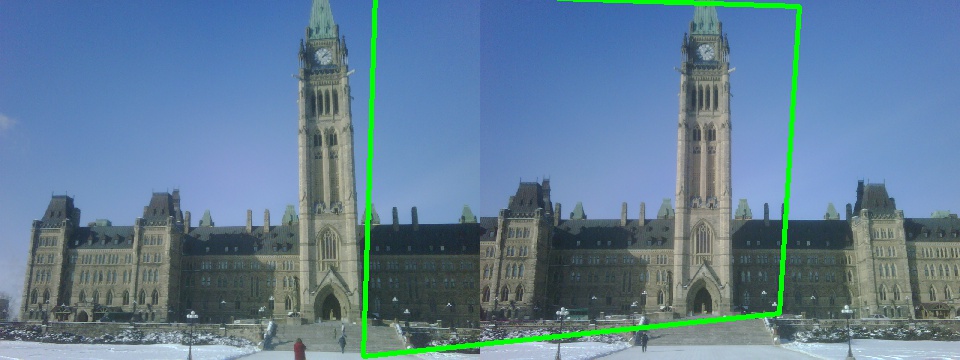
一、直接的特征提取
结果图片
可以看到很明显,右图中绘制出来了左图通过放射变换后所在的位置。目测是比较准确的。
代码:
#include "stdafx.h"
#include <iostream>
#include "opencv2/objdetect/objdetect.hpp"
#include "opencv2/features2d/features2d.hpp"
#include "opencv2/highgui/highgui.hpp"
#include "opencv2/calib3d/calib3d.hpp"
#include "opencv2/imgproc/imgproc_c.h"
#include "opencv2/imgproc/imgproc.hpp"
using namespace std;
using namespace cv;
using namespace cv::detail;
int main(int argc, char* argv[])
{
//读入测试用图
Mat img1 = imread("graf1.png");
Mat img2 = imread("graf3.png");
Ptr<DescriptorMatcher> descriptorMatcher;
// Match between img1 and img2
vector<DMatch> matches;
// keypoint for img1 and img2
vector<KeyPoint> keyImg1, keyImg2;
// Descriptor for img1 and img2
Mat descImg1, descImg2;
//创建ORB对象
Ptr<Feature2D> b = ORB::create();
//两种方法寻找特征点
b->detect(img1, keyImg1, Mat());
// and compute their descriptors with method compute
b->compute(img1, keyImg1, descImg1);
// or detect and compute descriptors in one step
b->detectAndCompute(img2, Mat(),keyImg2, descImg2,false);
//匹配特征点
descriptorMatcher = DescriptorMatcher::create("BruteForce");
descriptorMatcher->match(descImg1, descImg2, matches, Mat());
Mat index;
int nbMatch=int(matches.size());
Mat tab(nbMatch, 1, CV_32F);
for (int i = 0; i<nbMatch; i++)
{
tab.at<float>(i, 0) = matches[i].distance;
}
sortIdx(tab, index, cv::SORT_EVERY_COLUMN +cv::SORT_ASCENDING);
vector<DMatch> bestMatches;
for (int i = 0; i<60; i++)
{
bestMatches.push_back(matches[index.at<int>(i, 0)]);
}
Mat result;
drawMatches(img1, keyImg1, img2, keyImg2, bestMatches, result);
std::vector<Point2f> obj;
std::vector<Point2f> scene;
for( int i = 0; i < (int)bestMatches.size(); i++ )
{
obj.push_back( keyImg1[ bestMatches[i].queryIdx ].pt );
scene.push_back( keyImg2[ bestMatches[i].trainIdx ].pt );
}
//直接调用ransac,计算单应矩阵
Mat H = findHomography( obj, scene, CV_RANSAC );
//绘制仿射结果
std::vector<Point2f> obj_corners(4);
std::vector<Point2f> scene_corners(4);
obj_corners[0] = Point(0,0);
obj_corners[1] = Point( img1.cols, 0 );
obj_corners[2] = Point( img1.cols, img1.rows );
obj_corners[3] = Point( 0, img1.rows );
perspectiveTransform( obj_corners, scene_corners, H);
//-- Draw lines between the corners (the mapped object in the scene - image_2 )
Point2f offset( (float)img1.cols, 0);
line( result, scene_corners[0] + offset, scene_corners[1] + offset, Scalar(0, 255, 0), 4 );
line( result, scene_corners[1] + offset, scene_corners[2] + offset, Scalar( 0, 255, 0), 4 );
line( result, scene_corners[2] + offset, scene_corners[3] + offset, Scalar( 0, 255, 0), 4 );
line( result, scene_corners[3] + offset, scene_corners[0] + offset, Scalar( 0, 255, 0), 4 );
imshow("result", result);
waitKey();
}
这段代码主要参考的是OpenCV自带的"matchmethod_orb_akaze_brisk.cpp"。需要注意的是3.X版本中ORB函数的定义和之前也是不一样的。
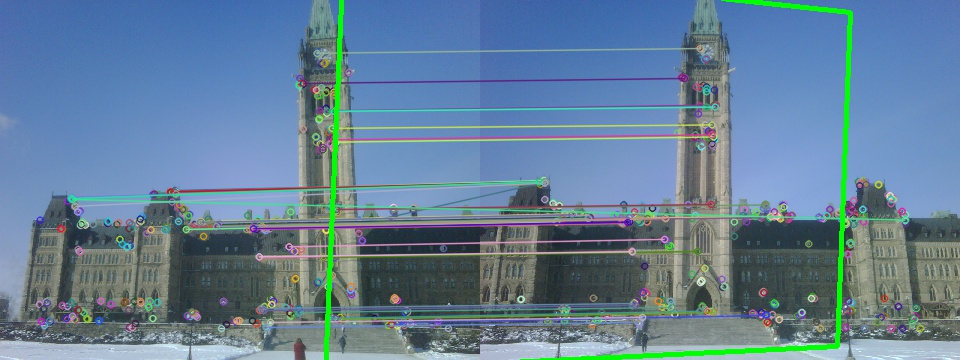
二、使用Stitching模块
代码:
#include "stdafx.h"
#include <iostream>
#include "opencv2/objdetect/objdetect.hpp"
#include "opencv2/features2d/features2d.hpp"
#include "opencv2/highgui/highgui.hpp"
#include "opencv2/calib3d/calib3d.hpp"
#include "opencv2/imgproc/imgproc_c.h"
#include "opencv2/imgproc/imgproc.hpp"
using namespace std;
using namespace cv;
using namespace cv::detail;
int main(int argc, char* argv[])
{
//读入测试用图
Mat img1 = imread("parliament2.bmp");
Mat img2 = imread("parliament3.bmp");
//两图拼成一个图
Mat result(img1.rows,2* img1.cols ,CV_8UC3,Scalar::all(0));
Mat MatSub = result.colRange(0, img1.cols);
img1.copyTo(MatSub);
MatSub = result.colRange(img1.cols,2*img1.cols);
img2.copyTo(MatSub);
//创建特征寻找指针
Ptr<FeaturesFinder> finder = makePtr<OrbFeaturesFinder>();
//创建保存特征的数据结构
vector<ImageFeatures> features(2);
//直接对3通道图片进行特征提取操作
(*finder)(img1,features[0]);
(*finder)(img2,features[1]);
finder->collectGarbage();
//配对
vector<MatchesInfo> pairwise_matches;
Ptr<FeaturesMatcher> matcher = makePtr<BestOf2NearestMatcher>(false, 0.3f);
(*matcher)(features, pairwise_matches);
matcher->collectGarbage();
//绘制仿射变换情况
std::vector<Point2f> obj_corners(4);
std::vector<Point2f> scene_corners(4);
obj_corners[0] = Point(0,0);
obj_corners[1] = Point( img1.cols, 0 );
obj_corners[2] = Point( img1.cols, img1.rows );
obj_corners[3] = Point( 0, img1.rows );
//获得适合的H
Mat H;
for ( int i=0;i<pairwise_matches.size();i++)
{
if (pairwise_matches[i].src_img_idx == 0 && pairwise_matches[i].dst_img_idx == 1)
{
H = pairwise_matches[i].H;
}
}
perspectiveTransform( obj_corners, scene_corners, H);
//-- Draw lines between the corners (the mapped object in the scene - image_2 )
Point2f offset( (float)img1.cols,0);
line( result, scene_corners[0] +offset , scene_corners[1] +offset , Scalar(0, 255, 0), 4 );
line( result, scene_corners[1] +offset , scene_corners[2] +offset , Scalar( 0, 255, 0), 4 );
line( result, scene_corners[2] +offset , scene_corners[3] +offset , Scalar( 0, 255, 0), 4 );
line( result, scene_corners[3] +offset , scene_corners[0] +offset , Scalar( 0, 255, 0), 4 );
imshow("result", result);
imwrite("result.jpg",result);
waitKey();
}
对后面这段代码重点解析。
1、首先为了能够最后方便显示,首先就是将两幅图片合成了一副图片,采用的是copyto+mask参数的方法。这种方法是我在AskOpenCV上面学到的。
//读入测试用图
Mat img1 = imread("parliament2.bmp");
Mat img2 = imread("parliament3.bmp");
//两图拼成一个图
Mat result(img1.rows,2* img1.cols ,CV_8UC3,Scalar::all(0));
Mat MatSub = result.colRange(0, img1.cols);
img1.copyTo(MatSub);
MatSub = result.colRange(img1.cols,2*img1.cols);
img2.copyTo(MatSub);
Mat img1 = imread("parliament2.bmp");
Mat img2 = imread("parliament3.bmp");
//两图拼成一个图
Mat result(img1.rows,2* img1.cols ,CV_8UC3,Scalar::all(0));
Mat MatSub = result.colRange(0, img1.cols);
img1.copyTo(MatSub);
MatSub = result.colRange(img1.cols,2*img1.cols);
img2.copyTo(MatSub);
2、创建特征提取函数
//创建特征寻找指针
Ptr<FeaturesFinder> finder = makePtr<OrbFeaturesFinder>();
//创建保存特征的数据结构
vector<ImageFeatures> features(2);
//直接对3通道图片进行特征提取操作
(*finder)(img1,features[0]);
(*finder)(img2,features[1]);
finder->collectGarbage();
Ptr<FeaturesFinder> finder = makePtr<OrbFeaturesFinder>();
//创建保存特征的数据结构
vector<ImageFeatures> features(2);
//直接对3通道图片进行特征提取操作
(*finder)(img1,features[0]);
(*finder)(img2,features[1]);
finder->collectGarbage();
直接创建OrbFeaturesFinder的智能指针对象,调用指针函数,寻找到特征到
ImageFeatures的数据结构中去。
这里,如果进行代码跟踪,就会发现对于同一幅图方法二找到ORB特征和方法一找到的是不一样的。
方法二在这里,将特征点的寻找,和特征向量的提取计算全部集成封装,需要注意。
struct CV_EXPORTS ImageFeatures
{
int img_idx;
Size img_size;
std::vector<KeyPoint> keypoints;
UMat descriptors;
};
{
int img_idx;
Size img_size;
std::vector<KeyPoint> keypoints;
UMat descriptors;
};
可以看到,ImageFeatures结构中不经包括了keypoints的vector,而且包括了UMat的descriptors,一步到位
3、特征匹配和提存
vector<MatchesInfo> pairwise_matches;
Ptr<FeaturesMatcher> matcher = makePtr<BestOf2NearestMatcher>(false, 0.3f);
(*matcher)(features, pairwise_matches);
matcher->collectGarbage();
Ptr<FeaturesMatcher> matcher = makePtr<BestOf2NearestMatcher>(false, 0.3f);
(*matcher)(features, pairwise_matches);
matcher->collectGarbage();
这里的封装应该说更多。在方法一种,在这里经过了BruteForce特征匹配,排序,Ransac
提纯3个步骤,那么在Stitching模块中,只是用了一个方法。如果根据函数中去,可以发
现其实实现步骤和方法一类似,但是也有自己不同地方
4、仿射变换、绘制结果
//绘制仿射变换情况
std::vector<Point2f> obj_corners(4);
std::vector<Point2f> scene_corners(4);
obj_corners[0] = Point(0,0);
obj_corners[1] = Point( img1.cols, 0 );
obj_corners[2] = Point( img1.cols, img1.rows );
obj_corners[3] = Point( 0, img1.rows );
//获得适合的H
Mat H;
for ( int i=0;i<pairwise_matches.size();i++)
{
if (pairwise_matches[i].src_img_idx == 0 && pairwise_matches[i].dst_img_idx == 1)
{
H = pairwise_matches[i].H;
}
}
perspectiveTransform( obj_corners, scene_corners, H);
//-- Draw lines between the corners (the mapped object in the scene - image_2 )
Point2f offset( (float)img1.cols,0);
line( result, scene_corners[0] +offset , scene_corners[1] +offset , Scalar(0, 255, 0), 4 );
line( result, scene_corners[1] +offset , scene_corners[2] +offset , Scalar( 0, 255, 0), 4 );
line( result, scene_corners[2] +offset , scene_corners[3] +offset , Scalar( 0, 255, 0), 4 );
line( result, scene_corners[3] +offset , scene_corners[0] +offset , Scalar( 0, 255, 0), 4 );
imshow("result", result);
imwrite("result.jpg",result);
这里和方法一类似,需要注意的地方就是由于H等数据结构都已经集成
在pairwise_matches的数据结构中,所以通过一个循环找到自己需要的H。
小结:这里初步对Stitching模块中对特征提取的封装解析进行了分析,为下一步图像拼接的深入研究做技术准备。值得注意的是目前看上去,Stitching模块中对特征提取的封
装实现的结果不如原生的方法好,这里是由于我操作的原因,还是因为本身设计的原因还要继续研究。