一、问题提出
ViZ对于显示3维的效果图来说,非常有帮助;我在使用OpenCV进行双目测距的过程中,有一些参数希望能够通过可视化的方法显示出来,所以参考了这方面相关的资料、做了一些实验,这里整理如下。这篇文章主要讲的是环境架设,并且假设阅读者已经有成功编译OpenCV的经验。出于系统稳定的考虑,我没有选择最新版本,而是使用了OpenCV3.2+VIZ6.3.0,编译环境为vs2012。
二、具体步骤
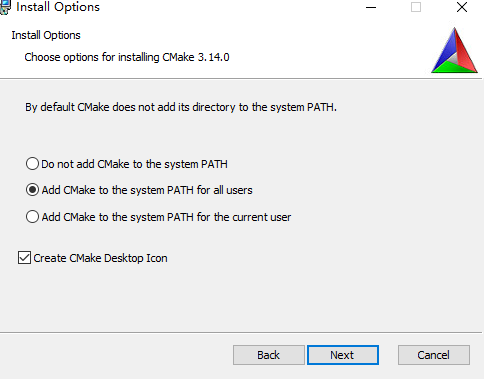
1、下载安装cmake,下载链接:https://github.com/Kitware/CMake/releases/download/v3.14.0/cmake-3.14.0-win64-x64.msi
建议这步这样选择:
2、下载VTK,下载链接:https://vtk.org/download/#latest
注意,对于VTK来说,6.3的话vs2012就可以,最新的8.2需要vs2015。由于现有工具链的原因,我优先选择了6.3

3、 编译VTK,打开cmake-gui进行配置
选择vtk源码的路径,新建一个文件夹build存放编译后的文件
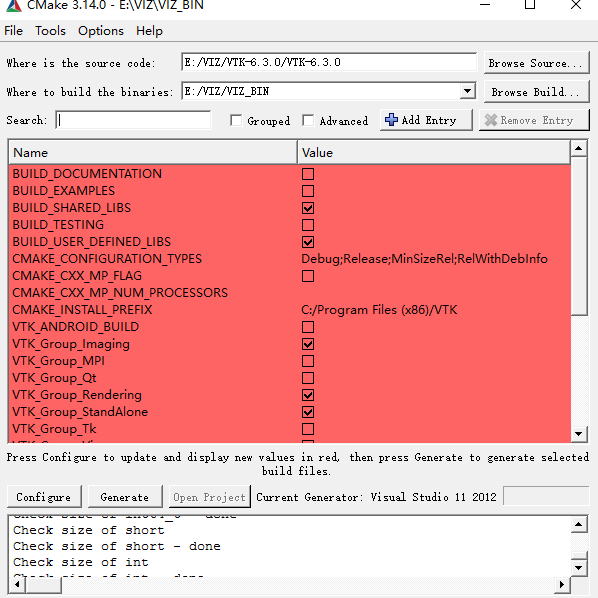
只需要勾选这5项就可以。两次configure,一次generate,然后打开vs生成解决方案。

相对来说,VTK的编译时比较简单的。
4、重新编译OpenCV,特别需要注意configure的操作。
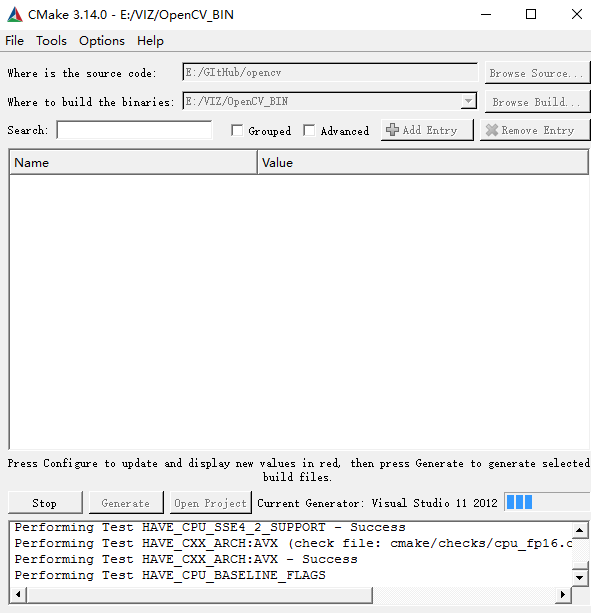
默认情况下,WITH_VTK是选中的,VTK_DIR没有配置,而BUILD_opencv_viz你是着不到的,就像下图这个样子。

这里的VTK库的路径,其实这里是要找VTKConfig.cmake文件存在的路径,比如前面我们编译过VTK,就有这样的地址

正确填入地址,就会出现Build_opecv_viz这个选项,这个也是默认选中的。

其他一些注意,不是必须的:

将world选上,这样生成的结果只有一个文件。

这里的build_tests可以去掉,为了使提高编译效率。
然后两次generate,一次confige,这个不变的永恒。
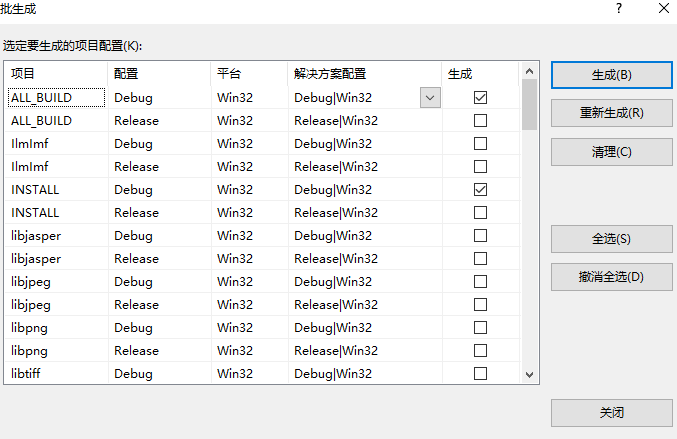
使用批生成最为便捷,这里展示的只是debug版本。
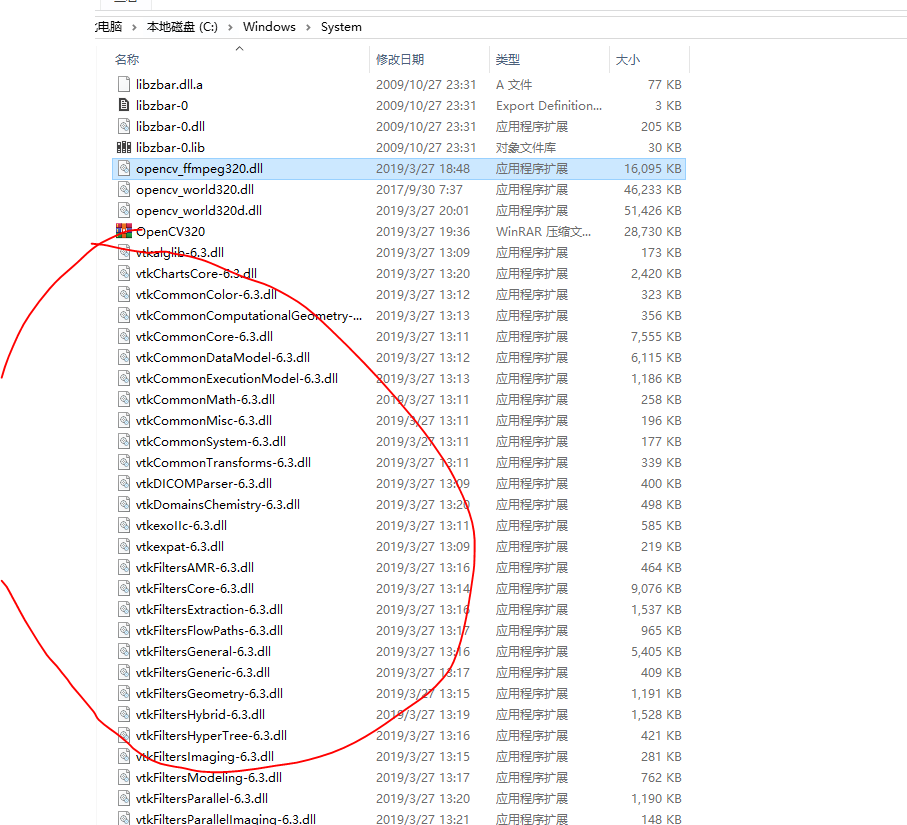
VTK自己带的许多.dll,需要放到PATH能够找到的地方,比如我比较喜欢放windows/system
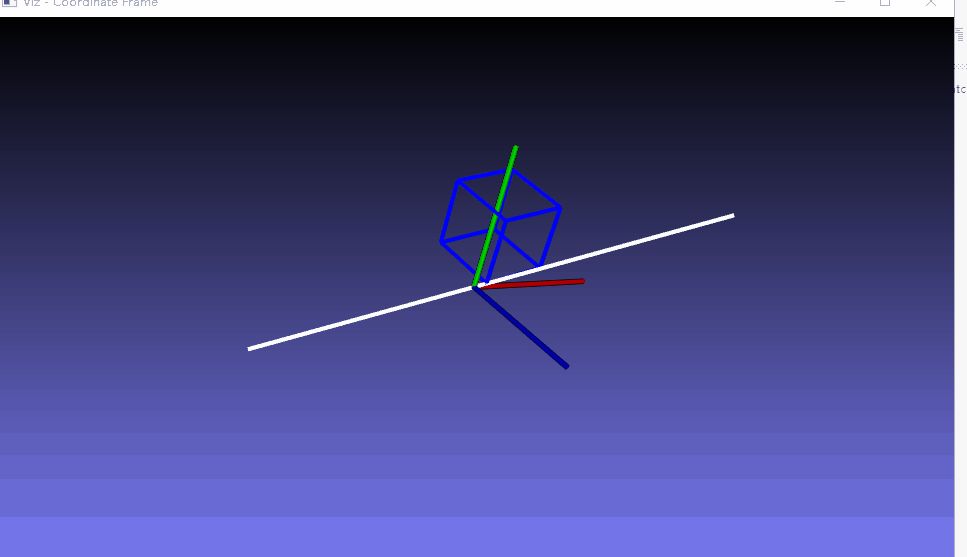
三、测试例子
这里就是生成一个可以运行的例子,仅仅是测试viz编译成功
#include "stdafx.h"
#include <opencv2/viz/vizcore.hpp>
#include <opencv2/calib3d/calib3d.hpp>
#include <iostream>

using namespace cv;
using namespace std;

/**
* @function main
*/
int main()
{
    /// Create a window
    viz::Viz3d myWindow("Coordinate Frame");
    /// Add coordinate axes
    myWindow.showWidget("Coordinate Widget", viz::WCoordinateSystem());
    /// Add line to represent (1,1,1) axis
    viz::WLine axis(Point3f(-1.0f, -1.0f, -1.0f), Point3f(1.0f, 1.0f, 1.0f));
    axis.setRenderingProperty(viz::LINE_WIDTH, 4.0);
    myWindow.showWidget("Line Widget", axis);
    /// Construct a cube widget
    viz::WCube cube_widget(Point3f(0.5, 0.5, 0.0), Point3f(0.0, 0.0, -0.5), true, viz::Color::blue());
    cube_widget.setRenderingProperty(viz::LINE_WIDTH, 4.0);
    /// Display widget (update if already displayed)
    myWindow.showWidget("Cube Widget", cube_widget);
    /// Rodrigues vector
    Mat rot_vec = Mat::zeros(1, 3, CV_32F);
    float translation_phase = 0.0, translation = 0.0;
    while (!myWindow.wasStopped())
    {
        //* Rotation using rodrigues
        /// Rotate around (1,1,1)
        rot_vec.at<float>(0, 0) += CV_PI * 0.01f;
        rot_vec.at<float>(0, 1) += CV_PI * 0.01f;
        rot_vec.at<float>(0, 2) += CV_PI * 0.01f;
        /// Shift on (1,1,1)
        translation_phase += CV_PI * 0.01f;
        translation = sin(translation_phase);
        Mat rot_mat;
        Rodrigues(rot_vec, rot_mat);
        /// Construct pose
        Affine3f pose(rot_mat, Vec3f(translation, translation, translation));
        myWindow.setWidgetPose("Cube Widget", pose);
        myWindow.spinOnce(1, true);
    }
    return 0;
}
附:参考文章
1、《OpenCV 中viz模块的编译和使用(VS2015)》 https://blog.csdn.net/A_L_A_N/article/details/81571165;
2、《OpenCV 3D显示Viz模块》 https://blog.csdn.net/Asimov_Liu/article/details/83539345
3、《【opencv】viz 3D虚拟空间模块编译及使用》https://blog.csdn.net/qq_15947787/article/details/79225845
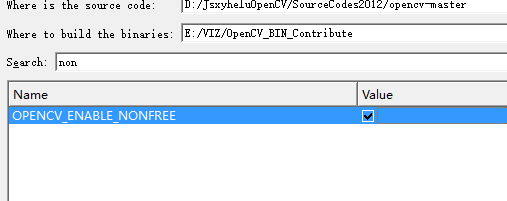
p.s.1 添加Contribute编译
由于深度相关的操作,很多时候都需要使用特征点,所以联编contribute是需要的,这里将主要步骤截图说明,首先是保证前面的操作都不变,可以直接在前面的基础上进行操作
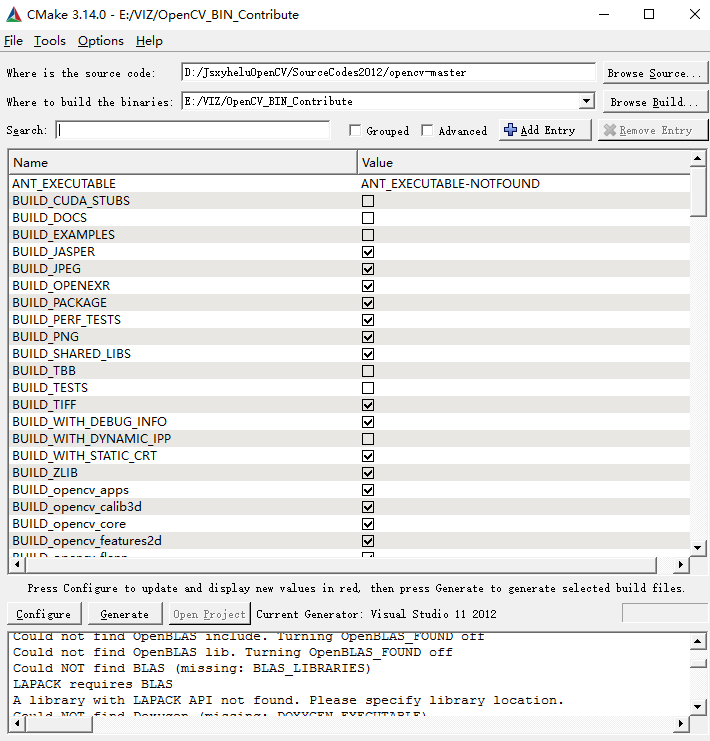
所说的不同,也主要是这两个地方

然后后面的操作也是一样的。
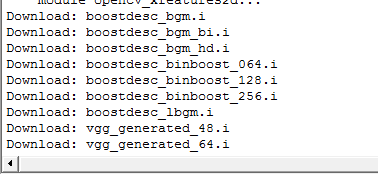
当然它自己也会下一堆的东西。
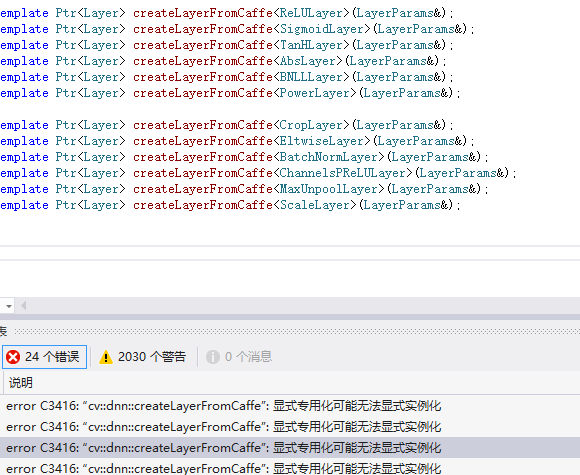
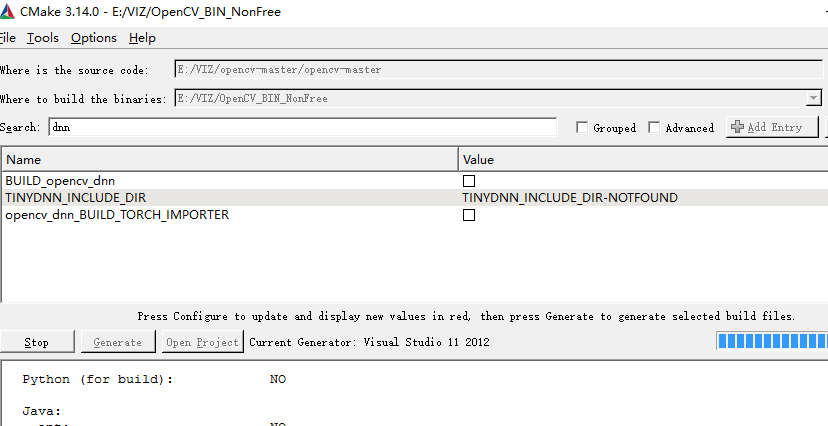
在vs2012下编译DNN会报这样的错误,由于我们这里不使用DNN,所以直接去掉。
在项目配置的时候,使用两个world
p.s.2 OpenCV自己带的几个例子运行
1、Pose of a widget
这个就是上面的例子。具体解释:
Explanation
Here is the general structure of the program:
- Create a visualization window. viz::Viz3d myWindow("Coordinate Frame");
- Show coordinate axes in the window using CoordinateSystemWidget. myWindow.showWidget("Coordinate Widget", viz::WCoordinateSystem());
- Display a line representing the axis (1,1,1). viz::WLine axis(Point3f(-1.0f,-1.0f,-1.0f), Point3f(1.0f,1.0f,1.0f));
axis.setRenderingProperty(viz::LINE_WIDTH, 4.0);
myWindow.showWidget("Line Widget", axis); - Construct a cube. viz::WCube cube_widget(Point3f(0.5,0.5,0.0), Point3f(0.0,0.0,-0.5), true, viz::Color::blue());
cube_widget.setRenderingProperty(viz::LINE_WIDTH, 4.0);
myWindow.showWidget("Cube Widget", cube_widget); - Create rotation matrix from rodrigues vector rot_vec.at<float>(0,0) += CV_PI * 0.01f;
rot_vec.at<float>(0,1) += CV_PI * 0.01f;
rot_vec.at<float>(0,2) += CV_PI * 0.01f;
...
Mat rot_mat;
Rodrigues(rot_vec, rot_mat); - Use Affine3f to set pose of the cube.
- Animate the rotation using wasStopped and spinOnce while(!myWindow.wasStopped())
{
...
myWindow.spinOnce(1, true);
}
2、Transformations
这
#include "stdafx.h"
#include <opencv2/viz.hpp>
#include <iostream>
#include <fstream>
using namespace cv;
using namespace std;
static void help()
{
cout
<< "--------------------------------------------------------------------------" << endl
<< "This program shows how to use makeTransformToGlobal() to compute required pose,"
<< "how to use makeCameraPose and Viz3d::setViewerPose. You can observe the scene "
<< "from camera point of view (C) or global point of view (G)" << endl
<< "Usage:" << endl
<< "./transformations [ G | C ]" << endl
<< endl;
}
static Mat cvcloud_load()
{
Mat cloud(1, 1889, CV_32FC3);
ifstream ifs("bunny.ply");
string str;
for(size_t i = 0; i < 12; ++i)
getline(ifs, str);
Point3f* data = cloud.ptr<cv::Point3f>();
float dummy1, dummy2;
for(size_t i = 0; i < 1889; ++i)
ifs >> data[i].x >> data[i].y >> data[i].z >> dummy1 >> dummy2;
cloud *= 5.0f;
return cloud;
}
int main(int argn, char **argv)
{
help();
if (argn < 2)
{
cout << "Missing arguments." << endl;
return 1;
}
bool camera_pov = (argv[1][0] == 'C');
viz::Viz3d myWindow("Coordinate Frame");
myWindow.showWidget("Coordinate Widget", viz::WCoordinateSystem());
Vec3f cam_pos(3.0f,3.0f,3.0f), cam_focal_point(3.0f,3.0f,2.0f), cam_y_dir(-1.0f,0.0f,0.0f);
Affine3f cam_pose = viz::makeCameraPose(cam_pos, cam_focal_point, cam_y_dir);
Affine3f transform = viz::makeTransformToGlobal(Vec3f(0.0f,-1.0f,0.0f), Vec3f(-1.0f,0.0f,0.0f), Vec3f(0.0f,0.0f,-1.0f), cam_pos);
Mat bunny_cloud = cvcloud_load();
viz::WCloud cloud_widget(bunny_cloud, viz::Color::green());
Affine3f cloud_pose = Affine3f().translate(Vec3f(0.0f,0.0f,3.0f));
Affine3f cloud_pose_global = transform * cloud_pose;
if (!camera_pov)
{
viz::WCameraPosition cpw(0.5); // Coordinate axes
viz::WCameraPosition cpw_frustum(Vec2f(0.889484, 0.523599)); // Camera frustum
myWindow.showWidget("CPW", cpw, cam_pose);
myWindow.showWidget("CPW_FRUSTUM", cpw_frustum, cam_pose);
}
myWindow.showWidget("bunny", cloud_widget, cloud_pose_global);
if (camera_pov)
myWindow.setViewerPose(cam_pose);
myWindow.spin();
return 0;
}Explanation
Here is the general structure of the program:
- Create a visualization window. viz::Viz3d myWindow("Transformations");
- Get camera pose from camera position, camera focal point and y direction. Point3f cam_pos(3.0f,3.0f,3.0f), cam_focal_point(3.0f,3.0f,2.0f), cam_y_dir(-1.0f,0.0f,0.0f);
Affine3f cam_pose = viz::makeCameraPose(cam_pos, cam_focal_point, cam_y_dir); - Obtain transform matrix knowing the axes of camera coordinate system. Affine3f transform = viz::makeTransformToGlobal(Vec3f(0.0f,-1.0f,0.0f), Vec3f(-1.0f,0.0f,0.0f), Vec3f(0.0f,0.0f,-1.0f), cam_pos);
- Create a cloud widget from bunny.ply file Mat bunny_cloud = cvcloud_load();
viz::WCloud cloud_widget(bunny_cloud, viz::Color::green()); - Given the pose in camera coordinate system, estimate the global pose. Affine3f cloud_pose = Affine3f().translate(Vec3f(0.0f,0.0f,3.0f));
Affine3f cloud_pose_global = transform * cloud_pose; - If the view point is set to be global, visualize camera coordinate frame and viewing frustum. if (!camera_pov)
{
viz::WCameraPosition cpw(0.5); // Coordinate axes
viz::WCameraPosition cpw_frustum(Vec2f(0.889484, 0.523599)); // Camera frustum
myWindow.showWidget("CPW", cpw, cam_pose);
myWindow.showWidget("CPW_FRUSTUM", cpw_frustum, cam_pose);
} - Visualize the cloud widget with the estimated global pose myWindow.showWidget("bunny", cloud_widget, cloud_pose_global);
- If the view point is set to be camera's, set viewer pose to cam_pose. if (camera_pov)
myWindow.setViewerPose(cam_pose);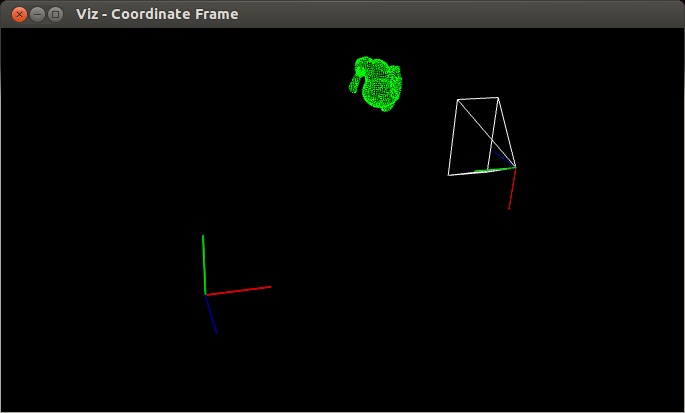 3、Creating a 3D histogram#include "stdafx.h"#include <opencv2/core.hpp>#include <opencv2/imgproc.hpp>#include <opencv2/highgui.hpp>#include <iostream>using namespace std;using namespace cv;#ifdef HAVE_OPENCV_VIZ#include <opencv2/viz.hpp>const String keys ="{Aide h usage ? help | | print this message }""{@arg1 | | Full path to color imag (3 channels)}";struct Histo3DData {Mat histogram;int seuil;double threshold;Ptr<viz::Viz3d> fen3D;int nbWidget;bool status;double maxH;int code;};void DrawHistogram3D(Histo3DData &);void AddSlidebar(String sliderName, String windowName, int sliderMin, int sliderMax, int valeurDefaut, int *sliderVal, void(*f)(int, void *), void *r);void UpdateThreshold(int , void * r);void KeyboardViz3d(const viz::KeyboardEvent &w, void *t);void DrawHistogram3D(Histo3DData &h){int planSize = (int)h.histogram.step1(0);int cols = (int)h.histogram.step1(1);int rows = (int)planSize / cols;int plans = (int)h.histogram.total() / planSize;h.fen3D->removeAllWidgets();h.nbWidget=0;if (h.nbWidget==0)h.fen3D->showWidget("Axis", viz::WCoordinateSystem(10));for (int k = 0; k < plans; k++){for (int i = 0; i < rows; i++){for (int j = 0; j < cols; j++){double x = h.histogram.at<float>(k, i, j);if (x >= h.threshold){double r=std::max(x/h.maxH,0.1);viz::WCube s(Point3d(k - r / 2, i - r / 2, j - r / 2), Point3d(k + r / 2, i + r / 2, j + r / 2), false, viz::Color(j / double(plans) * 255, i / double(rows) * 255, k / double(cols) * 255));h.fen3D->showWidget(format("I3d%d", h.nbWidget++), s);}}}}h.status = false;}void KeyboardViz3d(const viz::KeyboardEvent &w, void *t){Histo3DData *x=(Histo3DData *)t;if (w.action)cout << "you pressed "<< w.symbol<< " in viz window "<<x->fen3D->getWindowName()<<" ";x->code= w.code;switch (w.code) {case '/':x->status=true;x->threshold *= 0.9;break;case '*':x->status = true;x->threshold *= 1.1;break;}if (x->status){cout << x->threshold << " ";DrawHistogram3D(*x);}}void AddSlidebar(String sliderName, String windowName, int sliderMin, int sliderMax, int defaultSlider, int *sliderVal, void(*f)(int, void *), void *r){createTrackbar(sliderName, windowName, sliderVal, 1, f, r);setTrackbarMin(sliderName, windowName, sliderMin);setTrackbarMax(sliderName, windowName, sliderMax);setTrackbarPos(sliderName, windowName, defaultSlider);}void UpdateThreshold(int , void * r){Histo3DData *h = (Histo3DData *)r;h->status=true;h->threshold = h->seuil/1000000.0;cout<<"Widget : "<<h->nbWidget<<","<< h->threshold<<" ";}int main (int argc,char **argv){CommandLineParser parser(argc, argv, keys);if (parser.has("help")){parser.printMessage();return 0;}String nomFic = parser.get<String>(0);Mat img;if (nomFic.length() != 0){img = imread(nomFic, IMREAD_COLOR);if (img.empty()){cout << "Image does not exist!";return 0;}}else{img = Mat(512,512,CV_8UC3);parser.printMessage();RNG r;r.fill(img(Rect(0, 0, 256, 256)), RNG::NORMAL, Vec3b(60, 40, 50), Vec3b(10, 5, 20));r.fill(img(Rect(256, 0, 256, 256)), RNG::NORMAL, Vec3b(160, 10, 50), Vec3b(20, 5, 10));r.fill(img(Rect(0, 256, 256, 256)), RNG::NORMAL, Vec3b(90, 100, 50), Vec3b(10, 20, 20));r.fill(img(Rect(256, 256, 256, 256)), RNG::NORMAL, Vec3b(100, 10, 150), Vec3b(10, 5, 40));}Histo3DData h;h.status=true;h.seuil=90;h.threshold= h.seuil/1000000.0;float hRange[] = { 0, 256 };const float* etendu[] = { hRange, hRange,hRange };int hBins = 32;int histSize[] = { hBins, hBins , hBins };int channel[] = { 2, 1,0 };calcHist(&img, 1, channel, Mat(), h.histogram, 3, histSize, etendu, true, false);normalize(h.histogram, h.histogram, 100.0/(img.total()), 0, NORM_MINMAX, -1, Mat());minMaxIdx(h.histogram,NULL,&h.maxH,NULL,NULL);namedWindow("Image");imshow("Image",img);AddSlidebar("threshold","Image",0,100,h.seuil,&h.seuil, UpdateThreshold,&h);waitKey(30);h.fen3D = makePtr<viz::Viz3d>("3D Histogram");h.nbWidget=0;h.fen3D->registerKeyboardCallback(KeyboardViz3d,&h);DrawHistogram3D(h);while (h.code!=27){h.fen3D->spinOnce(1);if (h.status)DrawHistogram3D(h);if (h.code!=27)h.code= waitKey(30);}return 0;}#elseint main(int argc, char **argv){cout << " you need VIZ module ";return 0;}#endif
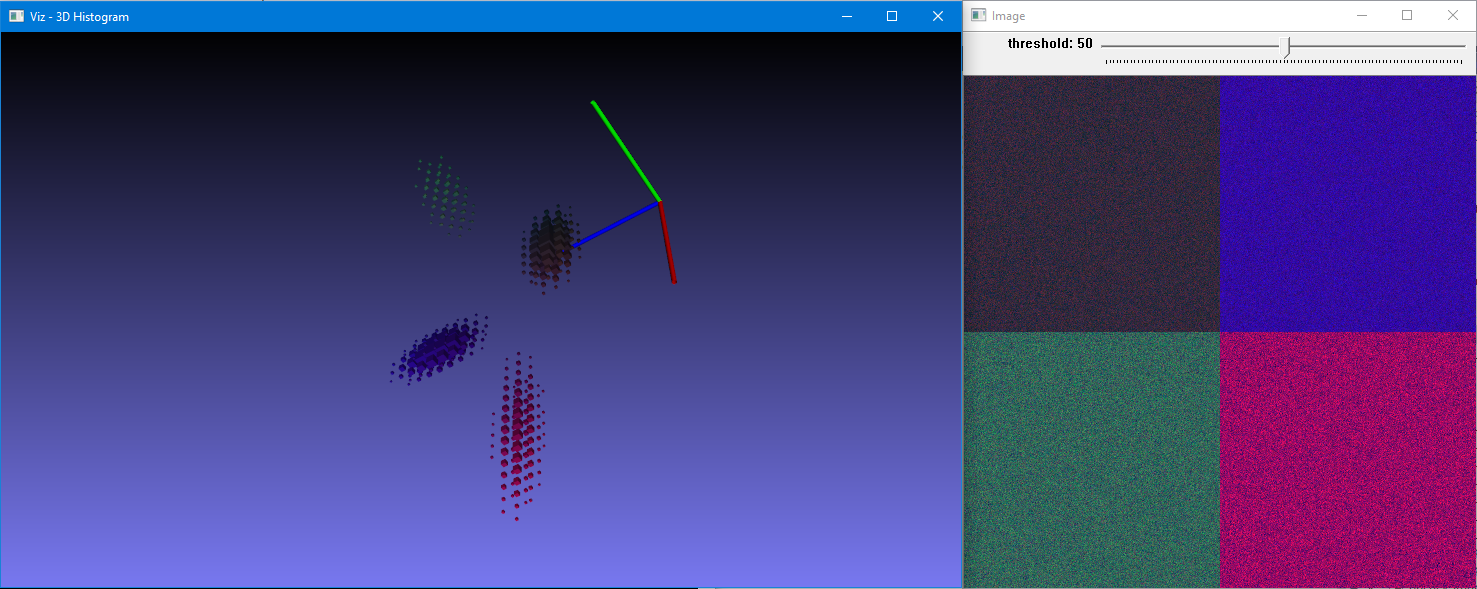 小结:这里做的,都是VTK的操作,所以想把这块搞明白,应该去搞VTK.而由于VTK本身自成一套,所以要以VIZ作为一个动机最好。