1、Bean 的配置
Spring可以看做一个大型工厂,用于生产和管理Spring容器中的Bean,Spring框架支持XML和Properties两种格式的配置文件,在实际开发中常用XML格式的配置文件。
XML配置文件的跟标签是<beans>,<beans>中包含了多个<bean>子元素,每个<bean>元素定义一个Bean,并描述Bean如何被装配到Spring容器中。
<bean>元素的常用属性及其子元素说明如下:
- id属性:Bean在BeanFactory中的唯一标识,在代码中通过BeanFactory获取Bean实例时需要以此作为索引名称;
- name属性:和id属性的用法类似,该属性的值中可以包含特殊字符;
- class属性:Bean的具体实现类,使用类的名(例如 dao.TestDIDaoImpl);
- scope属性:指定Bean实例的作用域;
- <constructor-arg>子元素:<bean>元素的子元素,使用构造方法注入,指定构造方法的参数。该元素的index属性指定参数的序号,ref属性指定对BeanFactory中其他Bean的引用关系,type属性指定参数类型,value属性指定参数的常量值;
- <property>子元素:<bean>元素的子元素,用于设置一个属性。该元素的name属性指定Bean实例中相应的属性名称,value属性指定Bean的属性值,ref属性指定属性对BeanFactory中其他Bean的引用关系;
- <list>子元素:<property>元素的子元素,用于封装List或数组类型的依赖注入;
- <map>子元素:<property>元素的子元素,用于封装Map类型的依赖注入;
- <set>子元素:<property>元素的子元素,用于封装Set类型的依赖注入;
- <entry>子元素:<map>元素的子元素,用于设置一个键值对;
2、Bean 的实例化
Spring框架实例化Bean有3种方法,即构造方法实例化、静态工厂实例化、实例工厂实例化。
2.1、构造方法实例化
在Spring框架中,Spring容器可以调用Bean对应类中的无参构造方法来实例化Bean,这种方法称为构造方法实例化。
在src目录下创建entity包,并创建BeanClass类,代码如下:
package entity;

public class BeanClass {
    public BeanClass() {
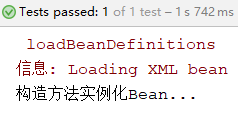
        System.out.println("构造方法实例化Bean...");
    }
}
在applicationContext.xml中配置Bean
<?xml version="1.0" encoding="UTF-8"?>
<beans xmlns="http://www.springframework.org/schema/beans"
       xmlns:xsi="http://www.w3.org/2001/XMLSchema-instance"
       xsi:schemaLocation="http://www.springframework.org/schema/beans http://www.springframework.org/schema/beans/spring-beans.xsd">

    <!--构造方法实例化Bean-->
    <bean id="beanClass" class="entity.BeanClass"></bean>
</beans>
测试代码
@Test
public void demo(){
    //初始化Spring容器ApplicationContext,加载配置文件
    ApplicationContext application = new ClassPathXmlApplicationContext("applicationContext.xml");
    //通过容器获取实例
    BeanClass beanClass = (BeanClass) application.getBean("beanClass");
}
运行结果

2.2、静态工厂实例化
创建BeanClass类,代码如下:
package entity;

public class BeanClass {
    public BeanClass(String str){
        System.out.println(str);
    }
}
创建静态工厂类,代码如下:
package entity;

public class BeanStaticFactory {
    public static BeanClass createBean(){
        return new BeanClass("静态工厂实例化Bean...");
    }
}
在applicationContext.xml配置静态工厂Bean
<?xml version="1.0" encoding="UTF-8"?>
<beans xmlns="http://www.springframework.org/schema/beans"
       xmlns:xsi="http://www.w3.org/2001/XMLSchema-instance"
       xsi:schemaLocation="http://www.springframework.org/schema/beans http://www.springframework.org/schema/beans/spring-beans.xsd">

    <!--静态工厂实例化Bean,factory-method属性指定静态方法-->
    <bean id="beanStaticFactory" class="entity.BeanStaticFactory" factory-method="createBean"></bean>
</beans>
测试代码
@Test
public void demo(){
    //初始化Spring容器ApplicationContext,加载配置文件
    ApplicationContext application = new ClassPathXmlApplicationContext("applicationContext.xml");
    //通过容器获取实例
    BeanClass beanClass = (BeanClass) application.getBean("beanStaticFactory");
}
运行结果

2.3、实例工厂实例化
创建BeanClass类,代码如下:
package entity;

public class BeanClass {
   /* public BeanClass() {
        System.out.println("构造方法实例化Bean...");
    }*/
    public BeanClass(String str){
        System.out.println(str);
    }
}
创建工厂类,代码如下:
package entity;

public class BeanFactory {
    public BeanClass createBean(){
        return new BeanClass("实例工厂实例化Bean...");
    }
}
在applicationContext.xml中添加配置信息
<?xml version="1.0" encoding="UTF-8"?>
<beans xmlns="http://www.springframework.org/schema/beans"
       xmlns:xsi="http://www.w3.org/2001/XMLSchema-instance"
       xsi:schemaLocation="http://www.springframework.org/schema/beans http://www.springframework.org/schema/beans/spring-beans.xsd">

    <!--配置工厂-->
    <bean id="beanFactory" class="entity.BeanFactory"></bean>
    <!--实例工厂实例化Bean,
        factory-bean属性指定配置工厂,
        factory-method属性指定实例化Bean的方法
        -->
    <bean id="instanceBean" factory-bean="beanFactory" factory-method="createBean"></bean>

</beans>
测试代码
@Test
public void demo(){
    //初始化Spring容器ApplicationContext,加载配置文件
    ApplicationContext application = new ClassPathXmlApplicationContext("applicationContext.xml");
    //通过容器获取实例
    BeanClass beanClass = (BeanClass) application.getBean("instanceBean");
}
运行结果

3、Bean 的作用域
在Spring中不仅可以完成Bean的实例化,还可以为Bean指定作用域,具体用法是在<bean>元素上配置scope属性,属性的值有以下几种:
- sigleton:默认的作用域,使用singleton定义的Bean在Spring容器中只有一个Bean实例,即单例模式;
- prototype:Spring容器每次获取prototype定义的Bean,容器都将创建一个新的Bean实例,即多例模式;
- request:在一次HTTP请求中容器将返回一个Bean实例,不同的HTTP请求返回不同的Bean实例。仅在Web Spring应用程序上下文中使用;
- session:在一个HTTP Session中,容器将返回同一个Bean实例。仅在Web Spring应用程序上下文中使用;
- application:为每个ServletContext对象创建一个实例,即同一个应用共享一个Bean实例。仅在Web Spring应用程序上下文中使用;
- websocket:为每个WebSocket对象创建一个Bean实例。仅在Web Spring应用程序上下文中使用;
4、Bean 的生命周期
Spring初始化bean或销毁bean时,有时需要做一些处理工作,因此Spring可以在创建和销毁bean的时候调用bean的两个生命周期方法,代码示例如下:
创建BeanClass类
package entity;

public class BeanClass {
   public void initMyself(){
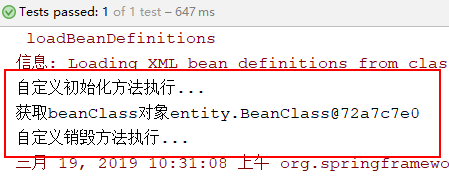
       System.out.println("自定义初始化方法执行...");
   }
   public void destoryMyself(){
       System.out.println("自定义销毁方法执行...");
   }
}
在applicationContext.xml中配置Bean
<?xml version="1.0" encoding="UTF-8"?>
<beans xmlns="http://www.springframework.org/schema/beans"
       xmlns:xsi="http://www.w3.org/2001/XMLSchema-instance"
       xsi:schemaLocation="http://www.springframework.org/schema/beans http://www.springframework.org/schema/beans/spring-beans.xsd">

   <!--配置bean,
       使用init-method属性指定初始化方法,
       使用destroy-method属性指定销毁方法
       -->
    <bean id="beanClass" class="entity.BeanClass" init-method="initMyself" destroy-method="destoryMyself"></bean>

</beans>
测试代码
@Test
public void demo(){
    //为了方便演示销毁方法的执行,使用ClassPathXmlApplicationContext
    ClassPathXmlApplicationContext ctx = new ClassPathXmlApplicationContext("applicationContext.xml");
    //通过容器获取实例
    BeanClass beanClass = (BeanClass) ctx.getBean("beanClass");
    System.out.println("获取beanClass对象"+beanClass);
    ctx.close();//关闭容器,销毁Bean对象

}
运行结果

5、Bean的装配方式
5.1、基于XML配置的装配
创建BeanClass实体类
public class BeanClass {
    private String[] arrs;//数组类型
    private List<String> list;//List集合类型
    private Set<String> set;//Set集合类型
    private Map<String,Integer> map;//Map集合类型
    private Properties prop;//属性类型

    //getter和setter方法
    //toString()方法

}
在applicationContext.xml中配置Bean
<?xml version="1.0" encoding="UTF-8"?>
<beans xmlns="http://www.springframework.org/schema/beans"
       xmlns:xsi="http://www.w3.org/2001/XMLSchema-instance"
       xsi:schemaLocation="http://www.springframework.org/schema/beans http://www.springframework.org/schema/beans/spring-beans.xsd">

    <!--集合类型属性注入-->
    <bean id="beanClass" class="entity.BeanClass">
        <!--数组类型-->
        <property name="arrs">
            <list>
                <value>aa</value>
                <value>bb</value>
            </list>
        </property>
        <!--List集合-->
        <property name="list">
            <list>
                <value>111</value>
                <value>222</value>
            </list>
        </property>
        <!--Set集合-->
        <property name="set">
            <set>
                <value>aaa</value>
                <value>bbb</value>
            </set>
        </property>
        <!--Map集合-->
        <property name="map">
            <map>
                <entry key="aa" value="11"></entry>
                <entry key="bb" value="22"></entry>
            </map>
        </property>
        <!--Properties属性-->
        <property name="prop">
            <props>
                <prop key="aa">11</prop>
                <prop key="bb">22</prop>
            </props>
        </property>
    </bean>

</beans>
测试代码
@Test
public void demo(){
    //初始化Spring容器ApplicationContext,加载配置文件
    ClassPathXmlApplicationContext ctx = new ClassPathXmlApplicationContext("applicationContext.xml");
    //通过容器获取实例
    BeanClass beanClass = (BeanClass) ctx.getBean("beanClass");
    System.out.println(beanClass);
}
运行结果

5.2、基于注解的装配
在Spring框架中定义了一系列的注解,下面介绍几个常用注解:
- @Component:该注解是一个泛化的概念,仅仅表示一个组件对象(Bean),可以作用在任何层次上;
- @Repository:该注解用于将数据访问层(DAO)的类标识为Bean,即注解数据访问层Bean,其功能与@Component相同;
- @Service:该注解用于标注一个业务逻辑注解类(Service层),其功能与@Component相同;
- @Controller:该注解用于标注一个控制器组件类(Spring MVC的Controller),其功能与@Component相同;
- @Autowired:该注解可以对类成员变量、方法及构造方法进行标注,完成自动装配的工作。通过使用@Autowired来消除setter和getter方法。默认按照Bean的类型进行装配;
- @Resource:该注解与@Autowired的功能一样,区别在于该注解默认是按照名称来装配注入的,只有当找不到与名称匹配的Bean时才会按照类型来装配注入;@Autowired默认按照Bean的类型进行装配,如果想按照名称来装配注入,则需要和@Qualifier一起使用。@Resource注解有两个属性,name属性指定Bean实例名称,type属性指定Bean类型;
- @Qualifier:该注解与@Autowired注解配合使用。当@Autowired注解需要按照名称来装配注入时需要和该注解一起使用,Bean的实例名称由@Qualifier注解的参数指定;
在上面几个注解中,虽然@Repository、@Service、@Controller等注解的功能与@Component注解相同,但为了类的标注层次化更加清晰,在实际开发中推荐使用以下方式进行配置:
- @Repository标注数据访问层(DAO层);
- @Service标注业务逻辑层(Service层);
- @Controller标注控制层;
代码示例如下:
(1)创建Dao层
创建dao包,并创建TestDao接口和接口实现类TestDaoImpl,并将实现类TestDaoImpl使用@Repository注解标注为数据访问层。
TestDao接口,代码如下:
package dao;

public interface TestDao {
    public void save();
}
TestDaoImpl实现类,代码如下:
package dao;

import org.springframework.stereotype.Repository;

/*如何在Service层中使用@Resource(name="testDao"),
  @Repository("testDao")中的testDao不能省略
*/
@Repository("testDao")
public class TestDaoImpl implements TestDao {
    @Override
    public void save() {
        System.out.println("testDao save");
    }
}
(2)创建Service层
创建service包,并创建TestService接口和接口实现类TestServiceImpl,并将实现类TestServiceImpl使用@Service注解标注为业务逻辑层。
TestService接口,代码如下:
package service;

public interface TestService {
    public void save();
}
TestServiceImpl接口实现类,代码如下:
package service;

import dao.TestDao;
import org.springframework.stereotype.Service;
import javax.annotation.Resource;

@Service("testService")
public class TestServiceImpl implements TestService {

    @Resource(name = "testDao")
    private TestDao testDao;

    @Override
    public void save() {
        testDao.save();
        System.out.println("testService save");
    }
}
(3)创建Controller层
创建controller包,并创建TestController类,将TestController类使用@Controller注解标注为控制器层。
TestController类,代码如下:
package controller;

import org.springframework.beans.factory.annotation.Autowired;
import org.springframework.stereotype.Controller;
import service.TestService;

@Controller
public class TestController {

    @Autowired
    private TestService testService;

    public void save(){
        testService.save();
        System.out.println("testController save");
    }
}
(4)配置注解
在applicationContext.xml中添加context约束,并配置context扫描包
<?xml version="1.0" encoding="UTF-8"?>
<beans xmlns="http://www.springframework.org/schema/beans"
       xmlns:xsi="http://www.w3.org/2001/XMLSchema-instance"
       xmlns:context="http://www.springframework.org/schema/context"
       xsi:schemaLocation="http://www.springframework.org/schema/beans
                        http://www.springframework.org/schema/beans/spring-beans.xsd
                        http://www.springframework.org/schema/context
                        http://www.springframework.org/schema/context/spring-context.xsd">

    <!--使用context命名空间,通过Spring扫描指定包-->
    <context:component-scan base-package="dao"></context:component-scan>
    <context:component-scan base-package="service"></context:component-scan>
    <context:component-scan base-package="controller"></context:component-scan>

</beans>
(5)创建测试类
测试方法,代码如下:
@Test
public void demo(){
    //初始化Spring容器ApplicationContext,加载配置文件
    ClassPathXmlApplicationContext ctx = new ClassPathXmlApplicationContext("applicationContext.xml");
    //通过容器获取实例
    TestController testCon = (TestController) ctx.getBean("testController");
    testCon.save();
}
运行结果:
