前言
线程,英文Thread。在java中,创建线程的方式有三种:
1、Thread
2、Runnable
3、Callable
在详细介绍下这几种方式之前,我们先来看下Thread类和Runnable接口。
Runnable接口
接口中只有一个run()方法,等待实现类去实现。
- package java.lang;
- @FunctionalInterface
- public interface Runnable {
-
- public abstract void run();
- }
Thread类
该类实现了Runnable接口,也提供了很多其他的方法,如yield(),join()等
- package java.lang;
- public
- class Thread implements Runnable {
- //获取当前线程
- public static native Thread currentThread();
- public static native void yield();
- //一系列的构造函数
- public Thread(Runnable target, String name) {
- init(null, target, name, 0);
- }
- public Thread(ThreadGroup group, String name) {
- init(group, null, name, 0);
- }
- /*调用该方法时,jvm会调用run方法
- *Causes this thread to begin execution; the Java Virtual Machine
- * calls the run method of this thread.
- */
- public synchronized void start() {
-
- if (threadStatus != 0)
- throw new IllegalThreadStateException();
-
- group.add(this);
-
- boolean started = false;
- try {
- start0();
- started = true;
- } finally {
- try {
- if (!started) {
- group.threadStartFailed(this);
- }
- } catch (Throwable ignore) {
-
- }
- }
- }
-
- }
一、实现Runnable接口
- public class i_Runnable {
-
- /**
- * 主线程main方法
- * @param args
- */
- public static void main(String[] args) {
- for (int i = 0; i < 100; i++) {
- System.out.println(Thread.currentThread().getName() + "====" + i);
- if (i == 20) {
- RunnableThreadTest rtt = new RunnableThreadTest();
- //子线程
- new Thread(rtt, "new Thread[1]====").start();
- //new Thread(rtt, "新线程2").start();
- }
- }
-
- }
- /**
- * RunnableThreadTest实现Runnable接口
- * @author YANG
- *
- */
- static class RunnableThreadTest implements Runnable {
- private int i;
-
- @Override
- public void run() {
- for (i = 0; i < 100; i++) {
- System.out.println(Thread.currentThread().getName() + " " + i);
- }
-
- }
-
- }
- }
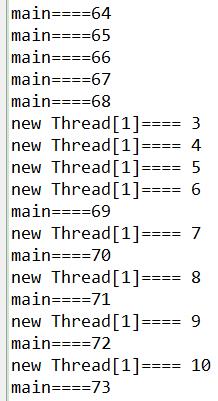
执行结果:
注意:
** 执行结果只截取了部分内容。
** 如果RunnableThreadTest类前不加static,会报错No enclosing instance of type i_Runnable is accessible. Must qualify the allocation with an enclosin。因为只有内部类修饰为静态时,才可以在静态类方法(main方法)中调用该类的成员变量和方法。
二、继承Thread类
- public class a_Thread {
- public static void main(String[] args) {
- Runner1 r=new Runner1();
- r.start(); //已经有thread 不需要new,直接调用start即可。
-
-
- for (int i = 0; i < 100; i++) {
- System.out.println("main Thread:"+i);
- }
- }
-
- //Runner1继承Thread类,重写run方法
- static class Runner1 extends Thread{
- @Override
- public void run() {
-
- for (int i = 0; i < 100; i++) {
- System.out.println("Runner1:"+i);
- }
-
- }
-
- }
- }
分析:换成run()方法之后,就变成了普通的方法调用,只有一个主线程,没有子线程。
执行结果:为了方便显示,我们将循环次数改为10。
- Runner1:0
- Runner1:1
- Runner1:2
- Runner1:3
- Runner1:4
- Runner1:5
- Runner1:6
- Runner1:7
- Runner1:8
- Runner1:9
- main Thread:0
- main Thread:1
- main Thread:2
- main Thread:3
- main Thread:4
- main Thread:5
- main Thread:6
- main Thread:7
- main Thread:8
- main Thread:9
三、实现Callable接口
前面两种方式是传统的线程技术中的内容,第三种方式Callable和Future是jdk1.5之后新增的。我们先来补充点东西,看看这种方式与之前的方式有什么联系。
- //实现Callable接口
- public class j_CallableTest implements Callable<String> {
- public static void main(String[] args) {
- j_CallableTest test=new j_CallableTest();
- FutureTask<String> ft=new FutureTask<>(test);
-
- for (int i = 0; i < 100; i++) {
- System.out.println(Thread.currentThread().getName()+" i的值为="+i);
- if(i==20){
- new Thread(ft,"子线程").start();
- }
- }
- }
-
- //重写call方法
- @Override
- public String call() throws Exception {
- int i = 0;
- String reString = "";
- for (; i < 100; i++) {
- reString = Thread.currentThread().getName() + " " + i;
- System.out.println(reString);
- }
- return reString;
- }
- }
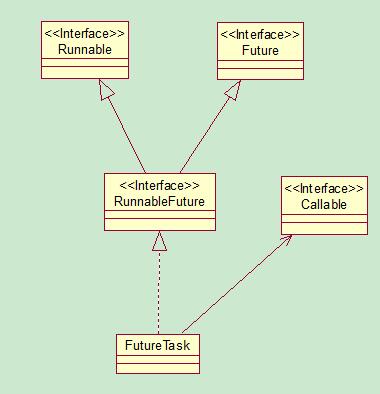
从上面可以看到,new Thread的方式还是用的public Thread(Runnable target, String name); 说明FutureTask也是Runnable类型的,他们之间的关系可以从下图中看出来。
那么,使用Callable和Future的方式有什么特点呢?
我们从他们的定义来看,Callable接口中只有一个方法,返回值为V。前两种方式都是返回void。
- @FunctionalInterface
- public interface Callable<V> {
- /**
- * Computes a result, or throws an exception if unable to do so.
- *
- * @return computed result
- * @throws Exception if unable to compute a result
- */
- V call() throws Exception;
- }
小结:
1、接口实现更灵活,java不支持多继承。在这方面,Runnable和Callable更有优势。
2、返回值问题。Runnable和Thread都不能有返回值,但Callable可以,而且支持多种类型的数据。
就这两点来看,新增的Callable和Future的实现方式优势十分明显啊。但是追到原理,其实这三种都可以归结为一种方式。