spring-cloud调用服务有两种方式,一种是Ribbon+RestTemplate, 另外一种是Feign。
Ribbon是一个基于HTTP和TCP客户端的负载均衡器,其实feign也使用了ribbon, 只要使用@FeignClient时,ribbon就会自动使用。
一、Ribbon
1.1
新建模块client-a
pom文件

<?xml version="1.0" encoding="UTF-8"?> <project xmlns="http://maven.apache.org/POM/4.0.0" xmlns:xsi="http://www.w3.org/2001/XMLSchema-instance" xsi:schemaLocation="http://maven.apache.org/POM/4.0.0 http://maven.apache.org/xsd/maven-4.0.0.xsd"> <parent> <artifactId>spring-cloud</artifactId> <groupId>com.feng</groupId> <version>0.0.1</version> </parent> <modelVersion>4.0.0</modelVersion><artifactId>client-a</artifactId> <dependencies> <dependency> <groupId>org.springframework.cloud</groupId> <artifactId>spring-cloud-starter-ribbon</artifactId> </dependency> </dependencies></project>
新建bootstrap.yml
server: port: 8910eureka:
//localhost:8010/eureka/
client:
serviceUrl:
defaultZone: http:
spring:
application:
name: client-a
ClientApplication, 这里我们需要注册一个RestTemplate,并且使用@LoadBalanced开启负载功能
/** * @author fengzp * @date 17/5/9 * @email fengzp@gzyitop.com * @company 广州易站通计算机科技有限公司 */ @SpringBootApplication @EnableDiscoveryClient public class ClientApplication {</span><span style="color: #0000ff;">public</span> <span style="color: #0000ff;">static</span> <span style="color: #0000ff;">void</span><span style="color: #000000;"> main(String[] args) { SpringApplication.run(ClientApplication.</span><span style="color: #0000ff;">class</span><span style="color: #000000;">, args); } @Bean @LoadBalanced RestTemplate restTemplate(){ </span><span style="color: #0000ff;">return</span> <span style="color: #0000ff;">new</span><span style="color: #000000;"> RestTemplate(); }}
测试用的controller
/** * @author fengzp * @date 17/5/9 * @email fengzp@gzyitop.com * @company 广州易站通计算机科技有限公司 */ @RestController public class TestController {@Autowired RestTemplate restTemplate; @RequestMapping(</span><span style="color: #800000;">"</span><span style="color: #800000;">/hi</span><span style="color: #800000;">"</span><span style="color: #000000;">) </span><span style="color: #0000ff;">public</span><span style="color: #000000;"> String hi(@RequestParam String id){ </span><span style="color: #0000ff;">return</span> restTemplate.getForObject(<span style="color: #800000;">"</span><span style="color: #800000;">http://service-a/hi?id=</span><span style="color: #800000;">"</span>+id, String.<span style="color: #0000ff;">class</span><span style="color: #000000;">); }}
1.2
为了测试负载功能,这里要再新建一个模块service-b, 和上一篇的service-a的代码基本相同,只把端口修改了就可以。
把client-a和service-b都启动成功后,打开eureka中心应该看到:
1.3
打开http://localhost:8910/hi?id=123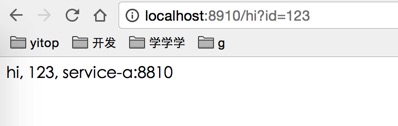
可以看到服务已经成功调用。
然后刷新页面
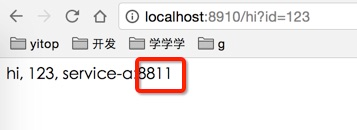
看到端口已经改变,说明负载功能成功实现
二、feign
2.1
新建模块client-b
pom文件
<?xml version="1.0" encoding="UTF-8"?> <project xmlns="http://maven.apache.org/POM/4.0.0" xmlns:xsi="http://www.w3.org/2001/XMLSchema-instance" xsi:schemaLocation="http://maven.apache.org/POM/4.0.0 http://maven.apache.org/xsd/maven-4.0.0.xsd"> <parent> <artifactId>spring-cloud</artifactId> <groupId>com.feng</groupId> <version>0.0.1</version> </parent> <modelVersion>4.0.0</modelVersion><artifactId>client-b</artifactId> <dependencies> <dependency> <groupId>org.springframework.cloud</groupId> <artifactId>spring-cloud-starter-feign</artifactId> </dependency> </dependencies></project>
bootstrap.yml
server: port: 8911eureka:
//localhost:8010/eureka/
client:
serviceUrl:
defaultZone: http:
spring:
application:
name: client-b
ClientApplication, 使用@EnableFeignClients开启feiginClient功能
/** * @author fengzp * @date 17/5/9 * @email fengzp@gzyitop.com * @company 广州易站通计算机科技有限公司 */ @SpringBootApplication @EnableDiscoveryClient @EnableFeignClients public class ClientApplication {</span><span style="color: #0000ff;">public</span> <span style="color: #0000ff;">static</span> <span style="color: #0000ff;">void</span><span style="color: #000000;"> main(String[] args) { SpringApplication.run(ClientApplication.</span><span style="color: #0000ff;">class</span><span style="color: #000000;">, args); }}
这里新建一个ServiceAFeignClient来调用service-a服务
@Component @FeignClient(value = "service-a") //这里的name对应调用服务的spring.applicatoin.name public interface ServiceAFeignClient {@RequestMapping(value </span>= <span style="color: #800000;">"</span><span style="color: #800000;">/hi</span><span style="color: #800000;">"</span><span style="color: #000000;">) String hi(@RequestParam(</span><span style="color: #800000;">"</span><span style="color: #800000;">id</span><span style="color: #800000;">"</span><span style="color: #000000;">) String id);}
Controller
@RestController public class TestController {@Autowired ServiceAFeignClient serviceAFeignClient; @RequestMapping(</span><span style="color: #800000;">"</span><span style="color: #800000;">/hi</span><span style="color: #800000;">"</span><span style="color: #000000;">) </span><span style="color: #0000ff;">public</span><span style="color: #000000;"> String hi(@RequestParam String id){ </span><span style="color: #0000ff;">return</span><span style="color: #000000;"> serviceAFeignClient.hi(id); }}
2.2
运行后的结果应该是和ribbon的相同。
个人感觉使用feign比较舒服,代码比较简洁。