pytest只是单独的一个单元测试框架,要完成app测试自动化需要把pytest
和appium进行整合,同时利用alltrue完成测试报告的产出。
编写常规的线性脚本具体的步骤如下:
1、设计待测试APP的自动化测试用例
2、新建app测试项目
3、配置conftest.py文件等
4、编写整体app测试用例运行文件
5、把设计好的自动化测试用例转化成脚本
实战一:设计待测试APP的自动化测试用例
实战二:新建app测试项目
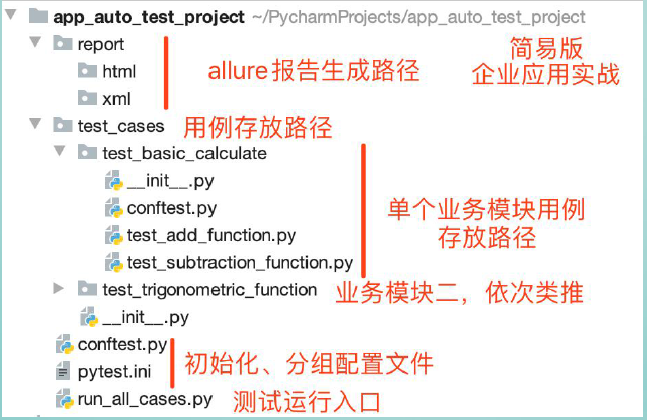
实战三:
1. 配置外层conftest.py文件
import pytest

@pytest.fixture(scope='session')
def des_env():  # 装饰函数的名称
    des_info = {
        'platformName': 'Android',
        'platformVersion': '9.0',  # 填写android虚拟机的系统版本
        'deviceName': 'Samsung Galaxy Note2',  # 填写安卓虚拟机的设备名称
        'appPackage': 'com.android.calculator2',  # 填写被测试包名
        'appActivity': 'com.android.calculator2.Calculator',  # 填写被测试app入口
        'udid': '192.168.58.103:5555',  # 填写通过命令行 adb devices 查看到的 uuid
        'noReset': True,
        'unicodeKeyboard': True,
        'resetKeyboard': True,
    }
    return des_info
2.配置内层conftest.py文件
from time import sleep

import pytest
from appium import webdriver

driver = None
@pytest.fixture()
def start_app(des_env):  # 装饰函数的名称
      global driver
      driver =  webdriver.Remote('http://localhost:4723/wd/hub', des_env)
      return driver
@pytest.fixture(autouse=True)
def close_driver():
    sleep(3)
    yield driver
    driver.close_app()
3.配置pytest.ini文件用于分组
[pytest]
markers =
      basic:marks tests as basic
      smoketest:marks tests as smoketest
      systemtest:marks tests as systemtest
实战四:编写整体运行测试用例的文件run_all_cases.py
import os
import time

import pytest

now_time = time.strftime("%Y_%m_%d_%H_%M_%S")
xml_result_path = os.path.join(os.path.dirname(__file__),'reports/xml',now_time)
os.mkdir(xml_result_path)
html_result_path = os.path.join(os.path.dirname(__file__),'reports/html',now_time)
os.mkdir(html_result_path)
#xml报告生成
pytest.main(['--alluredir={}'.format(xml_result_path),'-m basic','-s'])
#html报告生成
os.system("E:/allure/allure-2.13.5/bin/allure generate {} -o {}".format(xml_result_path,html_result_path))
实战五:编写具体的测试用例
allure用例描述详解:
