什么是GUI
GUI的全称为Graphical User
Interface,图形化界面或图形用户接口,是指采用图形方式显示的计算机操作环境用户接口。与早期计算机使用的命令行界面相比,图形界面对于用户来说更为简便易用。GUI的广泛应用是当今计算机发展的重大成就之一,它极大地方便了非专业用户的使用人们从此不再需要死记硬背大量的命令,取而代之的是通过窗口、菜单、按键等方式来方便地进行操作。而嵌入式GUI具有下面几个方面的基本要求:轻型、占用资源少、高性能、高可靠性、便于移植、可配置等特点。
Gui核心技术:Swing AWT
缺点:
界面不美观
需要jre环境
1. AWT
- AWT介绍
包含了很多类和接口 GUI:图形用户界面编程
元素:窗口,按钮,文本框
java.awt包
2. Swing
AWT使用
1. Frame窗口


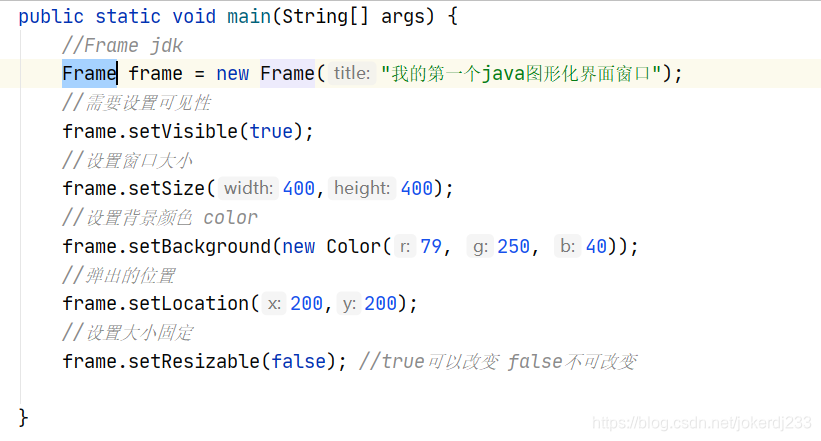
public static void main(String[] args) {
        //Frame jdk
        Frame frame = new Frame("我的第一个java图形化界面窗口");
        //需要设置可见性
        frame.setVisible(true);
        //设置窗口大小
        frame.setSize(400,400);
        //设置背景颜色 color
        frame.setBackground(new Color(79, 250, 40));
        //弹出的位置
        frame.setLocation(200,200);
        //设置大小固定
        frame.setResizable(false); //true可以改变 false不可改变

    }
2. 面板Panel

public static void main(String[] args) {
        Frame frame = new Frame("Panel");
        //布局
        Panel panel = new Panel();
        //设置布局
        frame.setLayout(null);
        //坐标
        frame.setBounds(300,300,500,500);
        //背景颜色
        frame.setBackground(new Color(10, 170, 170));
        //设置panel坐标
        panel.setBounds(50,50,400,400);
        //设置颜色
        panel.setBackground(new Color(0xFFAA4B));
        //frame.add panel
        frame.add(panel);
        //设置可见性
        frame.setVisible(true);
        //监听事件 监听窗体关闭事件
        frame.addWindowListener(new WindowAdapter(){//窗口关闭需要做的事情
            @Override
            public void windowClosing(WindowEvent e) {
                super.windowClosing(e);
                System.exit(0);//关闭程序
            }
        });
    }
效果

3. 布局管理器
1. 流式布局

public static void main(String[] args) {
        Frame frame = new Frame("TestFlowLayout");
        //组件 按钮
        Button button = new Button("button");
        Button button1 = new Button("button1");
        Button button2 = new Button("button2");
        //设置为流式布局
        frame.setLayout(new FlowLayout());
        //frame.setLayout(new FlowLayout(FlowLayout.LEFT));
        //frame.setLayout(new FlowLayout(FlowLayout.RIGHT));
        //设置窗体大小
        frame.setSize(1200,800);
        //把按钮添加上去
        frame.add(button);
        frame.add(button1);
        frame.add(button2);
        //窗体可见
        frame.setVisible(true);
    }
效果

2. 东西南北中

public static void main(String[] args) {
        Frame frame = new Frame("BorderLayOut");
        Button East = new Button("East");//东
        Button west = new Button("west");//西
        Button south = new Button("south");//南
        Button north = new Button("north");//北
        Button center = new Button("center");//中
        frame.setSize(500,500);//设置窗体大小
        frame.add(East,BorderLayout.EAST);
        frame.add(west,BorderLayout.WEST);
        frame.add(south,BorderLayout.SOUTH);
        frame.add(north,BorderLayout.NORTH);
        frame.add(center,BorderLayout.CENTER);
        frame.setVisible(true);//设置窗体可见
    }
效果

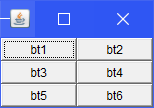
3. 表格布局

public static void main(String[] args) {
        Frame frame = new Frame("TestGirdLayout");
        Button bt1 = new Button("bt1");
        Button bt2 = new Button("bt2");
        Button bt3 = new Button("bt3");
        Button bt4 = new Button("bt4");
        Button bt5 = new Button("bt5");
        Button bt6 = new Button("bt6");

        frame.setLayout(new GridLayout(3,2));
        frame.add(bt1);
        frame.add(bt2);
        frame.add(bt3);
        frame.add(bt4);
        frame.add(bt5);
        frame.add(bt6);
        frame.pack();//大小默认
        frame.setVisible(true);
    }
效果

4. 事件监听
按下按钮,打印你好

public class TestAction {
    public static void main(String[] args) {
        //按下按钮触发事件
        Frame frame = new Frame();

        Button button = new Button();
        MyActionListener myActionListener = new MyActionListener();

        button.addActionListener(myActionListener);
        frame.add(button);//把按钮添加到frame
        frame.setVisible(true);//窗体可见
        frame.pack();//窗体自适应
        //关闭事件的方法
        windowcLose(frame);
    }
    public static void windowcLose(Frame frame){//关闭程序的方法
        frame.addWindowListener(new WindowAdapter() {
            @Override
            public void windowClosing(WindowEvent e) {
                System.exit(0);
            }
        });
    }
}

class MyActionListener implements ActionListener{//创建监听器

    @Override
    public void actionPerformed(ActionEvent e) {
        System.out.println("你好");
    }
}
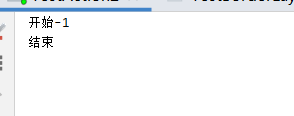
获取点击事件的信息

public class TestAction2 {
    public static void main(String[] args) {
        Frame frame = new Frame();
        Button button1 = new Button("开始");
        Button button2 = new Button("结束");
        frame.add(button1,BorderLayout.NORTH);
        frame.add(button2,BorderLayout.SOUTH);
        button1.setActionCommand("开始-1");
        frame.pack();
        frame.setVisible(true);
        myMinitor myMinitor = new myMinitor();
        button1.addActionListener(myMinitor);
        button2.addActionListener(myMinitor);

    }
}

class myMinitor implements ActionListener {

    @Override
    public void actionPerformed(ActionEvent e) {
        System.out.println(e.getActionCommand());//获取按钮上的信息
    }
}
效果


5. 文本框监听事件

public class TestText {
    public static void main(String[] args) {
        new MyFrame();
    }
}
class MyFrame extends Frame{

    public MyFrame(){
        TextField textField = new TextField();//创建一个文本框
        add(textField);

        //监听输入框的文字
        myaction myaction = new myaction();//创建监听器
        textField.addActionListener(myaction);
        textField.setEchoChar('*');//类似于密码框
        setVisible(true);//可见
        pack();//窗体自适应
    }
}
class myaction implements ActionListener{

    @Override
    public void actionPerformed(ActionEvent e) {
        TextField field = (TextField)e.getSource();//获得一些资源
        field.getText();//获得输入框的文本
        System.out.println(field.getText());//输出文本
        field.setText("");//清空文本
    }
}
效果

6. paint画笔

public class TestPaint {
    public static void main(String[] args) {
        new myPaint().loadPaint();
    }

}
class myPaint extends Frame{
    public void loadPaint() {
        setBounds(200,200,600,500);
        setVisible(true);
    }
    //画笔

    @Override
    public void paint(Graphics g) {
        super.paint(g);
        g.setColor(Color.red);//设置画笔颜色
        g.drawOval(200,200,200,200);//画一个空心圆
        g.fillOval(300,300,600,600);//画一个实心圆
    }
}
效果

7. 鼠标监听事件、模拟画笔
public class testMouse {
    public static void main(String[] args) {
        new myFrame("paint");
    }
}
class myFrame extends Frame{
    //需要集合保存画的点
    ArrayList points;
    public myFrame(String title){
        super(title);//设置标题
        setVisible(true);//可见
        this.addMouseListener(new mymouseLinster());
        points=new ArrayList<>();
    }
    @Override
    public void paint(Graphics g) {
        //画画 监听鼠标事件
        Iterator iterator=points.iterator();
        while (iterator.hasNext()){
            Point point=(Point)iterator.next();
            g.setColor(Color.BLUE);
            g.fillOval(point.x,point.y,10,10);
        }
    }
    public void addpoint(Point point){
        points.add(point);
    }

    public class mymouseLinster extends MouseAdapter{
        //鼠标按下 弹起 按住不放

        @Override
        public void mousePressed(MouseEvent e) {
            myFrame myFrame=(myFrame)e.getSource();
            //点击的时候产生一个点
            //这个点就是鼠标点的位置
            myFrame.addpoint(new Point(e.getX(),e.getY()));
            myFrame.repaint();
        }
    }
}
效果

8. 键盘监听
public class keyLinstener {
    public static void main(String[] args) {
        new keyFrame();
    }
}
class keyFrame extends Frame {
    public keyFrame()  {
        setVisible(true);
        setBounds(1,2,300,400);
        this.addKeyListener(new KeyAdapter() {
            @Override
            public void keyPressed(KeyEvent e) {
                int keyCode = e.getKeyCode();
                System.out.println(keyCode);
                if(keyCode==KeyEvent.VK_UP){ //vk-xxx 对应的键盘符
                    System.out.println("↑");
                }
            }
        });
    }
}
效果
按下键盘

Swing使用
1. JFrame窗口

public class SwingFrame {
    //初始化init();
    public static void init(){
        JFrame jFrame = new JFrame("这是一个jframe窗口");
        jFrame.setVisible(true);
        jFrame.setBounds(100,100,200,200);

        //设置文字
        JLabel lable = new JLabel("joker_dj");
        //设置文字水平居中
        lable.setHorizontalAlignment(SwingConstants.CENTER);
        jFrame.add(lable);


        //关闭事件
        jFrame.setDefaultCloseOperation(WindowConstants.EXIT_ON_CLOSE);
    }
    public static void main(String[] args) {
        init();
    }
}
2. Jdialog弹窗

//主窗口
public class Jdialog extends JFrame {
    public Jdialog() {
        setVisible(true);//
        this.setSize(700,500);//大小
        this.setDefaultCloseOperation(WindowConstants.EXIT_ON_CLOSE);//关闭

        //Jframe容器
        Container contentPane = this.getContentPane();
        //绝对路径
        contentPane.setLayout(null);
        //按钮
        JButton button=new JButton("点击弹出");
        button.setBounds(30,30,200,200);
        //点击这个按钮的时候
        button.addActionListener(new ActionListener() {//监听器
            @Override
            public void actionPerformed(ActionEvent e) {
                new MyDialog();
            }

        });
        contentPane.add(button);
    }

    public static void main(String[] args) {
        new Jdialog();
    }
}
//弹出的窗口
class MyDialog extends JDialog{
    public MyDialog(){
        this.setVisible(true);
        this.setBounds(300,300,200,200);
        Container contentPane = this.getContentPane();
        contentPane.setLayout(null);
        contentPane.add(new Label("joker_dj"));
    }
}
效果
