[root@ansible roles]# cat web.yml
- hosts: web
  remote_user: root

  tasks:
    - name: create file
      file: name=/tmp/new.file state=touch
    - name: create new user
      user: name=test2 system=yes shell=/sbin/nologin
    - name: install package
      yum: name=httpd  state=installed
    - name: copy html
      copy: src=/root/index.html dest=/var/www/html/index.html
    - name: start service
      service: name=httpd state=started enabled=yes

添加httpd index文件
[root@ansible ~]# cat index.html
123
测试访问
[root@ansible ~]# curl 10.0.0.8
123

- --limit 选则组里的某台机器执行命令
ansible web -m ping --limit 10.0.0.7
# 只在web组的 10.0.0.7上执行ping
- --list-tasks 查看任务列表
[root@ansible roles]# ansible-playbook web.yml --list-tasks
playbook: web.yml
play #1 (web): web TAGS: []
tasks:
create file TAGS: []
create new user TAGS: []
install package TAGS: []
copy html TAGS: []
start service TAGS: []
- handlers 和notify 结合重启服务
"web.yml" 20L, 546C 12,7 All
- hosts: web
remote_user: root

tasks:
- name: install package
yum: name=httpd state=installed
- name: copy html
copy: src=file/httpd.conf dest=/etc/httpd/conf/ backup=yes
notify: restart httpd
- name: start httpd
service: name=httpd state=started enabled=yes

handlers:
- name: restart httpd
service: name=httpd state=restarted enabled=yes
一.变量

1. - setup 查看内置变量
过滤变量 -setup -a 'ilter =变量'
[root@ansible roles]# ansible web -m setup -a 'filter=*addr'
10.0.0.8 | SUCCESS => {
    "ansible_facts": {},
    "changed": false
}

#支持 通配符 *号
[root@ansible roles]# ansible web -m setup -a 'filter=*ipv4'
10.0.0.8 | SUCCESS => {
    "ansible_facts": {
        "ansible_default_ipv4": {
            "address": "10.0.0.8",
            "alias": "eth0",
            "broadcast": "10.0.0.255",
            "gateway": "10.0.0.2",
            "interface": "eth0",
            "macaddress": "00:0c:29:24:58:ed",
            "mtu": 1500,
            "netmask": "255.255.255.0",
            "network": "10.0.0.0",
            "type": "ether"
        }
    },
    "changed": false
}
1-2 setup 内置变量应用
获取到cpu的核心数.根据服务器的核心数设置nginx worker进行的数量 ,通过remplate.j2 模板
ansible web -m setup | grep process
        "ansible_processor": [
        "ansible_processor_cores": 1,
        "ansible_processor_count": 2,
        "ansible_processor_threads_per_core": 1,
        "ansible_processor_vcpus": 2,
写好剧本,
[root@ansible roles]# cat templa.yml
- hosts: web
  remote_user: root

  tasks:
    - name: install nginx
      yum: name=nginx state=installed
    - name: copy conf
      template: src=nginx.conf.j2 dest=/etc/nginx/nginx.conf
      notify: restart ngx
      tags: restart ngx
    - name: start nginx
      service: name=nginx state=started

  handlers:
    - name: restart ngx
      service: name=nginx state=restarted
写变量文件
[root@ansible roles]# cat templates/nginx.conf.j2
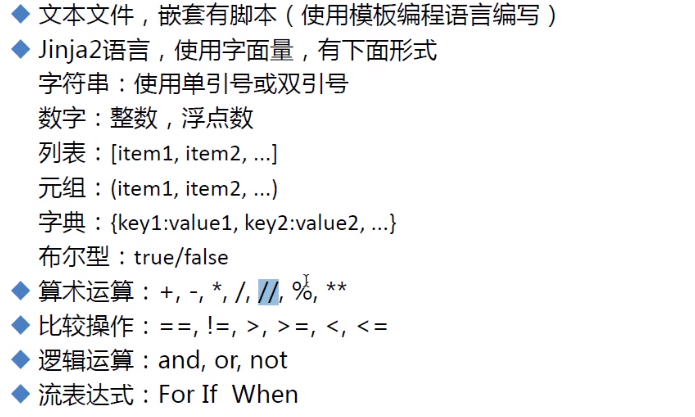
worker_processes {{ ansible_processor_vcpus **2 }};  #**2表示cpu核心的2次方 *2 是2的倍数, 比如服务器核心是2个2次方就是4个,nginx重启后 worker进程是4个,
events {
worker_connections 1024;
}
http {
include mime.types;
default_type application/octet-stream;
sendfile on;
keepalive_timeout 65;
server {
listen {{ http_port }};
server_name localhost;
location / {
root html;
index index.html index.htm;
}
error_page 500 502 503 504 /50x.html;
location = /50x.html {
root html;
}
}
}
2 .playbook中定义引用变量,命令行种调用
[root@ansible roles]# cat line.yml
- hosts: web
  remote_user: root
  tasks:
    - name: install package
      yum: name={{ pkname }}  state=installed
    - name: start httpd
      service: name={{ pkname }} state=started enabled=yes
命令行中 -e 调用playbook 中的变量 变量优先级 1
ansible-playbook -e 'pkname=redis' -C app.yml
3. playbook中定义变量 vars: 定义变量 yum模块在playbook中直接引用变量
- hosts: web
  remote_user: root
  vars:
    - pkg1: httpd
    - pkg2: mysql

  tasks:
    - name: install package
      yum: name={{ pkg1 }}  state=installed
    - name: install package
      yum: name={{ pkg2 }}  state=installed
4. 下在playbook外面定义变量 playbook中引用变量
写把变量写到var.yml文件里
[root@ansible roles]# cat var.yml
var1: httpd
var2: vsftpd
写剧本
[root@ansible roles]# cat testvar.yml
- hosts: web
  remote_user: root
  var_files:               #用个名字引用外面定义的变量
    - vars.yml:

  tast:
    - name: install pkg
      yum: name={{ var1 }}                #安装httpd
    - name: create file
      file: name=/tmp/{{ var2 }}.log state=touch   #在tmp下创建vsftpd日志文件
执行结果就是安装 httpd 和mysql
二. 主机清单变量
2.1 对组内主机定义不同变量此时 内的主机会有不同的端口 变量优先级 2
[web]
10.0.0.52 http_port=81    #只对 52主机生效
10.0.0.53 http_port=82     #只对 53生效
模版文件配置 结合模板把nginx配置文件复制到主机,nginx会启动主机清单里的端口
cat templates/nginx.conf.j2
worker_processes  1;
events {
    worker_connections  1024;
}
http {
    include       mime.types;
    default_type  application/octet-stream;
    sendfile        on;
    keepalive_timeout  65;
    server {
        listen       {{ http_port }};
        server_name  localhost;
        location / {
            root   html;
            index  index.html index.htm;
        }
        error_page   500 502 503 504  /50x.html;
        location = /50x.html {
            root   html;
        }
    }
}
剧本文件
[root@ansible roles]# cat templa.yml
- hosts: web
  remote_user: root

  tasks:
    - name: install nginx
      yum: name=nginx state=installed
    - name: copy conf
      template: src=nginx.conf.j2 dest=/etc/nginx/nginx.conf
      notify: restart ngx
      tags: restart ngx
    - name: start nginx
      service: name=nginx state=started

  handlers:
    - name: restart ngx
      service: name=nginx state=restarted
2.2 对组内的主机定义相同的变量 变量优先级 3
比如web组里有1000个主机,要写端口为2020,就得写1000个,下面给web组设置个变量写好端口
省的重复在web里写http_prot=2020
[web]
10.0.0.51
10.0.0.52
10.0.0.53

[web:vars]
http_prot=2020   对web组的所有主机生效
还可以命令行指定变量 优先级最高
ansible-playbook -e " httpd_port=99"t empla.yml
