1、搭建网站服务器:实现客户端与服务端的通信
新建 user 文件夹,新建 app.js 文件:
// 用于创建网站服务器的模块
const http = require('http');

// 创建服务器
const app = http.createServer();

// 为服务器端对象添加请求事件
app.on('request', (req, res) => {
  // 响应
  res.end('ok');
});
// 监听端口
app.listen(3000);
console.log('服务器已启动')
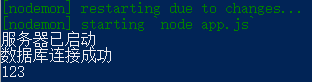
在命令行工具中,切换到 user 目录下,开启服务:
nodemon app.js
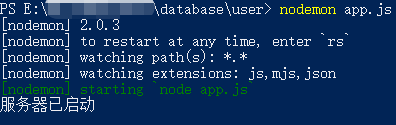
表示服务器启动成功了
2、连接数据库,创建用户集合,向集合中插入文档
引入mongoose第三方模块 用来操作数据库
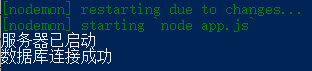
// 引入mongoose第三方模块 用来操作数据库
const mongoose = require('mongoose');

// 数据库连接 27012 是 MongoDB 的默认端口
mongoose.connect('mongodb://localhost/playground', { useNewUrlParser: true, useUnifiedTopology: true})
    .then(() => console.log('数据库连接成功'))
    .catch(err => console.log(err, '数据库连接失败'));
27017 是 MongoDB 的默认端口,可以不写
保存后可以看到:
2.2、创建用户集合
创建用户集合规则:
// 创建用户集合规则
const userSchema = new mongoose.Schema({
    name: {
        type: String,
        required: true,
        minlength: 2,
        maxlength: 20
    },
    age: {
        type: Number,
        min: 18,
        max: 80
    },
    password: String,
    email: String,
    hobbies: [String]
});
// 创建用户集合
const User = mongoose.model('User', userSchema);
2.3、向集合中插入文档
mongoimport -d playground -c users --file ./user.json
结果: imported successfully. 6 document(s) failed to import.
说明成功导入6条数据。
3、当用户访问 /list 时,将所有用户信息查询出来
3.1、实现路由功能
引入系统模块 url ,用于处理 url 地址
// 引入系统模块url 用于处理 url 地址
const url = require('url');

// 为服务器端对象添加请求事件
app.on('request', (req, res) => {
    // 请求方式
    const method = req.method;
    // 请求地址
    const { pathname } = url.parse(req.url);
    // 判断请求方式
    if (method == 'GET') {
        // 呈现用户列表页面
            if (pathname == '/list') {

        }
    } else if (method == 'POST') {

    }

  // 响应
  res.end('ok');
});
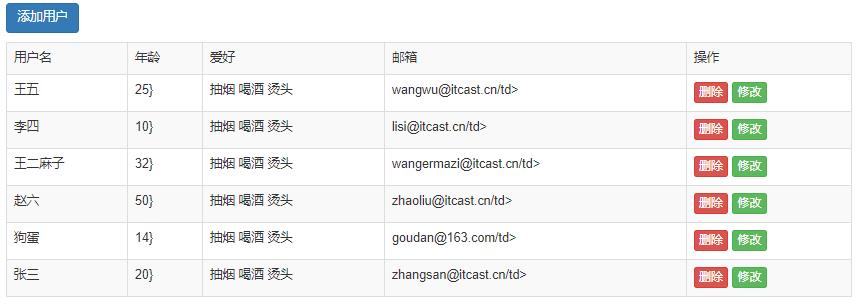
3.2、呈现列表页面
// 呈现用户列表页面
    if (pathname == '/list') {
            let list = `<!DOCTYPE html>
            <html lang="en">
            <head>
                <meta charset="UTF-8">
                <title>用户列表</title>
                <link rel="stylesheet" href="https://cdn.jsdelivr.net/npm/bootstrap@3.3.7/dist/css/bootstrap.min.css">
            </head>
            <body>
                <div class="container">
                    <h6>
                        <a href="add.html" class="btn btn-primary">添加用户</a>
                    </h6>
                    <table class="table table-striped table-bordered">
                        <tr>
                            <td>用户名</td>
                            <td>年龄</td>
                            <td>爱好</td>
                            <td>邮箱</td>
                            <td>操作</td>
                        </tr>
                        <tr>
                            <td>张三</td>
                            <td>20</td>
                            <td>
                                <span>抽烟</span>
                                <span>喝酒</span>
                                <span>烫头</span>
                            </td>
                            <td>zhangsan@itcast.cn</td>
                            <td>
                                <a href="" class="btn btn-danger btn-xs">删除</a>
                                <a href="" class="btn btn-success btn-xs">修改</a>
                            </td>
                        </tr>
                    </table>
                </div>
            </body>
            </html>
            `;
            res.end(list);
        }
在命令行工具中切换到 user 目录下,输入:
nodemon app.js
然后打开浏览器,输入:http://localhost:3000/list
可以看到页面:

3.3、从数据库中查询用户信息,将用户信息展示在列表中
通过 User.find() 查询用户信息
要用异步函数的方式:
// 为服务器端对象添加请求事件
app.on('request', async (req, res) => {
    // 请求方式
    const method = req.method;
    // 请求地址
    const { pathname } = url.parse(req.url);
    // 判断请求方式
    if (method == 'GET') {
        // 呈现用户列表页面
    if (pathname == '/list') {
            // 查询用户信息
            let users = await User.find()
            console.log(users);
    。。。。。。
然后回到浏览器刷新页面,在打开命令行工具,就可以看到查询的用户信息

4、将用户信息和表格 HTML 进行拼接,并将拼接结果响应回客户端
下面就要将查询出来的数据和 list 的 HTML 代码进行拼接。
把 list 的字符串,拆分为几个小字符串,然后进行拼接。
第一段字符串:
let list = `
            <!DOCTYPE html>
            <html lang="en">
            <head>
                <meta charset="UTF-8">
                <title>用户列表</title>
                <link rel="stylesheet" href="https://cdn.jsdelivr.net/npm/bootstrap@3.3.7/dist/css/bootstrap.min.css">
            </head>
            <body>
                <div class="container">
                    <h6>
                        <a href="add.html" class="btn btn-primary">添加用户</a>
                    </h6>
                    <table class="table table-striped table-bordered">
                        <tr>
                            <td>用户名</td>
                            <td>年龄</td>
                            <td>爱好</td>
                            <td>邮箱</td>
                            <td>操作</td>
                        </tr>
            `;
第三段字符串:
list += `
                </table>
                </div>
            </body>
            </html>
            `;
第二段字符串:
// 对数据进行循环操作
            users.forEach(item => {
                list += `
                <tr>
                    <td>${item.name}</td>
                    <td>${item.age}}</td>
                    <td>
                          <span>抽烟</span>
                          <span>喝酒</span>
                          <span>烫头</span>
                    </td>
                    <td>${item.email}/td>
                    <td>
                        <a href="" class="btn btn-danger btn-xs">删除</a>
                        <a href="" class="btn btn-success btn-xs">修改</a>
                    </td>
                </tr>
                `;
            });
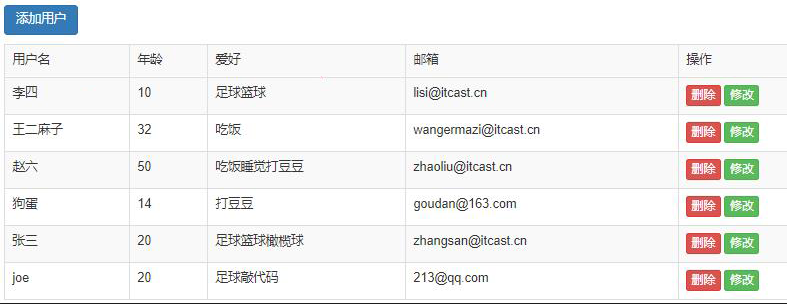
此时在浏览器刷新页面,已经可以动态显示用户信息列表
下面就是“爱好”字段的拼接,再进行下拆分:
// 对数据进行循环操作
            users.forEach(item => {
                list += `
                <tr>
                    <td>${item.name}</td>
                    <td>${item.age}</td>
                    <td>
                `;

                item.hobbies.forEach(item => {
                    list += `<span>${item}</span>`;
                })

                list += `</td>
                    <td>${item.email}</td>
                    <td>
                        <a href="" class="btn btn-danger btn-xs">删除</a>
                        <a href="" class="btn btn-success btn-xs">修改</a>
                    </td>
                </tr>`;
            });
刷新页面: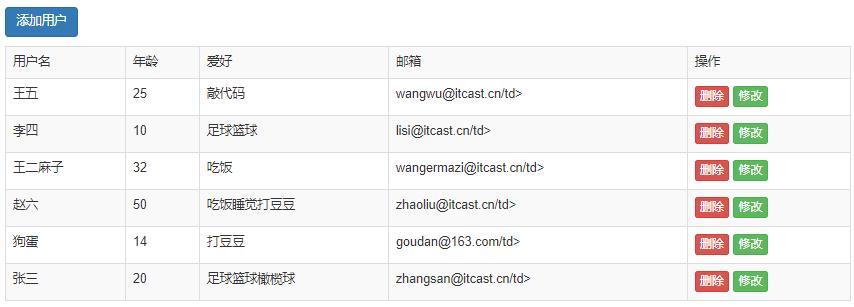
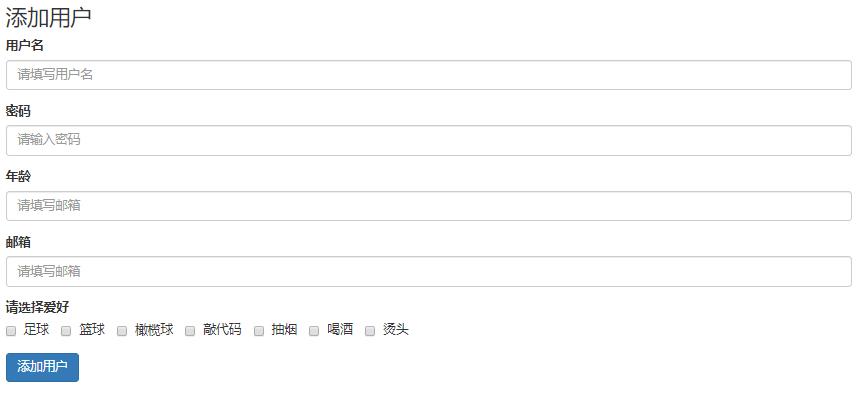
5、当用户访问 /add 时,呈现表单页面,并实现添加用户信息功能
5.1、当用户访问 /add 时,呈现表单页面
添加表单页面
if (pathname == '/list'){
  。。。。。。
} else if (pathname == '/add') {
            let add = `
            <!DOCTYPE html>
            <html lang="en">
            <head>
                <meta charset="UTF-8">
                <title>用户列表</title>
                <link rel="stylesheet" href="https://cdn.jsdelivr.net/npm/bootstrap@3.3.7/dist/css/bootstrap.min.css">
            </head>
            <body>
                <div class="container">
                    <h3>添加用户</h3>
                    <form>
                        <div class="form-group">
                            <label>用户名</label>
                            <input type="text" class="form-control" placeholder="请填写用户名">
                        </div>
                        <div class="form-group">
                            <label>密码</label>
                            <input type="password" class="form-control" placeholder="请输入密码">
                        </div>
                        <div class="form-group">
                            <label>年龄</label>
                            <input type="text" class="form-control" placeholder="请填写年龄">
                        </div>
                        <div class="form-group">
                            <label>邮箱</label>
                            <input type="email" class="form-control" placeholder="请填写邮箱">
                        </div>
                        <div class="form-group">
                            <label>请选择爱好</label>
                            <div>
                                <label class="checkbox-inline">
                                    <input type="checkbox" value="足球"> 足球
                                </label>
                                <label class="checkbox-inline">
                                    <input type="checkbox" value="篮球"> 篮球
                                </label>
                                <label class="checkbox-inline">
                                    <input type="checkbox" value="橄榄球"> 橄榄球
                                </label>
                                <label class="checkbox-inline">
                                    <input type="checkbox" value="敲代码"> 敲代码
                                </label>
                                <label class="checkbox-inline">
                                    <input type="checkbox" value="抽烟"> 抽烟
                                </label>
                                <label class="checkbox-inline">
                                    <input type="checkbox" value="喝酒"> 喝酒
                                </label>
                                <label class="checkbox-inline">
                                    <input type="checkbox" value="烫头"> 烫头
                                </label>
                            </div>
                        </div>
                        <button type="submit" class="btn btn-primary">添加用户</button>
                    </form>
                </div>
            </body>
            </html>
            `;
            res.end(add);
        }
在浏览器输入:http://localhost:3000/add
可以看到表单页:
下面要实现点击“添加按钮”可以跳转到表单页面的路由:
<a href="/add" class="btn btn-primary">添加用户</a>
回到浏览器,刷新页面,点击“添加按钮”,就可以跳转到表单页面了。
5.2、实现添加用户信息功能
添加用户请求要使用 Post:
<form method="POST">
为每一个表单字段添加子属性 name:
<input name="name" type="text" class="form-control" placeholder="请填写用户名">

<input name="password" type="password" class="form-control" placeholder="请输入密码">

<input name="age" type="text" class="form-control" placeholder="请填写年龄">

<input name="email" type="email" class="form-control" placeholder="请填写邮箱">

<label class="checkbox-inline">
     <input type="checkbox" value="足球" name="hobbies"> 足球
</label>
<label class="checkbox-inline">
     <input type="checkbox" value="篮球" name="hobbies"> 篮球
</label>
<label class="checkbox-inline">
     <input type="checkbox" value="橄榄球" name="hobbies"> 橄榄球
</label>
<label class="checkbox-inline">
    <input type="checkbox" value="敲代码" name="hobbies"> 敲代码
</label>
<label class="checkbox-inline">
    <input type="checkbox" value="抽烟" name="hobbies"> 抽烟
</label>
<label class="checkbox-inline">
    <input type="checkbox" value="喝酒"> 喝酒
</label>
<label class="checkbox-inline">
    <input type="checkbox" value="烫头"> 烫头
</label>
在 POST 路由里,增加一个路由:
else if (method == 'POST') {
    // 用户添加功能
    if ([pathname == '/add']) {

    }
}
再回到 html 代码部分的,from 表单添加请求地址:
<h3>添加用户</h3>
<form method="POST" action="/modify">
也就是说当用户点击“添加按钮”的时候走到新增加的这个 POST 的“/add”路由。
在 POST 中添加 /add路由,然后可以测试下代码:
else if (method == 'POST') {
    // 用户添加功能
    if ([pathname == '/add']) {
        console.log(123)
    }
  }
回到浏览器,刷新 /add 页面,点击下面的“添加用户”按钮,在命令行工具中,可以打印出:123
5.2.1、接收用户提交的信息
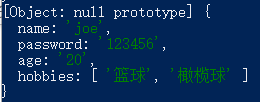
// 用户添加功能
if ([pathname == '/add']) {
    // 接收用户提交的信息
    let fromData= '';
    // 当有参数传递的时候会触发 data 事件
    req.on('data', param => {
        fromData += param;
    });
        // 当参数接收完毕的时候会触发 end 事件
    req.on('end', () => {
        console.log(fromData);
    });
}
回到浏览器中,随便在表单中输入一些内容后点击按钮提交,然后打开命令行工具可以看到:

下面要吧字符串转换为对象的格式。
node 提供的内置模块 querystring。
在 post.js 中导入 querystring 模块:
// 处理请求参数模块
const querystring = require('querystring');
使用 parse() 方法对参数的格式进行转换:
req.on('end', () => {
    console.log(querystring.parse(fromData));
});
回到浏览器重新提交内容,然后在命令行工具中可以看到:
5.2.2、将用户提交的信息添加到数据库中
// 当参数接收完毕的时候会触发 end 事件
req.on('end', async () => {
    let user = querystring.parse(fromData)
    // 将用户提交的信息添加到数据库中
    await User.create(user);
    // 重定向 状态码是301
    // Location 跳转地址
    res.writeHead(301, {
        Location: '/list'
    });
    res.end();
});
重新回到浏览器去添加信息,然后点击"添加用户"提交,成功后会自动跳转到列表页,内容增加了一条:

6、当用户访问 /modify 时,呈现修改页面,并实现修改用户信息功能
6.1、增加页面路由 呈现页面
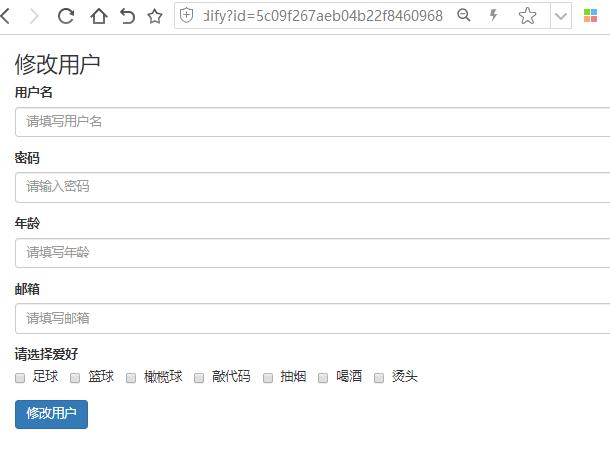
6.1.1、在点击修改按钮时,将用户 id 传递到当前页面
修改按钮部分代码:
<a href="/modify?id=${item._id}" class="btn btn-success btn-xs" >修改</a>
增加 /modify 路由:
if (pathname == '/list') {
} else if (pathname == '/add') {
} else if (pathname == '/modify') {
    // 呈现修改用户表单页面
            let modify = `
            <!DOCTYPE html>
            <html lang="en">
            <head>
                <meta charset="UTF-8">
                <title>用户列表</title>
                <link rel="stylesheet" href="https://cdn.jsdelivr.net/npm/bootstrap@3.3.7/dist/css/bootstrap.min.css">
            </head>
            <body>
                <div class="container">
                    <h3>修改用户</h3>
                    <form method="POST" action="/add">
                        <div class="form-group">
                            <label>用户名</label>
                            <input name="name" type="text" class="form-control" placeholder="请填写用户名">
                        </div>
                        <div class="form-group">
                            <label>密码</label>
                            <input name="password" type="password" class="form-control" placeholder="请输入密码">
                        </div>
                        <div class="form-group">
                            <label>年龄</label>
                            <input name="age" type="text" class="form-control" placeholder="请填写年龄">
                        </div>
                        <div class="form-group">
                            <label>邮箱</label>
                            <input name="email" type="email" class="form-control" placeholder="请填写邮箱">
                        </div>
                        <div class="form-group">
                            <label>请选择爱好</label>
                            <div>
                                <label class="checkbox-inline">
                                    <input type="checkbox" value="足球" name="hobbies"> 足球
                                </label>
                                <label class="checkbox-inline">
                                    <input type="checkbox" value="篮球" name="hobbies"> 篮球
                                </label>
                                <label class="checkbox-inline">
                                    <input type="checkbox" value="橄榄球" name="hobbies"> 橄榄球
                                </label>
                                <label class="checkbox-inline">
                                    <input type="checkbox" value="敲代码" name="hobbies"> 敲代码
                                </label>
                                <label class="checkbox-inline">
                                    <input type="checkbox" value="抽烟" name="hobbies"> 抽烟
                                </label>
                                <label class="checkbox-inline">
                                    <input type="checkbox" value="喝酒"> 喝酒
                                </label>
                                <label class="checkbox-inline">
                                    <input type="checkbox" value="烫头"> 烫头
                                </label>
                            </div>
                        </div>
                        <button type="submit" class="btn btn-primary">修改用户</button>
                    </form>
                </div>
            </body>
            </html>
            `;
            res.end(modify);
}
回到浏览器中,随便点击一个“修改”按钮,可以看到地址跳转到:modify?id=5c09f267aeb04b22f8460968
6.1.2、从数据库中查询当前用户信息,将用户信息展示到页面中
修改请求地址部分代码:
// 请求地址
const { pathname, query } = url.parse(req.url, true);
query:保存了 get 请求参数,默认为字符串类型
true:表示将查询参数解析成对象的形式
然后根据 id 查询当前用户信息
else if (pathname == '/modify') {
    let user = await User.find({'_id': query.id})
    console.log(user)
}
回到浏览器中刷新页面,在命令行工具中可以看到当前用户的信息:
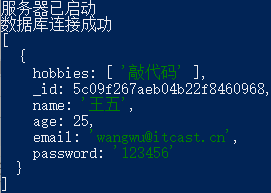
我们可以看到返回的是数组形式,不是我们要的对象形式,所以要把 find 改为 findOne:
else if (pathname == '/modify') {
    let user = await User.findOne({'_id': query.id})
    console.log(user)
}
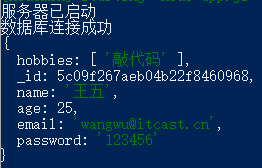
再刷新页面。回到命令行工具可以看到:已经为对象了
将查询出来的对象拼接到页面中:
<input value="${user.name}" name="name" type="text" class="form-control" placeholder="请填写用户名">

<input value="${user.password}" name="password" type="password" class="form-control" placeholder="请输入密码">

<input value="${user.age}" name="age" type="text" class="form-control" placeholder="请填写年龄">

<input value="${user.email}" name="email" type="email" class="form-control" placeholder="请填写邮箱">
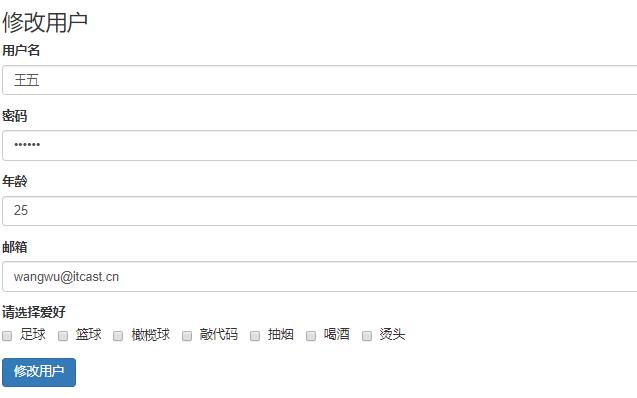
爱好等下再说,先到浏览器刷新页面看下:已经把用户信息展示出来了
爱好是在 hobbies 数组中的,我们需要在页面中表现为选中的状态,思路是:
先准备一个数组,把所有的爱好都存在这个数组里,然后循环这个数组。在循环的过程中,当前项的爱好是否为用户的爱好,如果是的话,就给这个标签增加选中状态 checked;如果当前循环项不是用户的爱好,我们就不增加选中标签。
定义爱好数组:
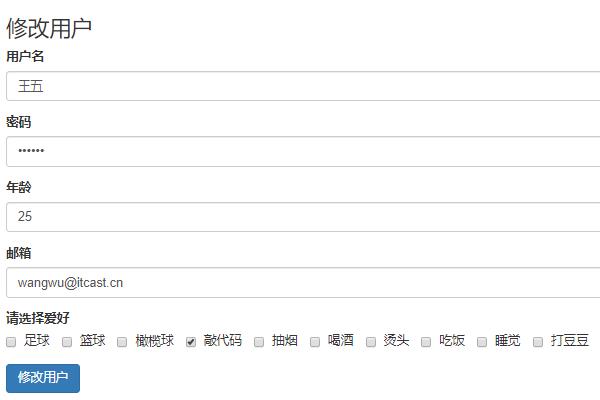
let hobbies = ['足球', '篮球', '橄榄球', '敲代码', '抽烟', '喝酒', '烫头', '吃饭', '睡觉', '打豆豆'];
拆分 modify 字符串:
let hobbies = ['足球', '篮球', '橄榄球', '敲代码', '抽烟', '喝酒', '烫头', '吃饭', '睡觉', '打豆豆'];
// 呈现修改用户表单页面
let modify = `
         、、、、、、
`;

hobbies.forEach(item => {
        // 判断当前循环项是否在用户的爱好数组中,includes 当前参数是否在数组中
        if (user.hobbies.includes(item)) {
            modify += `<label class="checkbox-inline">
                <input type="checkbox" value="${item}" name="hobbies" checked> ${item}
            </label>
            `
        } else {
            modify += `<label class="checkbox-inline">
                 <input type="checkbox" value="${item}" name="hobbies"> ${item}
            </label>
            `
        }
})

modify += `</div>
        </div>
       <button type="submit" class="btn btn-primary">修改用户</button>
     </form>
   </div>
 </body>
</html>`;
回到浏览器刷新页面可以看到当前用户的爱好是选中状态了:
6.2、实现用户修改功能
6.2..1、指定表单的提交地址以及请求方式 Post
回到 html 代码部分的,from 表单的请求地址改为'/modify':
<h3>修改用户</h3>
<form method="POST" action="/modify">
也就是说当用户点击“修改按钮”的时候走到新增加的这个 POST 的 “/modify” 路由。
在 POST 中添加 /modify 路由,然后可以测试下代码:
else if (method == 'POST') {
    // 用户添加功能
    if ([pathname == '/add']) {
        。。。。。。
    } else if (pathname == '/modify') {
    console.log(789)
    }
}
回到浏览器,刷新 /modify 页面,点击下面的“修改用户”按钮,在命令行工具中,可以打印出:789
6.2.2、在服务器端接收客户端传递过来的修改信息,找到对应用户,将用户信息更改为最新的
然后把上面 /add 部分的代码复制粘贴过来,再修改下:
else if (pathname == '/modify') {
            // 接收用户提交的信息
            let fromData= '';
            // 当有参数传递的时候会触发 data 事件
            req.on('data', param => {
                fromData += param;
            });
            // 当参数接收完毕的时候会触发 end 事件
            req.on('end', async () => {
                let user = querystring.parse(fromData)
                // 将用户提交的信息更新到数据库中
                await User.updateOne({_id: query.id} ,user);
                // 重定向 状态码是301
                // Location 跳转地址
                res.writeHead(301, {
                    Location: '/list'
                });
                res.end();
            });
        }
这里需要用到用户 id,所以上面 from 表单的提交地址要把 id 带上:
<h3>修改用户</h3>
<form method="POST" action="/modify?id=${user._id}">
然后回到浏览器刷新页面,修改一些信息后,点击“修改用户”按钮,可以看到结果:

7、当 用户访问 /delete 时,实现删除用户功能
7.1、给删除按钮添加链接,并携带 _id 参数:
<a href="/remove?id=${item._id}" class="btn btn-danger btn-xs">删除</a>
7.2、在 GET 方式中创建 /remove 路由:
if (pathname == '/list') {
    。。。。。。
} else if (pathname == '/add') {
   。。。。。。
} else if (pathname == '/modify') {
  。。。。。。
} else if (pathname == '/remove') {
   // 先通过 res.end 把参数 id 响应给客户端
   res.end(query.id);
}
回到浏览器刷新页面,点击删除按钮,结果:跳转到 /remove 路由并在页面显示 id

使用 findOneAndDelete 方法删除用户:
else if (pathname == '/remove') {
            // res.end(query.id);
            await User.findOneAndDelete({_id: query.id});
            res.writeHead(301, {
                Location: '/list'
            });
            res.end();
}
在浏览器中刷新页面,点击删除按钮:把 王五123 删除掉了
现在整个项目的增删改查功能都可以实现了,但是有两个问题:
1、所有的代码都写在了一个页面中,后期不好维护
2、页面中有大量的字符串拼接,很容易出错;而且后期 html 代码有修改的话,会很困难
在 node.js 中采用模块化管理,我们要根据代码的功能,把代码分离到不同的模块中。比如说:数据库连接以及用户集合的创建,就要分离到不同的文件中。
解决问题1:
在 user 项目的根目录下,创建 model 文件夹来放置一些和数据库相关的文件。
在 model 文件夹下,新建 index.js 文件:
// 引入mongoose第三方模块 用来操作数据库
const mongoose = require('mongoose');

// 数据库连接 27012 是 MongoDB 的默认端口
mongoose.connect('mongodb://localhost/playground', { useNewUrlParser: true, useUnifiedTopology: true})
    .then(() => console.log('数据库连接成功'))
  .catch(err => console.log(err, '数据库连接失败'));
在新建 user.js 文件:
// 引入mongoose第三方模块 用来操作数据库
const mongoose = require('mongoose');

// 创建用户集合规则
const userSchema = new mongoose.Schema({
    name: {
        type: String,
        required: true,
        minlength: 2,
        maxlength: 20
    },
    age: {
        type: Number,
        min: 18,
        max: 80
    },
    password: String,
    email: String,
    hobbies: [String]
});
// 创建用户集合
const User = mongoose.model('User', userSchema);
然后在 app.js 文件中,很多地方都用到了 User 这个集合构造函数,那么在 user.js 文件中,就应该把这个构造函数开放出去。
// 引入mongoose第三方模块 用来操作数据库
const mongoose = require('mongoose');

// 创建用户集合规则
const userSchema = new mongoose.Schema({
    name: {
        type: String,
        required: true,
        minlength: 2,
        maxlength: 20
    },
    age: {
        type: Number,
        min: 18,
        max: 80
    },
    password: String,
    email: String,
    hobbies: [String]
});
// 创建用户集合
const User = mongoose.model('User', userSchema);

module.exports = User;
其他文件中引入 user.js 文件,就可以拿到 User 这个集合的构造函数了。
回到 app.js 文件中,引入 index.js 和 user.js :
require('./model/index');
const User = require('./model/user');
再打开浏览器中,刷新页面,重新操作下各功能,发现没有问题。
完整 app.js 代码:
// 用于创建网站服务器的模块
const http = require('http');
// // 引入mongoose第三方模块 用来操作数据库
// const mongoose = require('mongoose');
// 引入系统模块url 用于处理 url 地址
const url = require('url');
// 处理请求参数模块
const querystring = require('querystring');

require('./model/index');
const User = require('./model/user');

// // 数据库连接 27012 是 MongoDB 的默认端口
// mongoose.connect('mongodb://localhost/playground', { useNewUrlParser: true, useUnifiedTopology: true})
//     .then(() => console.log('数据库连接成功'))
//   .catch(err => console.log(err, '数据库连接失败'));

// // 创建用户集合规则
// const userSchema = new mongoose.Schema({
//     name: {
//         type: String,
//         required: true,
//         minlength: 2,
//         maxlength: 20
//     },
//     age: {
//         type: Number,
//         min: 18,
//         max: 80
//     },
//     password: String,
//     email: String,
//     hobbies: [String]
// });
// // 创建用户集合
// const User = mongoose.model('User', userSchema);

// 创建服务器
const app = http.createServer();

// 为服务器端对象添加请求事件
app.on('request', async (req, res) => {
    // 请求方式
    const method = req.method;
    // 请求地址
    const { pathname, query } = url.parse(req.url, true);
    // 判断请求方式
    if (method == 'GET') {
        // 呈现用户列表页面
    if (pathname == '/list') {
            // 查询用户信息
            let users = await User.find()
            // console.log(users);
            // HTML字符串
            let list = `
            <!DOCTYPE html>
            <html lang="en">
            <head>
                <meta charset="UTF-8">
                <title>用户列表</title>
                <link rel="stylesheet" href="https://cdn.jsdelivr.net/npm/bootstrap@3.3.7/dist/css/bootstrap.min.css">
            </head>
            <body>
                <div class="container">
                    <h6>
                        <a href="/add" class="btn btn-primary">添加用户</a>
                    </h6>
                    <table class="table table-striped table-bordered">
                        <tr>
                            <td>用户名</td>
                            <td>年龄</td>
                            <td>爱好</td>
                            <td>邮箱</td>
                            <td>操作</td>
                        </tr>
            `;

            // 对数据进行循环操作
            users.forEach(item => {
                list += `
                <tr>
                    <td>${item.name}</td>
                    <td>${item.age}</td>
                    <td>
                `;

                item.hobbies.forEach(item => {
                    list += `<span>${item}</span>`;
                })

                list += `</td>
                    <td>${item.email}</td>
                    <td>
                        <a href="/remove?id=${item._id}" class="btn btn-danger btn-xs">删除</a>
                        <a href="/modify?id=${item._id}" class="btn btn-success btn-xs" >修改</a>
                    </td>
                </tr>`;
            });

            list += `
                </table>
                </div>
            </body>
            </html>
            `;
            res.end(list);
        } else if (pathname == '/add') {
            // 呈现添加用户表单页面
            let add = `
            <!DOCTYPE html>
            <html lang="en">
            <head>
                <meta charset="UTF-8">
                <title>用户列表</title>
                <link rel="stylesheet" href="https://cdn.jsdelivr.net/npm/bootstrap@3.3.7/dist/css/bootstrap.min.css">
            </head>
            <body>
                <div class="container">
                    <h3>添加用户</h3>
                    <form method="POST" action="/add">
                        <div class="form-group">
                            <label>用户名</label>
                            <input name="name" type="text" class="form-control" placeholder="请填写用户名">
                        </div>
                        <div class="form-group">
                            <label>密码</label>
                            <input name="password" type="password" class="form-control" placeholder="请输入密码">
                        </div>
                        <div class="form-group">
                            <label>年龄</label>
                            <input name="age" type="text" class="form-control" placeholder="请填写年龄">
                        </div>
                        <div class="form-group">
                            <label>邮箱</label>
                            <input name="email" type="email" class="form-control" placeholder="请填写邮箱">
                        </div>
                        <div class="form-group">
                            <label>请选择爱好</label>
                            <div>
                                <label class="checkbox-inline">
                                    <input type="checkbox" value="足球" name="hobbies"> 足球
                                </label>
                                <label class="checkbox-inline">
                                    <input type="checkbox" value="篮球" name="hobbies"> 篮球
                                </label>
                                <label class="checkbox-inline">
                                    <input type="checkbox" value="橄榄球" name="hobbies"> 橄榄球
                                </label>
                                <label class="checkbox-inline">
                                    <input type="checkbox" value="敲代码" name="hobbies"> 敲代码
                                </label>
                                <label class="checkbox-inline">
                                    <input type="checkbox" value="抽烟" name="hobbies"> 抽烟
                                </label>
                                <label class="checkbox-inline">
                                    <input type="checkbox" value="喝酒"> 喝酒
                                </label>
                                <label class="checkbox-inline">
                                    <input type="checkbox" value="烫头"> 烫头
                                </label>
                            </div>
                        </div>
                        <button type="submit" class="btn btn-primary">添加用户</button>
                    </form>
                </div>
            </body>
            </html>
            `;
            res.end(add);
        } else if (pathname == '/modify') {
            let user = await User.findOne({'_id': query.id});
            console.log(user)
            let hobbies = ['足球', '篮球', '橄榄球', '敲代码', '抽烟', '喝酒', '烫头', '吃饭', '睡觉', '打豆豆'];
            // 呈现修改用户表单页面
            let modify = `
            <!DOCTYPE html>
            <html lang="en">
            <head>
                <meta charset="UTF-8">
                <title>用户列表</title>
                <link rel="stylesheet" href="https://cdn.jsdelivr.net/npm/bootstrap@3.3.7/dist/css/bootstrap.min.css">
            </head>
            <body>
                <div class="container">
                    <h3>修改用户</h3>
                    <form method="POST" action="/modify?id=${user._id}">
                        <div class="form-group">
                            <label>用户名</label>
                            <input value="${user.name}" name="name" type="text" class="form-control" placeholder="请填写用户名">
                        </div>
                        <div class="form-group">
                            <label>密码</label>
                            <input value="${user.password}" name="password" type="password" class="form-control" placeholder="请输入密码">
                        </div>
                        <div class="form-group">
                            <label>年龄</label>
                            <input value="${user.age}" name="age" type="text" class="form-control" placeholder="请填写年龄">
                        </div>
                        <div class="form-group">
                            <label>邮箱</label>
                            <input value="${user.email}" name="email" type="email" class="form-control" placeholder="请填写邮箱">
                        </div>
                        <div class="form-group">
                            <label>请选择爱好</label>
                            <div>
                        `;

            hobbies.forEach(item => {
                // 判断当前循环项是否在用户的爱好数组中,includes 当前参数是否在数组中
                if (user.hobbies.includes(item)) {
                    modify += `<label class="checkbox-inline">
                        <input type="checkbox" value="${item}" name="hobbies" checked> ${item}
                    </label>
                `
                } else {
                    modify += `<label class="checkbox-inline">
                        <input type="checkbox" value="${item}" name="hobbies"> ${item}
                    </label>
                `
                }
            })

            modify += `</div>
                            </div>
                            <button type="submit" class="btn btn-primary">修改用户</button>
                        </form>
                    </div>
                </body>
                </html>`;
            res.end(modify);
        } else if (pathname == '/remove') {
            // res.end(query.id);
            await User.findOneAndDelete({_id: query.id});
            res.writeHead(301, {
                Location: '/list'
            });
            res.end();
        }

  } else if (method == 'POST') {
        // 用户添加功能
        if (pathname == '/add') {
            // 接收用户提交的信息
            let fromData= '';
            // 当有参数传递的时候会触发 data 事件
            req.on('data', param => {
                fromData += param;
            });
            // 当参数接收完毕的时候会触发 end 事件
            req.on('end', async () => {
                let user = querystring.parse(fromData)
                // 将用户提交的信息添加到数据库中
                await User.create(user);
                // 重定向 状态码是301
                // Location 跳转地址
                res.writeHead(301, {
                    Location: '/list'
                });
                res.end();
            });
        } else if (pathname == '/modify') {
            // 接收用户提交的信息
            let fromData= '';
            // 当有参数传递的时候会触发 data 事件
            req.on('data', param => {
                fromData += param;
            });
            // 当参数接收完毕的时候会触发 end 事件
            req.on('end', async () => {
                let user = querystring.parse(fromData)
                // 将用户提交的信息更新到数据库中
                await User.updateOne({_id: query.id} ,user);
                // 重定向 状态码是301
                // Location 跳转地址
                res.writeHead(301, {
                    Location: '/list'
                });
                res.end();
            });
        }
  }

  // 响应
  // res.end('ok');
});
// 监听端口
app.listen(3000);
console.log('服务器已启动')
解决问题2:
通过模板引擎来解决,下面再继续。