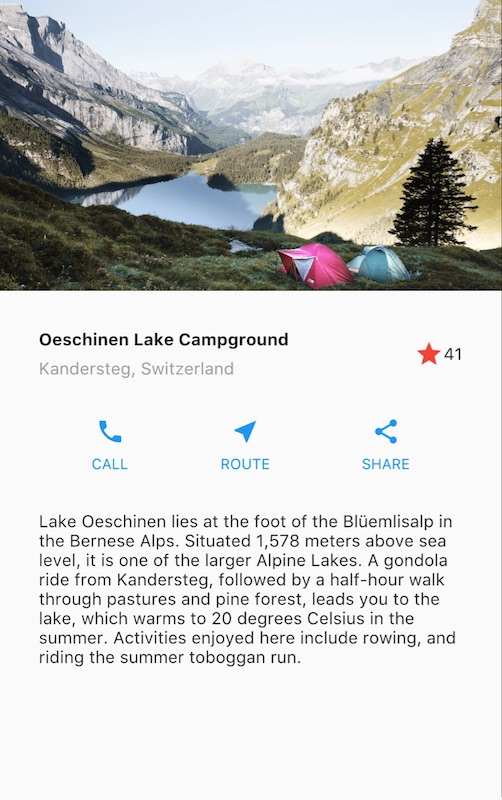
这是在Flutter中构建布局的指南。首先,您将构建以下屏幕截图的布局。然后回过头, 本指南将解释Flutter的布局方法,并说明如何在屏幕上放置一个widget。在讨论如何水平和垂直放置widget之后,会介绍一些最常见的布局widget:
如果你想对布局机制有一个“全貌”的理解,请参考Flutter的布局方法
第0步:创建应用程序基代码
1, 获取代码: 创建一个基本的“Hello World”Fluuer应用程序。
2.更改应用程序栏标题和应用程序标题,如下所示:
Widget build(BuildContext context) {
  return MaterialApp(
      title: 'Flutter layout demo',
      theme: ThemeData(
        primarySwatch: Colors.blue,
      ),
      home: new Scaffold(
        appBar: AppBar(
          title: Text('Flutter layout demo'),
        ),
        body: new Center(
          child: new Text('Hello World'),
        ),
      ),
    );
}
接下来,将图像添加到示例中:
- 在工程根目录创建一个
images文件夹. - 添加
lake.jpg. (请注意,wget不能保存此二进制文件。) - 更新
pubspec.yaml文件以包含assets标签. 这样才会使您的图片在代码中可用。
第一步: 绘制布局图
第一步是将布局拆分成基本的元素:
- 找出行和列.
- 布局包含网格吗?
- 有重叠的元素吗?
- 是否需要选项卡?
- 注意需要对齐、填充和边框的区域.
首先,确定更大的元素。在这个例子中,四个元素排列成一列:一个图像,两个行和一个文本块

接下来,绘制每一行。第一行称其为标题部分,有三个子项:一列文字,一个星形图标和一个数字。它的第一个子项,列,包含2行文字。 第一列占用大量空间,所以它必须包装在Expanded widget中。

第二行称其为按钮部分,也有3个子项:每个子项都是一个包含图标和文本的列。

一旦拆分好布局,最简单的就是采取自下而上的方法来实现它。为了最大限度地减少深度嵌套布局代码的视觉混淆,将一些实现放置在变量和函数中。
第二步: 实现标题行
首先,将在标题部分构建左列。在myapp类的build()方法的顶部添加以下代码:
Widget titleSection = Container(
  padding: const EdgeInsets.all(32),
  child: Row(
    children: [
      Expanded(
        /*1*/
        child: Column(
          crossAxisAlignment: CrossAxisAlignment.start,
          children: [
            /*2*/
            Container(
              padding: const EdgeInsets.only(bottom: 8),
              child: Text(
                'Oeschinen Lake Campground',
                style: TextStyle(
                  fontWeight: FontWeight.bold,
                ),
              ),
            ),
            Text(
              'Kandersteg, Switzerland',
              style: TextStyle(
                color: Colors.grey[500],
              ),
            ),
          ],
        ),
      ),
      /*3*/
      Icon(
        Icons.star,
        color: Colors.red[500],
      ),
      Text('41'),
    ],
  ),
);
将Column(列)放入Expanded中会拉伸该列以使用该行中的所有剩余空闲空间。 设置crossAxisAlignment属性值为CrossAxisAlignment.start,这会将该列中的子项左对齐。
将第一行文本放入Container中,然后底部添加8像素填充。列中的第二个子项(也是文本)显示为灰色。
标题行中的最后两项是一个红色的星形图标和文字“41”。将整行放在容器中,并沿着每个边缘填充32像素。
将标题部分添加替换到应用程序主体,如下所示:
    return MaterialApp(
      title: 'Flutter layout demo',
      theme: ThemeData(
        primarySwatch: Colors.blue,
      ),
      home: new Scaffold(
        appBar: AppBar(
          title: Text('Flutter layout demo'),
        ),
        body: Column(
          children: [
            titleSection,
          ],
        ),
      ),
    );
如果有问题,请将代码与lib/main.dart进行比较。
第3步: 实现按钮行
按钮部分包含3个使用相同布局的列 - 上面一个图标,下面一行文本。该行中的列平均分布行空间, 文本和图标颜色为主题中的primary color,它在应用程序的build()方法中设置为蓝色:
class MyApp extends StatelessWidget {
  @override
  Widget build(BuildContext context) {
    //...

    return new MaterialApp(
      title: 'Flutter Demo',
      theme: new ThemeData(
        primarySwatch: Colors.blue,
      ),

    //...
}
由于构建每一列的代码几乎相同,因此创建一个嵌套函数,如buildButtonColumn,它会创建一个颜色为primary color,包含一个Icon和Text的 Widget 列。
class MyApp extends StatelessWidget {
  @override
  Widget build(BuildContext context) {
    // ···
  }

  Column _buildButtonColumn(Color color, IconData icon, String label) {
    return Column(
      mainAxisSize: MainAxisSize.min,
      mainAxisAlignment: MainAxisAlignment.center,
      children: [
        Icon(icon, color: color),
        Container(
          margin: const EdgeInsets.only(top: 8),
          child: Text(
            label,
            style: TextStyle(
              fontSize: 12,
              fontWeight: FontWeight.w400,
              color: color,
            ),
          ),
        ),
      ],
    );
  }
}
构建函数将图标直接添加到列(Column)中。将文本放入容器以在文本上方添加填充,将其与图标分开。
通过调用函数并传递特定于该列的颜色、图标和文本,生成包含这些列的行。使用mainaxisalignment.space沿主轴对齐各列,使每列前后的自由空间均匀排列。在build()方法内的titleSection声明下方添加以下代码:
Color color = Theme.of(context).primaryColor;

Widget buttonSection = Container(
  child: Row(
    mainAxisAlignment: MainAxisAlignment.spaceEvenly,
    children: [
      _buildButtonColumn(color, Icons.call, 'CALL'),
      _buildButtonColumn(color, Icons.near_me, 'ROUTE'),
      _buildButtonColumn(color, Icons.share, 'SHARE'),
    ],
  ),
);
将按钮部分添加到正文:
    body: Column(
          children: [
            titleSection,
            buttonSection,
          ],
      ),
如果有问题,请将代码与lib/main.dart进行比较。
第4步:实现文本部分
将文本部分定义为变量。将文本放入容器中,并沿每个边缘添加填充。在buttonsection声明的正下方添加以下代码:
Widget textSection = Container(
  padding: const EdgeInsets.all(32),
  child: Text(
    'Lake Oeschinen lies at the foot of the Blüemlisalp in the Bernese '
        'Alps. Situated 1,578 meters above sea level, it is one of the '
        'larger Alpine Lakes. A gondola ride from Kandersteg, followed by a '
        'half-hour walk through pastures and pine forest, leads you to the '
        'lake, which warms to 20 degrees Celsius in the summer. Activities '
        'enjoyed here include rowing, and riding the summer toboggan run.',
    softWrap: true,
  ),
);
通过将softwrap设置为true,文本行将在换行前填充列宽。
将文本部分添加到正文:
    body: Column(
          children: [
            titleSection,
            buttonSection, //将按钮部分添加到正文
            textSection, //将文本部分添加到正文
          ],
        ),
如果有问题,请将代码与lib/main.dart进行比较。
第5步:实现图像部分
四列元素中的三个现在已经完成,只剩下图像部分。该图片可以在Creative Commons许可下在线获得, 但是它非常大,且下载缓慢。在步骤0中,您已经将该图像包含在项目中并更新了pubspec文件,所以现在可以从代码中直接引用它:
    children: [
            Image.asset(
              'images/lake.jpg',
               600,
              height: 240,
              fit: BoxFit.cover,
            ),  //从代码中引用图像
            titleSection,
            buttonSection, //将按钮部分添加到正文
            textSection, //将文本部分添加到正文
          ],
BoxFit.cover 告诉框架,图像应该尽可能小,但覆盖整个渲染框.
如果有问题,请将代码与lib/main.dart进行比较。
第6步: 整合
在最后一步中,将所有元素排列在ListView中,而不是列中,因为当应用程序在小型设备上运行时,ListView支持应用程序主体滚动。
    body: new ListView(
          children: [
            Image.asset(
              'images/lake.jpg',
               600,
              height: 240,
              fit: BoxFit.cover,
            ), //从代码中引用图像
            titleSection,
            buttonSection, //将按钮部分添加到正文
            textSection, //将文本部分添加到正文
          ],
        ),
Dart code: main.dart
Image: images
Pubspec: pubspec.yaml
结束了!当您热重载应用程序时,就会看到和截图中相同界面。您可以参考 给Flutter APP 添加交互来给您的应用添加交互。