初次尝试使用jenkins+python+appium构建自动化测试
因为刚刚尝试使用jenkins+python+appium尝试,只是一个Demo需要很多完善,先记录一下今天的成果,再接再厉
第一步:在本地的window系统安装jenkins
1) Jenkins下载地址:http://mirrors.jenkins-ci.org
2) 启动jenkins:java –jar Jenkins.war
3) 使用chrome浏览器打开127.0.0.1:8080/
备注:我本地未安装tomcat
第二步:脚本的编写(我的上一篇记录有关于appium第一条用例的)
1) 这条用例在上一条的基础之上我加入了HTMLtestrunner测试报告
2) 我使用的是网上修改后的HTMLtestrunner适用于python3的,将htmltestrunner.py放到D:pythonLib目录下
3) 脚本代码如下:
 1 import unittest
 2 import os
 3 from selenium import webdriver
 4 import HTMLTestRunner
 5
 6 class apptest(unittest.TestCase):
 7     def setUp(self):
 8         PATH = lambda p: os.path.abspath(
 9             os.path.join(os.path.dirname(__file__), p)
10         )
11         desired_caps = {}
12         desired_caps['deviceName'] = 'VBJ4C18607003439'  # adb devices查到的设备名
13         desired_caps['platformName'] = 'Android'
14         desired_caps['platformVersion'] = '8.1.0'  # android 系统版本
15         desired_caps['appPackage'] = 'com.aerozhonghuan.serialporttool'  # 被测App的包名
16         desired_caps['appActivity'] = 'com.aerozhonghuan.serialporttool.MainActivity'  # 启动时的Activity
17         self.driver = webdriver.Remote('http://localhost:4723/wd/hub', desired_caps)
18     def testApp(self):
19         driver = self.driver
20         el = driver.find_element_by_id("com.aerozhonghuan.serialporttool:id/btn_heartbeat")
21         el.click()
22         print('第一个appium脚本运行成功了')
23         filename = r'E:aaaaaa
eport.html' #E:aaaaaa
eport.html 这个目录下生成测试报告
24         fp = open(filename, 'wb+')
25         runner = HTMLTestRunner.HTMLTestRunner(
26             stream=fp,
27             title=u'APP自动化测试'
28         )
29         runner.run(self.suite())
30         fp.close()
31     def suite(self):
32         suite = unittest.TestSuite()
33         suite.addTest(apptest("testApp"))
34         return suite
35
36     def tearDown(self):
37         driver = self.driver
38         driver.quit()
39 if __name__ == '__main__':
40     unittest.main()
4) 报告如下:

第三补:Jenkins构建工程
1) 登录jenkins账号->新建任务->构建一个自由风格的软件项目->在构建步骤中选择执行windows批处理命令
2) 数据python的执行命令如: D:python.exeD:pycharm estappUnnitest.py
3) 保存后->点击构建->查看构建历史->控制台输出,即执行完成
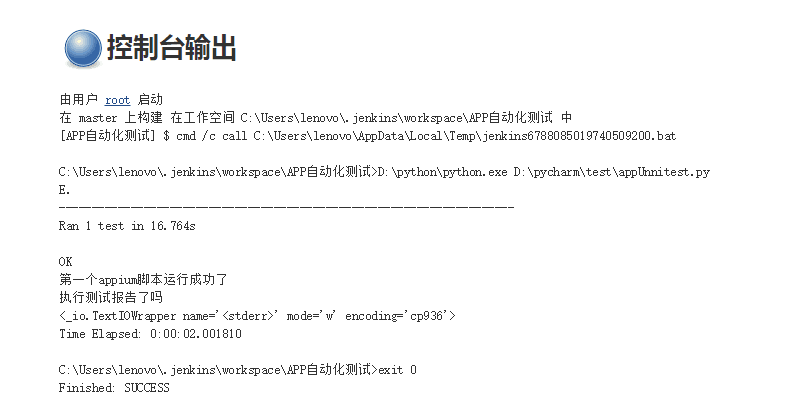
4) Jenkins控制台如图:
