time与datetime模块
time模块,用于输出时间
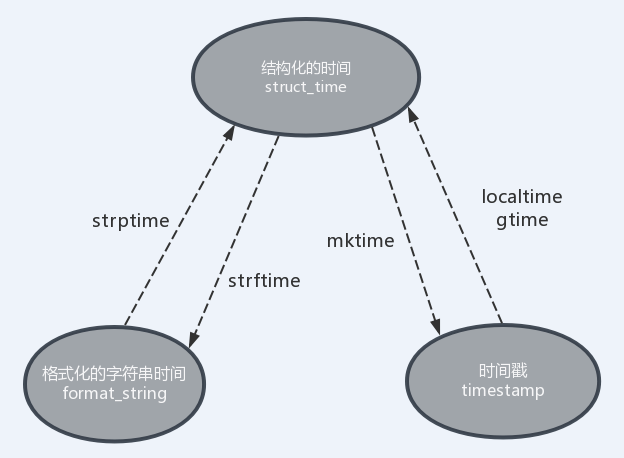
在Python中,用这几种方式来表示时间:
- 时间戳(timestamp):通常来说,时间戳表示的是从1970年1月1日00:00:00开始按秒计算的偏移量。我们运行“type(time.time())”,返回的是float类型。
- 格式化的时间字符串(Format String)。自定义时间输出格式。
- 结构化的时间(struct_time):struct_time元组共有9个元素共九个元素:(年,月,日,时,分,秒,一年中第几周,一年中第几天,夏令时)
import time
#--------先以当前时间为准,快速认识三种形式的时间
print(time.time())   # 时间戳:1487130156.419527
print(time.strftime("%Y-%m-%d %X"))   #格式化的时间字符串:'2017-02-15 11:40:53'
#struct_time:
print(time.localtime()) #本地时区的struct_time
print(time.gmtime())    #UTC时区的struct_time
计算机认识的只有时间戳,为了人们便于识别,于是出现结构化时间和格式化时间


%a    Locale’s abbreviated weekday name.
%A    Locale’s full weekday name.
%b    Locale’s abbreviated month name.
%B    Locale’s full month name.
%c    Locale’s appropriate date and time representation.
%d    Day of the month as a decimal number [01,31].
%H    Hour (24-hour clock) as a decimal number [00,23].
%I    Hour (12-hour clock) as a decimal number [01,12].
%j    Day of the year as a decimal number [001,366].
%m    Month as a decimal number [01,12].
%M    Minute as a decimal number [00,59].
%p    Locale’s equivalent of either AM or PM.    (1)
%S    Second as a decimal number [00,61].    (2)
%U    Week number of the year (Sunday as the first day of the week) as a decimal number [00,53]. All days in a new year preceding the first Sunday are considered to be in week 0.    (3)
%w    Weekday as a decimal number [0(Sunday),6].
%W    Week number of the year (Monday as the first day of the week) as a decimal number [00,53]. All days in a new year preceding the first Monday are considered to be in week 0.    (3)
%x    Locale’s appropriate date representation.
%X    Locale’s appropriate time representation.
%y    Year without century as a decimal number [00,99].
%Y    Year with century as a decimal number.
%z    Time zone offset indicating a positive or negative time difference from UTC/GMT of the form +HHMM or -HHMM, where H represents decimal hour digits and M represents decimal minute digits [-23:59, +23:59].
%Z    Time zone name (no characters if no time zone exists).
%%    A literal '%' character.

格式化字符串的时间格式
#默认以当前时间戳为准:
time.localtime(1473525444.037215)
time.gmtime()
time.mktime(time.localtime())
#默认以当前结构化时间为准:
time.strftime("%Y-%m-%d %X", time.localtime())
time.strptime('2011-05-05 16:37:06', '%Y-%m-%d %X')
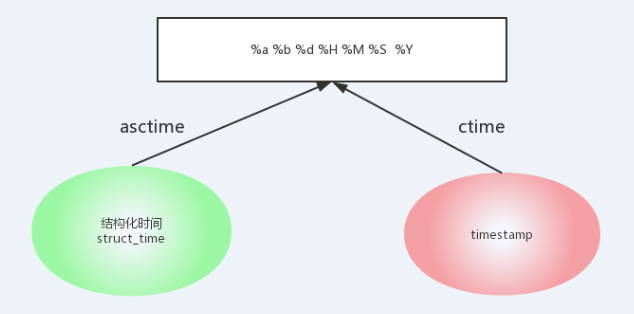
#默认将time.localtime()作为参数传入。
time.asctime()
#默认time.time()为参数。
time.ctime()
#线程推迟指定的时间运行,单位为秒。
time.sleep(secs)
datetime模块: 对时间进行运算
#时间加减
import datetime

# print(datetime.datetime.now()) #返回 2016-08-19 12:47:03.941925
# print(datetime.date.fromtimestamp(time.time()) )  # 时间戳直接转成日期格式 2016-08-19
# print(datetime.datetime.now() )
# print(datetime.datetime.now() + datetime.timedelta(3)) #当前时间+3天
# print(datetime.datetime.now() + datetime.timedelta(-3)) #当前时间-3天
# print(datetime.datetime.now() + datetime.timedelta(hours=3)) #当前时间+3小时
# print(datetime.datetime.now() + datetime.timedelta(minutes=30)) #当前时间+30分
#
# c_time  = datetime.datetime.now()
# print(c_time.replace(minute=3,hour=2)) #时间替换
random模块
用于生成随机浮点数、整数、字符串和随机抽取元素
方法:
random() 生成一个随机浮点数,范围在0.0~1.0之间
uniform(下限,上限) 在设置的范围内,随机生成一个浮点数(上下限可以是整数,浮点数)
randint(下限,上限) 在设定的范围内,随机生成一个整数(上下限必须为整数)
choice(序列) 从任何序列中选取一个随机的元素返回
shuffle(序列) 随机打乱一个序列中元素的顺序
sample(序列,长度) 从指定的序列中随机截取指定长度的片断,序列本身不做修改
例:
>>> import random
>>> random.random()
0.8447582194835284
>>> random.uniform(1,5)
3.331346403458685
>>> random.randint(1,5)
4
>>> a=range(1,10)
>>> random.choice(a)
6
>>> random.shuffle(a)
>>> print a
[7, 2, 5, 9, 1, 3, 4, 8, 6]
>>> random.sample(a,3)
[7, 5, 8]
random实现随机数
import random
def make_code(n):
    res=''
    for i in range(n):
        s1=chr(random.randint(65,90))
        s2=str(random.randint(0,9))
        res+=random.choice([s1,s2])
    return res

print(make_code(9))
OS模块
os,包含普遍的操作系统功能,与具体的平台无关。python编程时,处理文件和目录这些操作,就比如说:显示当前目录下所有文件/删除某个文件/获取文件大小……
os模块不受平台限制,也就是说:当我们要在linux中显示当前命令时就要用到pwd命令,而Windows中cmd命令行下就要用到这个,例如:这时候我们使用python中os模块的os.path.abspath(name)功能,甭管是linux或者Windows都可以获取当前的绝对路径。
常见函数列表
-
os.name:指示你正在使用的工作平台。比如对于Windows,返回是'nt',而对于Linux/Unix用户,返回是'posix'。 -
os.sep:取代操作系统特定的路径分隔符 -
os.getcwd:得到当前工作目录,即当前python脚本工作的目录路径。 -
os.getenv()和os.putenv:分别用来读取和设置环境变量 -
os.listdir():返回指定目录下的所有文件和目录名 -
os.remove(file):删除一个文件 -
os.stat(file):获得文件属性 -
os.chmod(file):修改文件权限和时间戳 -
os.mkdir(name) :创建目录 -
os.rmdir(name):删除目录 -
os.removedirs(r“c:python”):删除多个目录 -
os.system():运行shell命令 -
os.exit():终止当前进程 -
os.linesep:给出当前平台的行终止符。例如,Windows使用' ',Linux使用' '而Mac使用' ' -
os.path.split():返回一个路径的目录名和文件名 -
os.path.isfile()和os.path.isdir()分别检验给出的路径是一个目录还是文件 -
os.path.existe():检验给出的路径是否真的存在 -
os.listdir(dirname):列出dirname下的目录和文件 -
os.getcwd():获得当前工作目录 -
os.curdir:返回当前目录('.') -
os.chdir(dirname):改变工作目录到dirname -
os.path.isdir(name):判断name是不是目录,不是目录就返回false -
os.path.isfile(name):判断name这个文件是否存在,不存在返回false -
os.path.exists(name):判断是否存在文件或目录name -
os.path.getsize(name):或得文件大小,如果name是目录返回0L -
os.path.abspath(name):获得绝对路径 -
os.path.isabs():判断是否为绝对路径 -
os.path.normpath(path):规范path字符串形式 -
os.path.split(name):分割文件名与目录(事实上,如果你完全使用目录,它也会将最后一个目录作为文件名而分离,同时它不会判断文件或目录是否存在) -
os.path.splitext():分离文件名和扩展名 -
os.path.join(path,name):连接目录与文件名或目录 -
os.path.basename(path):返回文件名 -
os.path.dirname(path):返回文件路径
例:
文件操作
os.mknod("abc.test") #创建空文件
目录操作
os.mkdir("file")
创建一个名为file的目录
复制文件:
shutil.copyfile("oldfile","newfile")
oldfile和newfile都只能是文件
shutil.copy("oldfile","newfile")
oldfile只能是文件夹,newfile可以是文件,也可以是目标目录
shutil.copytree("olddir","newdir")
复制文件夹.olddir和newdir都只能是目录,且newdir必须不存在
os.rename("oldname","newname")
重命名文件(目录).文件或目录都是使用这条命令
shutil.move("oldpos","newpos")
移动文件(目录)
os.rmdir("dir")
只能删除空目录
shutil.rmtree("dir")
空目录、有内容的目录都可以删
os.chdir("path")
转换目录,换路径
OS路径处理的两种方式:
os.path.normpath(os.path.join(
    os.path.abspath(__file__),..,..))
os.path.dirname()嵌套os.path.abspath(__file__)
sys模块
sys.argv           命令行参数List,第一个元素是程序本身路径
sys.exit(n)        退出程序,正常退出时exit(0)
sys.version        获取Python解释程序的版本信息
sys.maxint         最大的Int值
sys.path           返回模块的搜索路径,初始化时使用PYTHONPATH环境变量的值
sys.platform       返回操作系统平台名称

例子:
#=========实现打印进度条函数==========
import sys
import time

def progress(percent,width=50):
    if percent >= 1:
        percent=1
    show_str=('[%%-%ds]' %width) %(int(width*percent)*'#')
    print('
%s %d%%' %(show_str,int(100*percent)),file=sys.stdout,flush=True,end='')
shutil模块
高级的 文件、文件夹、压缩包 处理模块
shutil.copyfileobj(fsrc, fdst[, length])
将文件内容拷贝到另一个文件中。
shutil.copyfile(src, dst)
拷贝文件
shutil.copymode(src, dst)
仅拷贝权限。内容、组、用户均不变
shutil.copystat(src, dst)
仅拷贝状态的信息,包括:mode bits, atime, mtime, flags
shutil.copy(src, dst)
拷贝文件和权限
shutil.copy2(src, dst)
拷贝文件和状态信息
shutil.ignore_patterns(*patterns)
shutil.copytree(src, dst, symlinks=False, ignore=None)
递归的去拷贝文件夹
import shutil
shutil.copytree('folder1', 'folder2', ignore=shutil.ignore_patterns('*.pyc', 'tmp*')) #目标目录不能存在,注意对folder2目录父级目录要有可写权限,ignore的意思是排除
shutil.rmtree(path[, ignore_errors[, onerror]])
递归的去删除文件
shutil.move(src, dst)
递归的去移动文件,它类似mv命令,其实就是重命名。
shutil.make_archive(base_name, format,...)
创建压缩包并返回文件路径,例如:zip、tar
创建压缩包并返回文件路径,例如:zip、tar
参数列表:
- base_name: 压缩包的文件名,也可以是压缩包的路径。只是文件名时,则保存至当前目录,否则保存至指定路径,
如 data_bak =>保存至当前路径
如:/tmp/data_bak =>保存至/tmp/ - format: 压缩包种类,“zip”, “tar”, “bztar”,“gztar”
- root_dir: 要压缩的文件夹路径(默认当前目录)
- owner: 用户,默认当前用户
- group: 组,默认当前组
- logger: 用于记录日志,通常是logging.Logger对象
shutil 对压缩包的处理是调用 ZipFile 和 TarFile 两个模块来进行的
json&pickle模块
用于对数据进行序列化
把对象(变量)从内存中变成可存储或传输的过程称之为序列化,在Python中叫pickling。
作用:
1:持久保存状态
2:跨平台数据交互
json
JSON表示的对象就是标准的JavaScript语言的对象,只支持双引号
JSON和Python内置的数据类型对应如下:


 import json

dic={'name':'alvin','age':23,'sex':'male'}
print(type(dic))#<class 'dict'>

j=json.dumps(dic)
print(type(j))#<class 'str'>

f=open('序列化对象','w')
f.write(j)  #-------------------等价于json.dump(dic,f)
f.close()
#-----------------------------反序列化<br>
import json
f=open('序列化对象')
data=json.loads(f.read())#  等价于data=json.load(f)
注:无论数据是怎样创建的,只要满足json格式,就可以json.loads出来
pickle
只能用于Python,并且可能不同版本的Python彼此都不兼容,因此,只能用Pickle保存那些不重要的数据,不能成功地反序列化也没关系。

与json的 dumps和loads使用类似,需要注意:
dumps时会转成bytes格式。
loads时需要注意文件要以bytes格式读取。
configparser模块
配置文件如下:
# 注释1
; 注释2

[section1]
k1 = v1
k2:v2
user=jinyudong
age=18
is_admin=true
salary=1234
读取
import configparser

config=configparser.ConfigParser()
config.read('a.cfg')

#查看所有的标题
res=config.sections()
#查看标题section1下所有key=value的key
options=config.options('section1')
#查看标题section1下所有key=value的(key,value)格式
item_list=config.items('section1')
#查看标题section1下user的值=>字符串格式
val=config.get('section1','user')
#查看标题section1下age的值=>整数格式
val1=config.getint('section1','age')
#查看标题section1下is_admin的值=>布尔值格式
val2=config.getboolean('section1','is_admin')

#查看标题section1下salary的值=>浮点型格式
val3=config.getfloat('section1','salary')
改写
import configparser

config=configparser.ConfigParser()
config.read('a.cfg',encoding='utf-8')


#删除整个标题section2
config.remove_section('section2')

#删除标题section1下的某个k1
config.remove_option('section1','k1')

#判断是否存在某个标题
print(config.has_section('section1'))

#判断标题section1下是否有user
print(config.has_option('section1',''))


#添加一个标题
config.add_section('egon')

#在标题egon下添加name=egon,age=18的配置
config.set('egon','name','egon')   #,必须是字符串


#最后将修改的内容写入文件,完成最终的修改
config.write(open('a.cfg','w'))
hashlib模块
hash:一种算法 ,3.x里代替了md5模块和sha模块,主要提供 SHA1, SHA224, SHA256, SHA384, SHA512 ,MD5 算法
三个特点:
1.内容相同则hash运算结果相同,内容稍微改变则hash值则变
2.不可逆推
3.相同算法:无论校验多长的数据,得到的哈希值长度固定。
 import hashlib
m=hashlib.md5()# m=hashlib.sha256()

m.update('hello'.encode('utf8'))
print(m.hexdigest())  #5d41402abc4b2a76b9719d911017c592

m.update('alvin'.encode('utf8'))

print(m.hexdigest())  #92a7e713c30abbb0319fa07da2a5c4af
m2=hashlib.md5()
m2.update('helloalvin'.encode('utf8'))
print(m2.hexdigest()) #92a7e713c30abbb0319fa07da2a5c4af

'''注意:把一段很长的数据update多次,与一次update这段长数据,得到的结果一样但是update多次为校验大文件提供了可能。'''

附加:
hmac 模块,它内部对我们创建 key 和 内容 进行进一步的处理然后再加密:
import hmac
h = hmac.new('alvin'.encode('utf8'))
h.update('hello'.encode('utf8'))
print (h.hexdigest())   #320df9832eab4c038b6c1d7ed73a5940
#要想保证hmac最终结果一致,必须保证:
#1:hmac.new括号内指定的初始key一样
#2:无论update多少次,校验的内容累加到一起是一样的内容