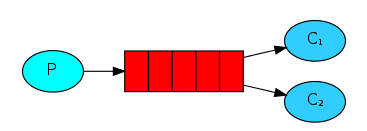
我们将创建一个工作队列,用于在多个工作人员(C1,C2)之间分配耗时的任务。
工作队列(又名:任务队列)的主要思想是避免立即执行资源密集型任务。将任务封装 为消息并将其发送到队列。在后台的工作进程再将队列中的任务弹出分配给消费者(C1,C2)执行。
特别是对于网络请求,一次短短的HTTP请求是要求迅速响应的,不可能让它一直停顿在高耗时操作上。
准备工作:
因为这里并没有真正的高耗时操作,比如缩放图像或输出一个pdf。因此我们只是用Thread.sleep()来假装我们很繁忙,而且会用"1-10"来表示需要停顿的秒数,比如一个叫Hello 3 的任务将停顿3秒钟。
循环派发任务
任务队列的一个优势就是能够容易的处理并行工作。如果我们积压了大量的工作,我们只需要启动更多的消费者程序即可。
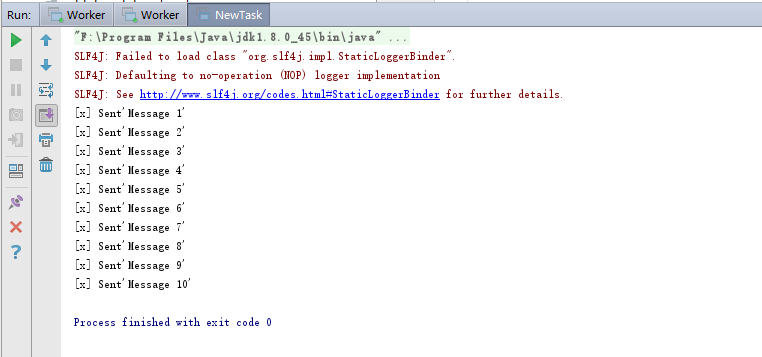
NewTask.java
package com.rabbitmq.tutorials.workqueues.autoack_ture;

import com.rabbitmq.client.Channel;
import com.rabbitmq.client.Connection;
import com.rabbitmq.client.ConnectionFactory;

/**
 * Created by zenglw on 2018/2/14.
 */
public class NewTask {
    /**
     * 队列名称
     */
    private final static String QUEUE_NAME = "hello";

    public static void main(String[] argv) throws Exception {

        //step 1: create a connection to the server
        ConnectionFactory factory = new ConnectionFactory();
        factory.setHost("192.168.0.103");//主机名称或IP地址
        Connection connection = factory.newConnection();
        Channel channel = connection.createChannel();//创建频道

        //step 2: To send, we must declare a queue for us to send to; then we can publish a message to the queue:
        channel.queueDeclare(QUEUE_NAME, false, false, false, null);//如果队列已经存在不会再创建
        int messageCount = 1;
        while(messageCount++<10) {
            String message = "Message "+ messageCount;
            channel.basicPublish("","hello",null,message.getBytes());
            System.out.println("[x] Sent'" + message + "'");
        }

        //step 3: Lastly, we close the channel and the connection;
        channel.close();
        connection.close();
    }
}
Work.java
package com.rabbitmq.tutorials.workqueues.autoack_ture;

import com.rabbitmq.client.*;

import java.io.IOException;

/**
 * Created by zenglw on 2018/2/14.
 */
public class Worker {
    private final static String QUEUE_NAME = "hello";

    public static void main(String[] argv) throws Exception {

        //step 1: create a connection to the server
        ConnectionFactory factory = new ConnectionFactory();
        factory.setHost("192.168.0.103");
        Connection connection = factory.newConnection();
        Channel channel = connection.createChannel();

        //step 2: To send, we must declare a queue for us to receive from; then we can receive a message from the queue:
        //请注意,我们也在这里声明队列。因为我们可能会在发布者之前启动消费者,所以我们希望确保队列存在,然后再试图使用消息。
        channel.queueDeclare(QUEUE_NAME, false, false, false, null);
        System.out.println(" [*] Waiting for messages. To exit press CTRL+C");

        //告诉服务器将队列中的消息传递给我们。由于它会异步推送消息,因此我们以对象的形式提供回调,缓冲消息直到准备好使用它们。这是一个DefaultConsumer子类所做的
        final Consumer consumer = new DefaultConsumer(channel) {
            @Override
            public void handleDelivery(String consumerTag, Envelope envelope, AMQP.BasicProperties properties, byte[] body) throws IOException {
                String message = new String(body, "UTF-8");

                System.out.println(" [x] Received '" + message + "'");
                try {
                    doWork(message);
                } finally {
                    System.out.println(" [x] Done");
                }
            }
        };
        boolean autoAck = true; // acknowledgment is covered below
        channel.basicConsume(QUEUE_NAME, autoAck, consumer);

    }

    private static void doWork(String task) {
        try {
            int sleepTime = Integer.valueOf(task.substring(task.length()-1))*1000;
            Thread.sleep(sleepTime);
        } catch (InterruptedException e) {

        }

    }
}
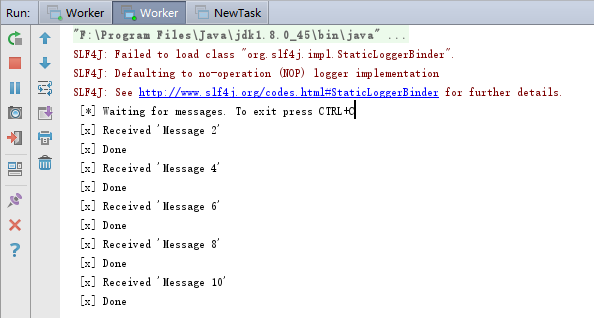
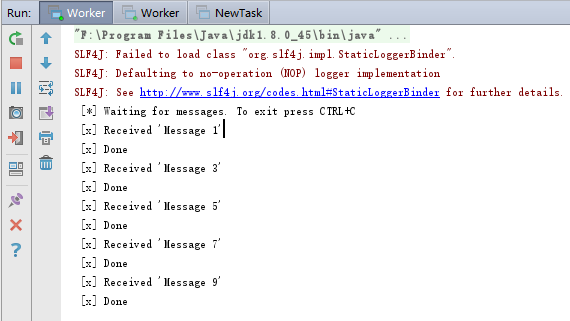
首先,启动两个worker实例,它们都会从队列中接收消息。

再启动NewTask实例,它会想队列中发生10条消息
默认情况下,RabbitMQ将依次将每个消息发送给下一个消费者。平均每个消费者将得到相同数量的消息。这种分发消息的方式称为循环。让我们查看一下2个worker实例接收到的消息
消息应答
完成一项任务可能需要几秒钟。你可能会想,如果其中一个消费者开始了一项耗时的任务,并在执行过程中死掉,会发生什么。使用我们当前的代码,一旦RabbitMQ向客户传递消息,它会立即被标记为删除(消费者接收到消息后自动应答)。在这种情况下,如果你kill了一个worker,我们将丢失它处理的信息。我们也将丢失所有发送给这个特定worker的消息,但是这些消息还没有被处理。
我们不想丢失任何任务。如果一个worker死掉,我们希望把任务交给另一个worker
为了确保消息不会丢失,RabbitMQ支持消息确认。一个ack(nowledgement)被消费者送回,告诉RabbitMQ一个特定的消息已经被接收、处理,并且RabbitMQ可以删除它。
如果一个消费者死亡(它的channel是关闭的,connection是关闭的,或者TCP连接丢失),而没有发送ack, RabbitMQ将会理解一条消息没有被完全处理,并且将重新排队。如果同时有其他的消费者在线,那么它将很快把它重新送到另一个消费者手中。这样你就可以确信,即使workers偶尔死亡,也不会丢失任何信息。
消息并没有超时时间这个概念,消息只会在消费者挂掉了时候重发。即使处理消息需要很长时间。
手动消息应答(Manual message acknowledgments)是默认打开的。在前面的例子中,我们通过autoAck=true标记设置为自动应答。消费者就该把个flag设置为false,在完成任务的时候再发送应答。
boolean autoAck = false;
使用这段代码,我们可以确保即使您使用CTRL+C杀死了一个正在这处理消息的worker时,什么也不会丢失。在worker死后不久,所有未应答的消息将被重新发送。
忘记应答
如果你处理完任务后忘记应答,RabbitMQ将会吃掉越来越多的内存,应为它没有能力取释放没有应答的消息。
为了debug这种场景,你可以使用rabbitmqctl 打印出messages_unacknowledged 字段
sudo rabbitmqctl list_queues name messages_ready messages_unacknowledged

消息持久化
我们已经学会了如何确保即使消费者死亡,任务也不会丢失。但是如果RabbitMQ服务器停止,我们的任务仍然会丢失。
当RabbitMQ退出或崩溃时,它将忘记队列和消息,除非您告诉它不要。需要两件事来确保消息不会丢失:我们需要将队列和消息标记为持久的。
首先,将队列声明为持久的:
boolean durable = true;
channel.queueDeclare("hello", durable, false, false, null);
虽然这个命令本身是正确的,但它在我们上面的例子中是无效的。这是因为我们已经定义了一个名为hello的队列,它不是持久的。RabbitMQ不允许您用不同的参数重新定义一个现有的队列,并向任何试图这样做的程序返回一个错误。那么我们申明另一个队列"task_queue":
boolean durable = true;
channel.queueDeclare("task_queue", durable, false, false, null);
现在,我们已经确保 task_queue 队列不会丢失,即使RabbitMQ服务器重启。接下来,我们将消息也标记为持久的--通过设置MessageProperties (which implements BasicProperties)的值为PERSISTENT_TEXT_PLAIN.
import com.rabbitmq.client.MessageProperties;

channel.basicPublish("", "task_queue",
            MessageProperties.PERSISTENT_TEXT_PLAIN,
            message.getBytes());
消息持久化注意点:
将消息标记为持久性并不能完全保证消息不会丢失。虽然它告诉RabbitMQ将消息保存到磁盘,但是当RabbitMQ接收了消息并没有保存它时,仍然有一个短时间窗口。另外,RabbitMQ对每个消息都不执行fsync(2)——它可能只是保存到缓存,而不是真正写入磁盘。持久性保证并不强大,但是对于简单的任务队列来说已经足够了。如果您需要更强的保证,那么您可以使用pulisher confirms。
公平派发
您可能已经注意到,调度仍然不能完全按照我们的要求工作。例如,在两个worker的情况下,当所有奇数的任务都很耗时,偶数的任务都很快时,一个worker会一直忙着,另一个worker几乎没有任务。嗯,RabbitMQ对此一无所知,并且仍然会均匀地发送消息
这是因为RabbitMQ在消息进入队列时才会发送消息。它不考虑消费者未确认的消息的数量。它只是盲目地将每个n-th消息发送给第n个用户。
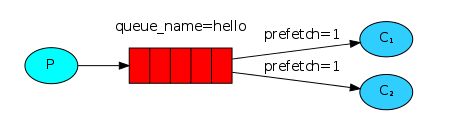
为了保持相对公平性,我们可以在worker中使用Channel.basicQos方法和prefetchCount = 1 告诉RabbitMQ服务器一次只获取一个信息。或者,换句话说,不要向worker发送新消息,直到它处理并应答了之前的消息。从而RabbitMQ服务器会将消息发送给其它并不那么忙的worker
int prefetchCount = 1;
channel.basicQos(prefetchCount);
留意队列的大小:
如果所有的任务都很忙,你的队列就会排满。你需求留意这一点,要么你增加更多的员工,要么采取其他的策略。
代码汇总
NewTask.java
package com.rabbitmq.tutorials.workqueues.three_persistence;

import com.rabbitmq.client.Channel;
import com.rabbitmq.client.Connection;
import com.rabbitmq.client.ConnectionFactory;
import com.rabbitmq.client.MessageProperties;

/**
 * Created by zenglw on 2018/2/14.
 */
public class NewTask {
    /**
     * 队列名称
     */
    private final static String QUEUE_NAME = "task_queue";

    public static void main(String[] argv) throws Exception {

        //step 1: create a connection to the server
        ConnectionFactory factory = new ConnectionFactory();
        factory.setHost("192.168.0.103");//主机名称或IP地址
        Connection connection = factory.newConnection();
        Channel channel = connection.createChannel();//创建频道

        //step 2: To send, we must declare a queue for us to send to; then we can publish a message to the queue:
        channel.queueDeclare(QUEUE_NAME, true, false, false, null);//如果队列已经存在不会再创建
        int messageCount = 1;
        while(messageCount++<10) {
            String message = "Message "+ messageCount;
            channel.basicPublish( "", QUEUE_NAME,
                    MessageProperties.PERSISTENT_TEXT_PLAIN,
                    message.getBytes());
            System.out.println(" [x] Sent '" + message + "'");
        }


        //step 3: Lastly, we close the channel and the connection;
        channel.close();
        connection.close();
    }
}
Worker.java
package com.rabbitmq.tutorials.workqueues.three_persistence;

import com.rabbitmq.client.*;

import java.io.IOException;

/**
 * Created by zenglw on 2018/2/14.
 */
public class Worker {
    private final static String QUEUE_NAME = "task_queue";

    public static void main(String[] argv) throws Exception {

        //step 1: create a connection to the server
        ConnectionFactory factory = new ConnectionFactory();
        factory.setHost("192.168.0.103");
        Connection connection = factory.newConnection();
        final Channel channel = connection.createChannel();

        //step 2: To send, we must declare a queue for us to receive from; then we can receive a message from the queue:
        //请注意,我们也在这里声明队列。因为我们可能会在发布者之前启动消费者,所以我们希望确保队列存在,然后再试图使用消息。
        channel.queueDeclare(QUEUE_NAME, true, false, false, null);
        System.out.println(" [*] Waiting for messages. To exit press CTRL+C");

        channel.basicQos(1); // accept only one unack-ed message at a time (see below)
        final Consumer consumer = new DefaultConsumer(channel) {
            @Override
            public void handleDelivery(String consumerTag, Envelope envelope, AMQP.BasicProperties properties, byte[] body) throws IOException {
                String message = new String(body, "UTF-8");

                System.out.println(" [x] Received '" + message + "'");
                try {
                    doWork(message);
                } finally {
                    System.out.println(" [x] Done");
                    channel.basicAck(envelope.getDeliveryTag(), false);
                }
            }
        };
        boolean autoAck = false;
        channel.basicConsume(QUEUE_NAME, autoAck, consumer);

    }

    private static void doWork(String task) {
        try {
            int sleepTime = Integer.valueOf(task.substring(task.length()-1))*1000;
            Thread.sleep(sleepTime);
        } catch (InterruptedException e) {

        }

    }
}
效果展示:
1. 启动NewTask实例

2.查看未应答消息
3.关闭RabbitMQ服务器,启动RabbitMQ服务器
4.查看未应答消息
[root@bogon ~]# sudo rabbitmqctl list_queues name messages_ready messages_unacknowledged                #查看未应答消息
Listing queues ...
hello    0    0
task_queue    10    0
...done.
[root@bogon ~]# /sbin/service rabbitmq-server stop                                                      #关闭RabbitMQ服务器
Redirecting to /bin/systemctl stop rabbitmq-server.service
[root@bogon ~]# /sbin/service rabbitmq-server start                                                     #启动RabbitMQ服务器
Redirecting to /bin/systemctl start rabbitmq-server.service
[root@bogon ~]# sudo rabbitmqctl list_queues name messages_ready messages_unacknowledged                #查看未应答消息
Listing queues ...
task_queue    10    0
...done.
[root@bogon ~]#