基于vue cli创建一个vue项目
首先安装最新的vue cli脚手架,
npm install --global @vue/cli
npm WARN optional SKIPPING OPTIONAL DEPENDENCY: fsevents@1.2.13 (node_modules@vuecli
ode_modulesfsevents):
npm WARN notsup SKIPPING OPTIONAL DEPENDENCY: Unsupported platform for fsevents@1.2.13: wanted {"os":"darwin","arch":"any"} (current: {"os":"win32","arch":"x64"})

+ @vue/cli@4.4.6
added 1230 packages from 670 contributors in 118.122s
查看安装的vue -V
@vue/cli 4.4.6
创建项目:vue create my-project-name(“my-project-name”,这个可以根据需要命名,尽量用英文)
Vue CLI v4.4.6
? Please pick a preset: Manually select features
? Check the features needed for your project: Babel, TS, Router, Vuex, CSS Pre-processors, Linter
? Use class-style component syntax? Yes
? Use Babel alongside TypeScript (required for modern mode, auto-detected polyfills, transpiling JSX)? Yes
? Use history mode for router? (Requires proper server setup for index fallback in production) Yes
? Pick a CSS pre-processor (PostCSS, Autoprefixer and CSS Modules are supported by default): Sass/SCSS (with node-sass)
? Pick a linter / formatter config: Prettier
? Pick additional lint features: Lint on save
? Where do you prefer placing config for Babel, ESLint, etc.? In dedicated config files
? Save this as a preset for future projects? Yes
? Save preset as: ts_tmpl
创建完成之后,会出现如下提示
⚓  Running completion hooks...

�  Generating README.md...

�  Successfully created project my-project-name.
�  Get started with the following commands:

 $ cd my-project-name
 $ npm run serve
根据提示执行命令
E:vue_codes>cd my-project-name

E:vue_codesmy-project-name>npm run serve

> my-project-name@0.1.0 serve E:vue_codesmy-project-name
> vue-cli-service serve

 INFO  Starting development server...
Starting type checking service...
Using 1 worker with 2048MB memory limit
98% after emitting CopyPlugin

 DONE  Compiled successfully in 5304ms                                                                      上午11:13:54

No type errors found
Version: typescript 3.9.7
Time: 3160ms

  App running at:
  - Local:   http://localhost:8080/
  - Network: http://192.168.1.95:8080/

  Note that the development build is not optimized.
  To create a production build, run npm run build.
在浏览器输入地址:http://localhost:8080/

出现如上图所示界面,表示项目创建成功了。
生成的代码目录结构如下:
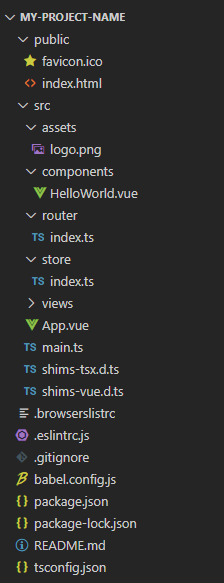
两个声明文件:shims-vue.d.ts和shims.tsx.d.ts
shims-vue.d.ts:由于 TypeScript 默认并不支持 *.vue 后缀的文件,所以在 vue 项目中引入的时候需要创建一个shims-vue.d.ts 文件,放在项目项目对应使用目录下,例如 src/shims-vue.d.ts,用来支持*.vue 后缀的文件
shims-tsx.d.ts:允许.tsx 结尾的文件,在 Vue 项目中编写 jsx 代码
tsconfig.json:typescript配置文件,主要用于指定待编译的文件和定义编译选项
normalize.css:Normalize.css 是一个可以定制的CSS文件,它让不同的浏览器在渲染网页元素的时候形式更统一。Normalize.css是一种CSS reset的替代方案。
.browserslistrc:这个配置能够分享目标浏览器和nodejs版本在不同的前端工具。这些工具能根据目标浏览器自动来进行配置,Browserslist这个东西单独是没用的,(补充: 在vue官方脚手架中,browserslist字段会被 @babel/preset-env 和 Autoprefixer 用来确定需要转译的 JavaScript 特性和需要添加的 CSS 浏览器前缀。)
browserslist的配置文件:
> 1% 兼容全球使用率大于1%的游览器
last 2 versions 兼容每个游览器的最近两个版本
not ie <= 8 不兼容ie8及以下
具体可见 browserslist。
改造项目结构
这种组件项目和我们日常的项目还是有很大区别的,由于前面我采用的是vue cli创建的完整模板项目,这里许多东西用不到,我们就将其删掉,最终项目目录结构如下:
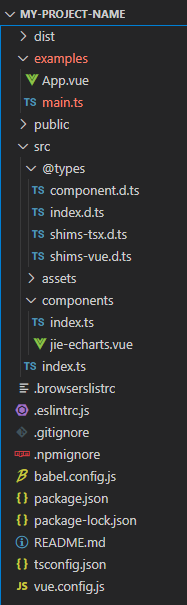
examples:是组件使用示例
src/components:是组件源码
package.json代码如下:
{
  "name": "jie-echarts",
  "version": "0.1.0",
  "private": false,
  "description": "echarts组件",
  "main": "dist/JieEcharts.common.js",
  "author": "zouqj<zouyujie@126.com>",
  "license": "MIT",
  "scripts": {
    "serve": "vue-cli-service serve",
    "build": "vue-cli-service build",
    "lint": "vue-cli-service lint",
    "lib": "vue-cli-service build --target lib --name JieEcharts ./src/index.ts"
  },
"type": "git",
"url": "git+https://github.com/zouyujie/vue-components/tree/master/jie-echarts"
},
"bugs": {
"url": "https://github.com/zouyujie/vue-components/issues"
},
"homepage": "https://github.com/zouyujie/vue-components/tree/master/jie-echarts",
"keywords": [
"vue",
"vuejs",
"typescript",
"vuecli4.x"
],
  "dependencies": {
    "core-js": "^3.6.5",
    "echarts": "^4.8.0",
    "ts-loader": "^8.0.1",
    "vue": "^2.6.11",
    "vue-class-component": "^7.2.3",
    "vue-property-decorator": "^8.4.2",
    "vue-router": "^3.2.0",
    "vuex": "^3.4.0"
  },
  "devDependencies": {
    "@types/echarts": "^4.6.4",
    "@typescript-eslint/eslint-plugin": "^2.33.0",
    "@typescript-eslint/parser": "^2.33.0",
    "@vue/cli-plugin-babel": "~4.4.0",
    "@vue/cli-plugin-eslint": "~4.4.0",
    "@vue/cli-plugin-router": "~4.4.0",
    "@vue/cli-plugin-typescript": "~4.4.0",
    "@vue/cli-plugin-vuex": "~4.4.0",
    "@vue/cli-service": "~4.4.0",
    "@vue/eslint-config-prettier": "^6.0.0",
    "@vue/eslint-config-typescript": "^5.0.2",
    "eslint": "^6.7.2",
    "eslint-plugin-prettier": "^3.1.3",
    "eslint-plugin-vue": "^6.2.2",
    "node-sass": "^4.12.0",
    "prettier": "^1.19.1",
    "sass-loader": "^8.0.2",
    "typescript": "~3.9.3",
    "vue-template-compiler": "^2.6.11"
  }
}
重点注意标红部分的配置。
tsconfig.json
{
  "compilerOptions": {
    "target": "esnext",
    "module": "esnext",
    "strict": true,
    "jsx": "preserve",
    "importHelpers": true,
    "moduleResolution": "node",
    "experimentalDecorators": true,
    "esModuleInterop": true,
    "allowSyntheticDefaultImports": true,
    "sourceMap": true,
    "baseUrl": ".",
    "typeRoots": ["/@types", "./node_modules/@types"],
    "types": ["webpack-env"],
    "paths": {
      "@/*": ["src/*"]
    },
    "lib": ["esnext", "dom", "dom.iterable", "scripthost"]
  },
  "include": [
    "src/**/*.ts",
    "src/**/*.tsx",
    "src/**/*.vue",
    "tests/**/*.ts",
    "tests/**/*.tsx"
  ],
  "exclude": ["node_modules"]
}
vue.config.js代码如下:
'use strict';
// Template version: 1.3.1
// see http://vuejs-templates.github.io/webpack for documentation.

const UglifyJsPlugin = require('uglifyjs-webpack-plugin');
const webpack = require('webpack');
const path = require('path');
const resolve = (dir) => path.resolve(__dirname, dir);
module.exports = {
  // 修改 src 目录 为 examples 目录
  pages: {
    index: {
      entry: 'examples/main.ts',
      template: 'public/index.html',
      filename: 'index.html',
    },
  },
  // vue 通过 file-loader 用版本哈希值和正确的公共基础路径来决定最终的图片路径,再用 url-loader 将小于 4kb 的
  // 图片内联,以减少 HTTP 请求的数量。所以我们可以通过 chainWebpack 调整图片的大小限制。例如,我们将
  // 图片大小限制设置为 13kb,低于13kb的图片全部被内联,高于13kb的图片会放在单独的img文件夹中。
  chainWebpack: (config) => {
    const imagesRule = config.module.rule('images');
    imagesRule
      .use('url-loader')
      .loader('url-loader')
      .tap((options) => Object.assign(options, { limit: 13312 }));
  },
  // 设置css: { extract: false },可以强制内联,就不会将css单独打包成一个文件,导致页面没有style
  css: { extract: false },
  productionSourceMap: false,
};
说明:UglifyJS Webpack Plugin插件用来缩小(压缩优化)js文件,修改应用入口文件,examples/main.ts,方便执行npm run serve的时候,可以直接查看组件的示例。
.npmignore可以将一些不需要发布到npm的文件忽略掉,.npmignore配置如下:
.*
package-lock.json
/.git/
/.vscode/
tslint.json
tsconfig.json
*.log

.DS_Store
/dist
/examples
/node_modules
/public
/src
/tests
.browserslistrc
jest.config.js
vue.config.js

# local env files
.env.local
.env.*.local

# Log files
npm-debug.log*
yarn-debug.log*
yarn-error.log*

# Editor directories and files
.idea
.vscode
.gitignore
.npmignore
.npmrc
*.suo
*.ntvs*
*.njsproj
*.sln
*.sw?
components下面
index.ts代码,以插件的形式进行封装,方便全局引用:
import jieEcharts from './jie-echarts.vue';

(jieEcharts as any).install = (Vue: any) => {
  Vue.component(jieEcharts.name, jieEcharts);
};

export default jieEcharts;
jie-echarts.vue,是组件源码,代码:
<template>
  <!-- 每一个图表都有自己唯一的id,需要动态传入。 -->
  <div :ref="id" :id="id" :class="myclass" :style="style" />
</template>
<script lang="ts">
import { Component, Vue, Prop, Watch } from "vue-property-decorator";
import Echarts from "echarts";
@Component({
  name: "jie-echarts"
})
export default class extends Vue {
  @Prop({ default: "myCharts" }) private id!: string;
  @Prop({ default: "100%" }) private width!: string;
  @Prop({ default: "200px" }) private height!: string;
  @Prop({ default: "echarts-line" }) private myclass!: string;
  @Prop() private options!: object;
  @Prop({ default: false }) private loading!: boolean;

  private MyEcharts: any = null; // echarts实例

  created() {
    console.log("this.options :>> ", this.options);
  }
  mounted() {
    this.InitCharts();
  }

  get style() {
    return {
      height: this.height,
       this.width
    };
  }
  @Watch("options", { deep: true })
  onChangeOption(newVal: string, oldVal: string) {
    if (this.MyEcharts) {
      if (newVal) {
        // console.log(JSON.stringify(newVal))
        this.MyEcharts.setOption(newVal, true);
      } else {
        this.MyEcharts.setOption(oldVal, true);
      }
      setTimeout(() => {
        this.MyEcharts.resize();
      });
    } else {
      this.InitCharts();
    }
  }
  @Watch("height")
  onChangeHeight(val: string) {
    if (val) {
      this.height = val;
    }
    if (this.MyEcharts) {
      this.MyEcharts.setOption(this.options, true);
    } else {
      this.InitCharts();
    }
  }
  @Watch("loading")
  onChangeLoading(val: boolean) {
    if (val == true) {
      this.showLoading();
    }
    if (val == false) {
      this.hideLoading();
    }
  }
  //-----------------------method----------------------
  // 组件初始化
  private InitCharts() {
    const dom: any = this.$refs[this.id] as HTMLDivElement; // document.getElementById(this.id);
    this.MyEcharts = Echarts.init(dom);
    if (this.loading == true) {
      this.showLoading();
    }
    /**
     * 此方法适用于所有项目的图表,但是每个配置都需要在父组件传进来,相当于每个图表的配置都需要写一遍,不是特别的省代码,主要是灵活度高
     * echarts的配置项,你可以直接在外边配置好,直接扔进来一个this.option
     */
    this.MyEcharts.clear(); // 适用于大数据量的切换时图表绘制错误,先清空在重绘
    this.MyEcharts.setOption(this.options, true); // 设置为true可以是图表切换数据时重新渲染
    setTimeout(() => {
      this.MyEcharts.resize();
    });
    // 当窗口变化时随浏览器大小而改变
    window.addEventListener("resize", () => {
      this.MyEcharts.resize();
    });
    this.MyEcharts.on("click", (params: any) => {
      this.mapClick(params);
    });
  }
  //组件单击事件
  private mapClick(params: any) {
    // console.log(params, 999999);
    const data = {
      color: params.color,
      data: params.data,
      dataIndex: params.dataIndex,
      seriesIndex: params.seriesIndex,
      chartType: params.componentSubType
    };
    this.$parent.$emit("chartParams", JSON.stringify(data));
    if (params.seriesType == "map") {
      this.$emit("mapValue", params.name);
    }
      this.$emit("eclick", params);
  }
  private showLoading() {
    if (this.MyEcharts) {
      this.MyEcharts.showLoading({
        text: "loading"
        // color: '#4cbbff',
        // textColor: '#4cbbff',
      });
    }
  }
  private hideLoading() {
    if (this.MyEcharts) {
      this.MyEcharts.hideLoading();
    }
  }
  beforeDestroy() {
    window.removeEventListener("resize", () => {
      this.MyEcharts.resize();
    });
  }
}
</script>
<style lang="scss" scoped>
.echarts-line {
  height: 100%;
}
</style>
@types目录下:
component.d.ts代码:
import Vue from 'vue';

export class VanComponent {
  static name: string;
  static install(vue: typeof Vue): void;
}
说明:@types是npm的一个分支,当我们把npm包发上去,npm包就会托管到服务器,供大家下载,但是ts为了代码的可复用性,要申明一些静态类型文件,那些文件就是*.d.ts
shims-vue.d.ts代码:
declare module "*.vue" {
  import Vue from "vue";
  export default Vue;
}
App.vue,组件引入演示界面,代码:
<template>
  <div id="app">
    <jie-echarts :options="echartsOptions"></jie-echarts>
  </div>
</template>
<script lang="ts">
import { Component, Vue, Watch, Prop } from "vue-property-decorator";
import jieEcharts from "../src/index";
@Component({
  components: {
    jieEcharts
  }
})
export default class TestJieEchartsPreview extends Vue {
  protected echartsOptions = {
    xAxis: {
      type: "category",
      data: ["Mon", "Tue", "Wed", "Thu", "Fri", "Sat", "Sun"]
    },
    yAxis: {
      type: "value"
    },
    series: [
      {
        data: [820, 932, 901, 934, 1290, 1330, 1320],
        type: "line"
      }
    ]
  };
}
</script>
<style lang="scss">
#app {
  font-family: Avenir, Helvetica, Arial, sans-serif;
  -webkit-font-smoothing: antialiased;
  -moz-osx-font-smoothing: grayscale;
  text-align: center;
  color: #2c3e50;
}

#nav {
  padding: 30px;

  a {
    font-weight: bold;
    color: #2c3e50;

    &.router-link-exact-active {
      color: #42b983;
    }
  }
}
</style>
执行npm run serve,运行结果如下:

发布到NPM

3.执行npm login,进行登录
PS E:vue_codesmy-project-name> npm login
Username: zouyujie
Password:
Email: (this IS public) zouyujie@126.com
如果你是使用的淘宝镜像,注意啊要先切换到npm官网镜像,切换方式:npm config set registry https://registry.npmjs.org/
4.执行命令 npm publish,进行发布,如果出现如下图所示错误:

说明邮箱没有绑定成功,点击https://www.npmjs.com/email-edit,进行绑定,然后重新执行npm publish,运行结果如下:
PS E:vue_codesmy-project-name> npm publish
npm notice
npm notice package: jie-echarts@0.1.0
npm notice === Tarball Contents ===
npm notice 632B    dist/index.html
npm notice 4.3kB   dist/favicon.ico
npm notice 66B     babel.config.js
npm notice 965.0kB dist/js/chunk-vendors.80f39f1d.js
npm notice 6.3kB   dist/js/index.f9222971.js
npm notice 1.4kB   package.json
npm notice 327B    README.md
npm notice === Tarball Details ===
npm notice name:          jie-echarts
npm notice version:       0.1.0
npm notice package size:  341.3 kB
npm notice unpacked size: 978.0 kB
npm notice shasum:        2b65bfa887ba4677dc95a36a4b0403ebfecc9fde
npm notice integrity:     sha512-RwSE3lC8N3wZT[...]b1b9cvJ8UtL/w==
npm notice total files:   7
npm notice
+ jie-echarts@0.1.0
至此,npm发布成功。
然后我们去npm上,查看我们发布的npm包,
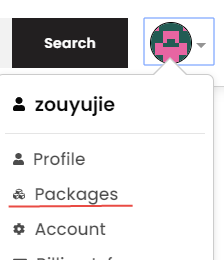
如果能看到如下图所示界面:
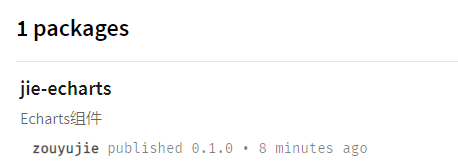
说明已发布成功。
注意:每次重新发布都要记得修改一下版本号,否则会发布失败。发布成功后,你的npm邮箱都会受到一封npm组件发布成功的邮件通知。
npm上地址:https://www.npmjs.com/package/jie-echarts
安装jie-echarts
npm i jie-echarts