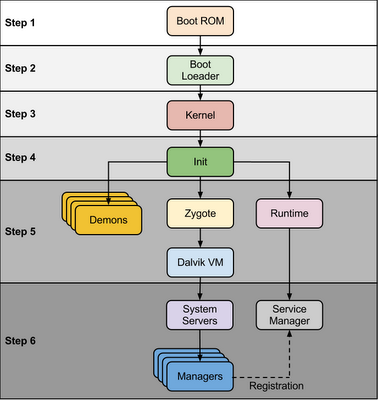
android 使用 linux 内核,一般运行在 ARM 体系架构上,android 设备启动的过程,应用层之下基本等同于linux, 从应用层第一个程序init开始有所区别,下面开始介绍。

step1, boot rom 主要作用是加载 boot loader 进入内存并执行,boot rom 一般固化在芯片上,设备启动加电自检后从固定的地址开始执行
step2,boot loader 分2步执行,boot rom只加载了第一部分bootloader代码进入内存,这部分代码随即加载第二部分bootloader代码,第二部分是核心,它完成了必要的环境准备后,开始加载内核.
Bootloader is small program which runs before Android operating system running. Bootloader is first program to run so It is specific for board and processor. Device manufacturer either use popular bootloaders like redboot,uboot, qi bootloader or they develop own bootloaders, It’s not part of Android Operating System. bootloader is the place where OEMs and Carriers put there locks and restrictions.
Bootloader perform execution in two stages, first stage It to detect external RAM and load program which helps in second stage, In second stage bootloader setup network, memory, etc. which requires to run kernel, bootloader is able to provide configuration parameters or inputs to the kernel for specific purpose.
Android bootloader can be found at
<Android Source>ootableootloaderlegacyusbloaderlegacy loader contain two important files that need to address here.
1. init.s - Initializes stacks, zeros the BSS segments, call _main() in main.c
2. main.c - Initializes hardware (clocks, board, keypad, console), creates Linux tags
Refer this link to know more about Android bootloader :
https://motorola-global-portal.custhelp.com/app/answers/detail/a_id/86208/~/bootloader-frequently-asked-questions
2. main.c - Initializes hardware (clocks, board, keypad, console), creates Linux tags
Refer this link to know more about Android bootloader :
https://motorola-global-portal.custhelp.com/app/answers/detail/a_id/86208/~/bootloader-frequently-asked-questions
step3, android 内核启动过程与标准linux类似,完成内存子系统、保护模式、任务调度系统、驱动子系统、设备系统、文件系统等的初始化,最后运行第一个应用程序init. 与标准系统有所不同的是,android的内核增加了部分驱动及补丁,
What is the difference between the linux and android kernels?, here's a list of changes/addons that the Android Project made to the Linux kernel:

Binder: It is an Android specific interprocess communication mechanism and remote method invocation system.
ashmem:  "Android Shared Memory". It is a new shared memory allocator, similar to POSIX SHM but with a different behavior and sporting a simpler file-based API.
pmem: "Process memory allocator": It is used to manage large (1-16+ MB) physically contigous regions of memory shared between userspace and kernel drivers.
logger:  This is the kernel support for the logcat command.
wakelocks: It is used for power management files. It holds the machine awake on a per-event basis until wakelock is released.
oom handling: It kills processes as available memory becomes low.
alarm manager: It lets user space tell the kernel when it would like to wake up.
RAM_CONSOLE: Allows to save kernel printk messages to a buffer in RAM, so that after a kernel panic they can be viewed in the next kernel invocation.
USB gadget driver for ADB
yaffs2 flash filesystem
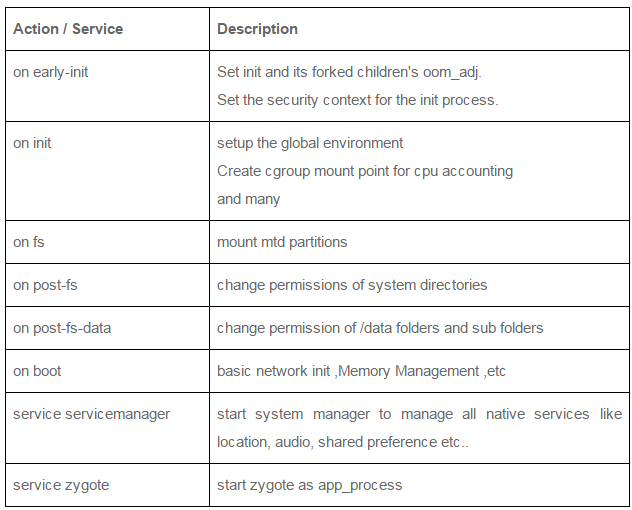
step4, init 进程,从这一步开始,android的启动跟其他linux发行版(如redhat,gentoo,ubuntu)就不一样了,init程序的实现、init.rc文件的格式,都是不一样的。init 进程主要功能是挂载磁盘分区,然后根据init.rc的配置解析并执行
Init is the very first process, we can say it is a root process, or the grandfather of all processes. The init process has two responsibilities.

     1- Mounts directories like /sys , /dev    or /proc
     2- Runs init.rc script

- The init process can be found at /init :: <android source>/system/core/init
- Init.rc file can be found at :: <android source>/system/core/rootdir/

Android has specific format and rules for init.rc files. More information about this rules can be found in: What is inside the init.rc and what is it used for.
At  this stage, you can finally see the Android logo in your screen.
init.rc主要配置项如下:

init 执行完后,界面开始出现android logo, adb shell ps 查看,后台已经出现一堆守护进程,如:
/system/bin/logd/sbin/adbd/system/bin/usbd/system/bin/debuggerd/system/bin/rild/system/bin/runtime/system/bin/dbus-daemonsystem_server- zygote
这些进程都是 init 进程 fork+execve 出来的子进程
step5, 从这一步开始,android系统从native(即c/c++)世界进入java世界(即代码跑在java 虚拟机内部)。 java世界的源头是上一步启动的 zygote 进程。这个进程启动后会初始化java虚拟机环境(其实就是加载 dvm.so或 art.so, 获取虚拟机动态库的一些api,如 jniEnv ,然后注册一堆jni函数给虚拟机)。 所有android上新创建的app 进程都是由 zygote 进程 clone 出来的,这样可以共享虚拟机动态库的代码,提高了效率。zygote 还有一个非常重要的功能,就是创建 system_server 进程,后者会加载并启动android app framework 的所有 service 线程(java线程),所谓android framework, 从native 视界看,就是 zygote 和 system_server 这两个进程。
step6, system_server 启动的服务线程,如下
After the above steps are completed,  Zygote launches the system services.  The Zygote forks a new process to launch the system services.
Core services:
Starting power manager
Creating the Activity Manager
Starting telephony registry
Starting package manager
Set activity manager service as system process
Starting context manager
Starting system contact providers
Starting battery service
Starting alarm manager
Starting sensor service
Starting window manager
Starting Bluetooth service
Starting mount service

Other services:

Starting status bar service
Starting hardware service
Starting NetStat service
Starting connectivity service
Starting Notification Manager
Starting DeviceStorageMonitor service
Starting Location Manager
Starting Search Service
Starting Clipboard Service
Starting checkin service
Starting Wallpaper service
Starting Audio Service
Starting HeadsetObserver
Starting AdbSettingsObserver

Now we have finally completed the booting process (system service are up and running in memory).