安装前提
Docker是基于linux的,在win10中安装wsl2:Windows Subsystem for Linux,让win10能够原生运行Linux二进制可执行文件的兼容层,且不会产生传统虚拟机或双启动设置开销。
总的来说类似安装一个 Windows 的子系统,在子系统里面运行 Linux 、Docker,并且以此为运行 VS code 的环境,就像在 Linux或Docker镜像 环境开发啦。
微软安装wsl2教程 或者安装:Hyper-V 微软开发的虚拟机
管理员 PowerShell 或 Windows 命令提示符中用命令操作,直接 wsl --install 就可以。
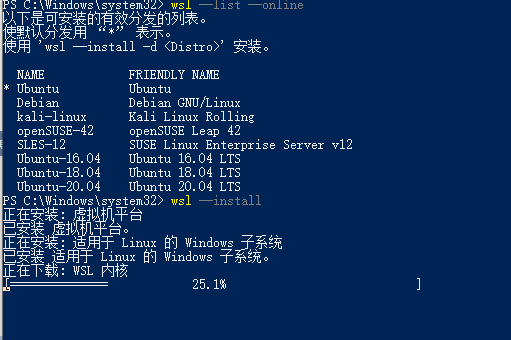
如果没完成不小心关了窗口...需要指定安装 分发:wsl --install -d Ubuntu
PS C:\Windows\system32> wsl --install -d Ubuntu
正在下载: Ubuntu
安装过程中出现错误。分发名称: 'Ubuntu' 错误代码: 0x80072f78]
PS C:\Windows\system32> wsl --list --online
以下是可安装的有效分发的列表。
请使用“wsl --install -d <分发>”安装。

NAME            FRIENDLY NAME
Ubuntu          Ubuntu
Debian          Debian GNU/Linux
kali-linux      Kali Linux Rolling
openSUSE-42     openSUSE Leap 42
SLES-12         SUSE Linux Enterprise Server v12
Ubuntu-16.04    Ubuntu 16.04 LTS
Ubuntu-18.04    Ubuntu 18.04 LTS
Ubuntu-20.04    Ubuntu 20.04 LTS
PS C:\Windows\system32> wsl -l -v
适用于 Linux 的 Windows 子系统没有已安装的分发版。
可以通过访问 Microsoft Store 来安装分发版:
https://aka.ms/wslstore
PS C:\Windows\system32> wsl --install -d Ubuntu
正在下载: Ubuntu
安装过程中出现错误。分发名称: 'Ubuntu' 错误代码: 0x80072f78]
PS C:\Windows\system32> wsl --install -d Ubuntu
正在下载: Ubuntu
安装过程中出现错误。分发名称: 'Ubuntu' 错误代码: 0x80072f78]
PS C:\Windows\system32> wsl --install -d Ubuntu
正在下载: Ubuntu
安装过程中出现错误。分发名称: 'Ubuntu' 错误代码: 0x80072eff]
PS C:\Windows\system32> wsl --install -d Ubuntu
正在下载: Ubuntu
正在安装: Ubuntu
已安装 Ubuntu。
正在启动 Ubuntu…
PS C:\Windows\system32>
安装过程中出现错误。分发名称: 'Ubuntu' 错误代码: 0x80072f78] 这个是因为网络问题,就和访问 GitHub 类似。
启动 Ubuntu 过后稍等一下,提示设置用户名和密码,完事!
Installing, this may take a few minutes...
Please create a default UNIX user account. The username does not need to match your Windows username.
For more information visit: https://aka.ms/wslusers
Enter new UNIX username: fyfh
New password:
Retype new password:
passwd: password updated successfully
Installation successful!
To run a command as administrator (user "root"), use "sudo <command>".
See "man sudo_root" for details.

Welcome to Ubuntu 20.04 LTS (GNU/Linux 4.4.0-19041-Microsoft x86_64)

 * Documentation:  https://help.ubuntu.com
 * Management:     https://landscape.canonical.com
 * Support:        https://ubuntu.com/advantage

  System information as of Sat May 28 20:13:43 CST 2022

  System load:    0.52      Processes:             7
  Usage of /home: unknown   Users logged in:       0
  Memory usage:   38%       IPv4 address for eth0: 192.168.0.108
  Swap usage:     1%

0 updates can be installed immediately.
0 of these updates are security updates.


The list of available updates is more than a week old.
To check for new updates run: sudo apt update


This message is shown once once a day. To disable it please create the
/home/fyfh/.hushlogin file.
fyfh@DESKTOP-UP9N3U4:~$
在开始菜单会有 Ubuntu 启动图标。
安装 Docker Desktop WSL 2 backend
微软教程安装docker并使用vscode连接 Docker官方说明
安装 Docker Desktop , 提示启用 WSL 2 代替 Hyper-V 和 添加桌面快捷方式,勾上即可(360阻止程序,全允许了,文件关联开启启动啥的)。安装成功按钮要求登出,保存好文件,点击。
PS:第一次运行 Docker Desktop 提示 WSL 2 installation is incomplete ... wsl2安装未完成,不知道是不是没装完关了窗口的原因,要求下载安装 Linux 内核更新包后重启 Docker,do as it says.
设置里面 选中使用基于 WSL 2 的引擎复选框。
进入powershell输入
docker run hello-world
会下载一个 简单镜像,正常运行就安装好啦!
PS C:\Windows\system32> docker run hello-world
Unable to find image 'hello-world:latest' locally
latest: Pulling from library/hello-world
2db29710123e: Pull complete
Digest: sha256:80f31da1ac7b312ba29d65080fddf797dd76acfb870e677f390d5acba9741b17
Status: Downloaded newer image for hello-world:latest

Hello from Docker!
This message shows that your installation appears to be working correctly.

To generate this message, Docker took the following steps:
 1. The Docker client contacted the Docker daemon.
 2. The Docker daemon pulled the "hello-world" image from the Docker Hub.
    (amd64)
 3. The Docker daemon created a new container from that image which runs the
    executable that produces the output you are currently reading.
 4. The Docker daemon streamed that output to the Docker client, which sent it
    to your terminal.

To try something more ambitious, you can run an Ubuntu container with:
 $ docker run -it ubuntu bash

Share images, automate workflows, and more with a free Docker ID:
 https://hub.docker.com/

For more examples and ideas, visit:
 https://docs.docker.com/get-started/
一些设置
WSL 可以在 v1 或 v2 模式下运行分发,确保分发在 WSL 2 模式下运行。
要检查 WSL 模式
wsl -l -v
将现有的 Linux 发行版升级到 v2
wsl --set-version (发行版名称) 2
将 v2 设置为将来安装的默认版本
wsl --set-default-version 2
当 Docker Desktop 启动时,转到Settings > Resources > WSL Integration,可以看到已经安装的发行版,只有 Ubuntu (可以勾上),Docker-WSL 集成将在默认 WSL 发行版上启用。
更改默认 WSL 发行版
wsl --set-default <distro name>
将 Ubuntu 设置为默认 WSL 发行版:wsl --set-default ubuntu
修改Docker Engine配置,增加镜像仓库地址
{
  "builder": {
    "gc": {
      "defaultKeepStorage": "20GB",
      "enabled": true
    }
  },
  "experimental": false,
  "features": {
    "buildkit": true
  },
  "registry-mirrors": [
    "https://xxxxx.mirror.aliyuncs.com",
    "http://hub-mirror.c.163.com",
    "https://registry.docker-cn.com",
    "https://docker.mirrors.ustc.edu.cn"
  ]
}
registry-mirrors 镜像地址,阿里云,网易,Docker中国区官方镜像地址,中国科技大学地址。
更改路径使应用获得最佳的文件系统性能
Docker 默认安装在c盘且安装过程中不可修改安装位置,安装、运行镜像挂载文件和win c盘在一起会影响性能,移动到其他盘符。
删除所有容器(或在图形界面操作)
docker rm $(docker ps -a -q)
关闭所有发行版
wsl --shutdown
指定盘符文件夹(提前创建好文件夹),备份已有image数据
wsl --export docker-desktop-data D:\docker-desktop\docker-desktop-data.tar
注销当前的docker-desktop-data发行版
wsl --unregister docker-desktop-data
指定盘符文件位置(D:\docker-desktop\data),导入先前的备份
wsl --import docker-desktop-data D:\docker-desktop\data D:\docker-desktop\docker-desktop-data.tar --version 2
重新运行即可。
PS:到此处,即可在 VS code 中安装 Remote Containers 扩展,然后在左侧扩展小图标找到它,远程资源管理器,点击,出来选择 WSL Targets ,就会看见默认的 Ubuntu
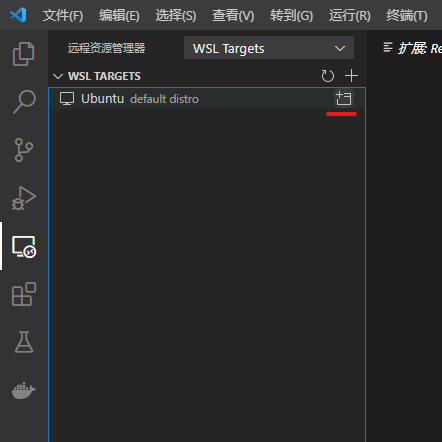
点击红线上按钮,打开新的 VS code 窗口,既是已 Ubuntu 为环境。不过此时打开文件,是没有项目文件的,也不好访问 Ubuntu 外面(主机)的文件,用其他的扩展好像可以(Remote Development 一系列微软出的扩展),没测试。
下面安装其他镜像容器,并且配置映射主机文件到容器内,方便每次使用。
deepo 比较大,可以在 https://hub.docker.com/ ,上搜索其他很小的镜像,专门的内置了 mysql 的, redis 的,或者 golang 的,很小,可以几个一起跑。
安装deepo镜像CPU版
powershell 中
docker pull ufoym/deepo:cpu
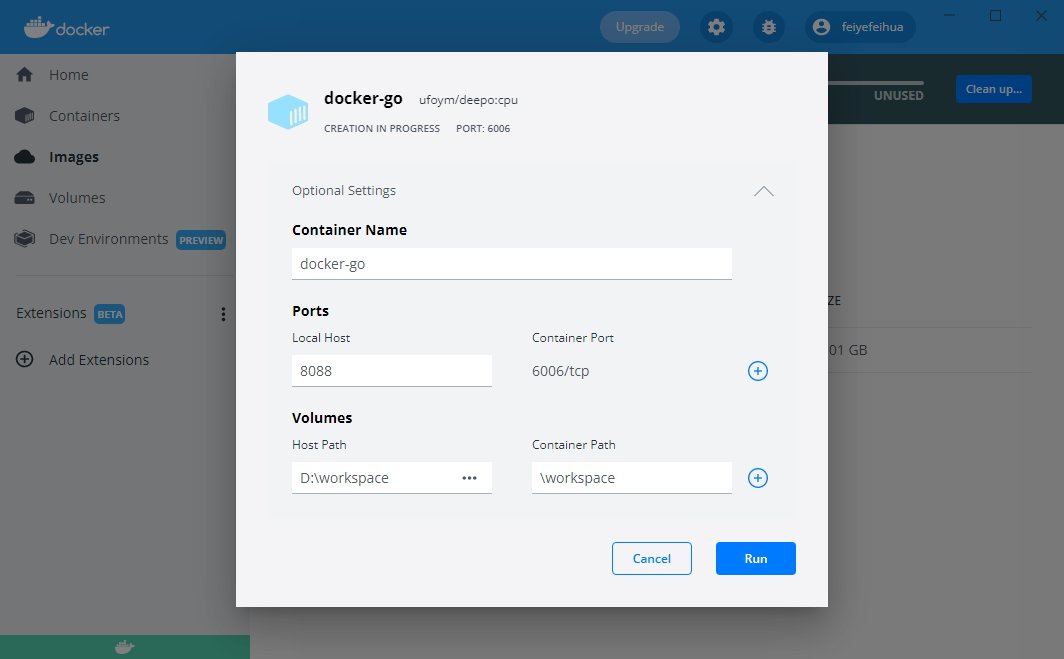
设置、启动容器:
docker run -it -p 8088:88 --name docker-go -v D:/workspace:/home/workspace ufoym/deepo:cpu
- -it -t 让docker分配一个伪终端并绑定到容器的标准输入上, -i 让容器的标准输入保持打开。不加 -it ,命令执行了会自动退出。因为如果没有衔接输入流,马上就结束了。加 -it 后docker命令会为容器分配一个伪终端,并接管其stdin/stdout支持交互操作,这时候bash命令不会自动退出。
- -p 表示对端口号进行映射,即将 docker 容器的 88 号端口映射到宿主机的 8088 端口。
- --name 将容器命名为 docker-go,指定名称方面下次运行,不指定则会随机命名。
- -v D:/workspace:/home/workspace 将宿主机的 D:/workspace 目录映射到容器的 /home/workspace 目录,方便容器和宿主机间共享数据,可以共享多个目录(-v D:/workspace:/home/workspace -v D:/other:/other)
- ufoym/deepo:cpu 镜像名称
或者用图形界面启动,填写参数,左侧 images 镜像选项,能看到所有下载的镜像,点击镜像对应的 Run 上面的配置按钮,就是没让配置 容器的端口,不过无所谓啦。
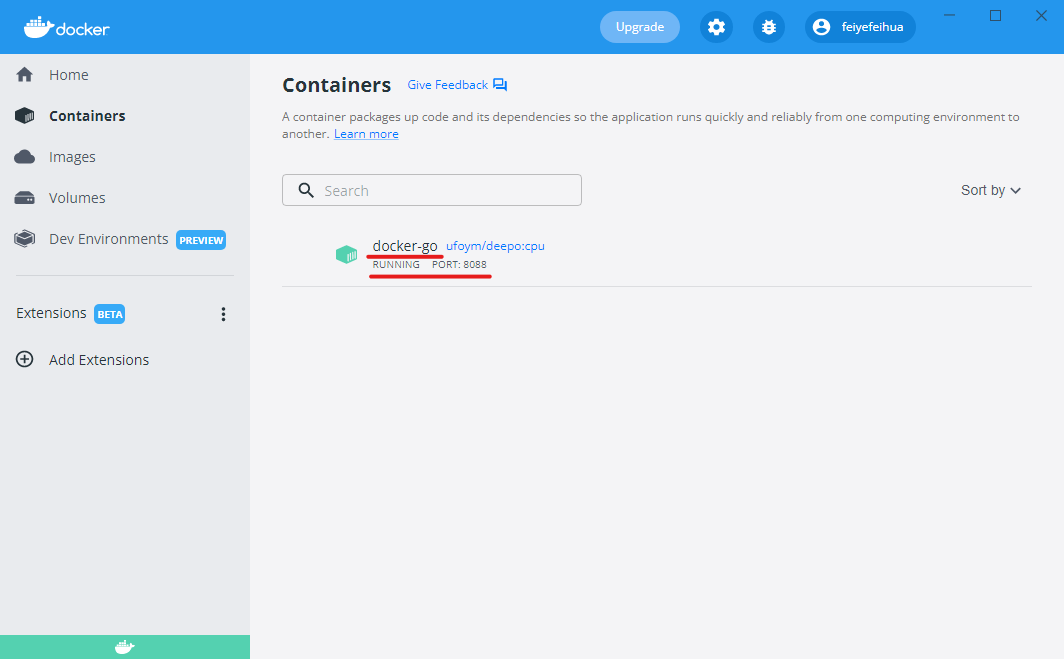
填好配置过后 Run ,会跳到 containers 栏,看到刚命名的 docker-go 已经跑起来了。
在 VS code 中安装 Docker 扩展、Remote Containers 扩展,然后点击左侧 docker 图标,在 container 栏 右键 已经启动的容器,点击 Attach Visual Studio Code,新弹出的 VS code 界面既是在启动的容器环境中了,并且打开文件夹选择时可以看到主机映射进去的工作目录!
下次使用直接按容器名称运行
docker container start docker-go
或者图形界面保存的有,点击按钮直接运行。
或者就都在 VS code 里面操作!此时 Docker 扩展 和 Remote Containers(选择 containers) 扩展 里面都可以直接启动、打开容器 VS code,前提是运行期 Docker Desktop。
PS:如果不安装 Remote Containers,会没有 Attach Visual Studio Code 选项,只有一个 Attach Shell ,会打开操作容器的终端。
容器环境配置
新开的 VS code 窗口相当于在容器里打开,而容器里面不能直接使用外面 VS code 安装的扩展,其他的类似GO环境、Flutter环境,都需要在容器里面安装。
扩展分为了本地和容器内
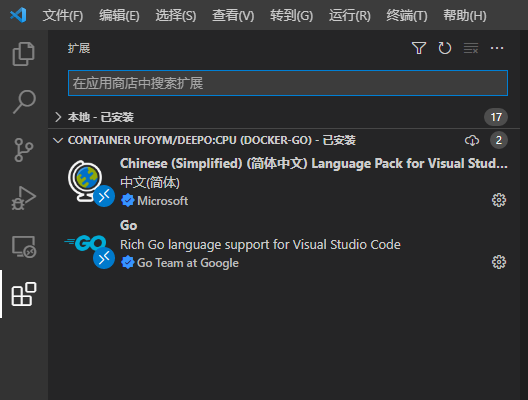
安装容器扩展,正常搜索,然后点击安装
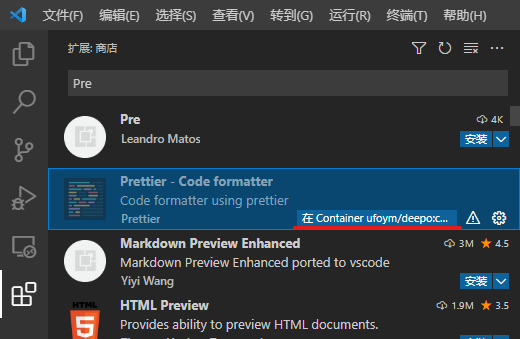
其他的,就在VS code 终端里面用命令安装了。