SpringCloud Config 简介
在分布式系统中,由于服务组件过多,为了方便争对不通的环境下的服务配置文件统一管理,实时更新,所以出现了分布式配置中心组件。市面上开源的配置中心有很多,360的QConf、淘宝的diamond、百度的disconf都是解决这类问题。国外也有很多开源的配置中心Apache的Apache Commons Configuration等。SpringCloud中选用的是SpringCloud Config。
SpringCloud Config分为Config Server和Config Client两部分,为分布式系统外部化配置提供了支持。 由于Config Server和Config Client都实现了对Spring Environment和PropertySource抽象的映射,因此SpringCloud Config非常适合Spring应用程序,当然也可与其他语言应用程序配合使用。
Config Server是一个可横向扩展、集中式的配置服务器,它用于集中管理应用程序各个环境下的配置(开发,测试,生产,灰度),默认使用Git存储配置内容(也可使用Subversion、本地文件系统或Vault存储配置),因此可以方便的实现对配置的版本控制与内容审计。 Config Client 是Config Server的客户端,用于操作存储在Config Server中的配置属性。
SpringCloud Config带来的便利
1、集中管理配置,通过Config来对集群中所有组件服务的配置信息进行集中管理;
2、争对不同的环境进行不同的配置(开发,联调,测试,灰度,生产);
3、运行期间可动态调整,根据服务器的负载情况动态的设置连接池信息或者熔断阈值;
4、配置修改后,不需要关闭服务可自动更新配置;
SpringCloud Config入门
1、申请一个自己的git仓库,将测试项目得yml或properties文件上传至Git目录;
2、构建Config Service
<!-- 1、引入Jar包 -->
<dependency>
    <groupId>org.springframework.cloud</groupId>
    <artifactId>spring-cloud-config-server</artifactId>
</dependency>

<!-- 2、配置属性信息 -->
server:
  port: 9005
spring:
  application:
    name: ms-cfg-service
  cloud:
    config:
      server:
        git:
          uri: https://gitee.com/******/springcloudconfig.git
          username: ******
          password: ******

<!-- 3、加注解@EnableConfigServer -->
@SpringBootApplication
@EnableConfigServer
public class ConfigServiceApplication {

    public static void main(String[] args) {
        SpringApplication.run(ConfigServiceApplication.class, args);
    }
}
备注:配置文件有三种访问方式,分别是:
1)通过application-{profiles}.yml来访问,eg:http://localhost:8080/application-dev.yml
2)通过/application/{profiles}/{lable}来访问, eg:http://localhost:8080/application/dev/master
3)通过/{lable}/application-{profiles}.yml来访问,eg:http://localhost:8080/master/application-dev.yml
3、构建Config Client
<!-- 1. 引入Jar包 -->
<dependency>
    <groupId>org.springframework.cloud</groupId>
    <artifactId>spring-cloud-starter-config</artifactId>
</dependency>

<!-- 2. 创建配置文件bootstrap.yml -->
spring:
  application:
    name: application
  cloud:
    config:
      uri: http://localhost:8080/
      profile: dev
      label: master
备注: spring.application.name 对应访问规则中的{application}
spring.cloud.config.profile 对应访问规则中的{profiles}
spring.cloud.config.label 对应访问规则中的{lable}
SpringCloud config的常规用法
我们定义一个openTest开关,来控制业务逻辑代码走新的逻辑分支还是走老的业务逻辑分支
方法一:
<!-- 1、在属性文件中定义一个变量 -->
ycdhz.openTest=dev

<!-- 2、在代码中通过@Value注解引用 -->
@Value("${ycdhz.openTest}")
private String openTest;

public void findInfo(){
    if(openTest.equal("dev")){
        System.out.print("开发环境")
    } else if (openTest.equal("test")){
        System.out.print("测试环境")
    } else {
        System.out.print("生产环境")
    }
}

<!-- 3、修改属性文件,重启生效-->
方法二:
<!-- 1、再Client端工程,引入jar包 -->
<dependency>
    <groupId>org.springframework.boot</groupId>
    <artifactId>spring-boot-starter-actuator</artifactId>
</dependency>

<!-- 2、再Client端工程,开启refresh的监控端点 -->
management:
  endpoints:
    web:
      exposure:
        include: "*"   开启所有的端点

<!-- 3、在读取配置文件中的类上加入@RefreshScope -->
@RestController
@RequestMapping("/order")
@RefreshScope
public class OrderController {

    @Value("${openTest}")
    private String openTest;
}

<!-- 4、在git上修改openTest的配置文件 -->
通过Post请求,执行http://localhost:8001/actuator/refresh刷新接口
备注:不在需要重启,只需要通过Post执行刷新方法即可。但是当需要在集群中大面积修改的情况下依旧很繁琐,需要对每一个服务进行刷新。
方法三:
配置Config Client
<!-- 1、在client端工程,引入jar包 -->
<dependency>
    <groupId>org.springframework.cloud</groupId>
    <artifactId>spring-cloud-starter-bus-amqp</artifactId>
</dependency>

<dependency>
    <groupId>org.springframework.boot</groupId>
    <artifactId>spring-boot-starter-actuator</artifactId>
</dependency>

<!-- 2、在client端工程,配置属性 -->
spring:
  application:
    name: application
  cloud:
    config:
      uri: http://localhost:9000/
      label: master
  rabbitmq:
    host: ****IP地址****
    port: ****端口号****
    virtual-host: ****host名****
    username: root
    password: root
    connection-timeout: 10000
    template:
      mandatory: true
management:
  endpoints:
    web:
      exposure:
        include: "*"
  server:
    port: 8080
配置 config Service
<!-- 1、在Service端工程,引入jar包 -->
<dependency>
    <groupId>org.springframework.cloud</groupId>
    <artifactId>spring-cloud-starter-bus-amqp</artifactId>
</dependency>

<dependency>
    <groupId>org.springframework.boot</groupId>
    <artifactId>spring-boot-starter-actuator</artifactId>
</dependency>

<!-- 2、在Service端工程,配置属性 -->
server:
  port: 9000
spring:
  application:
    name: ms-cfg-service
  cloud:
    config:
      server:
        git:
          uri: https://gitee.com/******/springcloudconfig.git
          username: ******
          password: ******
  rabbitmq:
    host: ****IP地址****
    port: ****端口号****
    virtual-host: ****host名****
    username: root
    password: root
    connection-timeout: 10000
    template:
      mandatory: true

<!-- 3、在Git上更新配置信息,访问bus-refresh刷新服务配置 -->
访问监控端点http://localhost:9000/actuator/bus-refresh刷新所有服务的配置信息
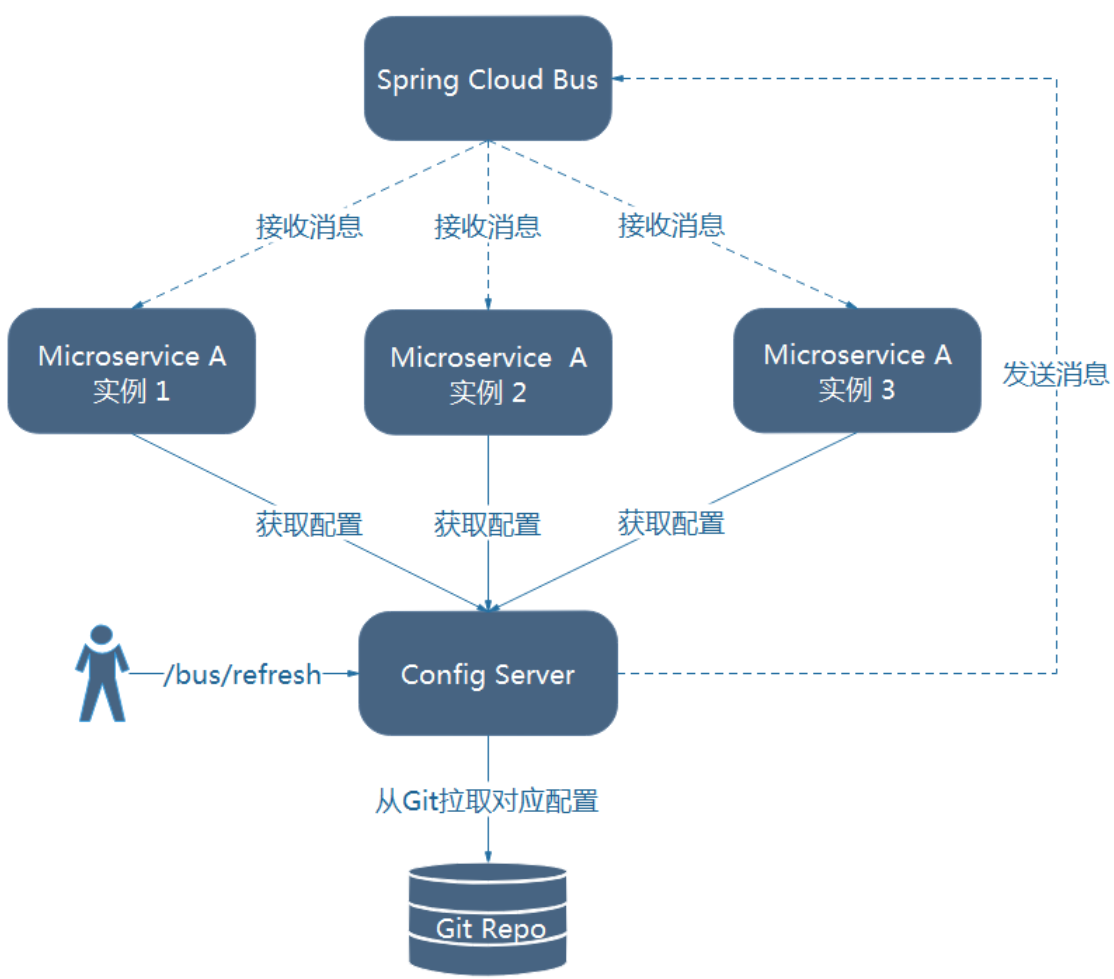
备注:使用消息总线bus来实现,不再需要去争对一个个服务组件做刷新。原理如图:
