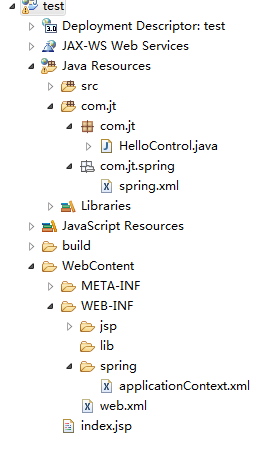
1、目录结构
2、web.xml配置
<?xml version="1.0" encoding="ISO-8859-1"?>
<web-app xmlns="http://java.sun.com/xml/ns/javaee"
  xmlns:xsi="http://www.w3.org/2001/XMLSchema-instance"
  xsi:schemaLocation="http://java.sun.com/xml/ns/javaee
                      http://java.sun.com/xml/ns/javaee/web-app_3_0.xsd"
  version="3.0"
  metadata-complete="true">
  <display-name>Welcome to Tomcat</display-name>
  <description>
     Welcome to Tomcat
  </description>
  <servlet>
      <servlet-name>springMVC</servlet-name>
      <servlet-class>org.springframework.web.servlet.DispatcherServlet</servlet-class>
      <init-param>
          <param-name>contextConfigLocation</param-name>
          <param-value>/WEB-INF/spring/applicationContext.xml,classpath*:com/jt/**/spring.xml</param-value>
      </init-param>
      <load-on-startup>1</load-on-startup>
  </servlet>
  <servlet-mapping>
      <servlet-name>springMVC</servlet-name>
      <url-pattern>/</url-pattern>
  </servlet-mapping>

</web-app>
3、applicationContext.xml配置
<?xml version="1.0" encoding="UTF-8"?>
<beans xmlns="http://www.springframework.org/schema/beans"
    xmlns:xsi="http://www.w3.org/2001/XMLSchema-instance"
    xmlns:context="http://www.springframework.org/schema/context"
    xsi:schemaLocation="http://www.springframework.org/schema/beans
         http://www.springframework.org/schema/beans/spring-beans-3.0.xsd
         http://www.springframework.org/schema/context
         http://www.springframework.org/schema/context/spring-context-3.0.xsd"
         >
    <!-- 视图分解解析器 -->
    <bean id="viewResolver" class="org.springframework.web.servlet.view.InternalResourceViewResolver">
        <!-- 这是前缀 -->
        <property name="prefix" value="/"></property>
        <!-- 这是后缀 -->
        <property name="suffix" value=".jsp"></property>
        <!-- 在spring的控制器中,返回的是一个字符串,那么请求的路径则是,前缀+返回字符串+后缀 -->
    </bean>

</beans>
4、spring.xml配置
<?xml version="1.0" encoding="UTF-8"?>
<beans xmlns="http://www.springframework.org/schema/beans"
    xmlns:xsi="http://www.w3.org/2001/XMLSchema-instance"
    xmlns:context="http://www.springframework.org/schema/context"
    xsi:schemaLocation="http://www.springframework.org/schema/beans
         http://www.springframework.org/schema/beans/spring-beans-3.0.xsd
         http://www.springframework.org/schema/context
         http://www.springframework.org/schema/context/spring-context-3.0.xsd"
         >
    <context:component-scan base-package="com.jt"/>
</beans>
5、HelloControl.java编写
package com.jt;


import org.springframework.stereotype.Controller;
import org.springframework.web.bind.annotation.RequestMapping;
import org.springframework.web.bind.annotation.ResponseBody;

@Controller
public class HelloControl {
    @RequestMapping(value="/sayHelloUrl")
    @ResponseBody
    public String sayHello(){
        System.out.println("sayHello congtroller");
        return "applicationContext";
    }
}
6、运行
