基于令牌的认证
我们知道WEB网站的身份验证一般通过session或者cookie完成的,登录成功后客户端发送的任何请求都带上cookie,服务端根据客户端发送来的cookie来识别用户。
WEB API使用这样的方法不是很适合,于是就有了基于令牌的认证,使用令牌认证有几个好处:可扩展性、松散耦合、移动终端调用比较简单等等,别人都用上了,你还有理由不用吗?
下面我们花个20分钟的时间来实现一个简单的WEB API token认证:
Step 1:安装所需的NuGet包:
打开NuGet包管理器控制台,然后输入如下指令:
Install-Package Microsoft.AspNet.WebApi.Owin -Version 5.1.2
Install-Package Microsoft.Owin.Host.SystemWeb -Version 2.1.0
Install-Package Microsoft.AspNet.Identity.Owin -Version 2.0.1
Install-Package Microsoft.Owin.Cors -Version 2.1.0
Step 2 在项目根目录下添加Owin“Startup”类
using System;
using System.Web.Http;

using Owin;
using Microsoft.Owin;
using Microsoft.Owin.Security.OAuth;
using SqlSugar.WebApi;

[assembly: OwinStartup(typeof(WebApi.Startup))]
namespace WebApi
{
    public class Startup
    {
        public void Configuration(IAppBuilder app)
        {
            HttpConfiguration config = new HttpConfiguration();
            ConfigureOAuth(app);

            WebApiConfig.Register(config);
            app.UseCors(Microsoft.Owin.Cors.CorsOptions.AllowAll);
            app.UseWebApi(config);
        }

        public void ConfigureOAuth(IAppBuilder app)
        {
            OAuthAuthorizationServerOptions OAuthServerOptions = new OAuthAuthorizationServerOptions()
            {
                AllowInsecureHttp = true,
                TokenEndpointPath = new PathString("/token"),
                AccessTokenExpireTimeSpan = TimeSpan.FromDays(1),
                Provider = new SimpleAuthorizationServerProvider()
            };
            app.UseOAuthAuthorizationServer(OAuthServerOptions);
            app.UseOAuthBearerAuthentication(new OAuthBearerAuthenticationOptions());
        }
    }
}
Step 3:在项目根目录下添加验证类 SimpleAuthorizationServerProvider,为了简单用户的验证部分我们省略掉;
using System.Threading.Tasks;
using System.Security.Claims;
using Microsoft.Owin.Security.OAuth;

namespace WebApi
{
    /// <summary>
    /// Token验证
    /// </summary>
    public class SimpleAuthorizationServerProvider : OAuthAuthorizationServerProvider
    {
        public override async Task ValidateClientAuthentication(OAuthValidateClientAuthenticationContext context)
        {
            await Task.Factory.StartNew(() => context.Validated());
        }

        public override async Task GrantResourceOwnerCredentials(OAuthGrantResourceOwnerCredentialsContext context)
        {
            await Task.Factory.StartNew(() => context.OwinContext.Response.Headers.Add("Access-Control-Allow-Origin", new[] { "*" }));
            /*
             * 对用户名、密码进行数据校验
            using (AuthRepository _repo = new AuthRepository())
            {
                IdentityUser user = await _repo.FindUser(context.UserName, context.Password);
                if (user == null)
                {
                    context.SetError("invalid_grant", "The user name or password is incorrect.");
                    return;
                }
            }*/

            var identity = new ClaimsIdentity(context.Options.AuthenticationType);
            identity.AddClaim(new Claim("sub", context.UserName));
            identity.AddClaim(new Claim("role", "user"));
            identity.AddClaim(new Claim(ClaimTypes.Name, user.UserName));

            context.Validated(identity);

        }
    }
}
Step 4:让CORS起作用
在ASP.NET Web API中启用OAuth的Access Token验证非常简单,只需在相应的Controller或Action加上[Authorize]标记
        [Authorize]
        public ActionResult Index()
        {
            ViewBag.Title = "Home Page";

            return View();
        }
Step 5 : 请求 Token

获取token, POST http://localhost:23477/token
参数BODY x-www-form-urlencoded 格式:
grant_type=password&username=admin&password=123456
返回状态200 结果为

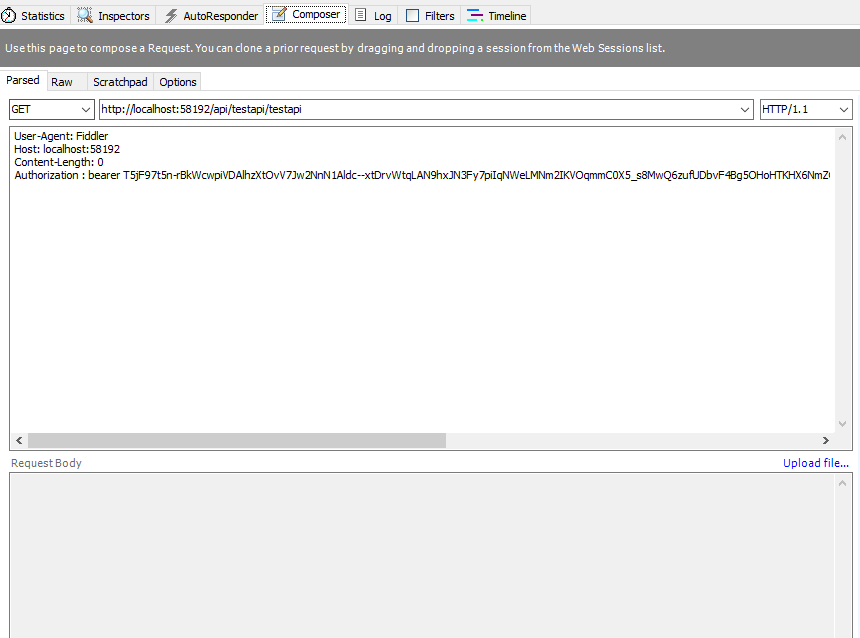
Step 5 调用api
只要在http请求头中加上Authorization:bearer Token就可以成功访问API就成功了:
GET http://localhost:58192/api/testapi/testapi
Authorization : bearer
T5jF97t5n-rBkWcwpiVDAlhzXtOvV7Jw2NnN1Aldc--xtDrvWtqLAN9hxJN3Fy7piIqNWeLMNm2IKVOqmmC0X5_s8MwQ6zufUDbvF4Bg5OHoHTKHX6NmZGNrU4mjpCuPLtSbT5bh_gFOZHoIXXIKmqD3Wu1MyyKKNhj9XPEIkd9bl4E9AZ1wAt4dyUxmPVA_VKuN7UvYJ97TkO04XyGqmXGtfVWKfM75mNVYNhySWTg
结果为:

转自:https://www.cnblogs.com/dukang1991/p/5627584.html
转自:https://blog.csdn.net/qq_32688731/article/details/80897563