一、网络编程概述
概述:
Java是 Internet 上的语言,它从语言级上提供了对网络应用程序的支持,程序员能够很容易开发常见的网络应用程序。
Java提供的网络类库,可以实现无痛的网络连接,联网的底层细节被隐藏在 Java 的本机安装系统里,由 JVM 进行控制。并且 Java 实现了一个跨平台的网络库,程序员面对的是一个统一的网络编程环境。
基础:
网络编程的目的:
网络编程的目的就是指直接或间接地通过网络协议与其它计算机进行通讯。
主要存在的问题:
如何准确地定位网络上一台或多台主机
找到主机后如何可靠高效地进行数据传输。
传输数据需要遵守一定的协议,被广泛运用的是TCP/IP协议
协议模型:

通信要素:
IP地址:InetAddress
网络中设备唯一标识;本地回环地址(localhost):127.0.0.1;不易于记忆,易于记忆的是域名:
域名容易记忆,当在连接网络时输入一个主机的域名后,域名服务器(DNS)负责将域名转化成IP地址,这样才能和主机建立连接。
端口:port
为了进行应用程序的标识区分,就提供了一些数字来标识应用程序。比方QQ 用4000来标识,我的电脑QQ发消息,发送到IP 地址是: 192.168.0.1 的编号为4000的应用程序上。而这些数字就是(逻辑)port。
端口号限定在0-65536之间,比如常见的MySQL(3306),http(80),一般我们应该使用1024以后的端口通信避免通信端口冲突;
端口号与IP地址的组合得出一个网络套接字——Socket。
二、InetAddress类的创建和使用
InetAddress类用来封装我们前面讨论的数字式的IP地址和该地址的域名。
1.实例化
通过 getLocalHost()——本机、getByName()以及getAllByName()三个静态方法进行访问
2.两个方法:
String getHostName():获取InetAddress对象的域名;
String getHostAddress():获取InetAddress对象的IP地址;
实例:
public static void main(String[] args) throws UnknownHostException {
        InetAddress address = InetAddress.getByName("www.atguigu.com");
        System.out.println("address = " + address);
        System.out.println(address.getHostName());
        System.out.println(address.getHostAddress());
    }

三、网络通信协议
1.网络通信协议
对速率、传输代码、代码结构、传输控制步骤、出错控制等的指定标准
2.传输协议的分层思想
采用分层的思想,同层可以通信,上一层可以调用下一层,而与再下一层无关系
传输层有两个重要协议:
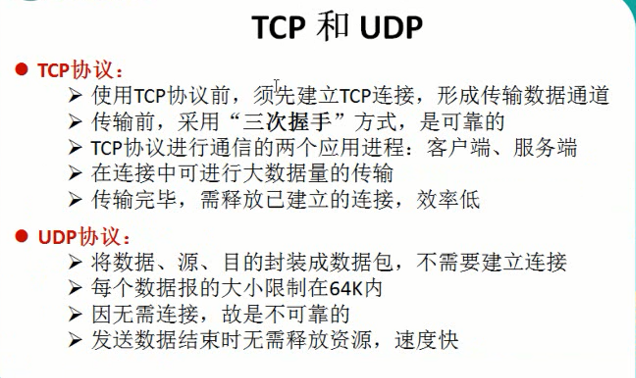
TCP:传输控制协议
UDP:用户数据报协议
3.TCP、UDP协议概述
更详细的关于UDP TCP的介绍,参照网友回答:


TCP---传输控制协议,提供的是面向连接、可靠的字节流服务。当客户和服务器彼此交换数据前,必须先在双方之间建立一个TCP连接,之后才能传输数据。TCP提供超时重发,丢弃重复数据,检验数据,流量控制等功能,保证数据能从一端传到另一端。
UDP---用户数据报协议,是一个简单的面向数据报的运输层协议。UDP不提供可靠性,它只是把应用程序传给IP层的数据报发送出去,但是并不能保证它们能到达目的地。由于UDP在传输数据报前不用在客户和服务器之间建立一个连接,且没有超时重发等机制,故而传输速度很快
现在Internet上流行的协议是TCP/IP协议,该协议中对低于1024的端口都有确切的定义,他们对应着Internet上一些常见的服务。这些常见的服务可以分为使用TCP端口(面向连接)和使用UDP端口(面向无连接)两种。
说到TCP和UDP,首先要明白“连接”和“无连接”的含义,他们的关系可以用一个形象地比喻来说明,就是打电话和写信。两个人如果要通话,首先要建立连接——即打电话时的拨号,等待响应后——即接听电话后,才能相互传递信息,最后还要断开连接——即挂电话。写信就比较简单了,填写好收信人的地址后将信投入邮筒,收信人就可以收到了。从这个分析可以看出,建立连接可以在需要痛心地双方建立一个传递信息的通道,在发送方发送请求连接信息接收方响应后,由于是在接受方响应后才开始传递信息,而且是在一个通道中传送,因此接受方能比较完整地收到发送方发出的信息,即信息传递的可靠性比较高。但也正因为需要建立连接,使资源开销加大(在建立连接前必须等待接受方响应,传输信息过程中必须确认信息是否传到及断开连接时发出相应的信号等),独占一个通道,在断开连接钱不能建立另一个连接,即两人在通话过程中第三方不能打入电话。而无连接是一开始就发送信息(严格说来,这是没有开始、结束的),只是一次性的传递,是先不需要接受方的响应,因而在一定程度上也无法保证信息传递的可靠性了,就像写信一样,我们只是将信寄出去,却不能保证收信人一定可以收到。
TCP是面向连接的,有比较高的可靠性,
一些要求比较高的服务一般使用这个协议,如FTP、Telnet、SMTP、HTTP、POP3等,而UDP是面向无连接的,使用这个协议的常见服务有DNS、SNMP、QQ等。对于QQ必须另外说明一下,QQ2003以前是只使用UDP协议的,其服务器使用8000端口,侦听是否有信息传来,客户端使用4000端口,向外发送信息(这也就不难理解在一般的显IP的QQ版本中显示好友的IP地址信息中端口常为4000或其后续端口的原因了),即QQ程序既接受服务又提供服务,在以后的QQ版本中也支持使用TCP协议了。
更多三次握手(四次分手)的请参见:http://www.jellythink.com/archives/705
更详细的TCP、UDP协议请参见:http://blog.csdn.net/li_ning_/article/details/52117463
四、网络编程实例
1。Socket

2.Socket编程实例
TCP
客户端向服务端发送消息,服务端接收
// 客户端
    @Test
    public void client() {
        Socket cs = null;
        OutputStream out = null;
        try {
            // 1.创建socket对象,指明服务端的IP地址与端口号
            cs = new Socket(InetAddress.getByName("127.0.0.1"), 9898);
            // 2.获取socket对象的输出流发送数据
            out = cs.getOutputStream();
            // 3.具体的输出过程(IO的操作)
            out.write("客户端信息".getBytes());
        } catch (IOException e) {
            e.printStackTrace();
        } finally {
            // 流的关闭
            if (out != null) {
                try {
                    out.close();
                } catch (IOException e) {
                    e.printStackTrace();
                }
            }
            if (cs != null) {
                try {
                    cs.close();
                } catch (IOException e) {
                    e.printStackTrace();
                }
            }
        }
    }
    // 服务端
    @Test
    public void server() {
        ServerSocket ss = null;
        Socket accept = null;
        InputStream in = null;
        try {
            // 1.创建一个ServerSocket对象指明自身的端口号
            ss = new ServerSocket(9898);
            // 2.调用accept方法返回socket对象
            accept = ss.accept();
            // 3.通过返回的socket对象的输入流获取数据
            in = accept.getInputStream();
            // 4.流的操作,详见IO(输入流主要作读取)
            int len;
            byte[] bytes = new byte[15];
            while ((len = in.read(bytes)) != -1) {
                System.out.println(new String(bytes, 0, len));
            }
            // 可以得出访问者信息
            System.out.println("收到来自于:"+accept.getInetAddress().getHostAddress());
        } catch (IOException e) {
            e.printStackTrace();
        } finally {
            // 流的关闭
            if (ss != null) {
                try {
                    ss.close();
                } catch (IOException e) {
                    e.printStackTrace();
                }
            }
            if (accept != null) {
                try {
                    accept.close();
                } catch (IOException e) {
                    e.printStackTrace();
                }
            }
            if (in != null) {
                try {
                    in.close();
                } catch (IOException e) {
                    e.printStackTrace();
                }
            }
        }
//操作步骤请参见代码注释
客户端向服务端发送消息,服务端接收,并发送发聩消息
  // 客户端
    @Test
    public void client() {
        Socket socket = null;
        OutputStream out = null;
        InputStream in = null;
        try {
            // 创建socket
            socket = new Socket(InetAddress.getByName("127.0.0.1"), 9898);
            // 得到输出流
            out = socket.getOutputStream();
            // 利用IO写数据
            out.write("我是客户端,收到请回答,over over!".getBytes());
            // 读取服务端反馈数据
            in = socket.getInputStream();
            int len;
            byte[] bytes = new byte[1024];
            while ((len = in.read(bytes)) != -1) {
                System.out.println(new String(bytes, 0, len));
            }
        } catch (IOException e) {
            e.printStackTrace();
        } finally {
            // 按照流的打开顺序,逆序关闭
            if (in != null) {
                try {
                    in.close();
                } catch (IOException e) {
                    e.printStackTrace();
                }
            }
            if (out != null) {
                try {
                    out.close();
                } catch (IOException e) {
                    e.printStackTrace();
                }
            }
            if (socket != null) {
                try {
                    socket.close();
                } catch (IOException e) {
                    e.printStackTrace();
                }
            }
        }

    }
    @Test
    // 服务端
    public void server() {
        ServerSocket ss = null;
        InputStream in = null;
        Socket accept = null;
        OutputStream out = null;
        try {
            // 创建服务端Socket
            ss = new ServerSocket(9898);
            // 接收消息
            accept = ss.accept();
            // 取得输入流返回值
            in = accept.getInputStream();
            // 利用IO读取
            int len;
            byte[] bytes = new byte[1024];
            while ((len = in.read(bytes)) != -1) {
                System.out.println(new String(bytes, 0, len));
            }
            // 发送反馈消息(利用socket得输出流)
            out = accept.getOutputStream();
            out.write("我是服务端,已经收到,over over!".getBytes());
        } catch (IOException e) {
            e.printStackTrace();
        } finally {
            if (out != null) {
                try {
                    out.close();
                } catch (IOException e) {
                    e.printStackTrace();
                }
            }
            if (in != null) {
                try {
                    in.close();
                } catch (IOException e) {
                    e.printStackTrace();
                }
            }
            if (accept != null) {
                try {
                    accept.close();
                } catch (IOException e) {
                    e.printStackTrace();
                }
            }
            if (ss != null) {
                try {
                    ss.close();
                } catch (IOException e) {
                    e.printStackTrace();
                }
            }
        }
    }
//这样会发现,程序无法停止,也就是通信连接不正常!
原因就是inputStream是阻塞式的,服务端无法确定客户端何时可以发送完成数据(不像第一个案例,发送完客户端就结束了),所以就一直在等
改为显式关闭客户端的输入即可:
// 客户端
    @Test
    public void client() {
        Socket socket = null;
        OutputStream out = null;
        InputStream in = null;
        try {
            // 创建socket
            socket = new Socket(InetAddress.getByName("127.0.0.1"), 9898);
            // 得到输出流
            out = socket.getOutputStream();
            // 利用IO写数据
            out.write("我是客户端,收到请回答,over over!".getBytes());
            // 显式的告诉服务端已经发送完毕!
            socket.shutdownOutput();
            // 读取服务端反馈数据
            in = socket.getInputStream();
            int len;
            byte[] bytes = new byte[1024];
            while ((len = in.read(bytes)) != -1) {
                System.out.println(new String(bytes, 0, len));
            }
        } catch (IOException e) {
            e.printStackTrace();
        } finally {
            // 按照流的打开顺序,逆序关闭
            if (in != null) {
                try {
                    in.close();
                } catch (IOException e) {
                    e.printStackTrace();
                }
            }
            if (out != null) {
                try {
                    out.close();
                } catch (IOException e) {
                    e.printStackTrace();
                }
            }
            if (socket != null) {
                try {
                    socket.close();
                } catch (IOException e) {
                    e.printStackTrace();
                }
            }
        }

    }
    @Test
    // 服务端
    public void server() {
        ServerSocket ss = null;
        InputStream in = null;
        Socket accept = null;
        OutputStream out = null;
        try {
            // 创建服务端Socket
            ss = new ServerSocket(9898);
            // 接收消息
            accept = ss.accept();
            // 取得输入流返回值
            in = accept.getInputStream();
            // 利用IO读取
            int len;
            byte[] bytes = new byte[1024];
            while ((len = in.read(bytes)) != -1) {
                System.out.println(new String(bytes, 0, len));
            }
            // 发送反馈消息(利用socket得输出流)
            out = accept.getOutputStream();
            out.write("我是服务端,已经收到,over over!".getBytes());
        } catch (IOException e) {
            e.printStackTrace();
        } finally {
            if (out != null) {
                try {
                    out.close();
                } catch (IOException e) {
                    e.printStackTrace();
                }
            }
            if (in != null) {
                try {
                    in.close();
                } catch (IOException e) {
                    e.printStackTrace();
                }
            }
            if (accept != null) {
                try {
                    accept.close();
                } catch (IOException e) {
                    e.printStackTrace();
                }
            }
            if (ss != null) {
                try {
                    ss.close();
                } catch (IOException e) {
                    e.printStackTrace();
                }
            }
        }
    }
}
客户端发送文件给服务端,服务端保存到本地,并发送“保存成功”的反馈,然后关闭TCP连接
 // 客户端
    @Test
    public void client() {
        FileInputStream in = null;
        Socket socket = null;
        OutputStream out = null;
        InputStream inFromServer = null;
        File file = new File("D:\test\1.jpg");
        try {
            // 建立socket
            socket = new Socket(InetAddress.getByName("127.0.0.1"), 9898);
            out = socket.getOutputStream();
            // 读取本地文件,写入socket的输出流
            in = new FileInputStream(file);
            int len;
            byte[] bytes = new byte[1024];
            while ((len = in.read(bytes)) != -1) {
                // 写入输出流(偏移量0,长度len)
                out.write(bytes, 0, len);
            }
            // 显式表明关闭
            socket.shutdownOutput();
            // 接收服务端的反馈消息
            inFromServer = socket.getInputStream();
            while ((len = inFromServer.read(bytes)) != -1) {
                System.out.println(new String(bytes, 0, len));
            }

        } catch (IOException e) {
            e.printStackTrace();
        } finally {
            // 逆序关闭流
            if (inFromServer != null) {
                try {
                    inFromServer.close();
                } catch (IOException e) {
                    e.printStackTrace();
                }
            }
            if (out != null) {
                try {
                    out.close();
                } catch (IOException e) {
                    e.printStackTrace();
                }
            }
            if (in != null) {
                try {
                    in.close();
                } catch (IOException e) {
                    e.printStackTrace();
                }
            }
            if (socket != null) {
                try {
                    socket.close();
                } catch (IOException e) {
                    e.printStackTrace();
                }
            }
        }
    }
    // 服务端
    @Test
    public void server() {
        ServerSocket ss = null;
        Socket accept = null;
        InputStream in = null;
        File file = new File("D:\test\2.jpg");
        FileOutputStream out = null;
        OutputStream outToClient = null;
        try {
            // 新建服务端socket
            ss = new ServerSocket(9898);
            accept = ss.accept();
            // 获取输入流,并保存到本地文件
            in = accept.getInputStream();
            out = new FileOutputStream(file);
            // 保存到本地
            int len;
            byte[] bytes = new byte[1024];
            while ((len = in.read(bytes)) != -1) {
                out.write(bytes, 0, len);
            }
            System.out.println("来自于:"+accept.getInetAddress().getHostAddress());
            // 发送反馈信息
            outToClient = accept.getOutputStream();
            outToClient.write("发送成功,服务端保存完毕!".getBytes());
        } catch (IOException e) {
            e.printStackTrace();
        } finally {
            if (outToClient != null) {
                try {
                    outToClient.close();
                } catch (IOException e) {
                    e.printStackTrace();
                }
            }
            if (out != null) {
                try {
                    out.close();
                } catch (IOException e) {
                    e.printStackTrace();
                }
            }
            if (in != null) {
                try {
                    in.close();
                } catch (IOException e) {
                    e.printStackTrace();
                }
            }
            if (accept != null) {
                try {
                    accept.close();
                } catch (IOException e) {
                    e.printStackTrace();
                }
            }
            if (ss != null) {
                try {
                    ss.close();
                } catch (IOException e) {
                    e.printStackTrace();
                }
            }
        }
// 依旧要显式关闭(这方面的改进请参见NIO)
UDP

实例:
  // 发送端
    @Test
    public void send() {
        DatagramSocket ds = null;
        try {
            ds = new DatagramSocket();
            String str = "UDP发送的数据包";
            byte[] bytes = str.getBytes();
            // 创建一个数据报(不大于64K),记录了数据信息与发送端与接收端的信息(IP、端口号)
            DatagramPacket dp = new DatagramPacket(bytes, 0, bytes.length,
                    InetAddress.getByName("127.0.0.1"),9898);
            ds.send(dp);
        } catch (IOException e) {
            e.printStackTrace();
        } finally {
            if (ds != null) {
                ds.close();
            }
        }
    }
    // 接收端
    @Test
    public void receive() {
        DatagramSocket ds = null;
        try {
            // 一样需要服务端指明端口
            ds = new DatagramSocket(9898);
            // 接收数据报
            byte[] bytes = new byte[1024];
            DatagramPacket dp = new DatagramPacket(bytes, 0, bytes.length);
            ds.receive(dp);
            // 数据已经到bytes中
            System.out.println(new String(dp.getData(),0,dp.getLength()));
        } catch (IOException e) {
            e.printStackTrace();
        } finally {
            if (ds != null) {
                ds.close();
            }
        }
    }
UDP更加详细的实例与讲解,参见:http://blog.csdn.net/ns_code/article/details/14128987
3.URL编程
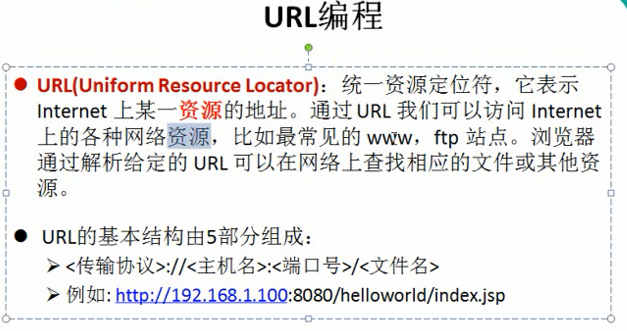
为了表示URL,java.net包中实现了类URL(就像File类对应一个文件,Java中使用对象的形式来表示)。
URL常见的使用实例,请参见:http://www.cnblogs.com/wzy330782/p/5487541.html
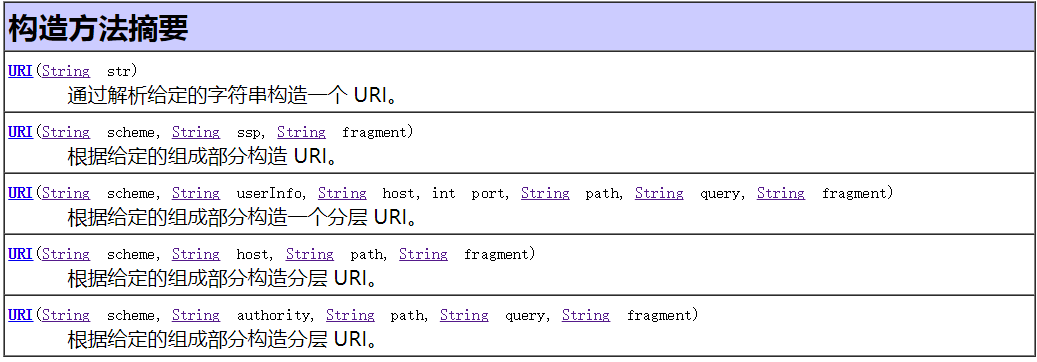
构造器
常用方法:

示例:(在tomcat开启一下,在examples中添加资源)
  @Test
    public void test1() {
        try {
            URL url = new URL("http://127.0.0.1:8080/examples/1.jpg");
            System.out.println(url.getProtocol());// 协议名
            System.out.println(url.getPort());// 端口号
            System.out.println(url.getFile());// 文件名
            System.out.println(url.getQuery());// 获取查询名
            System.out.println(url.getRef());// 返回文档标记
        } catch (IOException e) {
            e.printStackTrace();
        }
    }
结果:

获取URL资源
采用openStream获取输入流的方式
 @Test
    public void test1() {
        InputStream in = null;
        FileOutputStream out = null;
        try {
            URL url = new URL("http://127.0.0.1:8080/examples/1.jpg");
            System.out.println(url.getFile());// 文件名
            // 保存服务端URL对应的资源文件
            in = url.openStream();
            // 利用IO流进行文件的读取
            int len;
            byte[] bytes = new byte[1024];
            out = new FileOutputStream(new File("D:\test\2.jpg"));
            while ((len = in.read(bytes)) != -1) {
                out.write(bytes, 0, len);
            }
        } catch (IOException e) {
            e.printStackTrace();
        } finally {
            //流的关闭
            if (out != null) {
                try {
                    out.close();
                } catch (IOException e) {
                    e.printStackTrace();
                }
            }
            if (in != null) {
                try {
                    in.close();
                } catch (IOException e) {
                    e.printStackTrace();
                }
            }
        }
    }
采用URLConnection进行与服务器的交互(有读取也有输出),这里不赘述