一、实时同步概述
实时同步是一种只要当前目录发生变化则会触发一个事件,事件触发后会将变化的目录同步至远程服务器
二、实时同步背景
保证数据的连续性, 减少人力维护成本,解决NFS单点故障
三、实时同步数据选择
sersync+RSYNC(√)、inotify+rsync

Inotify是一个通知接口,用来监控文件系统的各种变化,如果文件存取,删除,移动。可以非常方便地实现文件异动告警,增量备份,并针对目录或文件的变化及时作出响应。rsync+inotify可以实触发式实时同步增量备份

sersync是国人基于rsync+inotify-tools开发的工具,不仅保留了优点同时还强化了实时监控,文件过滤,简化配置等功能,帮助用户提高运行效率,节省时间和网络资源。
四、安装sersync(NFS服务器)
1.安装sersync和inotify
[root@NFS01 ~]# yum install rsync inotify-tools -y
2.下载sersync软件包
[root@NFS01 ~]# wget https://raw.githubusercontent.com/wsgzao/sersync/master/sersync2.5.4_64bit_binary_stable_final.tar.gz
3.解压安装包
[root@NFS ~]# tar xf sersync2.5.4_64bit_binary_stable_final.tar.gz
4.移动并改名
[root@NFS ~]# mv GNU-Linux-x86 /usr/local/sersync
5.修改配置文件
[root@NFS ~]# cat /usr/local/sersync/confxml.xml
<?xml version="1.0" encoding="ISO-8859-1"?>
<head version="2.5">
	#主机IP
    <host hostip="localhost" port="8008"></host>
    #调试模式
    <debug start="false"/>
    <fileSystem xfs="false"/>
    #文件过滤
    <filter start="false">
	<exclude expression="(.*)\.svn"></exclude>
	<exclude expression="(.*)\.gz"></exclude>
	<exclude expression="^info/*"></exclude>
	<exclude expression="^static/*"></exclude>
    </filter>
    #inotify监控配置
    <inotify>
    #inotify监控的行为
	<delete start="true"/>
	<createFolder start="true"/>
	<createFile start="true"/>
	<closeWrite start="true"/>
	<moveFrom start="true"/>
	<moveTo start="true"/>
	<attrib start="true"/>
	<modify start="true"/>
    </inotify>
	#推送部分
    <sersync>
    #本地监控的目录
	<localpath watch="/data">
		#远程IP及模块名字
	    <remote ip="172.16.1.41" name="data"/>
	</localpath>
	<rsync>
		#rsync同步时的参数
	    <commonParams params="-artuz"/>
	    #开启认证
	    <auth start="true" users="rsync_backup" passwordfile="/etc/rsync.password"/>
	    #如果rsync服务不是873端口,需要开启
	    <userDefinedPort start="false" port="874"/><!-- port=874 -->
	    #超时时间
	    <timeout start="false" time="100"/><!-- timeout=100 -->
	    <ssh start="false"/>
	</rsync>
	#指定错误日志
	<failLog path="/tmp/rsync_fail_log.sh" timeToExecute="60"/><!--default every 60mins execute once-->
	#定时任务,默认600分钟进行一次全备
	<crontab start="false" schedule="600"><!--600mins-->
		#定时任务文件过滤
	    <crontabfilter start="false">
		<exclude expression="*.php"></exclude>
		<exclude expression="info/*"></exclude>
	    </crontabfilter>
	</crontab>
	<plugin start="false" name="command"/>
    </sersync>

    <plugin name="command">
	<param prefix="/bin/sh" suffix="" ignoreError="true"/>	<!--prefix /opt/tongbu/mmm.sh suffix-->
	<filter start="false">
	    <include expression="(.*)\.php"/>
	    <include expression="(.*)\.sh"/>
	</filter>
    </plugin>

    <plugin name="socket">
	<localpath watch="/opt/tongbu">
	    <deshost ip="192.168.138.20" port="8009"/>
	</localpath>
    </plugin>
    <plugin name="refreshCDN">
	<localpath watch="/data0/htdocs/cms.xoyo.com/site/">
	    <cdninfo domainname="ccms.chinacache.com" port="80" username="xxxx" passwd="xxxx"/>
	    <sendurl base="http://pic.xoyo.com/cms"/>
	    <regexurl regex="false" match="cms.xoyo.com/site([/a-zA-Z0-9]*).xoyo.com/images"/>
	</localpath>
    </plugin>
</head>
6.创建密码文件
[root@NFS ~]# echo 123456 > /etc/rsync.password
[root@NFS ~]# chmod 600 /etc/rsync.password
7.启动
#查看参数
[root@NFS ~]# /usr/local/sersync/sersync2 -h
set the system param
execute:echo 50000000 > /proc/sys/fs/inotify/max_user_watches
execute:echo 327679 > /proc/sys/fs/inotify/max_queued_events
parse the command param
_______________________________________________________
参数-d:启用守护进程模式
参数-r:在监控前,将监控目录与远程主机用rsync命令推送一遍
c参数-n: 指定开启守护线程的数量,默认为10个
参数-o:指定配置文件,默认使用confxml.xml文件
参数-m:单独启用其他模块,使用 -m refreshCDN 开启刷新CDN模块
参数-m:单独启用其他模块,使用 -m socket 开启socket模块
参数-m:单独启用其他模块,使用 -m http 开启http模块
不加-m参数,则默认执行同步程序

[root@NFS ~]# /usr/local/sersync/sersync2 -dro /usr/local/sersync/confxml.xml
set the system param
execute:echo 50000000 > /proc/sys/fs/inotify/max_user_watches
execute:echo 327679 > /proc/sys/fs/inotify/max_queued_events
parse the command param
option: -d 	run as a daemon
option: -r 	rsync all the local files to the remote servers before the sersync work
option: -o 	config xml name:  /usr/local/sersync/confxml.xml
daemon thread num: 10
parse xml config file
host ip : localhost	host port: 8008
will ignore the inotify createFile event
daemon start,sersync run behind the console
use rsync password-file :
user is	rsync_backup
passwordfile is 	/etc/rsync.password
config xml parse success
please set /etc/rsyncd.conf max connections=0 Manually
sersync working thread 12  = 1(primary thread) + 1(fail retry thread) + 10(daemon sub threads)
Max threads numbers is: 22 = 12(Thread pool nums) + 10(Sub threads)
please according your cpu ,use -n param to adjust the cpu rate
------------------------------------------
rsync the directory recursivly to the remote servers once
working please wait...
execute command: cd /data && rsync -artuz -R --delete ./ rsync_backup@172.16.1.41::data --password-file=/etc/rsync.password >/dev/null 2>&1
run the sersync:
watch path is: /data
五、sersync+NFS实战案例
1.需求
1.恢复快照
2.搭建交作业系统
3.配置挂载数据目录
4.NFS的数据目录实时备份到backup服务器(要求使用sersync)
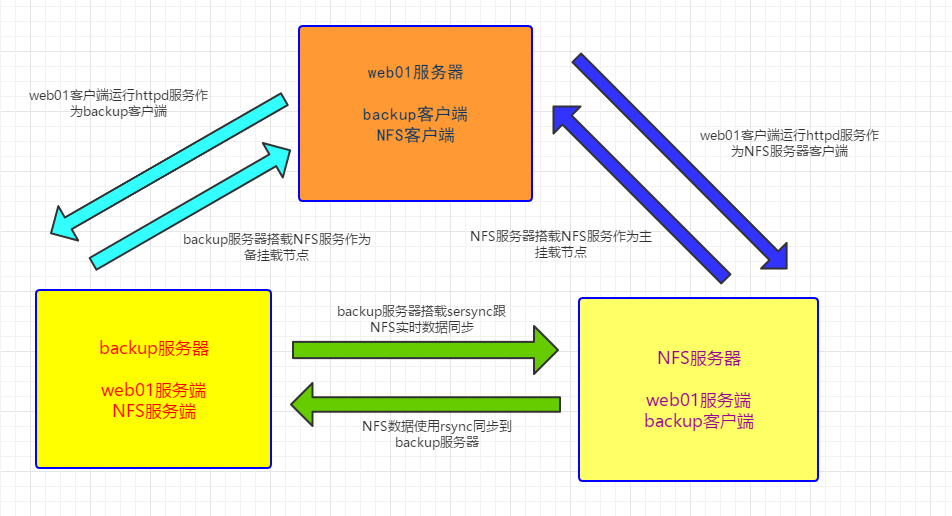
2.环境准备
| 主机 |
角色 |
IP |
| backup |
rsync服务端,NFS服务端 |
172.16.1.41 |
| NFS |
rsync客户端,NFS服务端 |
172.16.1.31 |
| web01 |
rsync客户端,NFS客户端 |
172.16.1.7,10.0.0.7 |
3.web01搭载上传作业平台
1.关闭防火墙
[root@web01 ~]# systemctl stop firewalld
[root@web01 ~]# systemctl disable firewalld

2.关闭selinux
[root@web01 ~]# setenforce 0
[root@web01 ~]# vim /etc/selinux/config
SELINUX=disabled

3.安装httpd和php
[root@web01 ~]# yum -y install httpd php

4.上传作业平台代码并解压到指定目录
[root@web01 ~]# rz -bye

[root@web01 ~]# ll
total 36
-rw-------. 1 root root  1350 Jun  9 21:42 anaconda-ks.cfg
-rw-r--r--. 1 root root   497 Aug  5 16:53 hostname_ip.sh
-rw-r--r--  1 root root 26995 Aug 13 16:42 kaoshi.zip
[root@web01 ~]# unzip kaoshi.zip  -d /var/www/html/
Archive:  kaoshi.zip
  inflating: /var/www/html/info.php
  inflating: /var/www/html/bg.jpg
  inflating: /var/www/html/index.html
  inflating: /var/www/html/upload_file.php

5.修改httpd配置
[root@web01 ~]# vim /etc/httpd/conf/httpd.conf
User www
Group www

6.创建统一用户
[root@web01 ~]# groupadd  -g 666 www
[root@web01 ~]# useradd -u 666 -g 666 www

7.修改用户权限
[root@web01 ~]# chown -R www:www  /var/www/html/

8.重启服务并验证服务
[root@web01 ~]# systemctl restart httpd
[root@web01 ~]# ps aux |grep http
root      24063  0.8  0.5 314580 12128 ?        Ss   19:49   0:00 /usr/sbin/httpd -DFOREGROUND
www       24064  0.0  0.3 314712  6160 ?        S    19:49   0:00 /usr/sbin/httpd -DFOREGROUND
www       24065  0.0  0.3 314712  6160 ?        S    19:49   0:00 /usr/sbin/httpd -DFOREGROUND
www       24066  0.0  0.3 314712  6160 ?        S    19:49   0:00 /usr/sbin/httpd -DFOREGROUND
www       24067  0.0  0.3 314712  6160 ?        S    19:49   0:00 /usr/sbin/httpd -DFOREGROUND
www       24068  0.0  0.3 314712  6160 ?        S    19:49   0:00 /usr/sbin/httpd -DFOREGROUND
root      24070  0.0  0.0 112708   976 pts/0    R+   19:49   0:00 grep --color=auto http
4.NFS服务器搭建NFS服务端
1.关闭防火墙
[root@NFS ~]# systemctl stop firewalld
[root@NFS ~]# systemctl disable firewalld

2.关闭selinux
[root@NFS ~]# setenforce 0
[root@NFS ~]# vim /etc/selinux/config
SELINUX=disabled

3.安装NFS和rpcbind
[root@NFS ~]# yum -y install  NFS-utils rpcbind

4.配置NFS服务
[root@NFS ~]# vim /etc/exports
/web/data	172.16.1.0/24(rw,sync,all_squash,anonuid=666,anongid=666)

5.重启服务并验证
[root@NFS ~]# systemctl restart NFS
[root@NFS ~]# cat  /var/lib/NFS/etab
/web/data	172.16.1.0/24(rw,sync,wdelay,hide,nocrossmnt,secure,root_squash,all_squash,no_subtree_check,secure_locks,acl,no_pNFS,anonuid=666,anongid=666,sec=sys,rw,secure,root_squash,all_squash)

6.创建统一用户
[root@NFS ~]# groupadd -g 666 www
[root@NFS ~]# useradd  -u 666 -g 666 www

7.创建挂载目录并修改权限
[root@NFS ~]# mkdir -p /web/data
[root@NFS ~]# chown -R www:www  /web/data/
5.web01客户端挂载目录
1.安装NFS和rpcbind
[root@web01 ~]# yum -y install  NFS rpcbind

2.启动rpcbind
[root@web01 ~]# systemctl start rpcbind

3.查看挂载点
[root@web01 ~]# showmount  -e 172.16.1.31
Export list for 172.16.1.31:
/web/data 172.16.1.0/24

4.挂载目录
[root@web01 ~]# mount -t NFS 172.16.1.31:/web/data /var/www/html/upload

5.查看挂载点
[root@web01 ~]# df -h
Filesystem             Size  Used Avail Use% Mounted on
/dev/sda3               98G  1.7G   96G   2% /
devtmpfs               980M     0  980M   0% /dev
tmpfs                  991M     0  991M   0% /dev/shm
tmpfs                  991M  9.6M  981M   1% /run
tmpfs                  991M     0  991M   0% /sys/fs/cgroup
/dev/sda1              497M  120M  378M  25% /boot
tmpfs                  199M     0  199M   0% /run/user/0
172.16.1.31:/web/data   98G  1.7G   96G   2% /var/www/html/upload
6.backup搭建rsync服务端
1.关闭防火墙
[root@backup ~]# systemctl stop firewalld
[root@backup ~]# systemctl disable firewalld

2.关闭selinux
[root@backup ~]# setenforce 0
[root@backup ~]# vim /etc/selinux/config
SELINUX=disabled

3.安装rsync服务
[root@backup ~]# yum -y install rsync

4.配置rsync服务
[root@backup ~]# vim /etc/rsyncd.conf
uid = www
gid = www
port = 873
fake super = yes
use chroot = no
max connections =200
timeout = 600
ignore errors
read only =false
list = true
auth users = rsync_backup
secrets file = /etc/rsync.passwd
log file = /var/log/rsyncd.log
#####################################
[backup]
comment = "文件备份目录"
path = /backup

[data]
comment = "数据备份目录"
path = /data

5.创建统一用户
[root@backup ~]# groupadd  -g 666 www
[root@backup ~]# useradd  -u 666 -g 666 www

6.创建密码文件并修改权限
[root@backup ~]# echo  "rsync_backup:123456" >/etc/rsync.passwd
[root@backup ~]# chmod 600 /etc/rsync.passwd

7.创建备份目录并修改权限
[root@backup ~]# mkdir /backup
[root@backup ~]# mkdir /data
[root@backup ~]# chown -R www:www  /backup/
[root@backup ~]# chown -R www:www  /data/

8,重启服务并验证服务
[root@backup ~]# systemctl  restart rsyncd
[root@backup ~]# netstat  -lntp
Active Internet connections (only servers)
Proto Recv-Q Send-Q Local Address           Foreign Address         State       PID/Program name
tcp        0      0 0.0.0.0:873             0.0.0.0:*               LISTEN      24097/rsync
tcp        0      0 0.0.0.0:111             0.0.0.0:*               LISTEN      6135/rpcbind
tcp        0      0 0.0.0.0:22              0.0.0.0:*               LISTEN      7151/sshd
tcp        0      0 127.0.0.1:25            0.0.0.0:*               LISTEN      7291/master
tcp6       0      0 :::873                  :::*                    LISTEN      24097/rsync
tcp6       0      0 :::111                  :::*                    LISTEN      6135/rpcbind
tcp6       0      0 :::22                   :::*                    LISTEN      7151/sshd
tcp6       0      0 ::1:25                  :::*                    LISTEN      7291/master
7.NFS数据实时备份到backup服务器
1.安装inotify
[root@NFS ~]# yum install rsync inotify-tools -y

2.上传serdync软件包
[root@NFS ~]# rz -bye

[root@NFS ~]# ll
-rw-r--r--  1 root root 727290 Aug 14 17:15 sersync2.5.4_64bit_binary_stable_final.tar.gz

3.解压安装包
[root@NFS ~]# tar -xf sersync2.5.4_64bit_binary_stable_final.tar.gz

4.移动并改名
[root@NFS ~]# mv GNU-Linux-x86 /usr/local/sersync

5.修改配置文件
[root@NFS ~]# vim /usr/local/sersync/confxml.xml
        </crontab>
        <plugin start="false" name="command"/>
    </sersync>
    <plugin name="command">
        <param prefix="/bin/sh" suffix="" ignoreError="true"/>  <!--prefix /opt/tongbu/mmm.sh suffix-->
        <filter start="false">
            <include expression="(.*)\.php"/>
            <include expression="(.*)\.sh"/>
        </filter>
    </plugin>

    <plugin name="socket">
        <localpath watch="/opt/tongbu">
            <deshost ip="192.168.138.20" port="8009"/>
        </localpath>
    </plugin>
    <plugin name="refreshCDN">
        <localpath watch="/data0/htdocs/cms.xoyo.com/site/">
            <cdninfo domainname="ccms.chinacache.com" port="80" username="xxxx" passwd="xxxx"/>
            <sendurl base="http://pic.xoyo.com/cms"/>
            <regexurl regex="false" match="cms.xoyo.com/site([/a-zA-Z0-9]*).xoyo.com/images"/>
        </localpath>
    </plugin>
</head>

6.创建密码文件并设置权限
[root@NFS ~]# echo "123456" >/etc/rsync.password
[root@NFS ~]# chmod 600 /etc/rsync.password

7.启动数据实时同步
[root@NFS ~]# /usr/local/sersync/sersync2 -dro /usr/local/sersync/confxml.xml
set the system param
execute:echo 50000000 > /proc/sys/fs/inotify/max_user_watches
execute:echo 327679 > /proc/sys/fs/inotify/max_queued_events
parse the command param
option: -d 	run as a daemon
option: -r 	rsync all the local files to the remote servers before the sersync work
option: -o 	config xml name:  /usr/local/sersync/confxml.xml
daemon thread num: 10
parse xml config file
host ip : localhost	host port: 8008
will ignore the inotify createFile event
daemon start,sersync run behind the console
use rsync password-file :
user is	rsync_backup
passwordfile is 	/etc/rsync.password
config xml parse success
please set /etc/rsyncd.conf max connections=0 Manually
sersync working thread 12  = 1(primary thread) + 1(fail retry thread) + 10(daemon sub threads)
Max threads numbers is: 22 = 12(Thread pool nums) + 10(Sub threads)
please according your cpu ,use -n param to adjust the cpu rate
------------------------------------------
rsync the directory recursivly to the remote servers once
working please wait...
execute command: cd /web/data && rsync -artuz -R --delete ./ rsync_backup@172.16.1.41::data --password-file=/etc/rsync.password >/dev/null 2>&1
run the sersync:
watch path is: /web/data
8.backup搭建NFS服务端
1.安装NFS和rpcbind
[root@backup ~]# yum -y install  NFS rpcbind

2.配置NFS服务
[root@backup ~]# vim /etc/exports
/backup	172.16.1.0/24(rw,sync,all_squash,anonuid=666,anongid=666)

3.重启服务并验证
[root@backup ~]# cat /var/lib/NFS/etab
/backup	172.16.1.0/24(rw,sync,wdelay,hide,nocrossmnt,secure,root_squash,all_squash,no_subtree_check,secure_locks,acl,no_pNFS,anonuid=666,anongid=666,sec=sys,rw,secure,root_squash,all_squash)
9.测试
1.访问交作业页面,上传图片

2.查看web服务器
[[root@web01 /var/www/html/upload]#  ll
total 48
-rw-r--r-- 1 www www 46257 Aug 14 21:05 1_jh.jpg

3.查看NFS服务器data目录
[root@NFS /web/data]# ll
total 48
-rw-r--r-- 1 www www 46257 Aug 14 21:05 1_jh.jpg

4.查看backup服务器data目录
[root@backup /data]# ll
total 48
-rw-r--r-- 1 www www 46257 Aug 14 21:05 1_jh.jpg