一、开机启动流程
1.按下电源1
2.BIOS自检
3.MBR引导
4.进入GRUB菜单
5.加载内核kernel
6.启动系统进程(使用systemd进行管理) init进程
7.读取运行级别
[root@jindada ~]# ll /etc/systemd/system/default.target
lrwxrwxrwx 1 root root 37 Jul 6 02:16 /etc/systemd/system/default.target -> /lib/systemd/system/multi-user.target
[root@jindada ~]# ll /usr/lib/systemd/system/runlevel*.target
lrwxrwxrwx. 1 root root 15 Jul 6 02:14 /usr/lib/systemd/system/runlevel0.target -> poweroff.target
lrwxrwxrwx. 1 root root 13 Jul 6 02:14 /usr/lib/systemd/system/runlevel1.target -> rescue.target
lrwxrwxrwx. 1 root root 17 Jul 6 02:14 /usr/lib/systemd/system/runlevel2.target -> multi-user.target
lrwxrwxrwx. 1 root root 17 Jul 6 02:14 /usr/lib/systemd/system/runlevel3.target -> multi-user.target
lrwxrwxrwx. 1 root root 17 Jul 6 02:14 /usr/lib/systemd/system/runlevel4.target -> multi-user.target
lrwxrwxrwx. 1 root root 16 Jul 6 02:14 /usr/lib/systemd/system/runlevel5.target -> graphical.target
lrwxrwxrwx. 1 root root 13 Jul 6 02:14 /usr/lib/systemd/system/runlevel6.target -> reboot.target
8.初始化系统
[root@jindada ~]# ll /usr/lib/systemd/system/sysinit.target
-rw-r--r--. 1 root root 518 Oct 31 2018 /usr/lib/systemd/system/sysinit.target
9.并行启动开机自启动的服务
10.运行getty文件,显示登陆界面
[root@jindada ~]# ll /usr/lib/systemd/system/getty.target
-rw-r--r--. 1 root root 460 Oct 31 2018 /usr/lib/systemd/system/getty.target
11.Centos-6 和 Centos-7的区别
| centos6 | centos7 |
| init管理进程 | systemd管理进程 |
| 串行启动服务 | 并行启动服务 |
| 启动效率慢,容易故障 | 启动效率高,不容易出现故障 |
二、系统的运行级别

0 poweroff #关机
1 rescue #单用户模式
2 multi-user #多用户模式
3 multi-user #多用户模式
4 multi-user #多用户模式
5 graphical #图形界面模式 桌面模式
6 reboot #重启
#如何查看系统运行级别
Centos-6
[root@jindada ~]# runlevel
N 3
[root@jindada ~]# init 5
[root@jindada ~]# runlevel
3 5
[root@jindada ~]# init 3
Centos-7
[root@jindada ~]# systemctl get-default
multi-user.target
#修改运行级别
[root@jindada ~]# systemctl set-default graphical.target
Removed symlink /etc/systemd/system/default.target.
Created symlink from /etc/systemd/system/default.target to /usr/lib/systemd/system/graphical.target.
[root@jindada ~]# systemctl get-default
graphical.target
[root@jindada ~]# systemctl set-default multi-user.target
Removed symlink /etc/systemd/system/default.target.
Created symlink from /etc/systemd/system/default.target to /usr/lib/systemd/system/multi-user.target.
[root@jindada ~]# systemctl get-default
multi-user.target
三、system介绍
systemd system daemon
#主配置文件目录
[root@jindada ~]# ll /etc/systemd/system/ -d
drwxr-xr-x. 12 root root 4096 Aug 5 09:05 /etc/systemd/system/
#系统服务配置文件
[root@jindada ~]# ll /usr/lib/systemd/system/ -d
drwxr-xr-x. 26 root root 12288 Jul 30 19:51 /usr/lib/systemd/system/
#程序,进程运行时产生的一些文件
[root@jindada ~]# ll /run/systemd/system/ -d
drwxr-xr-x 5 root root 160 Aug 5 09:30 /run/systemd/system/
#启动
[root@jindada ~]# systemctl start nginx
#停止
[root@jindada ~]# systemctl stop nginx
#状态
[root@jindada ~]# systemctl status nginx
#重启
[root@jindada ~]# systemctl restart nginx
#平滑重启
[root@jindada ~]# systemctl reload nginx
#禁用某个服务
[root@jindada ~]# systemctl mask nginx
#解除禁用
[root@jindada ~]# systemctl unmask nginx
#开机自启动
[root@jindada ~]# systemctl enable nginx
#取消开机自启动
[root@jindada ~]# systemctl disable nginx
status状态
active (running) #运行
Active: inactive (dead) #不在运行
disabled #开机不自启
enabled #开机自启
failed #失败
#显示当前运行级别下开机自启动的服务
[root@jindada ~]# systemctl list-unit-files
四、system设置
#使用system进行管理关机重启操作
[root@jindada ~]# systemctl reboot
[root@jindada ~]# systemctl poweroff
#如何设置主机名
[root@jindada ~]# hostname
jindada
[root@jindada ~]# hostnamectl
Static hostname: jindada
Icon name: computer-vm
Chassis: vm
Machine ID: 6b11e94f1fe04eb89579c1c41f6f5307
Boot ID: 783be43c5a44420ead4bd26792a6d22c
Virtualization: vmware
Operating System: CentOS Linux 7 (Core)
CPE OS Name: cpe:/o:centos:centos:7
Kernel: Linux 3.10.0-957.el7.x86_64
Architecture: x86-64
[root@jindada ~]# hostnamectl set-hostname web01
[root@jindada ~]# logout
Connection closing...Socket close.
Connection closed by foreign host.
Disconnected from remote host(虚拟机-10.0.0.100) at 09:54:12.
Type `help' to learn how to use Xshell prompt.
[C:~]$
Connecting to 10.0.0.100:22...
Connection established.
To escape to local shell, press 'Ctrl+Alt+]'.
Last login: Wed Aug 5 17:51:59 2020 from 10.0.0.1
[root@web01 ~]#
[root@web01 ~]# cat /etc/hostname
web01
Centos-6修改 临时生效
[root@web01 ~]# hostname jindada
[root@web01 ~]# logout
Connection closing...Socket close.
Connection closed by foreign host.
Disconnected from remote host(虚拟机-10.0.0.100) at 09:55:10.
Type `help' to learn how to use Xshell prompt.
[C:~]$
Connecting to 10.0.0.100:22...
Connection established.
To escape to local shell, press 'Ctrl+Alt+]'.
Last login: Wed Aug 5 09:54:16 2020 from 10.0.0.1
[root@jindada ~]# cat /etc/hostname
web01
#如何修改字符集
[root@jindada ~]# echo $LANG
en_US.UTF-8
[root@jindada ~]# localectl set-locale LANG=zh_CN.UTF-8
[root@jindada ~]# logout
Connection closing...Socket close.
Connection closed by foreign host.
Disconnected from remote host(虚拟机-10.0.0.100) at 09:57:21.
Type `help' to learn how to use Xshell prompt.
[C:~]$
Connecting to 10.0.0.100:22...
Connection established.
To escape to local shell, press 'Ctrl+Alt+]'.
Last login: Wed Aug 5 09:55:13 2020 from 10.0.0.1
[root@jindada ~]#
[root@jindada ~]# cat /etc/locale.conf
LANG=zh_CN.UTF-8
[root@jindada ~]# yum install -y sl
已加载插件:fastestmirror
Loading mirror speeds from cached hostfile
* base: mirrors.aliyun.com
* extras: mirrors.aliyun.com
* updates: mirrors.aliyun.com
软件包 sl-5.02-1.el7.x86_64 已安装并且是最新版本
无须任何处理
#临时修改变量
[root@jindada ~]# export LANG=en_US.UTF-8
[root@jindada ~]# echo $LANG
en_US.UTF-8
#系统日志管理
[root@jindada ~]# journalctl -xe #查看当前服务的日志
[root@jindada ~]# tail /var/log/messages
Aug 5 10:01:32 jindada systemd: Stopped The nginx HTTP and reverse proxy server.
Aug 5 10:01:32 jindada systemd: Starting The nginx HTTP and reverse proxy server...
Aug 5 10:01:32 jindada nginx: nginx: [emerg] unknown directive "isten" in /etc/nginx/nginx.conf:39
Aug 5 10:01:32 jindada nginx: nginx: configuration file /etc/nginx/nginx.conf test failed
Aug 5 10:01:32 jindada systemd: nginx.service: control process exited, code=exited status=1
Aug 5 10:01:32 jindada systemd: Failed to start The nginx HTTP and reverse proxy server.
Aug 5 10:01:32 jindada systemd: Unit nginx.service entered failed state.
Aug 5 10:01:32 jindada systemd: nginx.service failed.
Aug 5 10:02:01 jindada systemd: Started Session 19 of user root.
Aug 5 10:03:01 jindada systemd: Started Session 20 of user root.
#查看日志的最后20行内容
[root@jindada ~]# journalctl -n 20
#实时查看日志的输出
[root@jindada ~]# journalctl -f
#显示日志的级别日志
[root@jindada ~]# journalctl -p
alert crit debug emerg err info notice warning
[root@jindada ~]# journalctl -p err
-- Logs begin at Wed 2020-08-05 17:51:37 CST, end at Wed 2020-08-05 10:05:01 CST. --
Aug 05 17:51:41 jindada kernel: sd 2:0:0:0: [sda] Assuming drive cache: write through
Aug 05 17:51:41 jindada kernel: sd 2:0:1:0: [sdb] Assuming drive cache: write through
Aug 05 17:51:41 jindada kernel: sd 2:0:2:0: [sdc] Assuming drive cache: write through
Aug 05 17:51:44 jindada kernel: piix4_smbus 0000:00:07.3: SMBus Host Controller not enabled!
Aug 05 09:54:13 web01 sshd[7162]: error: Received disconnect from 10.0.0.1 port 50011:0:
Aug 05 09:55:11 jindada sshd[7333]: error: Received disconnect from 10.0.0.1 port 50033:0:
Aug 05 09:57:22 jindada sshd[7369]: error: Received disconnect from 10.0.0.1 port 50041:0:
Aug 05 09:59:29 jindada sshd[7419]: error: Received disconnect from 10.0.0.1 port 50067:0:
Aug 05 10:00:51 jindada sshd[7473]: error: Received disconnect from 10.0.0.1 port 50097:0:
Aug 05 10:01:32 jindada systemd[1]: Failed to start The nginx HTTP and reverse proxy server.
#只查看某个服务的日志
[root@jindada ~]# journalctl -u sshd
-- Logs begin at Wed 2020-08-05 17:51:37 CST, end at Wed 2020-08-05 10:06:01 CST. --
Aug 05 17:51:56 jindada systemd[1]: Starting OpenSSH server daemon...
Aug 05 17:51:56 jindada sshd[6981]: Server listening on 0.0.0.0 port 22.
Aug 05 17:51:56 jindada sshd[6981]: Server listening on :: port 22.
Aug 05 17:51:56 jindada systemd[1]: Started OpenSSH server daemon.
Aug 05 17:51:59 jindada sshd[7162]: Accepted password for root from 10.0.0.1 port 50011 ssh2
Aug 05 09:54:16 web01 sshd[7333]: Accepted password for root from 10.0.0.1 port 50033 ssh2
Aug 05 09:55:12 jindada sshd[7369]: Accepted password for root from 10.0.0.1 port 50041 ssh2
Aug 05 09:57:26 jindada sshd[7419]: Accepted password for root from 10.0.0.1 port 50067 ssh2
Aug 05 09:59:31 jindada sshd[7473]: Accepted password for root from 10.0.0.1 port 50097 ssh2
Aug 05 10:00:52 jindada sshd[7525]: Accepted password for root from 10.0.0.1 port 50111 ssh2
五、单用户模式
1.忘记root密码
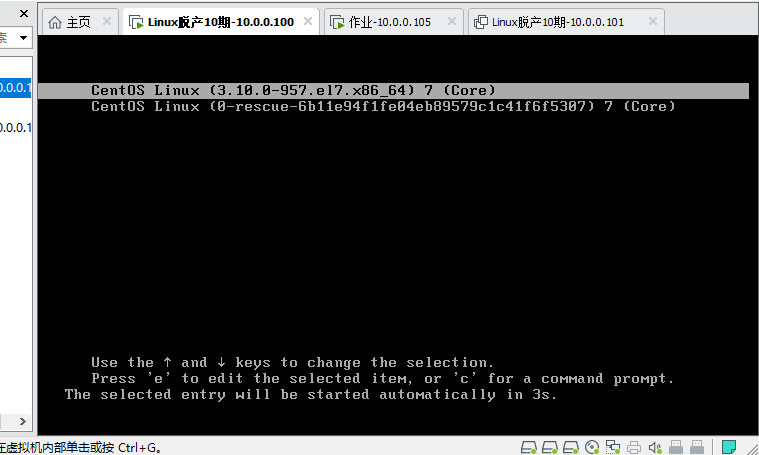
开机在grub界面输入 e
在linux16开头的行的最后面输入 init=/bin/bash enforcing=0
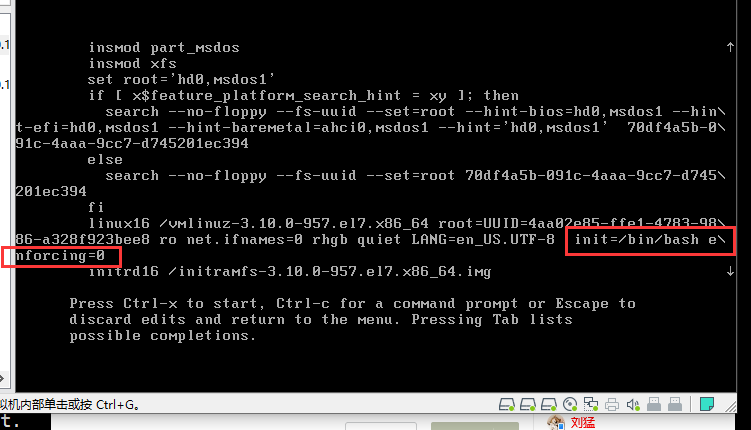
按 ctrl键 + x
重新挂载根分区 mount -o rw,remount /
修改密码
 、
、

重启 exec /sbin/init

2.运行级别被设置为重启
[root@web01 ~]# systemctl set-default reboot.target
Removed symlink /etc/systemd/system/default.target.
Created symlink from /etc/systemd/system/default.target to /usr/lib/systemd/system/reboot.target.
[root@web01 ~]# systemctl get-default
reboot.target
开机在grub界面输入 e

在linux16开头的行的最后面输入 rd.break

按 ctrl键 + x
重新挂载根分区 mount -o rw,remount /sysroot
赋予权限 chroot /sysroot

修改运行级别

exit
reboot

六、救援模式
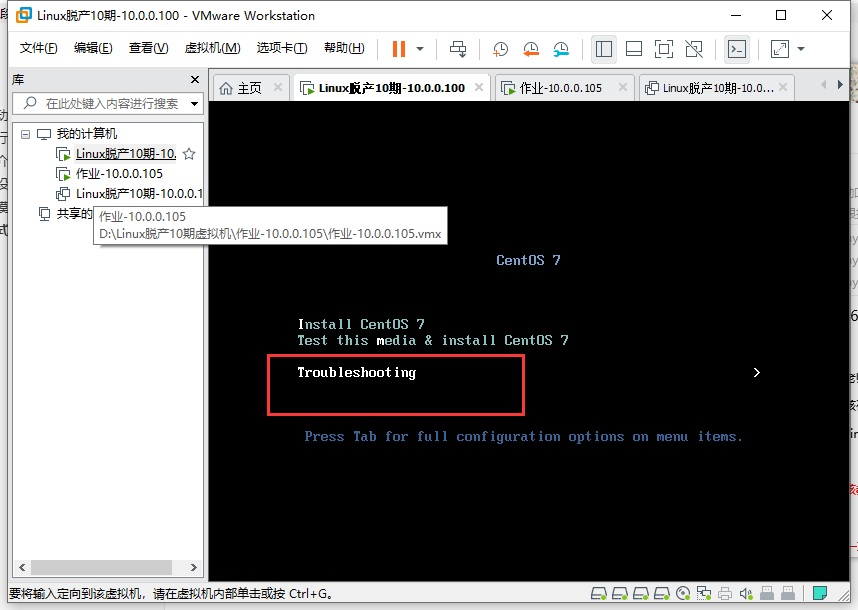
先挂载光盘,然后选择光盘引导为第一位,如下图所示。
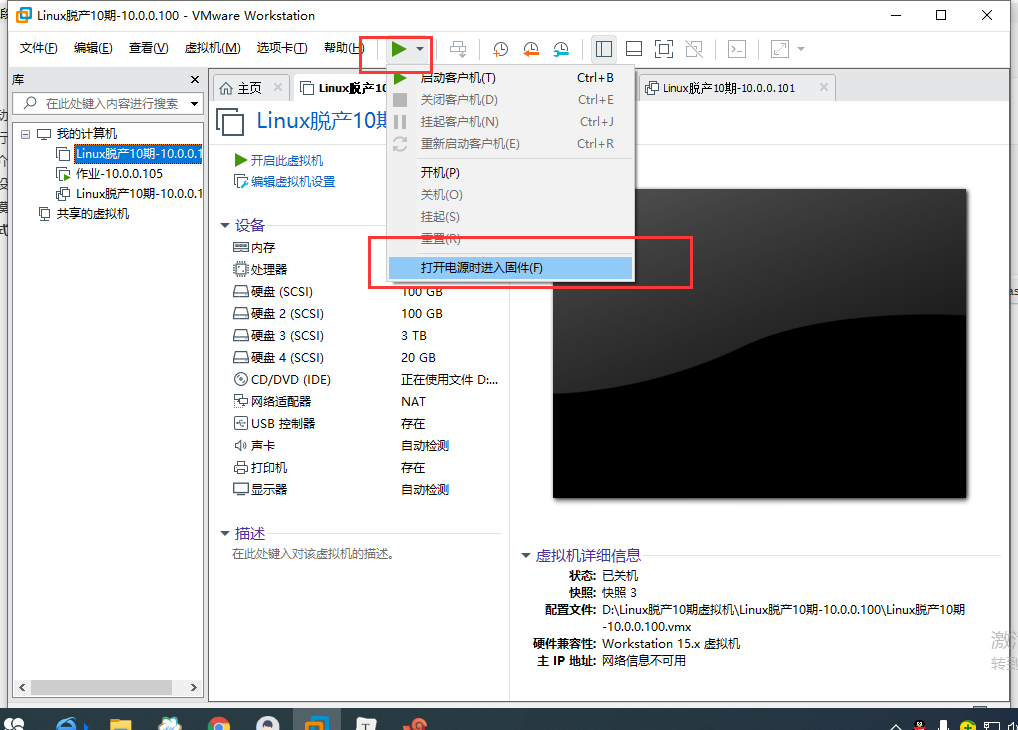
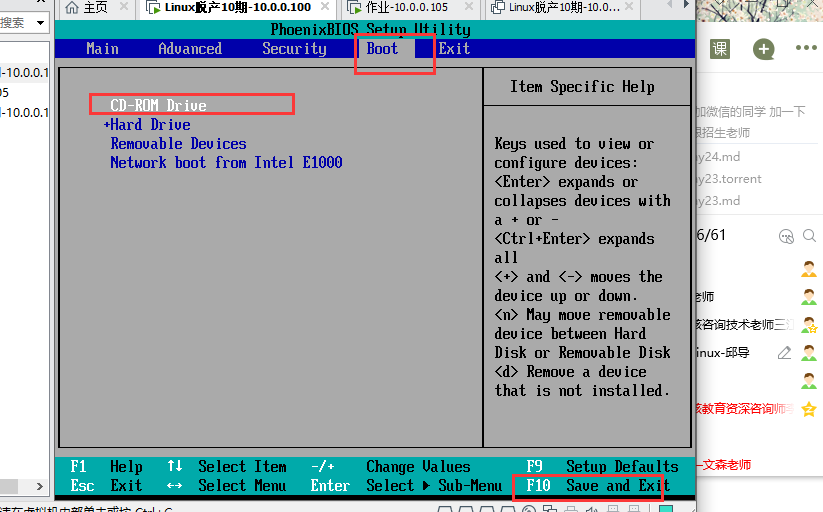
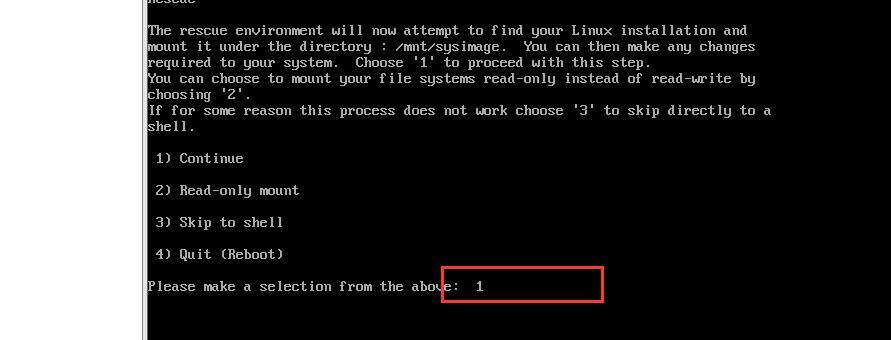
进入故障排除模式,然后选择救援模式,如下图所示。

挂载真实系统后,发现数据都还存在,之后就可以挂在磁盘,将数据备份出来。
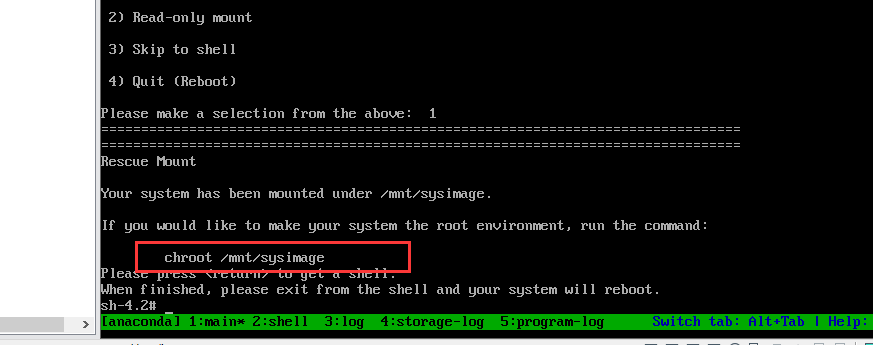

2.MBR引导坏掉,修复MBR,主要出现在安装双系统的时候,后安装的系统把原来的MBR删除了,需要修复
破坏硬盘的前446字节,模拟MBR引导损坏,会发现重启无法启动系统
dd if=/dev/zero of=/dev/sda bs=1 count=446
重启,查看系统状态
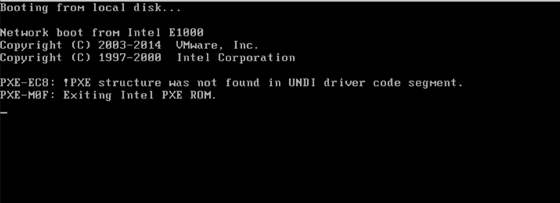
进入救援模式,分配一个shell,进行修复系统
#修复grub
bash-4.2# grub2-install /dev/sda
#退出
bash-4.2# exit
#重启进入系统
bash-4.2# reboot
3.CentOS-7 误删除grub文件,进行修复
模拟故障
#删除grub2
rm -rf /boot/grub2/
#重启
reboot
查看系统状态

进入救援模式,分配一个shell,进行修复系统
bash-4.2# grub2-install /dev/sda
bash-4.2# grub2-mkconfig -o /boot/grub2/grub.cfg
bash-4.2# ls /boot/grub2
bash-4.2# exit
sh-4.2# reboot
七、网卡命名规则
1.概述
CentOS6之前基于传统的命名方式如:eth1,eth0....
Centos7提供了不同的命名规则,默认是基于固件、拓扑、位置信息来分配。这样做的优点是命名是全自动的、可预知的,缺点是比eth0更难读。比如ens33
2.网卡命名的策略
规则1:如果Firmware或者BIOS提供的设备索引信息可用就用此命名。比如eno1。否则使用规则2
规则2:如果Firmware或Bios的PCI-E扩展插槽可用就用此命名。比如ens1,否则使用规则3
规则3:如果硬件接口的位置信息可用就用此命名。比如enp2s0
规则4:根据MAC地址命名,比如enx7d3e9f。默认不开启。
规则5:上述均不可用时回归传统命名方式
上面的所有命名规则需要依赖于一个安装包:biosdevname
biosdevname和net.ifnames属于两种不同的命名规范
CentOS-7中默认biosdevname的值为0,net.ifnames的值为1。
#命令行修改网卡命名规则
mv /etc/sysconfig/network-scripts/ifcfg-ens33 ifcfg-eth0
#修改网卡配置文件设备名称
sed -i "s#ens33#eth0#g" ifcfg-eth0
#GRUB添加kernel参数
vim /etc/sysconfig/grub
GRUB_CMDLINE_LINUX="...net.ifnames=0 biosdevname=0 quiet"
#加载到引导分区
grub2-mkconfig -o /boot/grub2/grub.cfg
#重启系统生效
reboot