这里就一个计算器开发为例
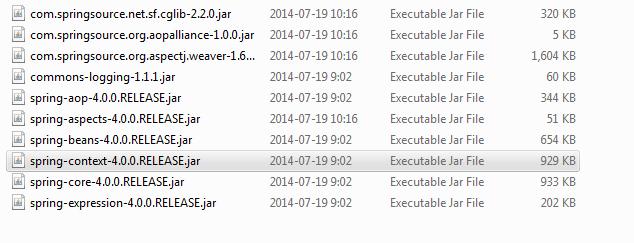
1搭建环境-搭配好Spring的AOP开发环境
导入以下这些包:
2建立好核心处理模块的类
ArithmeticCalculator:
package com.jeremy.spring.AspectJ;

public interface ArithmeticCalculator {
		int add(int i,int j);
		int sub(int i,int j);
		int mul(int i,int j);
		int div(int i,int j);
}
ArithmeticCalculatorImp
package com.jeremy.spring.AspectJ;

import org.springframework.stereotype.Component;

@Component
public class ArithmeticCalculatorImpl implements ArithmeticCalculator {

    @Override
    public int add(int i, int j) {
        int result =i+j;
        System.out.println(this.getClass()+"     "+this.hashCode());
        return result;
    }

    @Override
    public int sub(int i, int j) {
        int result =i-j;
        return result;
    }

    @Override
    public int mul(int i, int j) {
        int result =i*j;
        return result;
    }

    @Override
    public int div(int i, int j) {
        int result =i/j;
        return result;
    }

}
3建立切面类,并在里面配置切面信息
package com.jeremy.spring.AspectJ;

import java.util.Arrays;

import org.aspectj.lang.JoinPoint;
import org.aspectj.lang.annotation.After;
import org.aspectj.lang.annotation.Aspect;
import org.aspectj.lang.annotation.Before;
import org.springframework.stereotype.Component;

/**
 * AOP 的 helloWorld
 * 1. 加入 jar 包
 * com.springsource.net.sf.cglib-2.2.0.jar
 * com.springsource.org.aopalliance-1.0.0.jar
 * com.springsource.org.aspectj.weaver-1.6.8.RELEASE.jar
 * spring-aspects-4.0.0.RELEASE.jar
 *
 * 2. 在 Spring 的配置文件中加入 aop 的命名空间。
 *
 * 3. 基于注解的方式来使用 AOP
 * 3.1 在配置文件中配置自动扫描的包: <context:component-scan base-package="com.atguigu.spring.aop"></context:component-scan>
 * 3.2 加入使 AspjectJ 注解起作用的配置: <aop:aspectj-autoproxy></aop:aspectj-autoproxy>
 * 为匹配的类自动生成动态代理对象.
 *
 * 4. 编写切面类:
 * 4.1 一个一般的 Java 类
 * 4.2 在其中添加要额外实现的功能.
 *
 * 5. 配置切面
 * 5.1 切面必须是 IOC 中的 bean: 实际添加了 @Component 注解
 * 5.2 声明是一个切面: 添加 @Aspect
 * 5.3 声明通知: 即额外加入功能对应的方法.
 * 5.3.1 前置通知: @Before("execution(public int com.atguigu.spring.aop.ArithmeticCalculator.*(int, int))")
 * @Before 表示在目标方法执行之前执行 @Before 标记的方法的方法体.
 * @Before 里面的是切入点表达式:
 *
 * 6. 在通知中访问连接细节: 可以在通知方法中添加 JoinPoint 类型的参数, 从中可以访问到方法的签名和方法的参数.
 *
 * 7. @After 表示后置通知: 在方法执行之后执行的代码.
 */

//通过添加 @Aspect 注解声明一个 bean 是一个切面!
@Aspect
@Component
public class LoggingAspect {

    @Before("execution(public int com.jeremy.spring.AspectJ.ArithmeticCalculator.*(int, int))")
    public void beforeMethod(JoinPoint joinPoint){
        String methodName = joinPoint.getSignature().getName();
        Object [] args = joinPoint.getArgs();

        System.out.println("The method " + methodName + " begins with " + Arrays.asList(args));
    }

    @After("execution(* com.jeremy.spring.AspectJ.*.*(..))")
    public void afterMethod(JoinPoint joinPoint){
        String methodName = joinPoint.getSignature().getName();
        System.out.println("The method " + methodName + " ends");
    }

}
4配置SPring的xml文件
3基于注解的方式来使用 AOP
3.1 在配置文件中配置自动扫描的包: <context:component-scan base-package="com.atguigu.spring.aop"></context:component-scan>
3.2 加入使 AspjectJ 注解起作用的配置: <aop:aspectj-autoproxy></aop:aspectj-autoproxy>为匹配的类自动生成动态代理对象.
<?xml version="1.0" encoding="UTF-8"?>
<beans xmlns="http://www.springframework.org/schema/beans"
    xmlns:xsi="http://www.w3.org/2001/XMLSchema-instance"
    xmlns:aop="http://www.springframework.org/schema/aop"
    xmlns:context="http://www.springframework.org/schema/context"
    xsi:schemaLocation="http://www.springframework.org/schema/beans http://www.springframework.org/schema/beans/spring-beans.xsd
        http://www.springframework.org/schema/aop http://www.springframework.org/schema/aop/spring-aop-4.0.xsd
        http://www.springframework.org/schema/context http://www.springframework.org/schema/context/spring-context-4.0.xsd">
    <!-- 自动扫描的包 -->
    <context:component-scan base-package="com.jeremy.spring.AspectJ"></context:component-scan>
    <!-- 使 AspectJ 的注解起作用 -->
    <aop:aspectj-autoproxy></aop:aspectj-autoproxy>

</beans>