我是廖志伟,一名Java开发工程师、幕后大佬社区创始人、Java领域优质创作者、CSDN博客专家。拥有多年一线研发经验,研究过各种常见框架及中间件的底层源码,对于大型分布式、微服务、三高架构(高性能、高并发、高可用)有过实践架构经验。
文章目录
本文的大概内容:
一、RabbitMQ的基本概念,以及6种工作模式,消息确认机制
RabbitMQ 简介:RabbitMQ 基于 AMQP 标准,采用 Erlang 语言开发的消息中间件。
 基本概念:
基本概念:
- Producer:作为消息的生成者。
- Consumer:作为消息的消费者。
- Connection:消息的发布方或者消息的消费方 和broker 之间的 TCP 连接。
- Channel:Channel 是在 connection内部建立的逻辑连接,如果应用程序支持多线程,通常每个thread创建单独的 channel 进行通讯,AMQP method包含了channel id 帮助客户端和message broker 识别 channel,所以 channel之间是完全隔离的,减少了操作系统建立 TCP connection 的开销。
- Broker:接收和分发消息的应用,RabbitMQ服务就是Message Broker。
- Virtual host:虚拟机,出于多租户和安全因素设计的,把 AMQP的基本组件划分到一个虚拟的分组中,可以类比mysql数据库会创建很多库,库和库之间是独立的。当多个不同的用户使用同一个RabbitMQserver 提供的服务时,可以划分出多个vhost,每个用户在自己的 vhost 创建 exchange/queue 等。
- Queue:队列,消息队列,接收消息、缓存消息,消息最终被送到这里等待 consumer 取走。
- Binding:绑定,exchange 和 queue 之间的虚拟连接,binding 中可以包含 routing key。Binding 信息被保存到 exchange 中的查询表中,用于 message 的分发依据
- Exchange:交换机,message 到达 broker 的第一站,根据分发规则,匹配查询表中的 routing key,分发消息到queue 中去。
交换机常用的类型有:
Fanout:广播,将消息交给所有绑定到交换机的队列
Direct:定向,把消息交给符合指定routing key 的队列
Topic:通配符,把消息交给符合routing pattern(路由模式) 的队列
二、6 种工作模式
一、理论
RabbitMQ 提供了 6 种工作模式,简单模式、work queues、Publish/Subscribe
发布与订阅模式、Routing 路由模式、Topics 主题模式、RPC 远程调用模式(远程调用,不太算消息队列)
简单模式:一个生产者生产消息发送到队列里面,一个消费者从队列里面拿消息,进行消费消息。一个生产者、一个消费者,不需要设置交换机(使用默认的交换机)
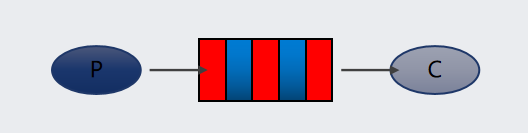
说明:类似一个邮箱,可以缓存消息;生产者向其中投递消息,消费者从其中取出消息。
Work queues 工作队列模式:一个生产者生产消息发送到队列里面,一个或者多个消费者从队列里面拿消息,进行消费消息。一个生产者、多个消费者(竞争关系),不需要设置交换机(使用默认的交换机)
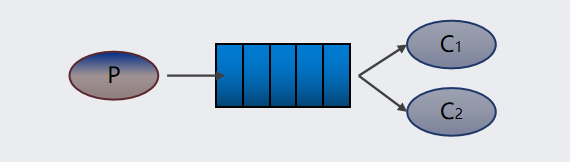
说明:对于任务过重或任务较多情况使用工作队列可以提高任务处理的速度。应用场景:过年过节12306抢票,发短信给用户,可以接入多个短信服务进行发送,提供任务的处理速度。
Pub/Sub 订阅模式 :一个生产者生产消息发送到交换机里面,由交换机处理消息,队列与交换机的任意绑定,将消息指派给某个队列,一个或者多个消费者从队列里面拿消息,进行消费消息。需要设置类型为 fanout 的交换机,并且交换机和队列进行绑定,当发送消息到交换机后,交换机会将消息发送到绑定的队列。
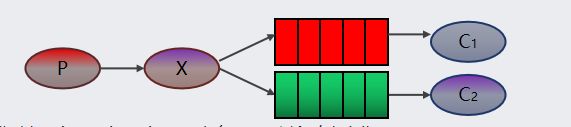
说明:Exchange(交换机)只负责转发消息,不具备存储消息的能力,因此如果没有任何队列与 Exchange 绑定,或者没有符合路由规则的队列,那么消息会丢失!
Routing 路由模式:一个生产者生产消息发送到交换机里面,并且指定一个路由key,队列与交换机的绑定是通过路由key进行绑定的,消费者在消费的时候需要根据路由key从交换机里面拿消息,进行消费消息。需要设置类型为 direct 的交换机,交换机和队列进行绑定,并且指定 routing key,当发送消息到交换机后,交换机会根据 routing key 将消息发送到对应的队列。
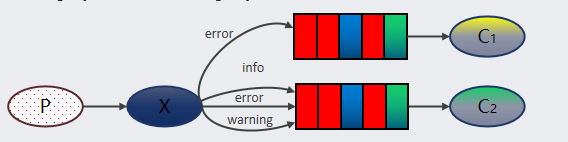
说明:Routing 模式要求队列在绑定交换机时要指定 routing key,消息会转发到符合 routing key 的队列。
Topics 通配符模式:一个生产者生产消息发送到交换机里面,并且使用通配符的形式(类似mysql里面的模糊查询,比如想获取一批带有item前缀的数据),队列与交换机的绑定是通过通配符进行绑定的,消费者在消费的时候需要根据根据通配符从交换机里面拿消息,进行消费消息。需要设置类型为 topic 的交换机,交换机和队列进行绑定,并且指定通配符方式的 routing key,当发送消息到交换机后,交换机会根据 routing key 将消息发送到对应的队列
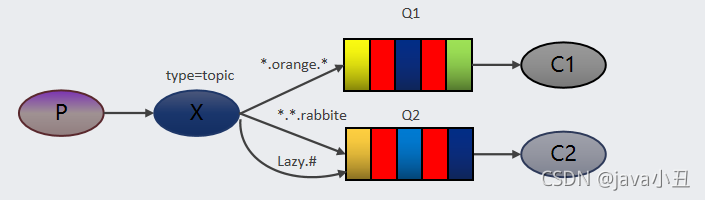 说明:通配符规则:# 匹配一个或多个词,* 匹配不多不少恰好1个词。例如:Lazy.# 能够匹配 Lazy.insert.content或者 Lazy.insert,Lazy.* 只能匹配Lazy.insert。
二、代码

创建一个Maven工程,引入pom依赖:
    <dependencies>
		<!--rabbitmq客户端-->
        <dependency>
            <groupId>com.rabbitmq</groupId>
            <artifactId>amqp-client</artifactId>
            <version>5.3.0</version>
        </dependency>
		<!--json转换工具包-->
        <dependency>
            <groupId>com.google.code.gson</groupId>
            <artifactId>gson</artifactId>
            <version>2.8.5</version>
        </dependency>
    </dependencies>
创建一个连接Rabbitmq的工具类:
import com.rabbitmq.client.Connection;
import com.rabbitmq.client.ConnectionFactory;

public class RabbitUtils {
    private static ConnectionFactory connectionFactory = new ConnectionFactory();
    static {
        connectionFactory.setHost("你的rabbitmq的ip地址");
        connectionFactory.setPort(5672);//RabbitMQ的默认端口号,根据实际情况修改
        connectionFactory.setUsername("你的rabbitmq的用户名称");
        connectionFactory.setPassword("你的rabbitmq的用户密码");
        connectionFactory.setVirtualHost("你的rabbitmq的虚拟机");
    }
    public static Connection getConnection(){
        Connection conn = null;
        try {
            conn = connectionFactory.newConnection();
            return conn;
        } catch (Exception e) {
            throw new RuntimeException(e);
        }
    }
}
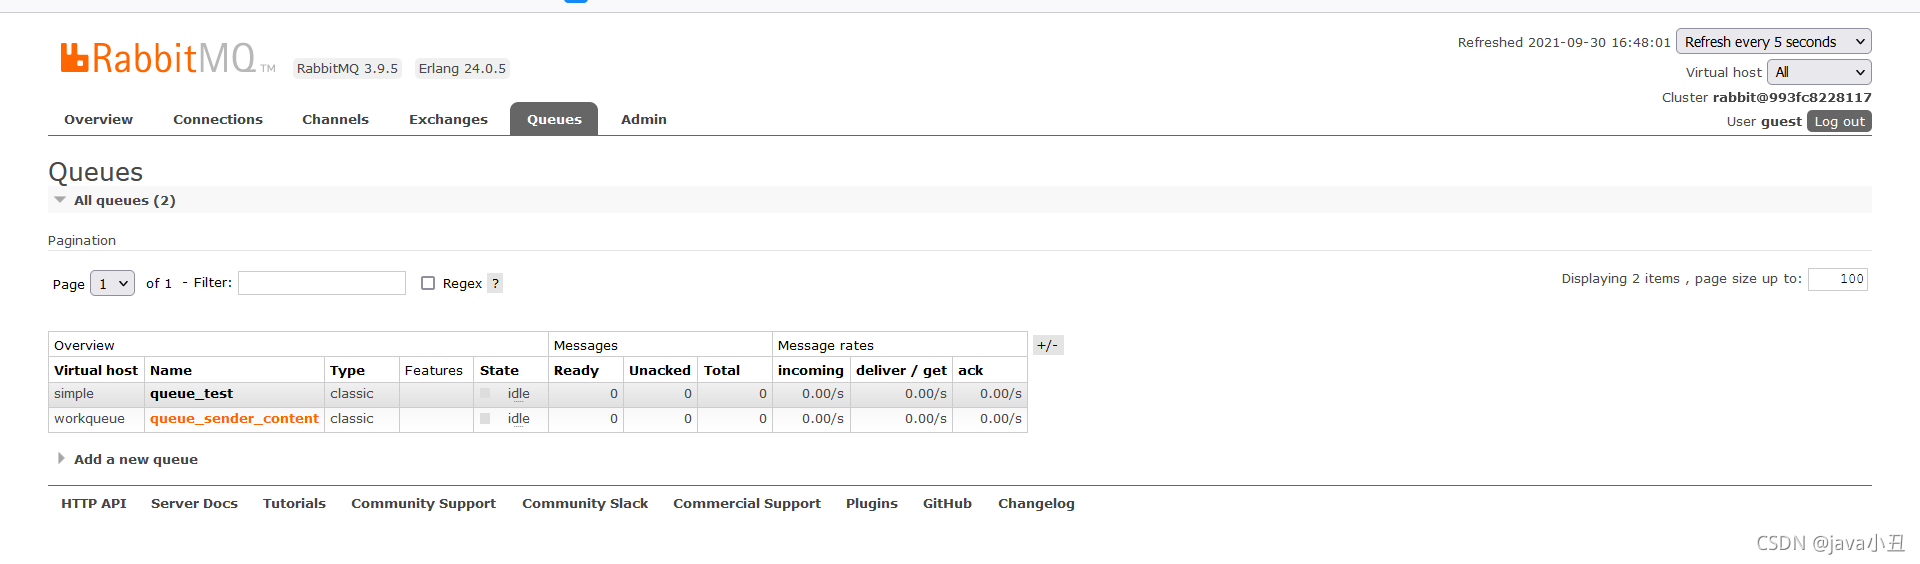
简单模式:
为了区分好理解,我每个模式都去创建一个虚拟机,这里我先去rabbitMq管控页面创建一个虚拟机
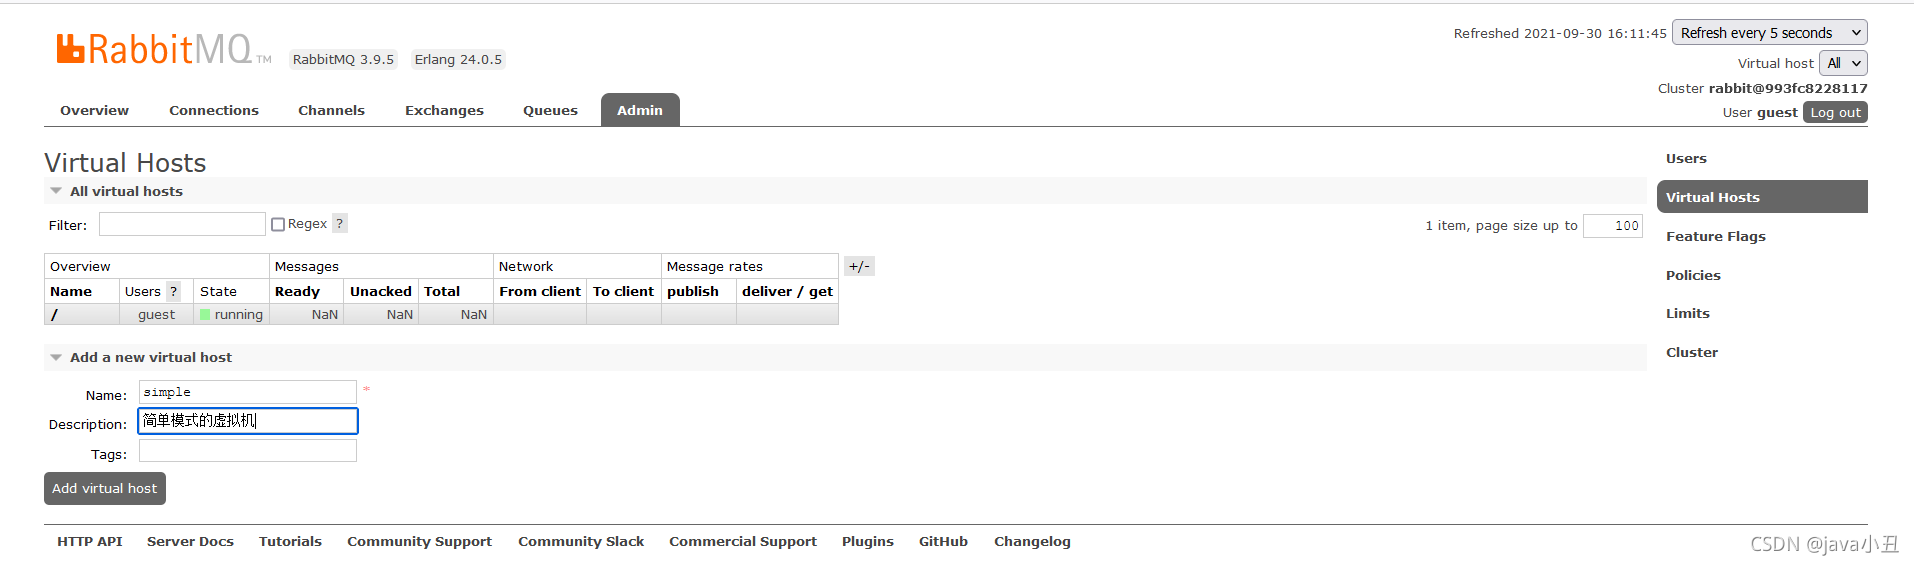
修改工具类的虚拟机:

生产者:
import com.liao.rabbitmq.utils.RabbitConstant;
import com.liao.rabbitmq.utils.RabbitUtils;
import com.rabbitmq.client.Channel;
import com.rabbitmq.client.Connection;

public class Producer {

    public static void main(String[] args) throws Exception {
        //获取TCP长连接
        Connection conn = RabbitUtils.getConnection();
        //创建通信“通道”,相当于TCP中的虚拟连接
        Channel channel = conn.createChannel();
        //创建队列,声明并创建一个队列,如果队列已存在,则使用这个队列
        //channel.queueDeclare的五个参数
        //第一个参数:队列名称ID
        //第二个参数:是否持久化,false对应不持久化数据,MQ停掉数据就会丢失
        //第三个参数:是否队列私有化,false则代表所有消费者都可以访问,true代表只有第一次拥有它的消费者才能一直使用,其他消费者不让访问
        //第四个:是否自动删除,false代表连接停掉后不自动删除掉这个队列
        //其他额外的参数, null
        channel.queueDeclare(RabbitConstant.QUEUE_TEST,false, false, false, null);
        String message = "要发送的message";
        //channel.basicPublish的四个参数
        //exchange 交换机,暂时用不到,在后面进行发布订阅时才会用到
        //队列名称
        //额外的设置属性
        //最后一个参数是要传递的消息字节数组
        channel.basicPublish("", RabbitConstant.QUEUE_TEST, null,message.getBytes());
        channel.close();
        conn.close();
        System.out.println("===发送成功===");
    }
}
消费者:
import com.liao.rabbitmq.utils.RabbitConstant;
import com.liao.rabbitmq.utils.RabbitUtils;
import com.rabbitmq.client.*;
import java.io.IOException;

public class Consumer {

    public static void main(String[] args) throws Exception{
        //获取TCP长连接
        Connection conn = RabbitUtils.getConnection();
        //创建通信“通道”,相当于TCP中的虚拟连接
        Channel channel = conn.createChannel();
        //创建队列,声明并创建一个队列,如果队列已存在,则使用这个队列
        //第一个参数:队列名称ID
        //第二个参数:是否持久化,false对应不持久化数据,MQ停掉数据就会丢失
        //第三个参数:是否队列私有化,false则代表所有消费者都可以访问,true代表只有第一次拥有它的消费者才能一直使用,其他消费者不让访问
        //第四个:是否自动删除,false代表连接停掉后不自动删除掉这个队列
        //其他额外的参数, null
        channel.queueDeclare(RabbitConstant.QUEUE_TEST,false, false, false, null);
        //从MQ服务器中获取数据
        //创建一个消息消费者
        //第一个参数:队列名
        //第二个参数代表是否自动确认收到消息,false代表手动编程来确认消息,这是MQ的推荐做法
        //第三个参数要传入DefaultConsumer的实现类
        channel.basicConsume(RabbitConstant.QUEUE_TEST, false, new Reciver(channel));
    }
}


class  Reciver extends DefaultConsumer {

    private Channel channel;

    //重写构造函数,Channel通道对象需要从外层传入,在handleDelivery中要用到
    public Reciver(Channel channel) {
        super(channel);
        this.channel = channel;
    }

    @Override
    public void handleDelivery(String consumerTag, Envelope envelope, AMQP.BasicProperties properties, byte[] body) throws IOException {
         String message = new String(body);
         System.out.println("消费者接收到的消息:"+message);
         System.out.println("消息的TagId:"+envelope.getDeliveryTag());
        //false只确认签收当前的消息,设置为true的时候则代表签收该消费者所有未签收的消息
        channel.basicAck(envelope.getDeliveryTag(), false);
    }
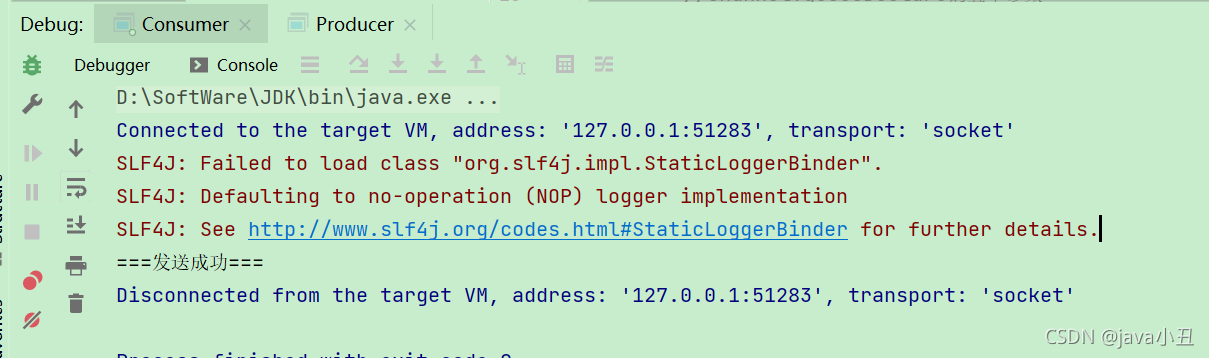
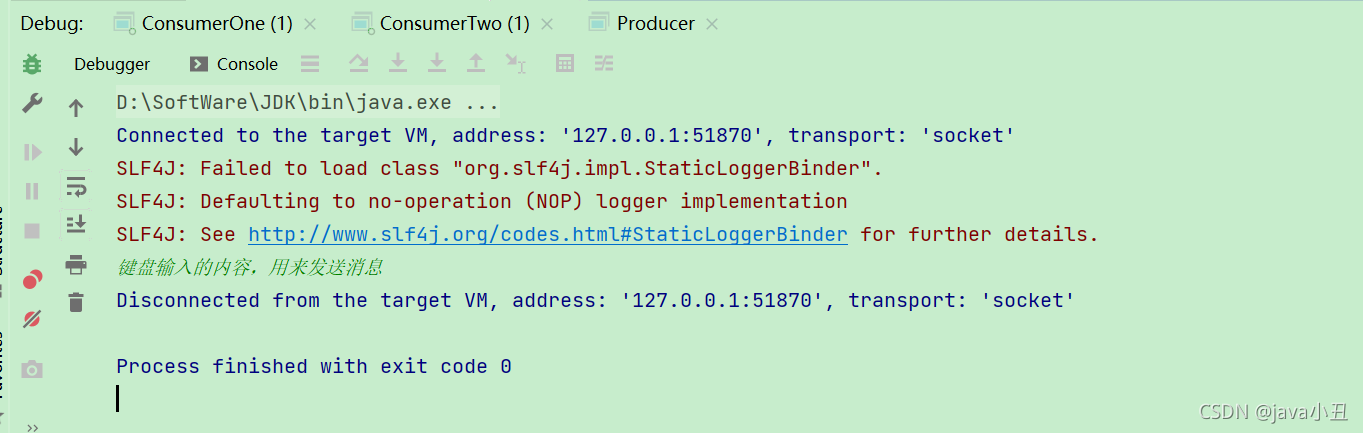
我先启动消费者后启动生产者,这样只要生产者一生产消息,消费者就可以立马消费。

Work queues 工作队列模式:
为了区分好理解,我每个模式都去创建一个虚拟机,这里我先去rabbitMq管控页面创建一个虚拟机
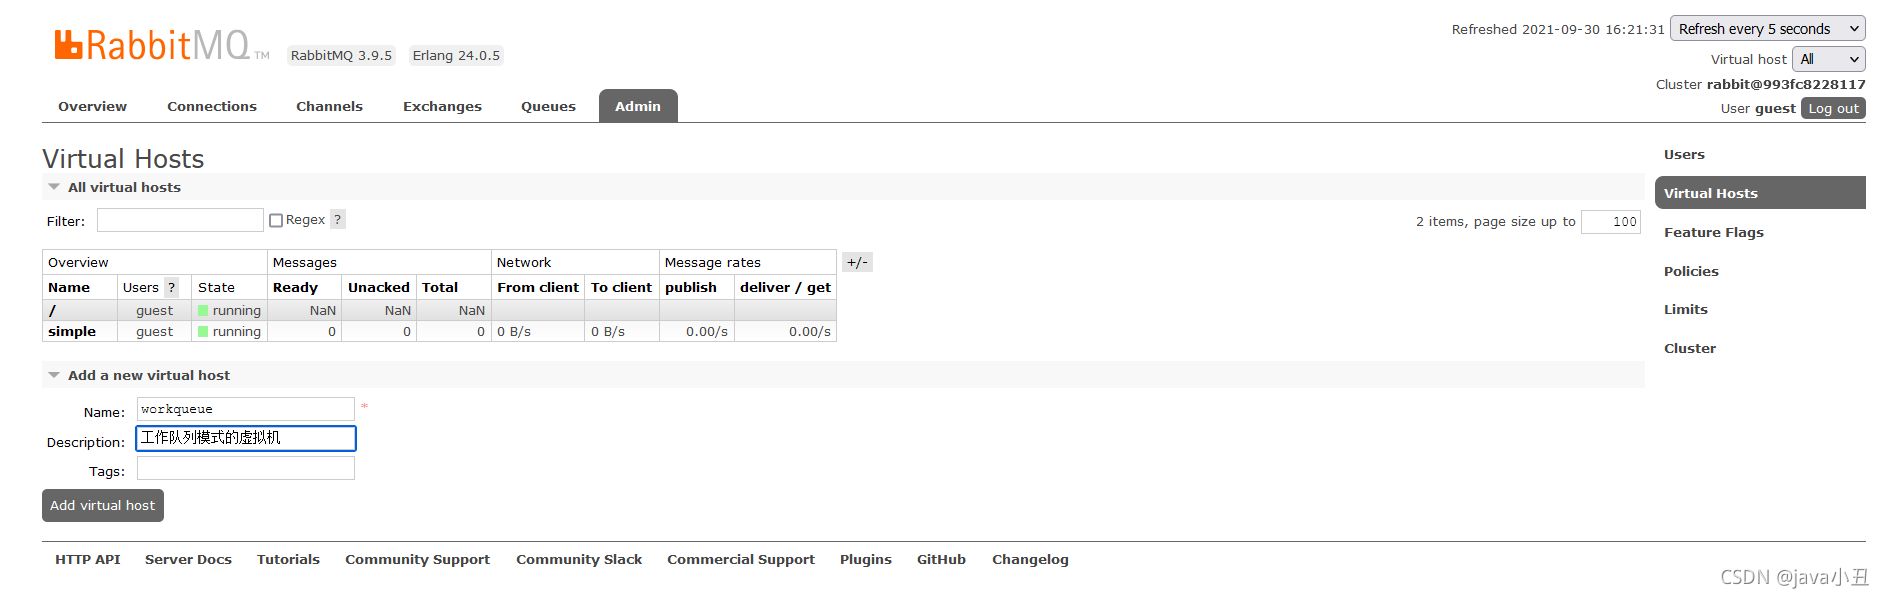 修改工具类的虚拟机

为了模拟某些业务,这里使用自定义实体类发送消息,所以我新建了一个自定义实体类
/**
 * 自定义的实体类:发送内容
 */
public class SenderContent {

    private String name;
    private String content;

    public SenderContent(String name, String content) {
        this.name = name;
        this.content = content;
    }

    public String getName() {
        return name;
    }

    public void setName(String name) {
        this.name = name;
    }

    public String getContent() {
        return content;
    }

    public void setContent(String content) {
        this.content = content;
    }
}
生产者:
import com.liao.rabbitmq.utils.RabbitConstant;
import com.liao.rabbitmq.utils.RabbitUtils;
import com.google.gson.Gson;
import com.rabbitmq.client.Channel;
import com.rabbitmq.client.Connection;

/**
 * 生成者
 */
public class Producer {

    public static void main(String[] args) throws Exception {
        Connection connection = RabbitUtils.getConnection();
        Channel channel = connection.createChannel();
        channel.queueDeclare(RabbitConstant.QUEUE_SENDER_CONTENT, false, false, false, null);
        for(int i = 1 ; i <= 100 ; i++) {
            SenderContent senderContent = new SenderContent("姓名:" + i, "内容:" + i);
            String jsonSMS = new Gson().toJson(senderContent);
            channel.basicPublish("" , RabbitConstant.QUEUE_SENDER_CONTENT , null , jsonSMS.getBytes());
        }
        System.out.println("发送数据成功");
        channel.close();
        connection.close();
    }
}
消费者一:
import com.liao.rabbitmq.utils.RabbitConstant;
import com.liao.rabbitmq.utils.RabbitUtils;
import com.rabbitmq.client.*;
import java.io.IOException;


/**
 * 消费者1
 */
public class ConsumerOne {

    public static void main(String[] args) throws Exception {
        Connection connection = RabbitUtils.getConnection();
        final Channel channel = connection.createChannel();
        channel.queueDeclare(RabbitConstant.QUEUE_SENDER_CONTENT, false, false, false, null);
        //如果不写basicQos(1),则自动MQ会将所有请求平均发送给所有消费者
        //basicQos,MQ不再对消费者一次发送多个请求,而是消费者处理完一个消息后(确认后),在从队列中获取一个新的
        channel.basicQos(1);//处理完一个取一个
        channel.basicConsume(RabbitConstant.QUEUE_SENDER_CONTENT , false , new DefaultConsumer(channel){
            @Override
            public void handleDelivery(String consumerTag, Envelope envelope, AMQP.BasicProperties properties, byte[] body) throws IOException {
                String jsonSMS = new String(body);
                System.out.println("ConsumerOne-发送成功:" + jsonSMS);
                try {
                    Thread.sleep(10);
                } catch (Exception e) {
                    e.printStackTrace();
                }
                //确认签收
                channel.basicAck(envelope.getDeliveryTag() , false);
            }
        });
    }

}
消费者二:
import com.liao.rabbitmq.utils.RabbitConstant;
import com.liao.rabbitmq.utils.RabbitUtils;
import com.rabbitmq.client.*;
import java.io.IOException;

/**
 * 消费者2
 */
public class ConsumerTwo {

    public static void main(String[] args) throws IOException {
        Connection connection = RabbitUtils.getConnection();
        final Channel channel = connection.createChannel();
        channel.queueDeclare(RabbitConstant.QUEUE_SENDER_CONTENT, false, false, false, null);
        //如果不写basicQos(1),则自动MQ会将所有请求平均发送给所有消费者
        //basicQos,MQ不再对消费者一次发送多个请求,而是消费者处理完一个消息后(确认后),在从队列中获取一个新的
        channel.basicQos(1);//处理完一个取一个
        channel.basicConsume(RabbitConstant.QUEUE_SENDER_CONTENT , false , new DefaultConsumer(channel){
            @Override
            public void handleDelivery(String consumerTag, Envelope envelope, AMQP.BasicProperties properties, byte[] body) throws IOException {
                String jsonSMS = new String(body);
                System.out.println("ConsumerTwo-发送成功:" + jsonSMS);
                try {
                    Thread.sleep(100);
                } catch (InterruptedException e) {
                    e.printStackTrace();
                }
                //确认签收
                channel.basicAck(envelope.getDeliveryTag() , false);
            }
        });
    }
}
消费者三:
import com.liao.rabbitmq.utils.RabbitConstant;
import com.liao.rabbitmq.utils.RabbitUtils;
import com.rabbitmq.client.*;
import java.io.IOException;

/**
 * 消费者3
 */
public class ConsumerThree {


    public static void main(String[] args) throws IOException {
        Connection connection = RabbitUtils.getConnection();
        final Channel channel = connection.createChannel();
        channel.queueDeclare(RabbitConstant.QUEUE_SENDER_CONTENT, false, false, false, null);
        //如果不写basicQos(1),则自动MQ会将所有请求平均发送给所有消费者
        //basicQos,MQ不再对消费者一次发送多个请求,而是消费者处理完一个消息后(确认后),在从队列中获取一个新的
        channel.basicQos(1);//处理完一个取一个
        channel.basicConsume(RabbitConstant.QUEUE_SENDER_CONTENT , false , new DefaultConsumer(channel){
            @Override
            public void handleDelivery(String consumerTag, Envelope envelope, AMQP.BasicProperties properties, byte[] body) throws IOException {
                String jsonSMS = new String(body);
                System.out.println("ConsumerThree-发送成功:" + jsonSMS);
                try {
                    Thread.sleep(500);
                } catch (InterruptedException e) {
                    e.printStackTrace();
                }
                //确认签收
                channel.basicAck(envelope.getDeliveryTag() , false);
            }
        });
    }
}
这里对每个消费者设置不同的休眠时间演示每个消费者处理业务的时间不同,查看消息消费的情况
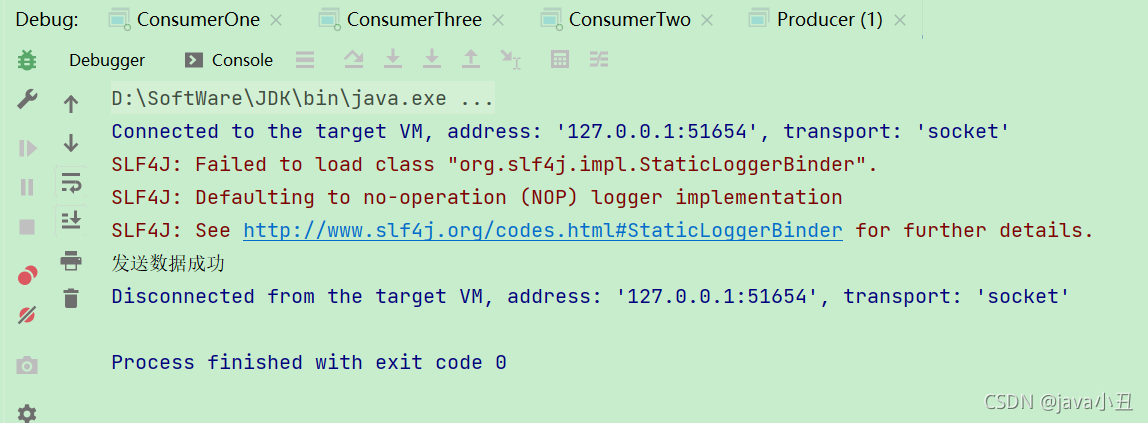
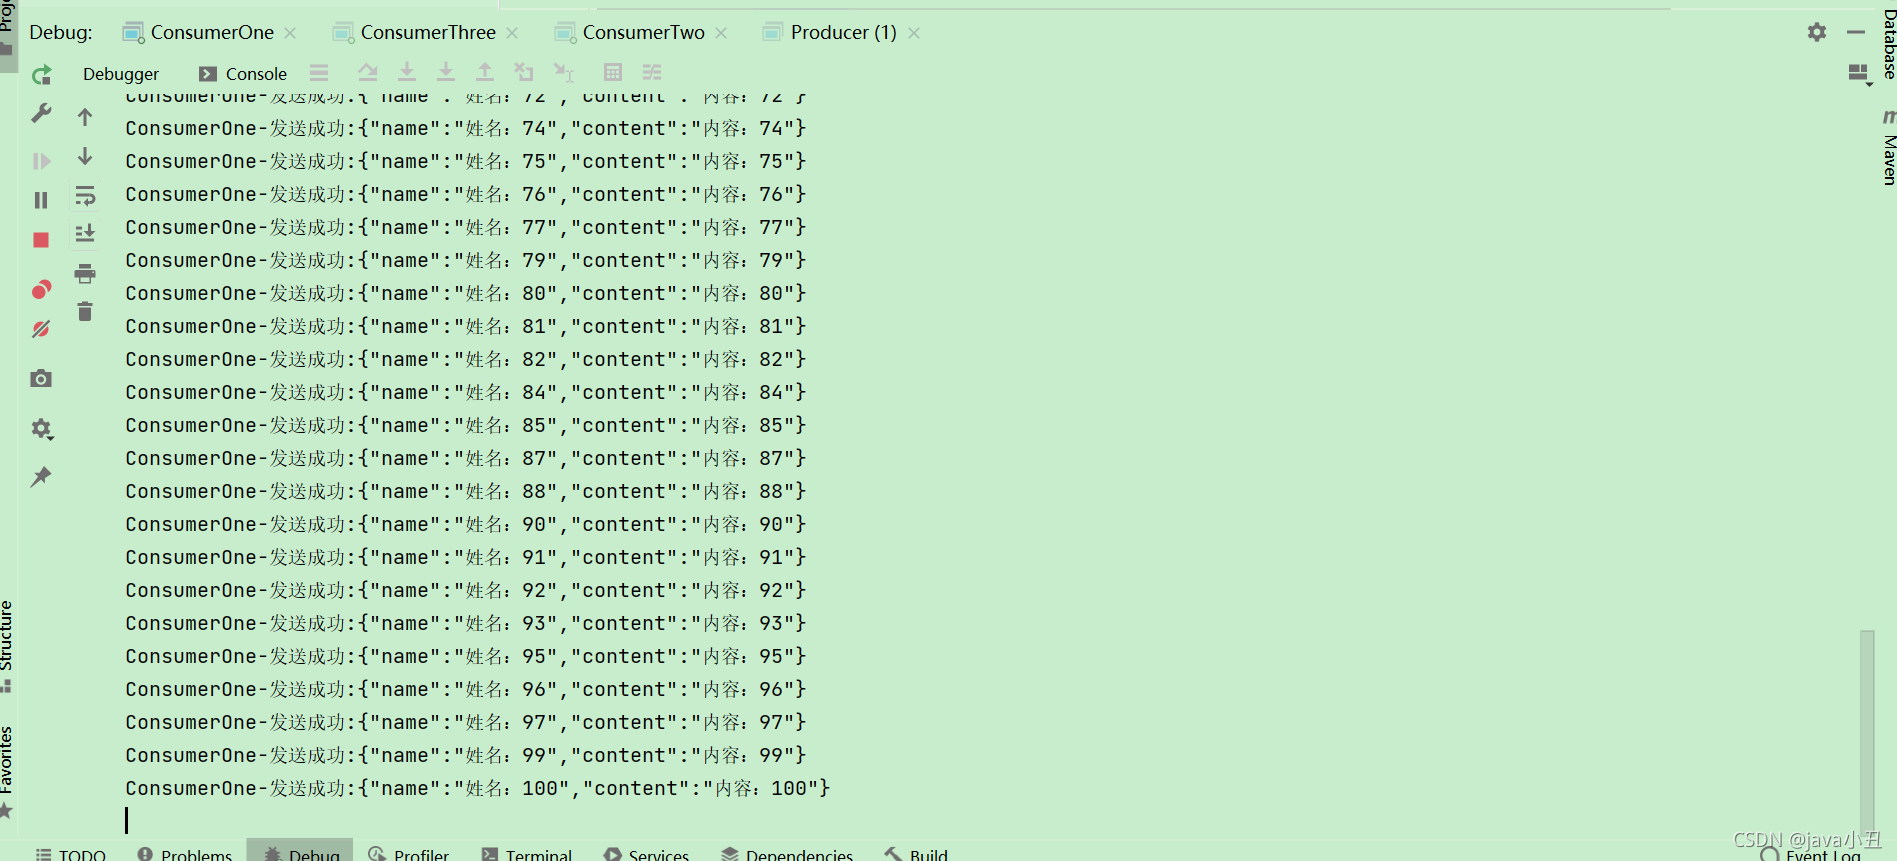
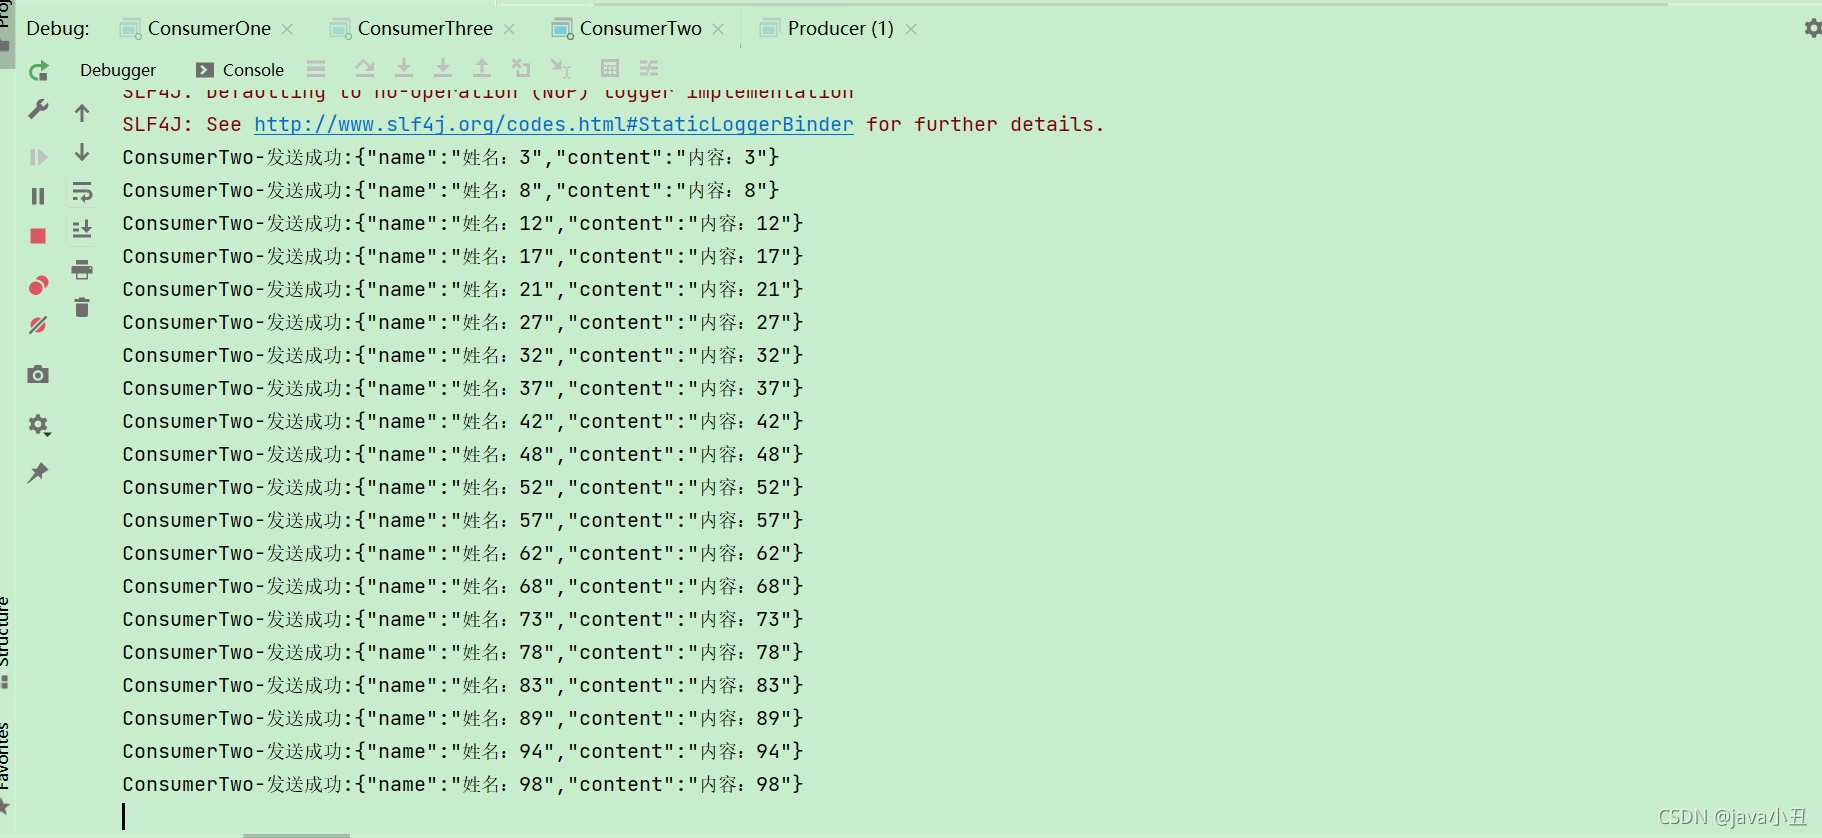
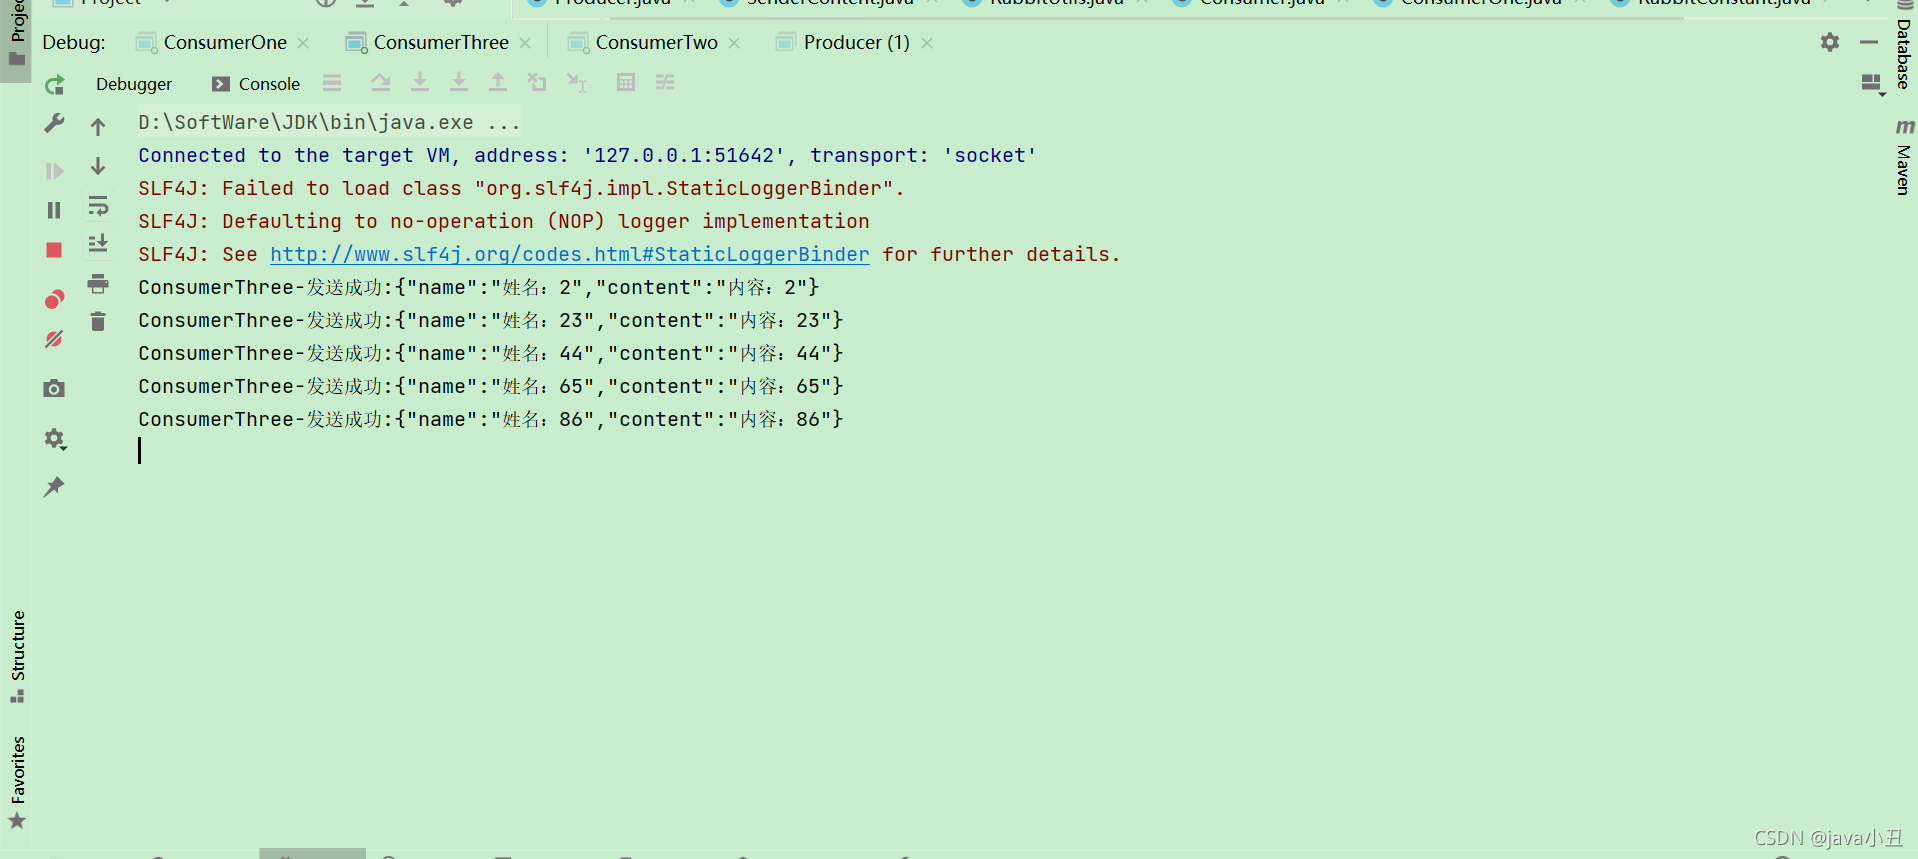
可以看出消费者一消费的最多,消费者三消费的最少,因为代码中设置了这个
channel.basicQos(1);//处理完一个取一个
消费者处理完一个消息后(确认后),在从队列中获取一个新的。
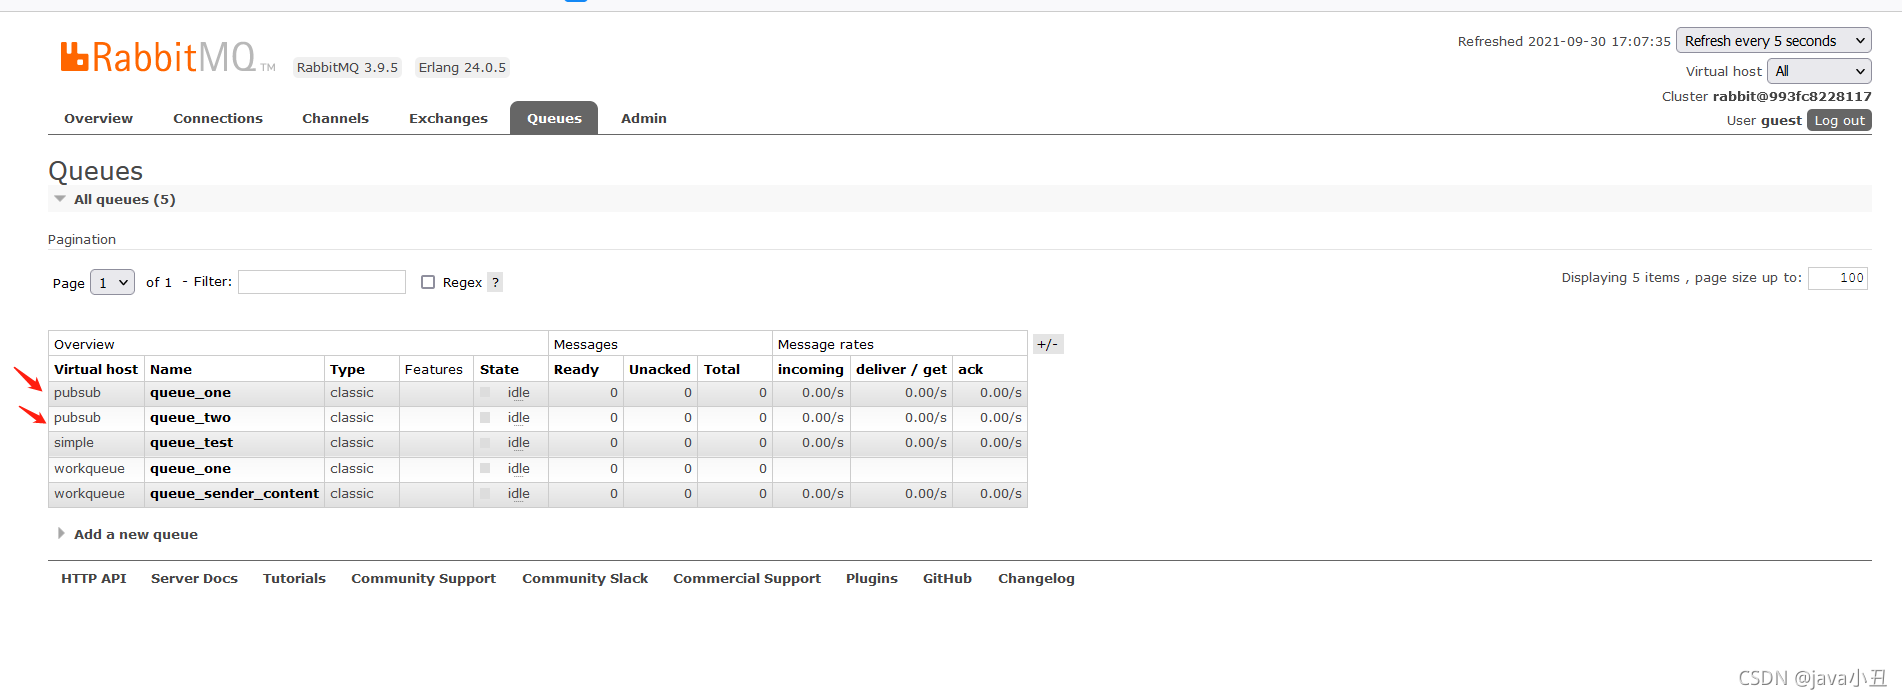
Pub/Sub 订阅模式 :
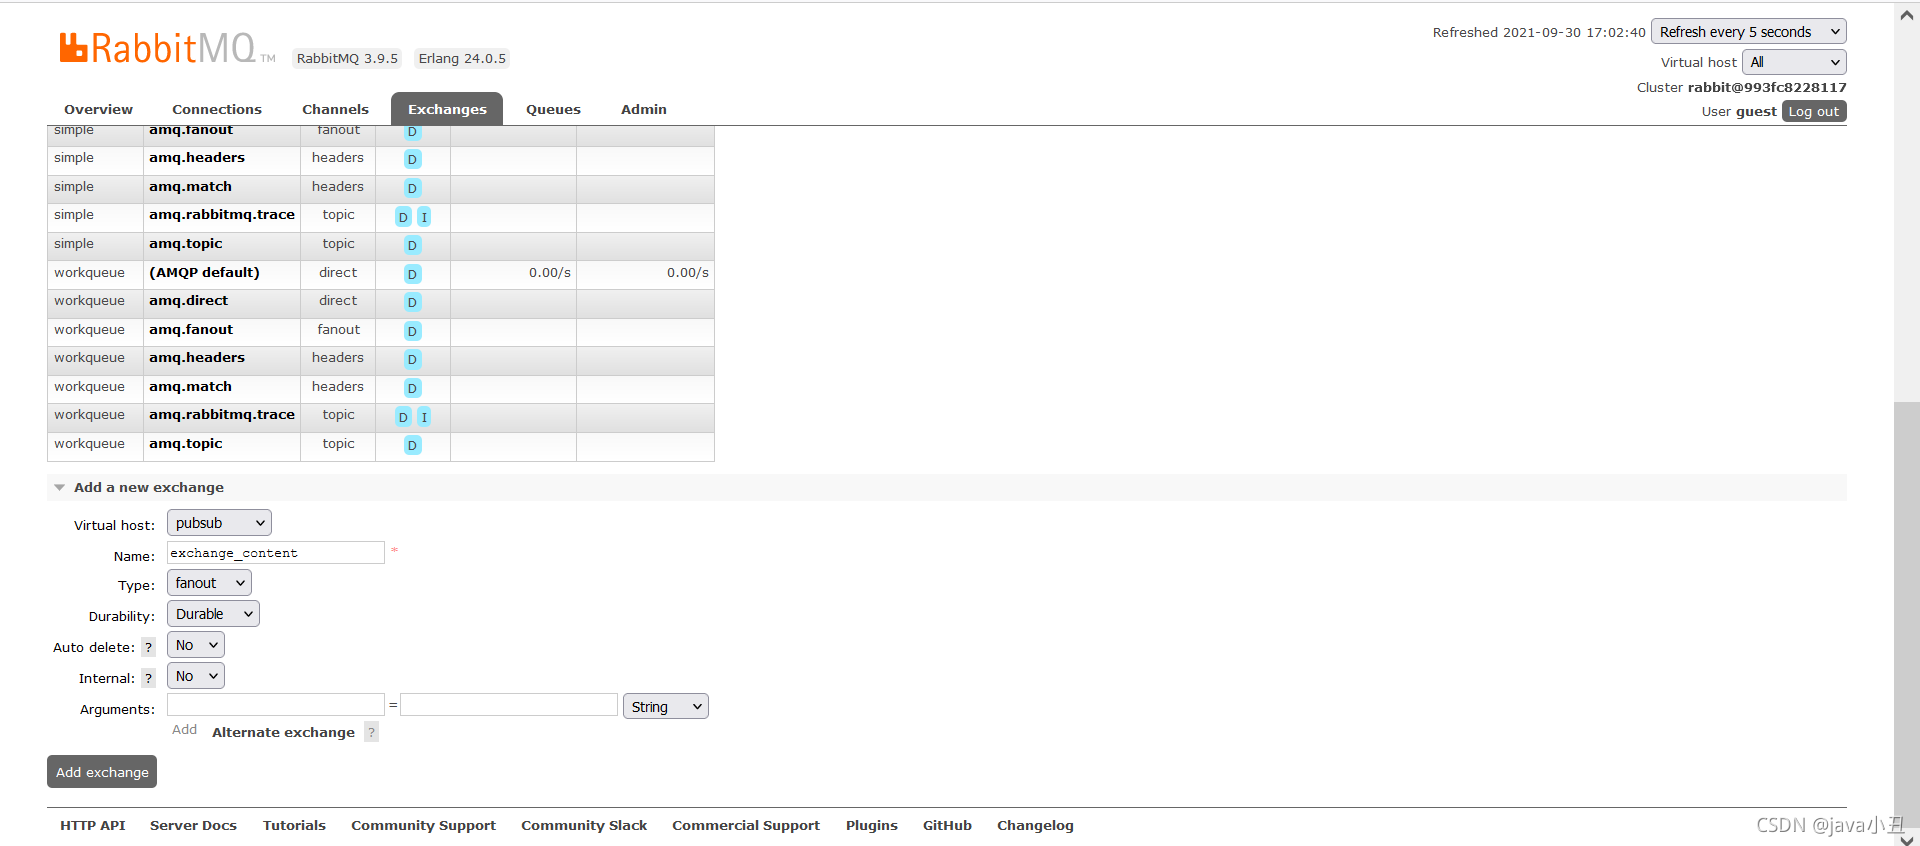
为了区分好理解,我每个模式都去创建一个虚拟机,这里我先去rabbitMq管控页面创建一个虚拟机
 创建一个交换机:这里用广播模式作为交换机的类型用来演示
修改工具类的虚拟机

生产者:
import com.liao.rabbitmq.utils.RabbitConstant;
import com.liao.rabbitmq.utils.RabbitUtils;
import com.rabbitmq.client.Channel;
import com.rabbitmq.client.Connection;
import java.util.Scanner;

/**
 * 发布者
 */
public class Producer {

    public static void main(String[] args) throws Exception {
        Connection connection = RabbitUtils.getConnection();
        //键盘输入
        String input = new Scanner(System.in).next();
        Channel channel = connection.createChannel();
        //第一个参数交换机名字   其他参数和之前的一样
        channel.basicPublish(RabbitConstant.EXCHANGE_CONTENT,"" , null , input.getBytes());
        channel.close();
        connection.close();
    }
}
消费者一:
import com.liao.rabbitmq.utils.RabbitConstant;
import com.liao.rabbitmq.utils.RabbitUtils;
import com.rabbitmq.client.*;
import java.io.IOException;
/**
* 消费者1
*/
public class ConsumerOne {
public static void main(String[] args) throws IOException {
//获取TCP长连接
Connection connection = RabbitUtils.getConnection();
//获取虚拟连接
final Channel channel = connection.createChannel();
//声明队列信息
channel.queueDeclare(RabbitConstant.QUEUE_ONE, false, false, false, null);
//queueBind用于将队列与交换机绑定
//参数1:队列名 参数2:交互机名 参数三:路由key(暂时用不到)
channel.queueBind(RabbitConstant.QUEUE_ONE, RabbitConstant.EXCHANGE_CONTENT, "");
channel.basicQos(1);
channel.basicConsume(RabbitConstant.QUEUE_ONE , false , new DefaultConsumer(channel){
@Override
public void handleDelivery(String consumerTag, Envelope envelope, AMQP.BasicProperties properties, byte[] body) throws IOException {
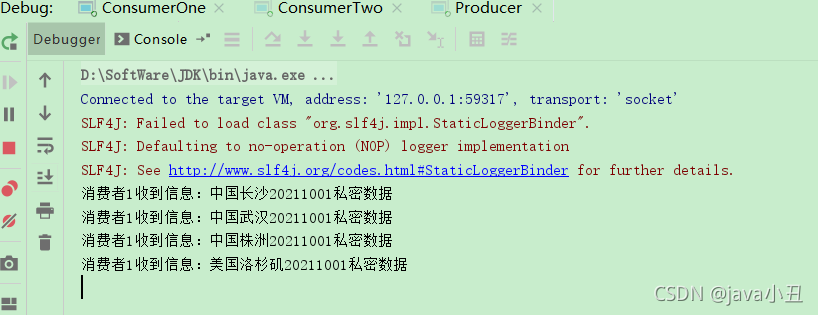
System.out.println("消费者一收到信息:" + new String(body));
channel.basicAck(envelope.getDeliveryTag() , false);
}
});
}
}
消费者二:
import com.liao.rabbitmq.utils.RabbitConstant;
import com.liao.rabbitmq.utils.RabbitUtils;
import com.rabbitmq.client.*;
import java.io.IOException;
/**
* 消费者2
*/
public class ConsumerTwo {
public static void main(String[] args) throws IOException {
//获取TCP长连接
Connection connection = RabbitUtils.getConnection();
//获取虚拟连接
final Channel channel = connection.createChannel();
//声明队列信息
channel.queueDeclare(RabbitConstant.QUEUE_TWO, false, false, false, null);
//queueBind用于将队列与交换机绑定
//参数1:队列名 参数2:交互机名 参数三:路由key(暂时用不到)
channel.queueBind(RabbitConstant.QUEUE_TWO, RabbitConstant.EXCHANGE_CONTENT, "");
channel.basicQos(1);
channel.basicConsume(RabbitConstant.QUEUE_TWO , false , new DefaultConsumer(channel){
@Override
public void handleDelivery(String consumerTag, Envelope envelope, AMQP.BasicProperties properties, byte[] body) throws IOException {
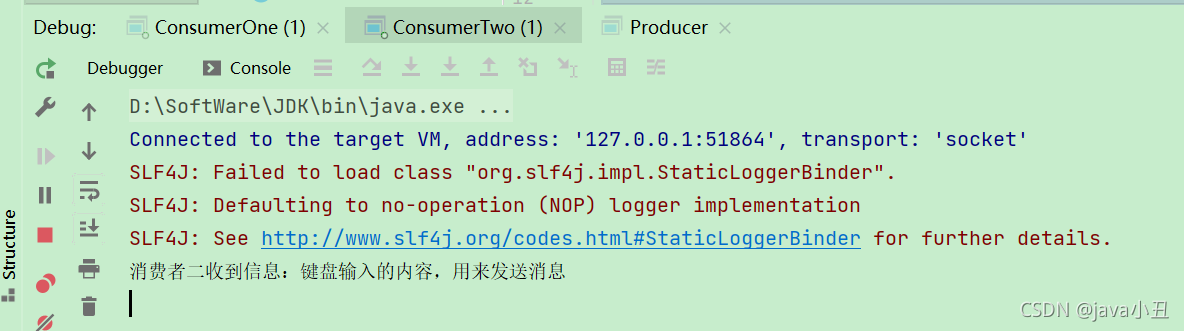
System.out.println("消费者二收到信息:" + new String(body));
channel.basicAck(envelope.getDeliveryTag() , false);
}
});
}
}
演示效果:

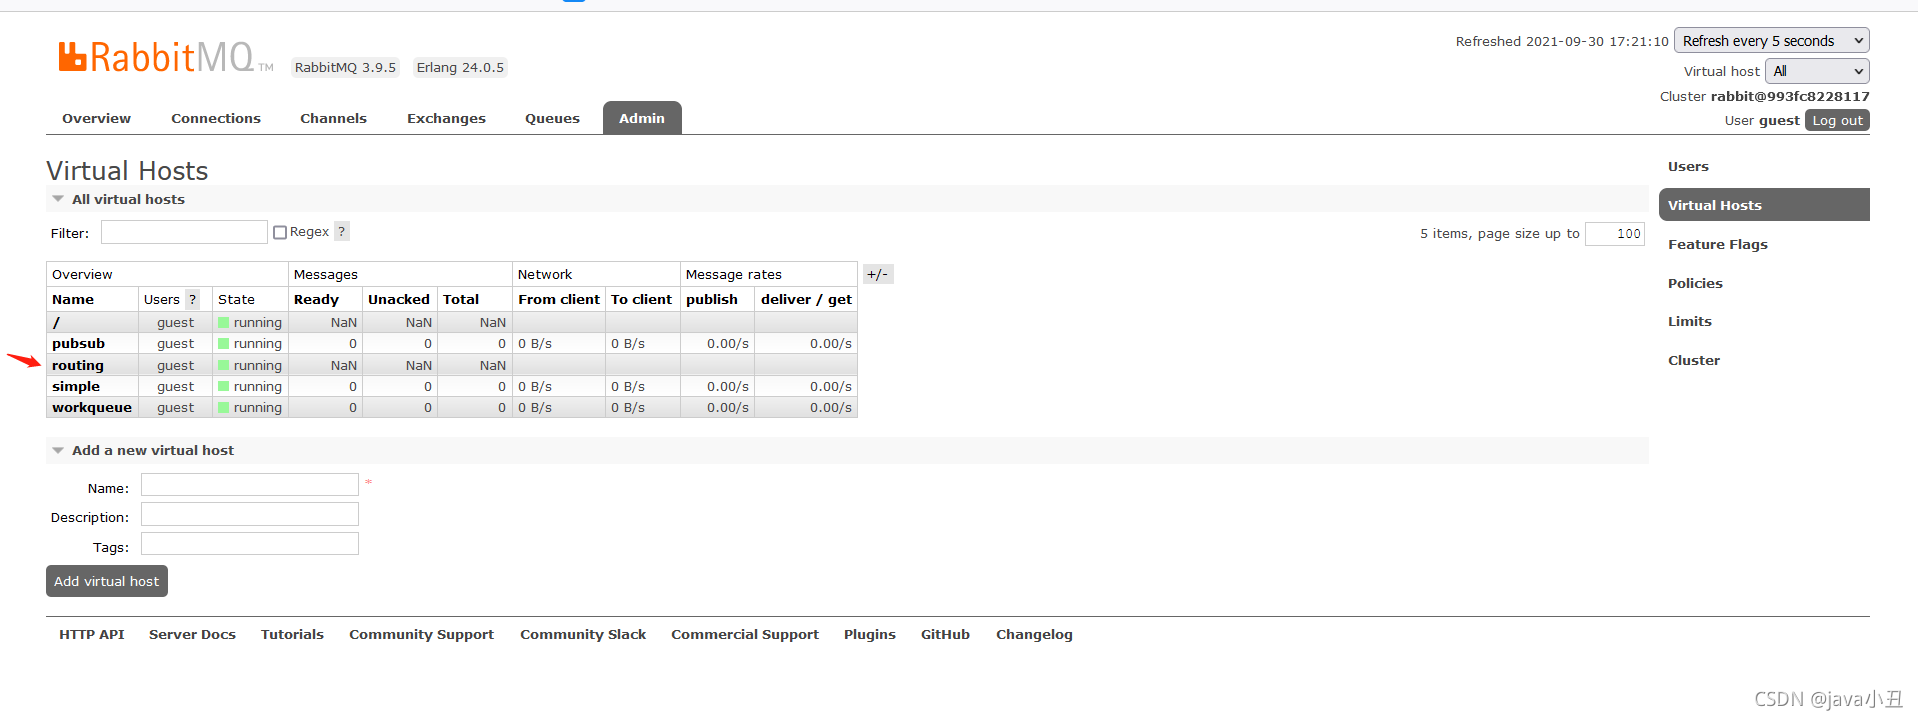
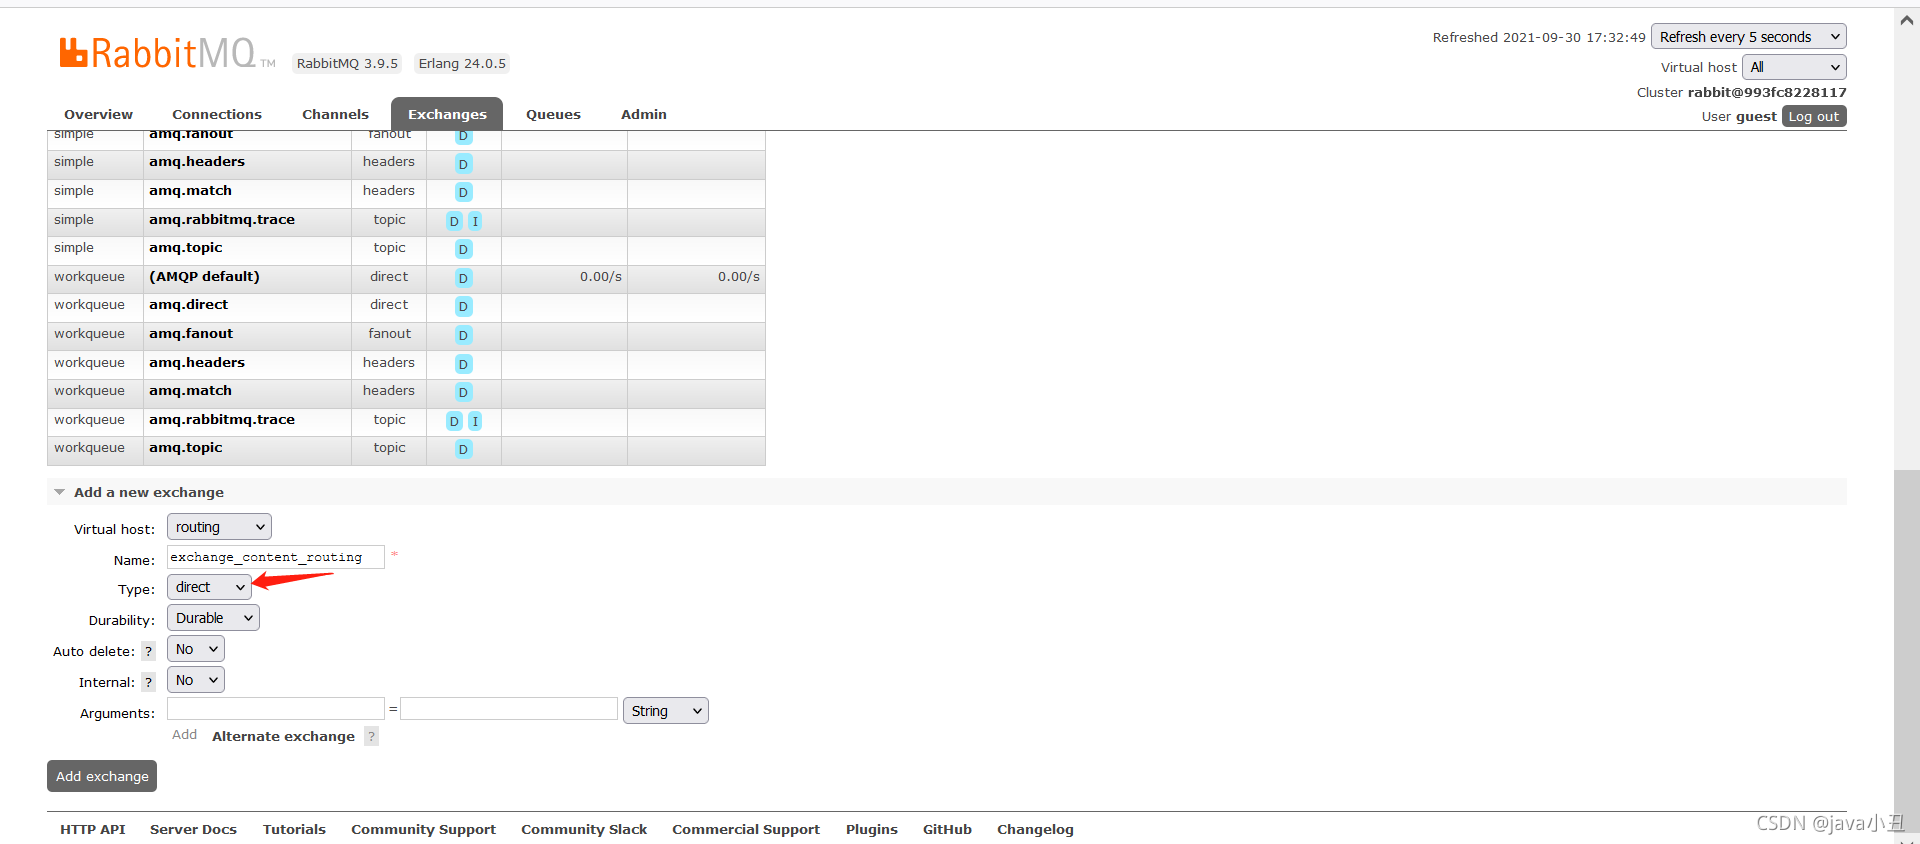
Routing 路由模式:
为了区分好理解,我每个模式都去创建一个虚拟机,这里我先去rabbitMq管控页面创建一个虚拟机
 修改工具类的虚拟机

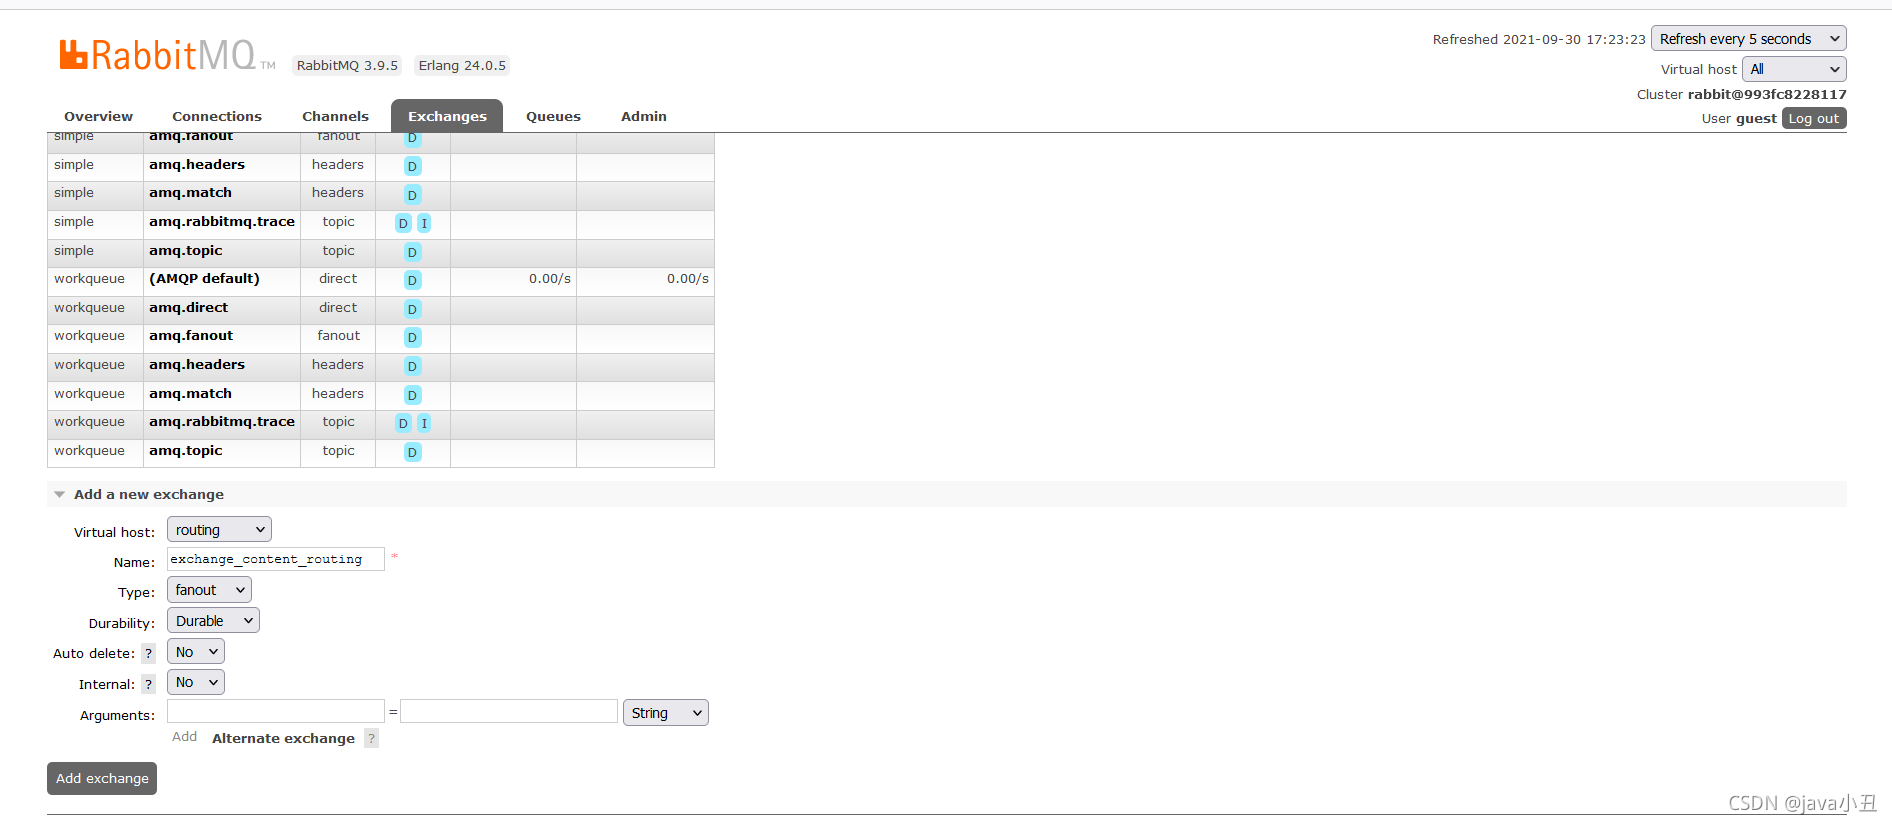
创建交换机:这里的交换机type类型一定要改成routing模式,如果还是广播模式的fanout的话,跟上面发布和订阅模式出现的效果会是一样的。
错误实例:
 正确的实例:
 生产者:
生产者:
import com.liao.rabbitmq.utils.RabbitConstant;
import com.liao.rabbitmq.utils.RabbitUtils;
import com.rabbitmq.client.Channel;
import com.rabbitmq.client.Connection;
import java.util.Iterator;
import java.util.LinkedHashMap;
import java.util.Map;

/**
 * 发布者
 */
public class Producer {

    public static void main(String[] args) throws Exception {
        Map area = new LinkedHashMap<String, String>();
        area.put("routing.one.a.20201127", "中国湖南长沙20201127私密数据");
        area.put("routing.one.d.20201128", "中国河北石家庄20201128私密数据");
        area.put("routing.two.b.20201127", "中国湖北武汉20201127私密数据");
        area.put("routing.two.e.20201128", "中国湖北武汉20201128私密数据");
        area.put("routing.three.c.20201127", "中国湖南株洲20201128私密数据");
        area.put("routing.three.f.20201128", "中国河南郑州20201128私密数据");
        area.put("us.one.a.20201127", "美国加州洛杉矶20201127私密数据");
        area.put("us.two.b.20201128", "美国加州洛杉矶20201128私密数据");
        Connection connection = RabbitUtils.getConnection();
        Channel channel = connection.createChannel();
        Iterator<Map.Entry<String, String>> itr = area.entrySet().iterator();
        while (itr.hasNext()) {
            Map.Entry<String, String> me = itr.next();
            //第一个参数交换机名字   第二个参数作为 消息的routing key
            channel.basicPublish(RabbitConstant.EXCHANGE_CONTENT_ROUTING,me.getKey() , null , me.getValue().getBytes());
        }
        channel.close();
        connection.close();
    }
}
消费者一:
import com.liao.rabbitmq.utils.RabbitConstant;
import com.liao.rabbitmq.utils.RabbitUtils;
import com.rabbitmq.client.*;
import java.io.IOException;

/**
 * 消费者1
 */
public class ConsumerOne {

    public static void main(String[] args) throws IOException {
        Connection connection = RabbitUtils.getConnection();
        final Channel channel = connection.createChannel();
        channel.queueDeclare(RabbitConstant.QUEUE_ONE, false, false, false, null);
        //queueBind用于将队列与交换机绑定
        //参数1:队列名 参数2:交互机名  参数三:路由key
        channel.queueBind(RabbitConstant.QUEUE_ONE, RabbitConstant.EXCHANGE_CONTENT_ROUTING, "routing.one.a.20201127");
        channel.queueBind(RabbitConstant.QUEUE_ONE, RabbitConstant.EXCHANGE_CONTENT_ROUTING, "us.one.a.20201127");
        channel.basicQos(1);
        channel.basicConsume(RabbitConstant.QUEUE_ONE , false , new DefaultConsumer(channel){
            @Override
            public void handleDelivery(String consumerTag, Envelope envelope, AMQP.BasicProperties properties, byte[] body) throws IOException {
                System.out.println("消费者1收到信息:" + new String(body));
                channel.basicAck(envelope.getDeliveryTag() , false);
            }
        });

    }

}
消费者二:
import com.liao.rabbitmq.utils.RabbitConstant;
import com.liao.rabbitmq.utils.RabbitUtils;
import com.rabbitmq.client.*;
import java.io.IOException;

/**
 * 消费者2
 */
public class ConsumerTwo {

    public static void main(String[] args) throws IOException {
        Connection connection = RabbitUtils.getConnection();
        final Channel channel = connection.createChannel();
        channel.queueDeclare(RabbitConstant.QUEUE_TWO, false, false, false, null);
        //queueBind用于将队列与交换机绑定
        //参数1:队列名 参数2:交互机名  参数三:路由key
        channel.queueBind(RabbitConstant.QUEUE_TWO, RabbitConstant.EXCHANGE_CONTENT_ROUTING, "routing.one.d.20201128");
        channel.queueBind(RabbitConstant.QUEUE_TWO, RabbitConstant.EXCHANGE_CONTENT_ROUTING, "routing.two.e.20201128");
        channel.basicQos(1);
        channel.basicConsume(RabbitConstant.QUEUE_TWO , false , new DefaultConsumer(channel){
            @Override
            public void handleDelivery(String consumerTag, Envelope envelope, AMQP.BasicProperties properties, byte[] body) throws IOException {
                System.out.println("消费者2收到信息:" + new String(body));
                channel.basicAck(envelope.getDeliveryTag() , false);
            }
        });

    }

}
效果:
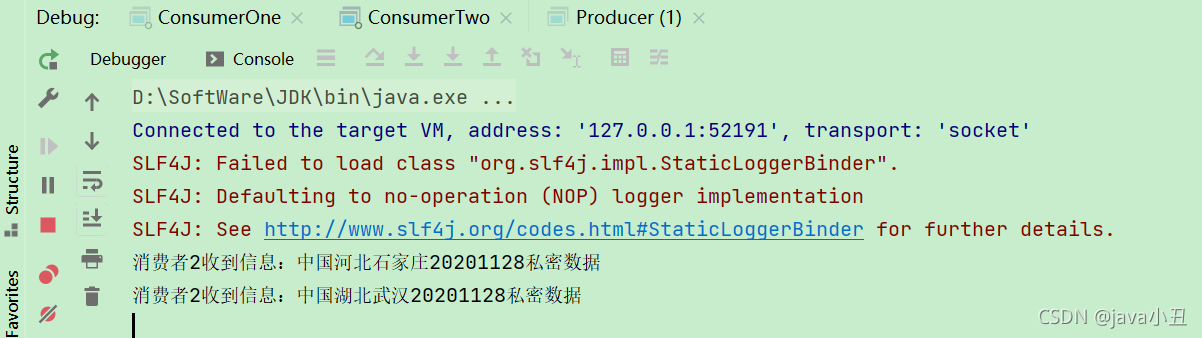
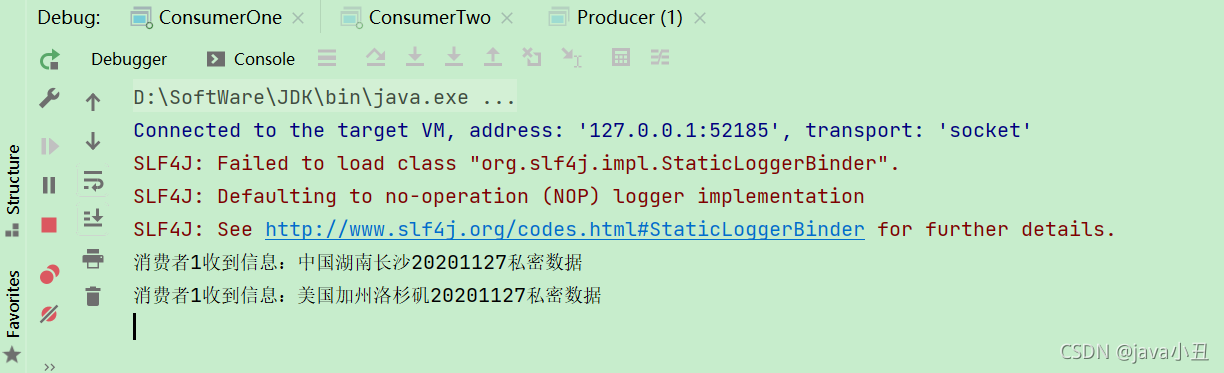
 路由模式需要消费者指定路由key
Topics 通配符模式:
为了区分好理解,我每个模式都去创建一个虚拟机,这里我先去rabbitMq管控页面创建一个虚拟机
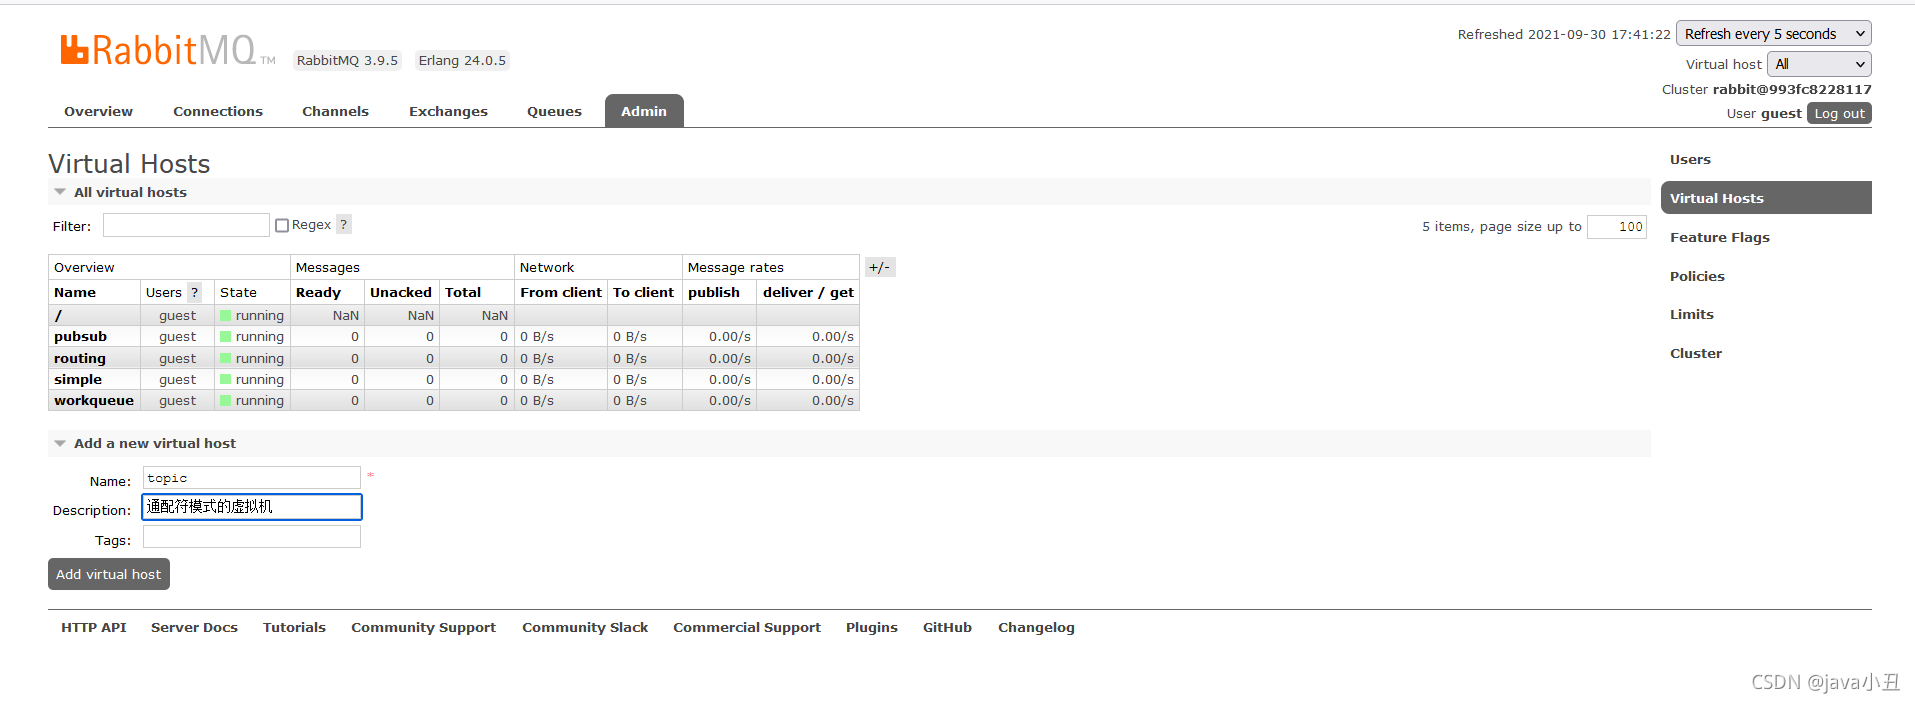 修改工具类的虚拟机

创建交互机,类型为topic
 生产者:
生产者:
import com.liao.rabbitmq.utils.RabbitConstant;
import com.liao.rabbitmq.utils.RabbitUtils;
import com.rabbitmq.client.Channel;
import com.rabbitmq.client.Connection;
import java.util.Iterator;
import java.util.LinkedHashMap;
import java.util.Map;

/**
 * 发布者
 */
public class Producer {

    public static void main(String[] args) throws Exception {
        Map area = new LinkedHashMap<String, String>();
        area.put("routing.one.a.20201127", "中国湖南长沙20201127私密数据");
        area.put("routing.one.d.20201128", "中国河北石家庄20201128私密数据");
        area.put("routing.two.b.20201127", "中国湖北武汉20201127私密数据");
        area.put("routing.two.e.20201128", "中国湖北武汉20201128私密数据");
        area.put("routing.three.c.20201127", "中国湖南株洲20201128私密数据");
        area.put("routing.three.f.20201128", "中国河南郑州20201128私密数据");
        area.put("us.one.a.20201127", "美国加州洛杉矶20201127私密数据");
        area.put("us.two.b.20201128", "美国加州洛杉矶20201128私密数据");
        Connection connection = RabbitUtils.getConnection();
        Channel channel = connection.createChannel();
        Iterator<Map.Entry<String, String>> itr = area.entrySet().iterator();
        while (itr.hasNext()) {
            Map.Entry<String, String> me = itr.next();
            //第一个参数交换机名字   第二个参数作为 消息的routing key
            channel.basicPublish(RabbitConstant.EXCHANGE_CONTENT_TOPIC,me.getKey() , null , me.getValue().getBytes());
        }
        channel.close();
        connection.close();
    }
}
消费者一:
import com.liao.rabbitmq.utils.RabbitConstant;
import com.liao.rabbitmq.utils.RabbitUtils;
import com.rabbitmq.client.*;
import java.io.IOException;
/**
* 消费者1
*/
public class ConsumerOne {
public static void main(String[] args) throws IOException {
Connection connection = RabbitUtils.getConnection();
final Channel channel = connection.createChannel();
channel.queueDeclare(RabbitConstant.QUEUE_ONE, false, false, false, null);
//queueBind用于将队列与交换机绑定
//参数1:队列名 参数2:交互机名 参数三:路由key
channel.queueBind(RabbitConstant.QUEUE_ONE, RabbitConstant.EXCHANGE_CONTENT_TOPIC, "*.*.*.20201127");
// channel.queueBind(RabbitConstant.QUEUE_ONE, RabbitConstant.EXCHANGE_CONTENT_TOPIC, "us.two.b.20201128");
channel.basicQos(1);
channel.basicConsume(RabbitConstant.QUEUE_ONE , false , new DefaultConsumer(channel){
@Override
public void handleDelivery(String consumerTag, Envelope envelope, AMQP.BasicProperties properties, byte[] body) throws IOException {
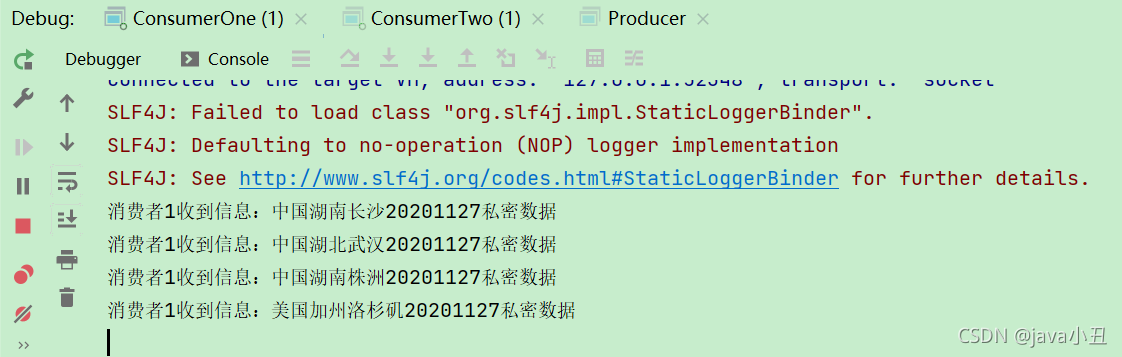
System.out.println("消费者1收到信息:" + new String(body));
channel.basicAck(envelope.getDeliveryTag() , false);
}
});
}
}
消费者二:
import com.liao.rabbitmq.utils.RabbitConstant;
import com.liao.rabbitmq.utils.RabbitUtils;
import com.rabbitmq.client.*;
import java.io.IOException;
/**
* 消费者2
*/
public class ConsumerTwo {
public static void main(String[] args) throws IOException {
//获取TCP长连接
Connection connection = RabbitUtils.getConnection();
//获取虚拟连接
final Channel channel = connection.createChannel();
//声明队列信息
channel.queueDeclare(RabbitConstant.QUEUE_TWO, false, false, false, null);
//指定队列与交换机以及routing key之间的关系
channel.queueBind(RabbitConstant.QUEUE_TWO, RabbitConstant.EXCHANGE_CONTENT_TOPIC, "us.#");
channel.basicQos(1);
channel.basicConsume(RabbitConstant.QUEUE_TWO , false , new DefaultConsumer(channel){
@Override
public void handleDelivery(String consumerTag, Envelope envelope, AMQP.BasicProperties properties, byte[] body) throws IOException {
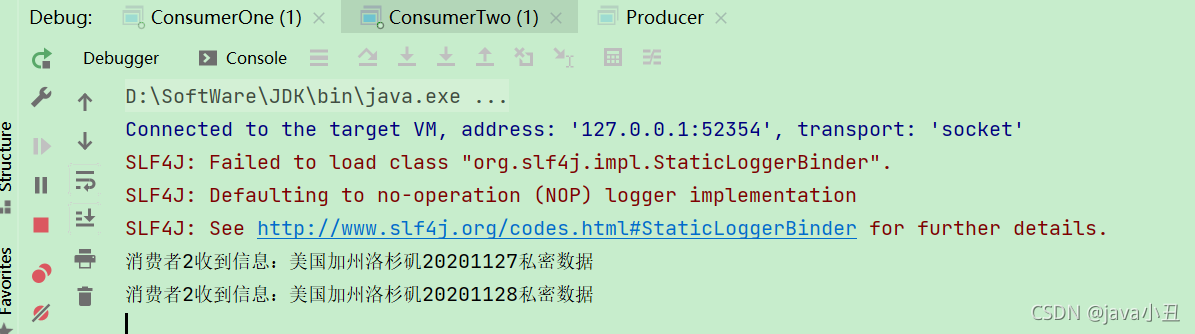
System.out.println("消费者2收到信息:" + new String(body));
channel.basicAck(envelope.getDeliveryTag() , false);
}
});
}
}
效果:
说明:如果想切换模式进行测试,只需要修改工具类中的虚拟机即可。前面的命名都是一样的,就是为了在这个时候体现出每个虚拟机都是隔离的,所以那么key是一样的也没关系。
三、消息确认机制:confirm状态和return状态
一、理论
confirm状态:表示生产者将消息投递到Broker时产生的状态,会出现二种情况:
- ack:表示已经被Broker签收
- nack:表示表示已经被Broker拒收,原因可能有队列满了,限流,IO异常…
return状态:表示生产者将消息投递到Broker,被Broker签收,但是没有对应的队列进行投递,将消息回退给生产者的状态。
说明:这二种状态都只和生产者有关,于消费者没关系。
二、代码
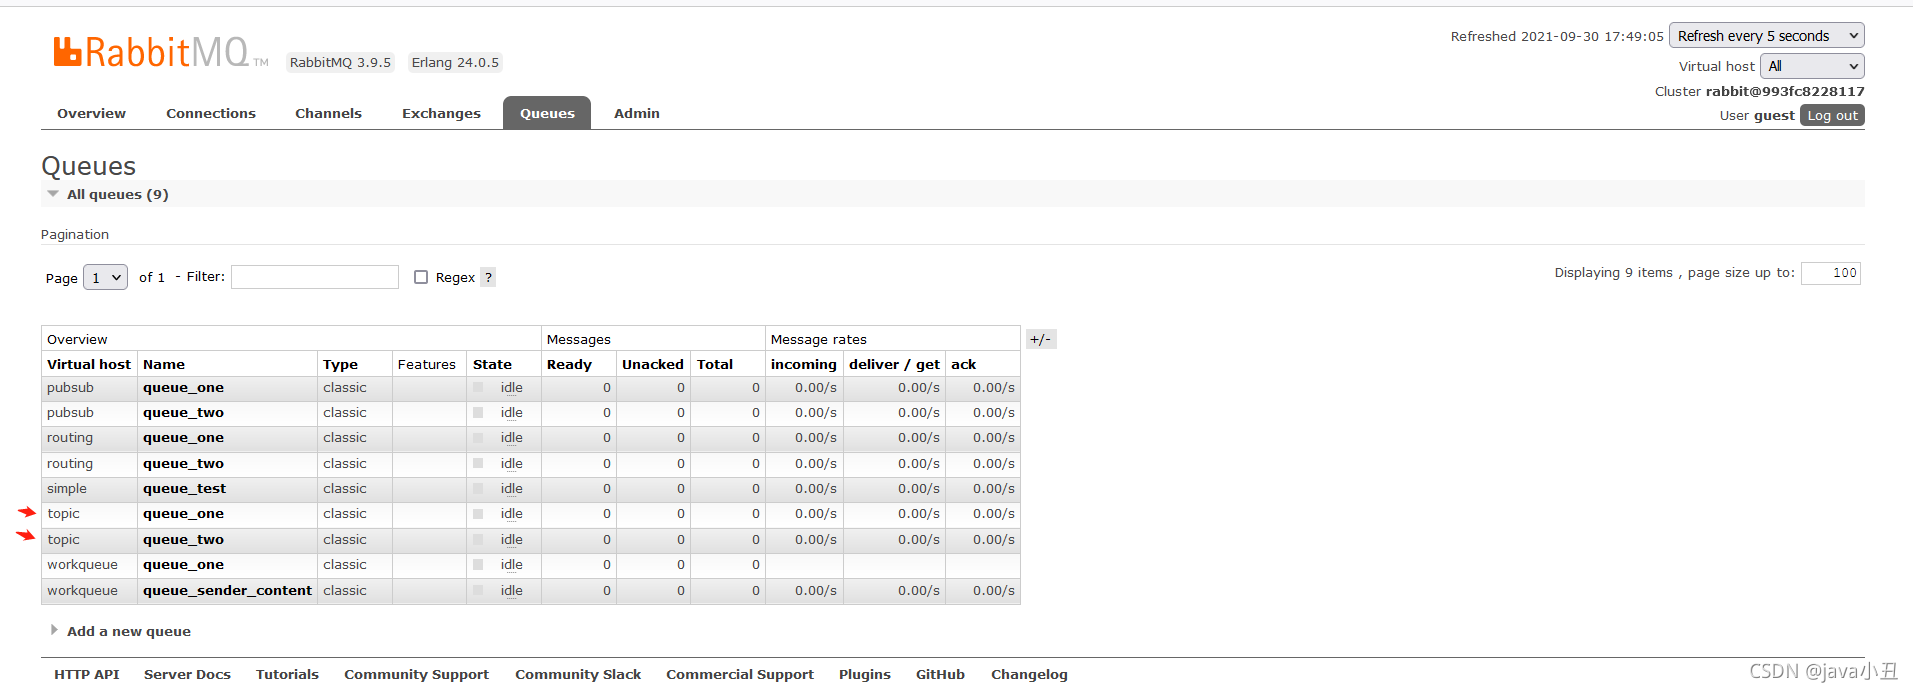
沿用之前的topic虚拟机,就不在创建新的虚拟机了
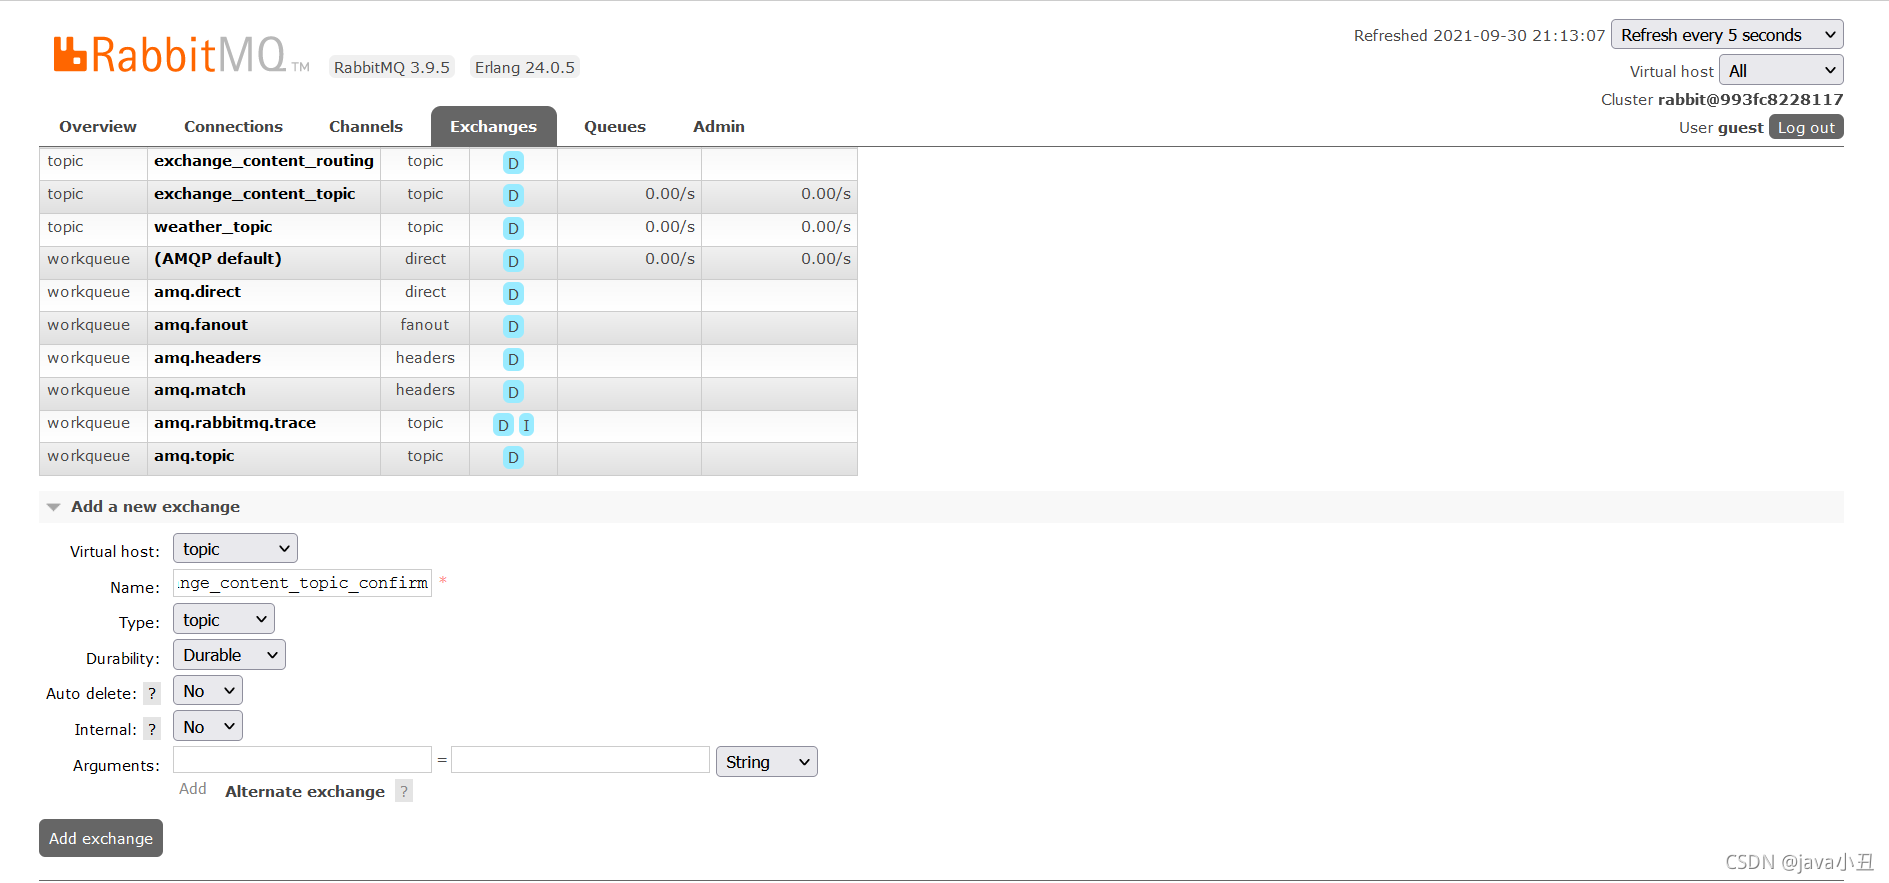
创建一个交换机:
 生产者:
生产者:
package com.liao.rabbitmq.confirm;

import com.liao.rabbitmq.utils.RabbitConstant;
import com.liao.rabbitmq.utils.RabbitUtils;
import com.rabbitmq.client.*;
import java.io.IOException;
import java.util.Iterator;
import java.util.LinkedHashMap;
import java.util.Map;

/**
 * 发布者
 */
public class Producer {

    public static void main(String[] args) throws Exception {
        Map area = new LinkedHashMap<String, String>();
        area.put("routing.one.a.20211001", "中国长沙20211001私密数据");
        area.put("routing.two.b.20211001", "中国武汉20211001私密数据");
        area.put("routing.three.c.20211001", "中国株洲20211001私密数据");
        area.put("routing.one.d.20211002", "中国石家庄20211002私密数据");
        area.put("routing.two.e.20211002", "中国武汉20211002私密数据");
        area.put("routing.three.f.20211002", "中国郑州20211002私密数据");
        area.put("routing.error.f.aaa", "未成功投递的私密数据");
        area.put("us.one.a.20211001", "美国洛杉矶20211001私密数据");
        area.put("us.two.b.20211002", "美国洛杉矶20211002私密数据");
        Connection connection = RabbitUtils.getConnection();
        Channel channel = connection.createChannel();
        //开启confirm监听模式
        channel.confirmSelect();
        channel.addConfirmListener(new ConfirmListener() {
            public void handleAck(long l, boolean b) throws IOException {
                //第二个参数代表接收的数据是否为批量接收,一般我们用不到。
                System.out.println("消息已被Broker接收,Tag:" + l );
            }

            public void handleNack(long l, boolean b) throws IOException {
                System.out.println("消息已被Broker拒收,Tag:" + l);
            }
        });
        channel.addReturnListener(new ReturnCallback() {
            public void handle(Return r) {
                System.err.println("===========================");
                System.err.println("Return编码:" + r.getReplyCode() + "-Return描述:" + r.getReplyText());
                System.err.println("交换机:" + r.getExchange() + "-路由key:" + r.getRoutingKey() );
                System.err.println("Return主题:" + new String(r.getBody()));
                System.err.println("===========================");
            }
        });
        Iterator<Map.Entry<String, String>> itr = area.entrySet().iterator();
        while (itr.hasNext()) {
            Map.Entry<String, String> me = itr.next();
            //Routing key 第二个参数相当于数据筛选的条件
            //第三个参数为:mandatory true代表如果消息无法正常投递则return回生产者,如果false,则直接将消息放弃。
            channel.basicPublish(RabbitConstant.EXCHANGE_CONTENT_TOPIC_CONFIRM,me.getKey() ,true, null , me.getValue().getBytes());
        }
        //如果关闭则无法进行监听,因此此处不需要关闭
        /*channel.close();
        connection.close();*/
    }
}
消费者一:
import com.liao.rabbitmq.utils.RabbitConstant;
import com.liao.rabbitmq.utils.RabbitUtils;
import com.rabbitmq.client.*;
import java.io.IOException;

/**
 * 消费者1
 */
public class ConsumerOne {

    public static void main(String[] args) throws IOException {
        Connection connection = RabbitUtils.getConnection();
        final Channel channel = connection.createChannel();
        channel.queueDeclare(RabbitConstant.QUEUE_ONE, false, false, false, null);
        //queueBind用于将队列与交换机绑定
        //参数1:队列名 参数2:交互机名  参数三:路由key
        channel.queueBind(RabbitConstant.QUEUE_ONE, RabbitConstant.EXCHANGE_CONTENT_TOPIC_CONFIRM, "*.*.*.20211001");
        channel.basicQos(1);
        channel.basicConsume(RabbitConstant.QUEUE_ONE , false , new DefaultConsumer(channel){
            @Override
            public void handleDelivery(String consumerTag, Envelope envelope, AMQP.BasicProperties properties, byte[] body) throws IOException {
                System.out.println("消费者1收到信息:" + new String(body));
                //channel.basicNack的三个参数
                //第一个参数:long deliveryTag:唯一标识 ID。
                //第二个参数:boolean multiple:是否批处理,当该参数为 true 时,则可以一次性确认 delivery_tag 小于等于传入值的所有消息。
                //第三个参数:boolean requeue:如果 requeue 参数设置为 true,则 RabbitMQ 会重新将这条消息存入队列,以便发送给下一个订阅的消费者; 如果 requeue 参数设置为 false,则 RabbitMQ 立即会还把消息从队列中移除,而不会把它发送给新的消费者。
//                channel.basicNack(envelope.getDeliveryTag() , false,false);
                channel.basicAck(envelope.getDeliveryTag() , false);
            }
        });
    }
}
消费者二:
import com.liao.rabbitmq.utils.RabbitConstant;
import com.liao.rabbitmq.utils.RabbitUtils;
import com.rabbitmq.client.*;
import java.io.IOException;

/**
 * 消费者2
 */
public class ConsumerTwo {

    public static void main(String[] args) throws IOException {
        //获取TCP长连接
        Connection connection = RabbitUtils.getConnection();
        //获取虚拟连接
        final Channel channel = connection.createChannel();
        //声明队列信息
        channel.queueDeclare(RabbitConstant.QUEUE_TWO, false, false, false, null);
        //指定队列与交换机以及routing key之间的关系
        channel.queueBind(RabbitConstant.QUEUE_TWO, RabbitConstant.EXCHANGE_CONTENT_TOPIC_CONFIRM, "us.#");
        channel.basicQos(1);
        channel.basicConsume(RabbitConstant.QUEUE_TWO , false , new DefaultConsumer(channel){
            @Override
            public void handleDelivery(String consumerTag, Envelope envelope, AMQP.BasicProperties properties, byte[] body) throws IOException {
                System.out.println("消费者2收到信息:" + new String(body));
//                channel.basicNack(envelope.getDeliveryTag() , false,false);
                channel.basicAck(envelope.getDeliveryTag() , false);
            }
        });
    }

}
演示效果:

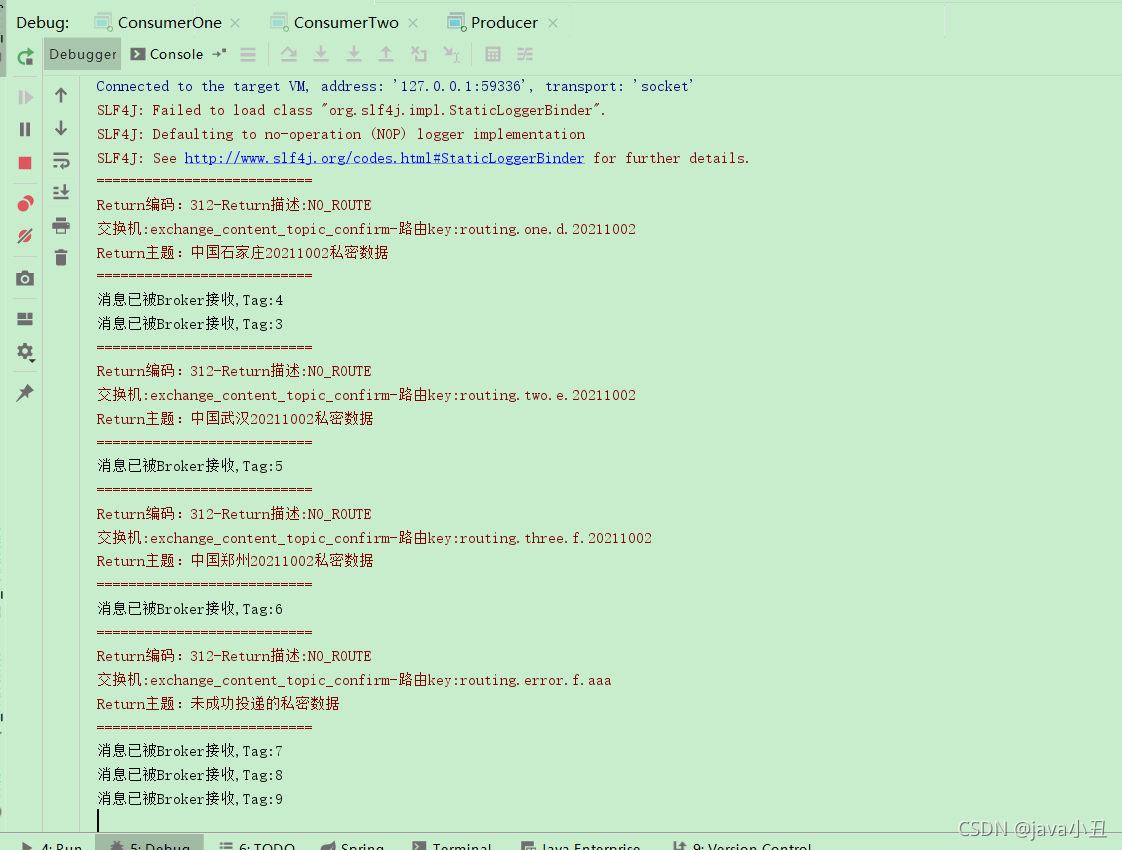 可以看到打印return都是key中没有20211001后缀或者没有us前缀的数据
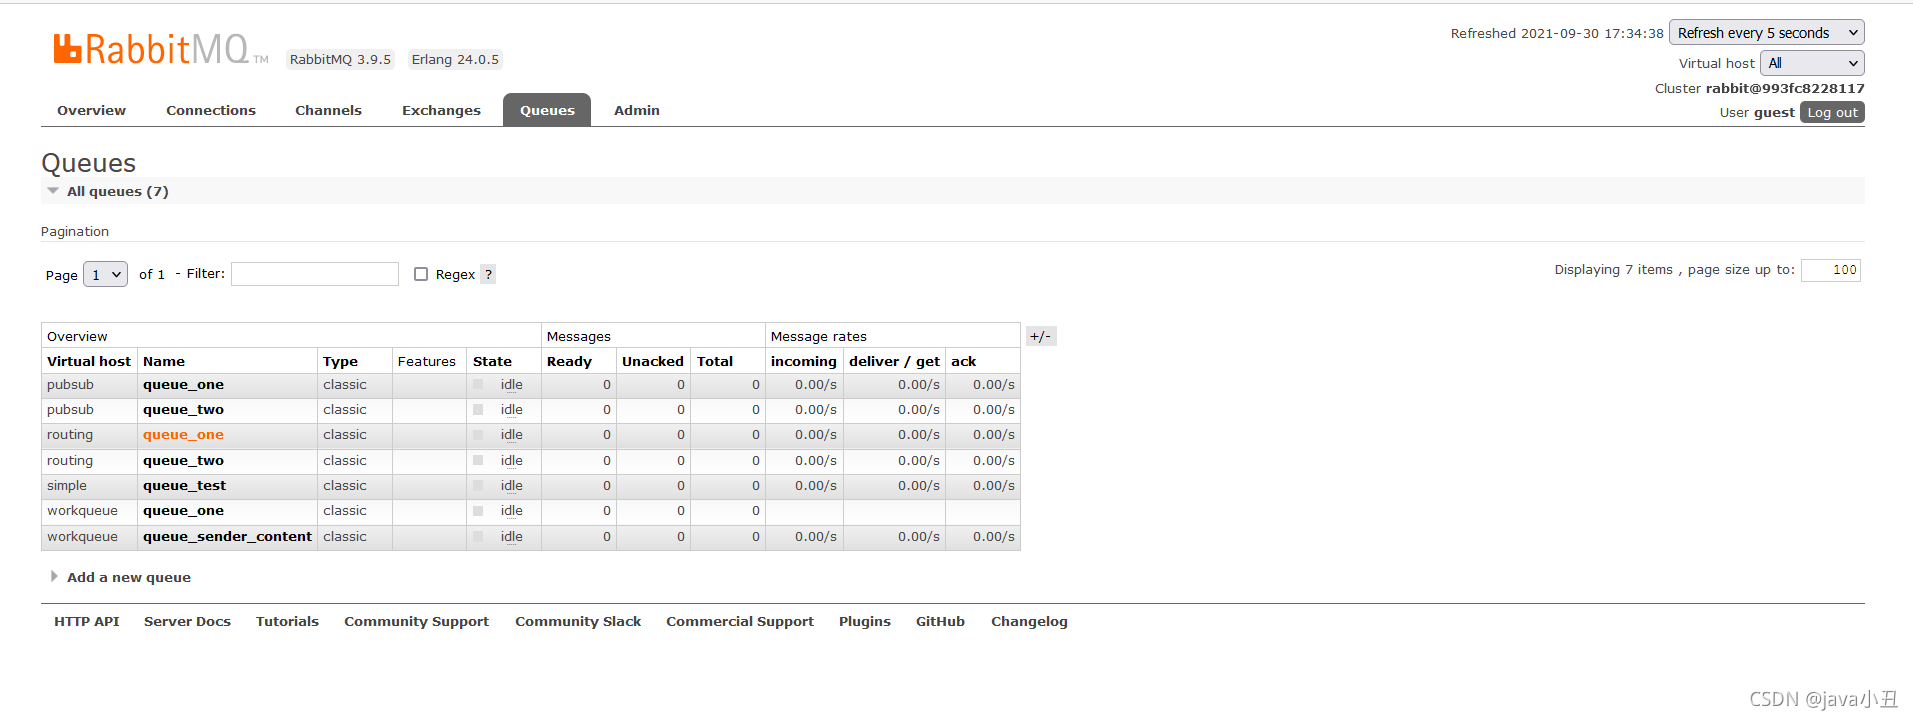
二、Spring整合RabbitMQ(简单模式,广播模式,路由模式,通配符模式,消息可靠性投递,防止消息丢失,TTL,死信队列,延迟队列,消息积压,消息幂等性)
本文通过实战代码,Spring整合RabbitMQ,项目分二个模块,consumer和produle。
一、项目代码
1.生产者
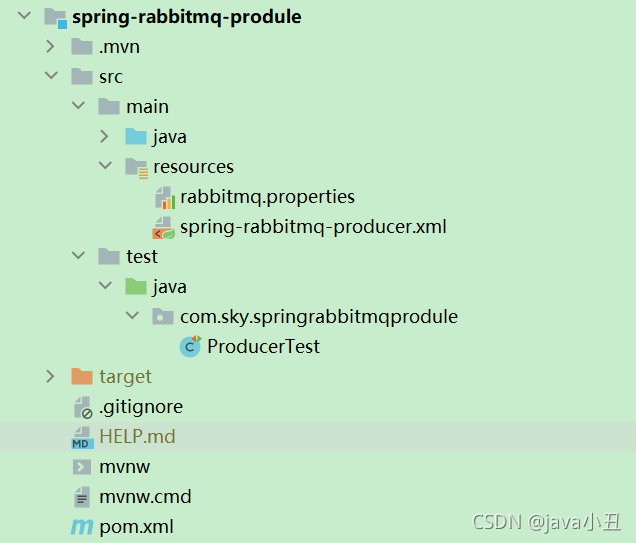
1.项目架构图:
代码如下(示例):
2.pom.xml依赖:
<?xml version="1.0" encoding="UTF-8"?>
<project xmlns="http://maven.apache.org/POM/4.0.0"
         xmlns:xsi="http://www.w3.org/2001/XMLSchema-instance"
         xsi:schemaLocation="http://maven.apache.org/POM/4.0.0 http://maven.apache.org/xsd/maven-4.0.0.xsd">
    <modelVersion>4.0.0</modelVersion>

    <groupId>com.sky</groupId>
    <artifactId>spring-rabbitmq-produle</artifactId>
    <version>1.0-SNAPSHOT</version>


    <dependencies>
        <dependency>
            <groupId>org.springframework</groupId>
            <artifactId>spring-context</artifactId>
            <version>5.1.7.RELEASE</version>
        </dependency>

        <dependency>
            <groupId>org.springframework.amqp</groupId>
            <artifactId>spring-rabbit</artifactId>
            <version>2.1.8.RELEASE</version>
        </dependency>

        <dependency>
            <groupId>junit</groupId>
            <artifactId>junit</artifactId>
            <version>4.12</version>
        </dependency>

        <dependency>
            <groupId>org.springframework</groupId>
            <artifactId>spring-test</artifactId>
            <version>5.1.7.RELEASE</version>
        </dependency>
    </dependencies>

    <build>
        <plugins>
            <plugin>
                <groupId>org.apache.maven.plugins</groupId>
                <artifactId>maven-compiler-plugin</artifactId>
                <version>3.8.0</version>
                <configuration>
                    <source>1.8</source>
                    <target>1.8</target>
                </configuration>
            </plugin>
        </plugins>
    </build>
</project>
3.spring-rabbitmq-producer.xml:
<?xml version="1.0" encoding="UTF-8"?>
<beans xmlns="http://www.springframework.org/schema/beans"
       xmlns:xsi="http://www.w3.org/2001/XMLSchema-instance"
       xmlns:context="http://www.springframework.org/schema/context"
       xmlns:rabbit="http://www.springframework.org/schema/rabbit"
       xsi:schemaLocation="http://www.springframework.org/schema/beans
       http://www.springframework.org/schema/beans/spring-beans.xsd
       http://www.springframework.org/schema/context
       https://www.springframework.org/schema/context/spring-context.xsd
       http://www.springframework.org/schema/rabbit
       http://www.springframework.org/schema/rabbit/spring-rabbit.xsd">
    <!--加载配置文件-->
    <context:property-placeholder location="classpath:rabbitmq.properties"/>

    <!-- 定义rabbitmq connectionFactory -->
    <rabbit:connection-factory id="connectionFactory" host="${rabbitmq.host}"
                               port="${rabbitmq.port}"
                               username="${rabbitmq.username}"
                               password="${rabbitmq.password}"
                               virtual-host="${rabbitmq.virtual-host}"/>
    <!--定义管理交换机、队列-->
    <rabbit:admin connection-factory="connectionFactory"/>

    <!--定义持久化队列,不存在则自动创建;不绑定到交换机则绑定到默认交换机
    默认交换机类型为direct,名字为:"",路由键为队列的名称
    -->
    <!--
        id:bean的名称
        name:queue的名称
        auto-declare:自动创建
        auto-delete:自动删除。 最后一个消费者和该队列断开连接后,自动删除队列
        durable:是否持久化
    -->

    <rabbit:queue id="spring_queue" name="spring_queue"    auto-declare="true"/>

    <!-- ~~~~~~~~~~~~~~~~~~~~~~~~~~~~广播;所有队列都能收到消息~~~~~~~~~~~~~~~~~~~~~~~~~~~~ -->
    <!--定义广播交换机中的持久化队列,不存在则自动创建-->
    <rabbit:queue id="spring_fanout_queue_1" name="spring_fanout_queue_1" auto-declare="true"/>

    <!--定义广播交换机中的持久化队列,不存在则自动创建-->
    <rabbit:queue id="spring_fanout_queue_2" name="spring_fanout_queue_2" auto-declare="true"/>

    <!--定义广播类型交换机;并绑定上述两个队列-->
    <rabbit:fanout-exchange id="spring_fanout_exchange" name="spring_fanout_exchange"  auto-declare="true">
        <rabbit:bindings>
            <rabbit:binding queue="spring_fanout_queue_1"  />
            <rabbit:binding queue="spring_fanout_queue_2"/>
        </rabbit:bindings>
    </rabbit:fanout-exchange>


    <!-- 定义队列-->
    <rabbit:queue id="spring_direct_queue" name="spring_direct_queue"  auto-declare="true"/>

    <!--
      定义 Routing  路由模式 交互机
    -->
    <rabbit:direct-exchange name="spring_direct_exchange" >
        <rabbit:bindings>
            <!--direct 类型的交换机绑定队列  key :路由key  queue:队列名称-->
            <rabbit:binding queue="spring_direct_queue" key="direct"></rabbit:binding>
        </rabbit:bindings>

    </rabbit:direct-exchange>

    <!-- ~~~~~~~~~~~~~~~~~~~~~~~~~~~~通配符;*匹配一个单词,#匹配多个单词 ~~~~~~~~~~~~~~~~~~~~~~~~~~~~ -->
    <!--定义广播交换机中的持久化队列,不存在则自动创建-->
    <rabbit:queue id="spring_topic_queue_one" name="spring_topic_queue_one"  auto-declare="true"/>
    <!--定义广播交换机中的持久化队列,不存在则自动创建-->
    <rabbit:queue id="spring_topic_queue_two" name="spring_topic_queue_two" auto-declare="true"/>
    <!--定义广播交换机中的持久化队列,不存在则自动创建-->
    <rabbit:queue id="spring_topic_queue_three" name="spring_topic_queue_three" auto-declare="true"/>

    <!--
      声明  topic 类型的交换机
    -->
    <rabbit:topic-exchange id="spring_topic_exchange"  name="spring_topic_exchange" auto-declare="true">
        <rabbit:bindings>
            <rabbit:binding pattern="one.*"  queue="spring_topic_queue_one"/>
            <rabbit:binding pattern="two.#" queue="spring_topic_queue_two"/>
            <rabbit:binding pattern="three.#" queue="spring_topic_queue_three"/>
        </rabbit:bindings>
    </rabbit:topic-exchange>

    <!--定义rabbitTemplate对象操作可以在代码中方便发送消息-->
    <rabbit:template id="rabbitTemplate" connection-factory="connectionFactory"/>

</beans>
4.rabbitmq.properties:
rabbitmq.host=110.42.239.246
rabbitmq.port=5672
rabbitmq.username=guest
rabbitmq.password=guest
rabbitmq.virtual-host=spring
说明:这里免费提供rabbitmq连接方式给大家使用学习
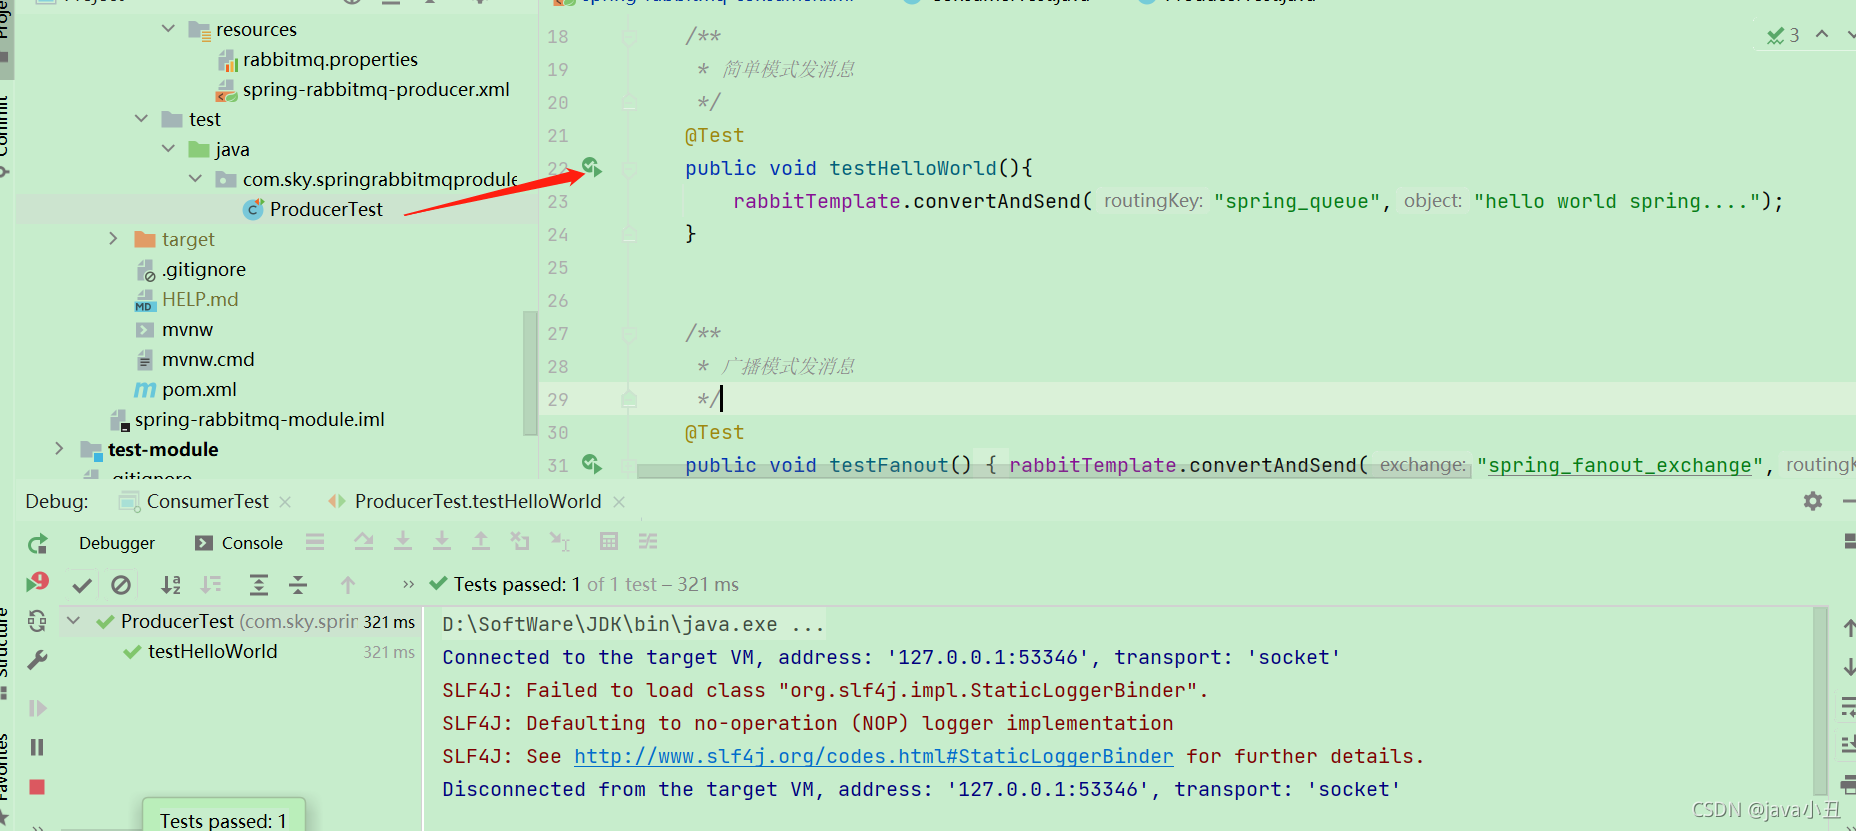
5.ProducerTest:
package com.sky.springrabbitmqprodule;
import org.junit.Test;
import org.junit.runner.RunWith;
import org.springframework.amqp.rabbit.core.RabbitTemplate;
import org.springframework.beans.factory.annotation.Autowired;
import org.springframework.test.context.ContextConfiguration;
import org.springframework.test.context.junit4.SpringJUnit4ClassRunner;
@RunWith(SpringJUnit4ClassRunner.class)
@ContextConfiguration(locations = "classpath:spring-rabbitmq-producer.xml")
public class ProducerTest {
@Autowired
private RabbitTemplate rabbitTemplate;
/**
* 简单模式发消息
*/
@Test
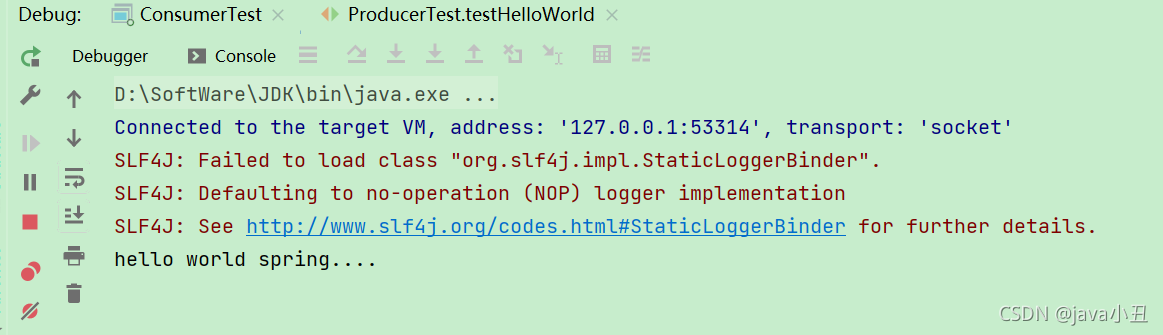
public void testHelloWorld(){
rabbitTemplate.convertAndSend("spring_queue","hello world spring....");
}
/**
* 广播模式发消息
*/
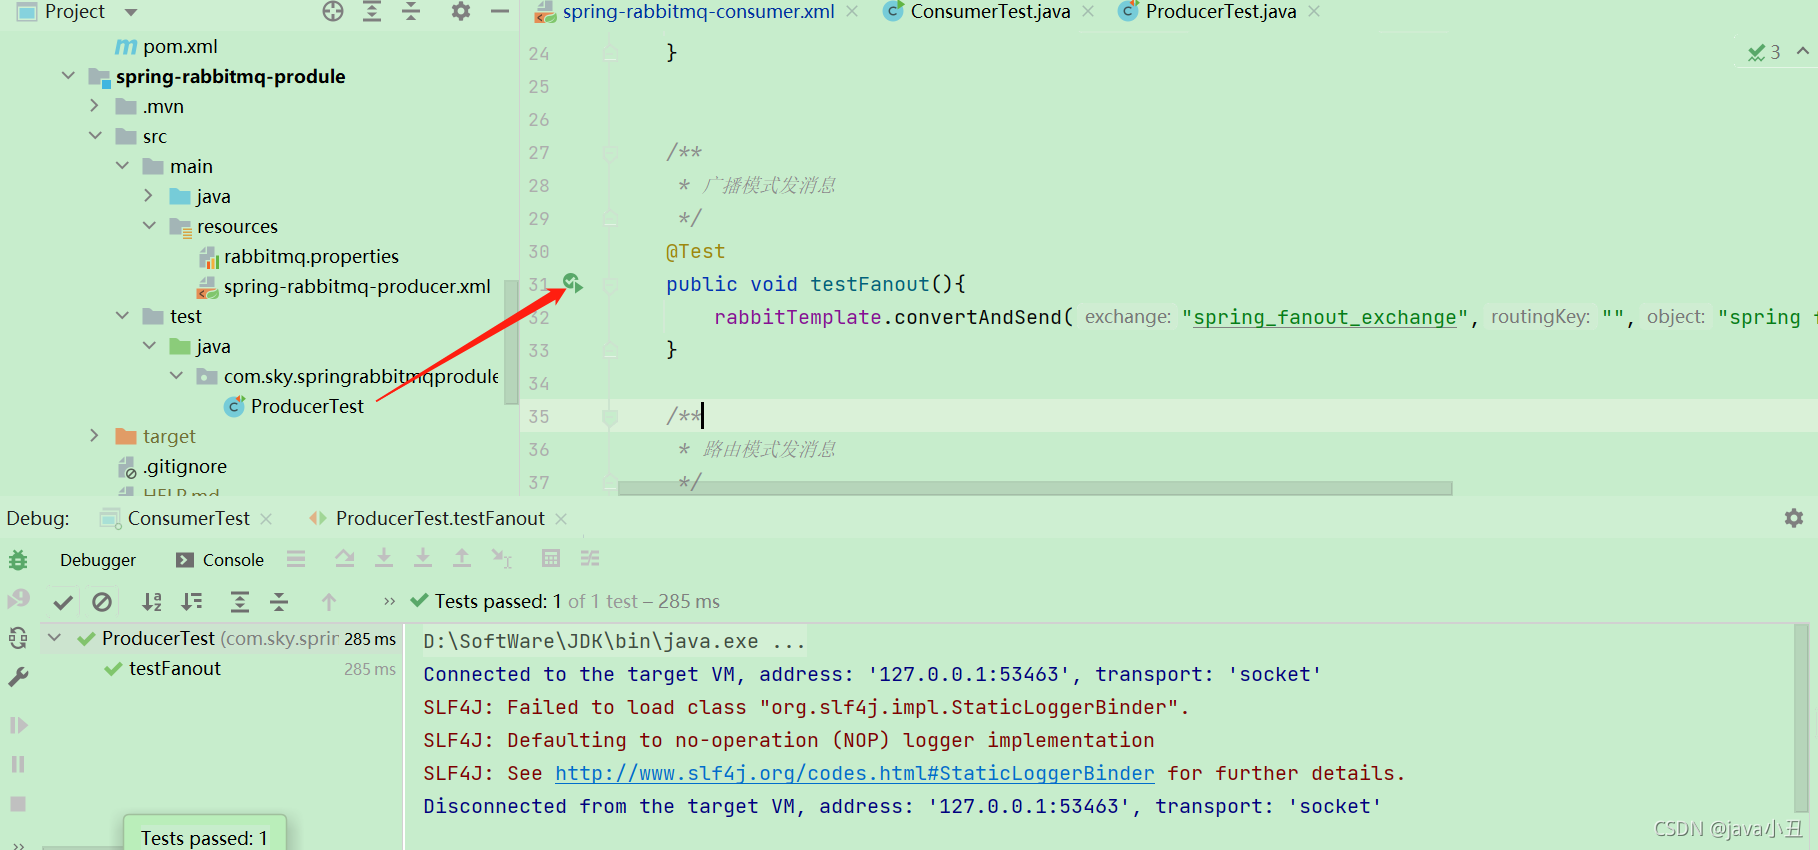
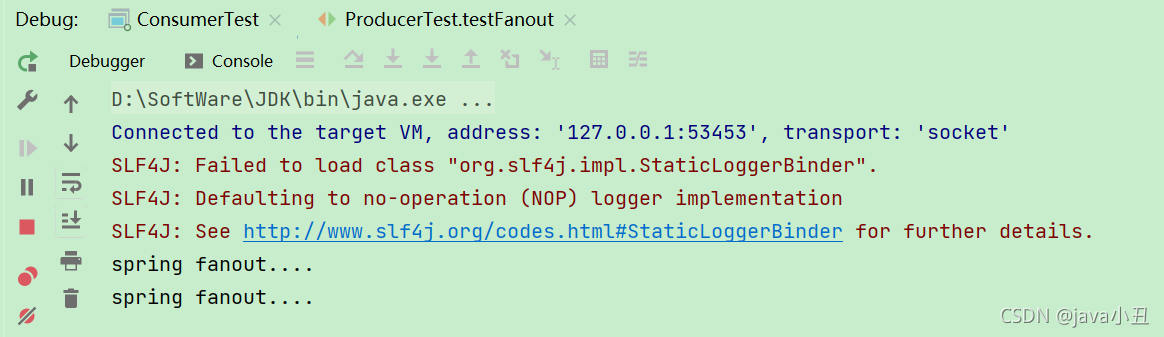
@Test
public void testFanout(){
rabbitTemplate.convertAndSend("spring_fanout_exchange","","spring fanout....");
}
/**
* 路由模式发消息
*/
@Test
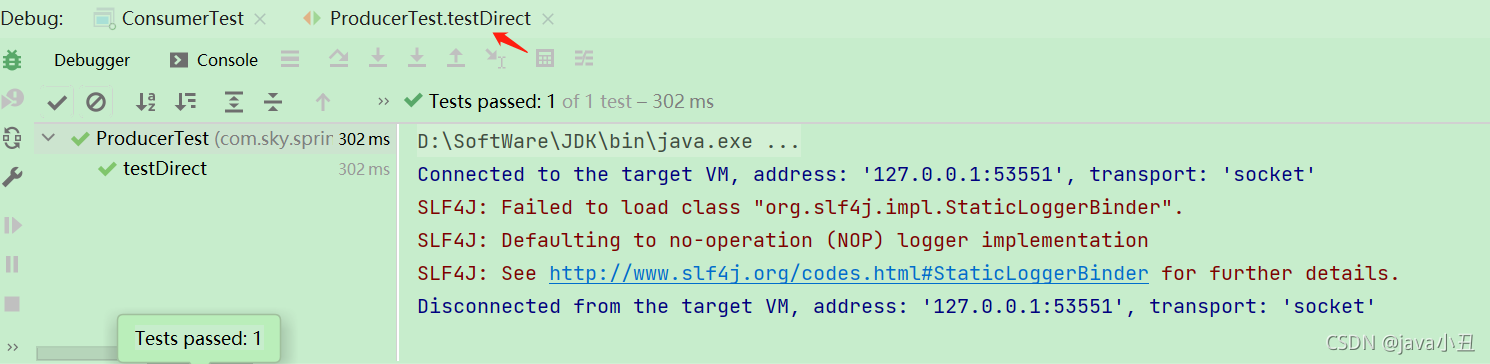
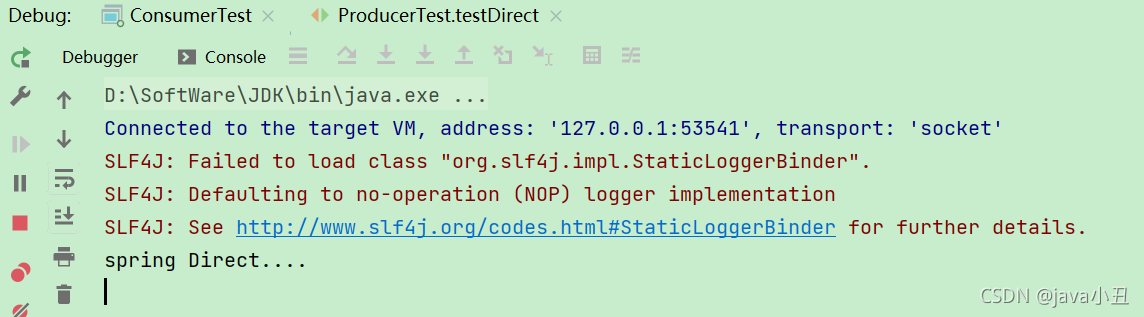
public void testDirect(){
rabbitTemplate.convertAndSend("spring_direct_exchange","direct","spring Direct....");
}
/**
* 通配符模式发消息
*/
@Test
public void testTopics(){
rabbitTemplate.convertAndSend("spring_topic_exchange","one.onekey","spring topic one....");
rabbitTemplate.convertAndSend("spring_topic_exchange","two.twokey.topic","spring topic two....");
rabbitTemplate.convertAndSend("spring_topic_exchange","three.threekey.topic","spring topic three....");
}
}
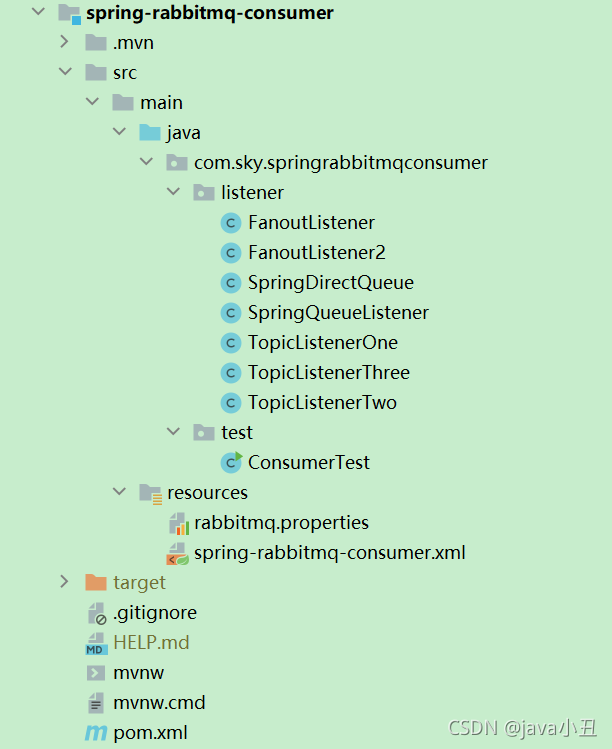
2.消费者
1.项目架构图
代码如下(示例):
2.pom.xml依赖:
<?xml version="1.0" encoding="UTF-8"?>
<project xmlns="http://maven.apache.org/POM/4.0.0"
         xmlns:xsi="http://www.w3.org/2001/XMLSchema-instance"
         xsi:schemaLocation="http://maven.apache.org/POM/4.0.0 http://maven.apache.org/xsd/maven-4.0.0.xsd">
    <modelVersion>4.0.0</modelVersion>

    <groupId>com.sky</groupId>
    <artifactId>spring-rabbitmq-consumer</artifactId>
    <version>1.0-SNAPSHOT</version>

    <dependencies>
        <dependency>
            <groupId>org.springframework</groupId>
            <artifactId>spring-context</artifactId>
            <version>5.1.7.RELEASE</version>
        </dependency>

        <dependency>
            <groupId>org.springframework.amqp</groupId>
            <artifactId>spring-rabbit</artifactId>
            <version>2.1.8.RELEASE</version>
        </dependency>

        <dependency>
            <groupId>junit</groupId>
            <artifactId>junit</artifactId>
            <version>4.12</version>
        </dependency>

        <dependency>
            <groupId>org.springframework</groupId>
            <artifactId>spring-test</artifactId>
            <version>5.1.7.RELEASE</version>
        </dependency>
    </dependencies>

    <build>
        <plugins>
            <plugin>
                <groupId>org.apache.maven.plugins</groupId>
                <artifactId>maven-compiler-plugin</artifactId>
                <version>3.8.0</version>
                <configuration>
                    <source>1.8</source>
                    <target>1.8</target>
                </configuration>
            </plugin>
        </plugins>
    </build>

</project>
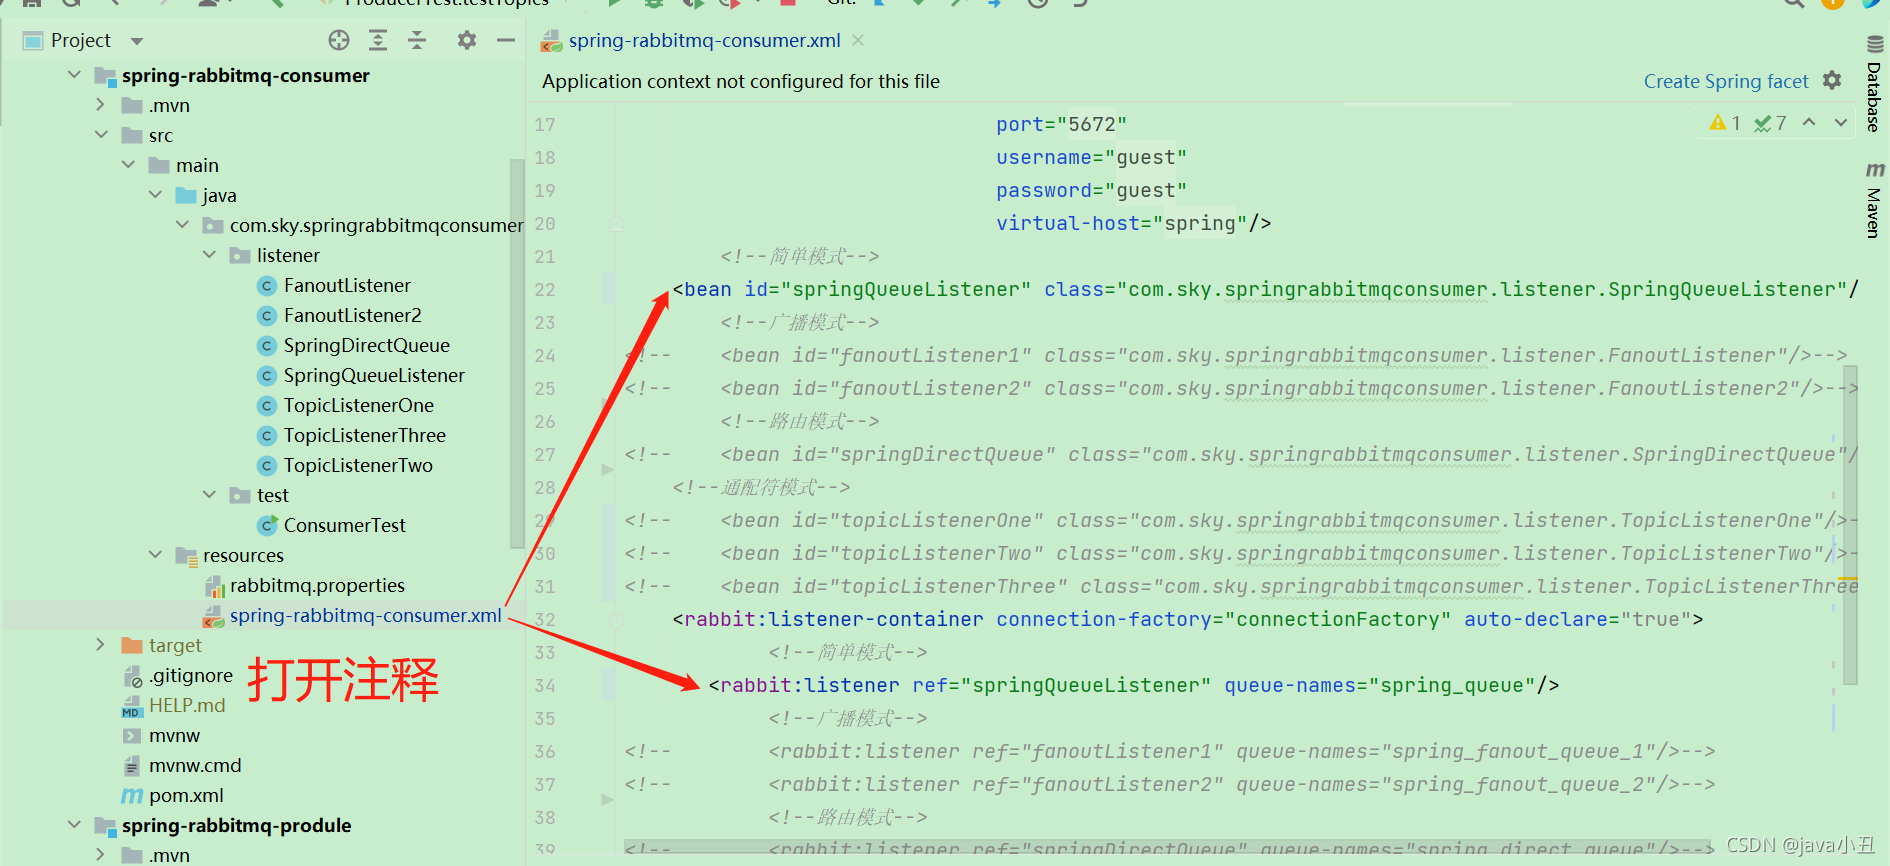
3.spring-rabbitmq-consumer.xml
<?xml version="1.0" encoding="UTF-8"?>
<beans xmlns="http://www.springframework.org/schema/beans"
xmlns:xsi="http://www.w3.org/2001/XMLSchema-instance"
xmlns:context="http://www.springframework.org/schema/context"
xmlns:rabbit="http://www.springframework.org/schema/rabbit"
xsi:schemaLocation="http://www.springframework.org/schema/beans
http://www.springframework.org/schema/beans/spring-beans.xsd
http://www.springframework.org/schema/context
https://www.springframework.org/schema/context/spring-context.xsd
http://www.springframework.org/schema/rabbit
http://www.springframework.org/schema/rabbit/spring-rabbit.xsd">
<!--加载配置文件-->
<context:property-placeholder location="classpath:rabbitmq.properties"/>
<!-- 定义rabbitmq connectionFactory -->
<rabbit:connection-factory id="connectionFactory" host="${rabbitmq.host}"
port="${rabbitmq.port}"
username="${rabbitmq.username}"
password="${rabbitmq.password}"
virtual-host="${rabbitmq.virtual-host}"/>
<!--简单模式-->
<!-- <bean id="springQueueListener" class="com.sky.springrabbitmqconsumer.listener.SpringQueueListener"/>-->
<!--广播模式-->
<!-- <bean id="fanoutListener1" class="com.sky.springrabbitmqconsumer.listener.FanoutListener"/>-->
<!-- <bean id="fanoutListener2" class="com.sky.springrabbitmqconsumer.listener.FanoutListener2"/>-->
<!--路由模式-->
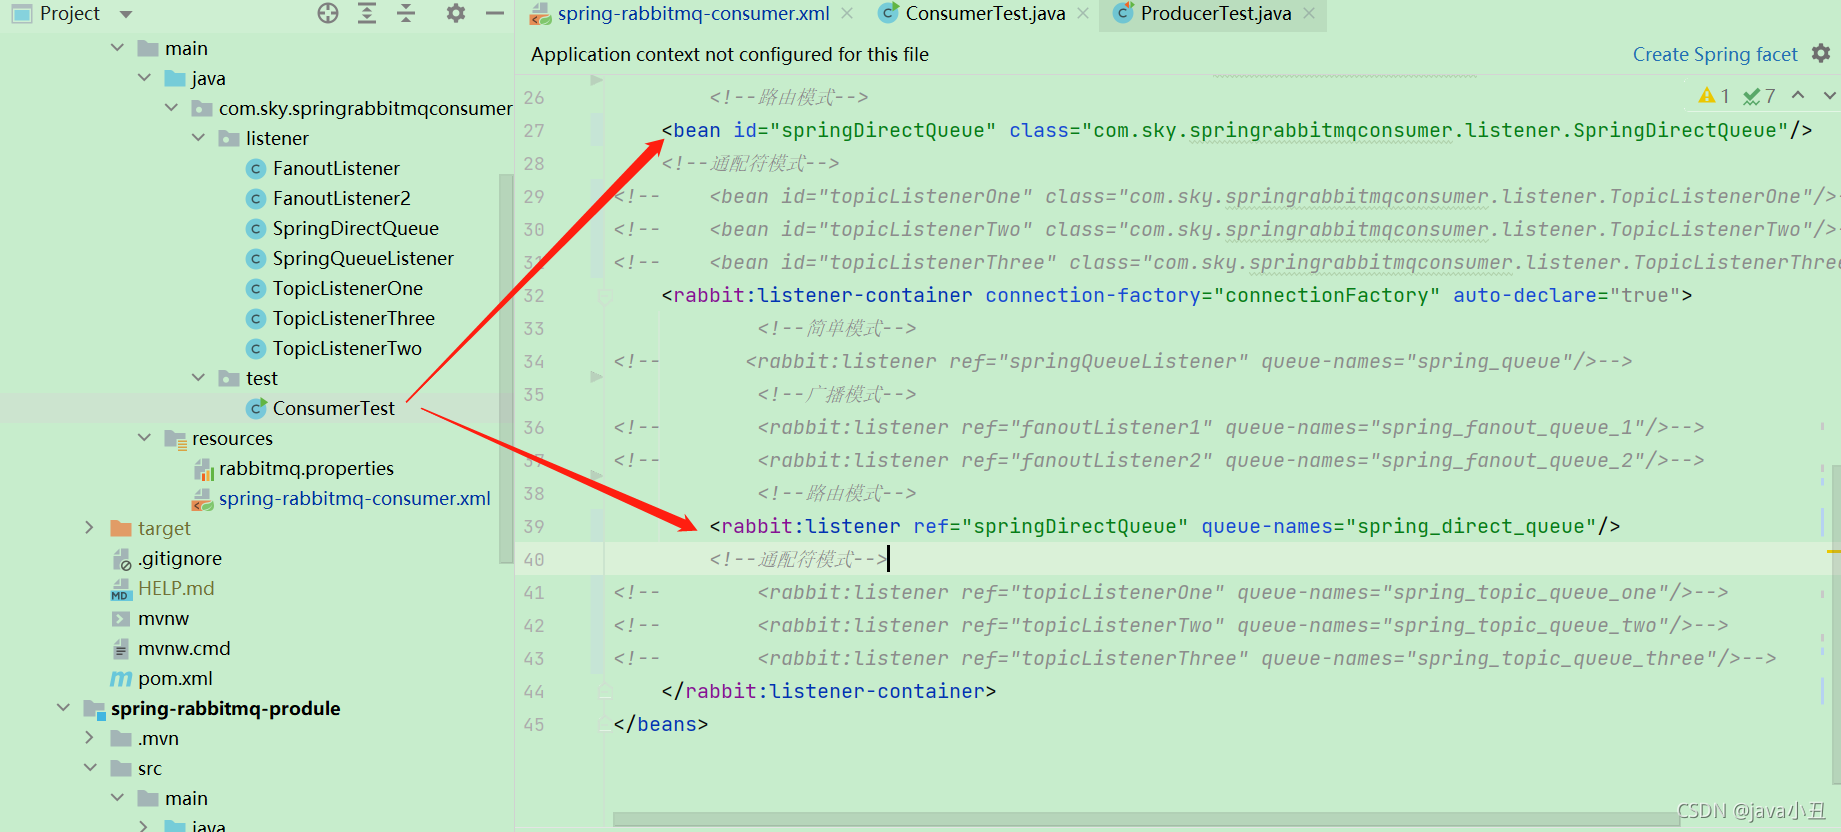
<!-- <bean id="springDirectQueue" class="com.sky.springrabbitmqconsumer.listener.SpringDirectQueue"/>-->
<!--通配符模式-->
<bean id="topicListenerOne" class="com.sky.springrabbitmqconsumer.listener.TopicListenerOne"/>
<bean id="topicListenerTwo" class="com.sky.springrabbitmqconsumer.listener.TopicListenerTwo"/>
<bean id="topicListenerThree" class="com.sky.springrabbitmqconsumer.listener.TopicListenerThree"/>
<rabbit:listener-container connection-factory="connectionFactory" auto-declare="true">
<!--简单模式-->
<!-- <rabbit:listener ref="springQueueListener" queue-names="spring_queue"/>-->
<!--广播模式-->
<!-- <rabbit:listener ref="fanoutListener1" queue-names="spring_fanout_queue_1"/>-->
<!-- <rabbit:listener ref="fanoutListener2" queue-names="spring_fanout_queue_2"/>-->
<!--路由模式-->
<!-- <rabbit:listener ref="springDirectQueue" queue-names="spring_direct_queue"/>-->
<!--通配符模式-->
<rabbit:listener ref="topicListenerOne" queue-names="spring_topic_queue_one"/>
<rabbit:listener ref="topicListenerTwo" queue-names="spring_topic_queue_two"/>
<rabbit:listener ref="topicListenerThree" queue-names="spring_topic_queue_three"/>
</rabbit:listener-container>
</beans>
4.rabbitmq.properties
rabbitmq.host=110.42.239.246
rabbitmq.port=5672
rabbitmq.username=guest
rabbitmq.password=guest
rabbitmq.virtual-host=spring
说明:配置和生产者的一致
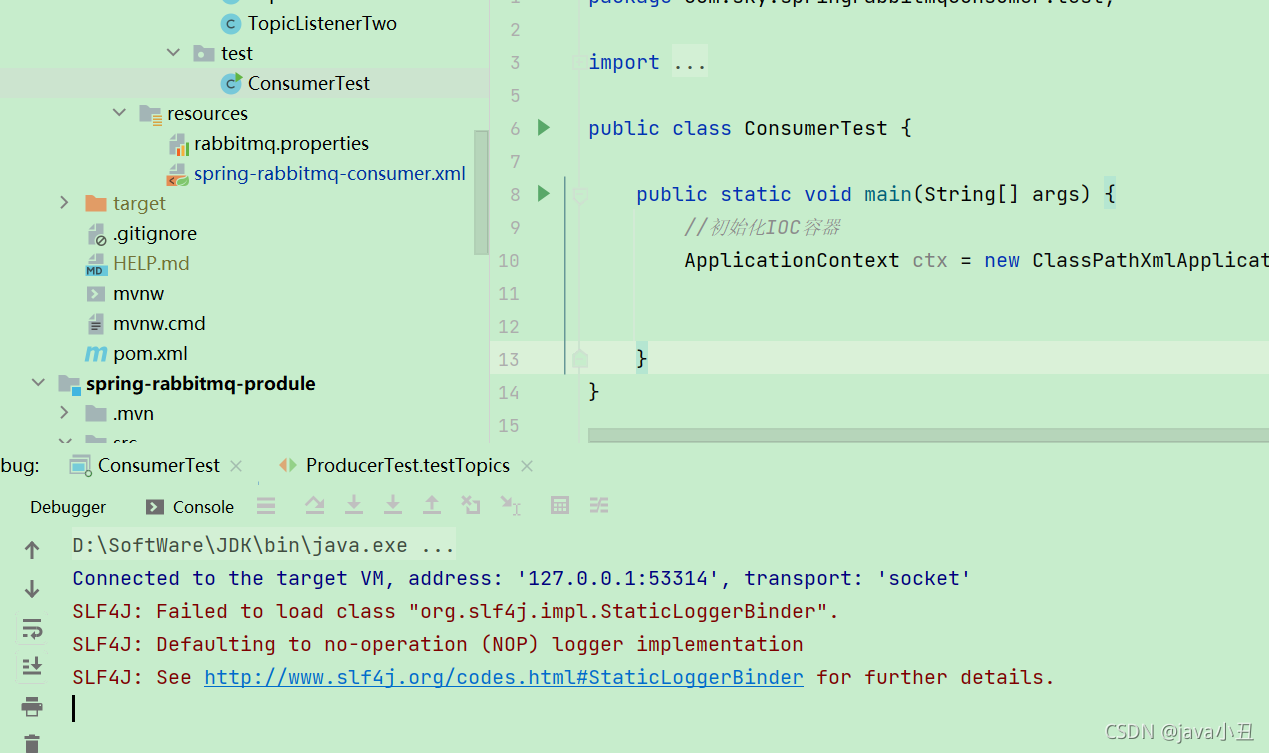
5.ConsumerTest
package com.sky.springrabbitmqconsumer.test;

import org.springframework.context.ApplicationContext;
import org.springframework.context.support.ClassPathXmlApplicationContext;

public class ConsumerTest {

    public static void main(String[] args) {
        //初始化IOC容器
        ApplicationContext ctx = new ClassPathXmlApplicationContext("classpath:spring-rabbitmq-consumer.xml");


    }
}
6.FanoutListener
package com.sky.springrabbitmqconsumer.listener;

import org.springframework.amqp.core.Message;
import org.springframework.amqp.core.MessageListener;

public class FanoutListener implements MessageListener {
    @Override
    public void onMessage(Message message) {
        //打印消息
        System.out.println(new String(message.getBody()));
    }
}
7.FanoutListener2
package com.sky.springrabbitmqconsumer.listener;

import org.springframework.amqp.core.Message;
import org.springframework.amqp.core.MessageListener;

public class FanoutListener2 implements MessageListener {
    @Override
    public void onMessage(Message message) {
        //打印消息
        System.out.println(new String(message.getBody()));
    }
}
8.SpringDirectQueue
package com.sky.springrabbitmqconsumer.listener;

import org.springframework.amqp.core.Message;
import org.springframework.amqp.core.MessageListener;

public class SpringDirectQueue implements MessageListener {
    @Override
    public void onMessage(Message message) {
        //打印消息
        System.out.println(new String(message.getBody()));
    }
}
9.SpringQueueListener
package com.sky.springrabbitmqconsumer.listener;

import org.springframework.amqp.core.Message;
import org.springframework.amqp.core.MessageListener;

public class SpringQueueListener implements MessageListener {
    @Override
    public void onMessage(Message message) {
        //打印消息
        System.out.println(new String(message.getBody()));
    }
}
10.TopicListenerOne
package com.sky.springrabbitmqconsumer.listener;

import org.springframework.amqp.core.Message;
import org.springframework.amqp.core.MessageListener;

public class TopicListenerOne implements MessageListener {
    @Override
    public void onMessage(Message message) {
        //打印消息
        System.out.println(new String(message.getBody()));
    }
}
11.TopicListenerTwo
package com.sky.springrabbitmqconsumer.listener;

import org.springframework.amqp.core.Message;
import org.springframework.amqp.core.MessageListener;

public class TopicListenerTwo implements MessageListener {
    @Override
    public void onMessage(Message message) {
        //打印消息
        System.out.println(new String(message.getBody()));
    }
}
12.TopicListenerThree
package com.sky.springrabbitmqconsumer.listener;

import org.springframework.amqp.core.Message;
import org.springframework.amqp.core.MessageListener;

public class TopicListenerThree implements MessageListener {
    @Override
    public void onMessage(Message message) {
        //打印消息
        System.out.println(new String(message.getBody()));
    }
}
上面就是这个项目的所有代码了,下面就是Demo演示内容。
二、项目演示
演示简单模式:
消费者取消注释:
 消费者启动服务:
 生产者发送消息:
 消费者查看消息:
演示广播模式:
消费者取消注释:
消费者启动服务:

生产者发送消息:
消费者查看消息:
演示路由模式:
消费者取消注释:
消费者启动服务:

生产者发送消息:
消费者查看消息:
演示通配符模式:
消费者取消注释:

消费者启动服务:
生产者发送消息:
消费者查看消息:

三、消息可靠性投递
消息可靠性实现需要保证以下几点:
-
持久化
exchange要持久化
queue要持久化
message要持久化 -
生产方确认Confirm
-
消费方确认Ack
-
Broker高可用
1.rabbitmq 整个消息投递的路径
producer—>rabbitmq broker—>exchange—>queue—>consumer
- 消息从producer 到 exchange 则会返回一个 confirmCallback 。
- 消息从exchange–>queue 投递失败则会返回一个 returnCallback 。
2.实现消息可靠性投递的步骤
- 生产者设置ConnectionFactory的publisher-confirms=“true” 开启 确认模式。
- 生产者设置ConnectionFactory的publisher-returns=“true” 开启 退回模式。
- 生产者使用rabbitTemplate.setConfirmCallback设置回调函数。当消息发送到exchange后回调confirm方法。在方法中判断ack,如果为true,则发送成功,如果为false,则发送失败,需要处理。
- 生产者使用rabbitTemplate.setReturnCallback设置退回函数,当消息从exchange路由到queue失败后,如果设置了rabbitTemplate.setMandatory(true)参数,则会将消息退回给producer。并执行回调函数returnedMessage。
- 消费者在rabbit:listener-container标签中设置acknowledge属性,设置ack方式 none:自动确认,manual:手动确认(none自动确认模式很危险,当生产者发送多条消息,消费者接收到一条信息时,会自动认为当前发送的消息已经签收了,这个时候消费者进行业务处理时出现了异常情况,也会认为消息已经正常签收处理了,而队列里面显示都被消费掉了。所以真实开发都会改为手动签收,可以防止消息丢失)
- 消费者如果在消费端没有出现异常,则调用channel.basicAck(deliveryTag,false);方法确认签收消息
- 消费者如果出现异常,则在catch中调用 basicNack或 basicReject,拒绝消息,让MQ重新发送消息。
3.具体实现可靠消息投递的代码
说明:基于上述Spring整合RabbitMQ的代码进行改动
生产者
第一处改动:设置确认模式和退回模式
 代码:
代码:
publisher-confirms="true"
publisher-returns="true"
第二处改动:声明队列和交互机的bean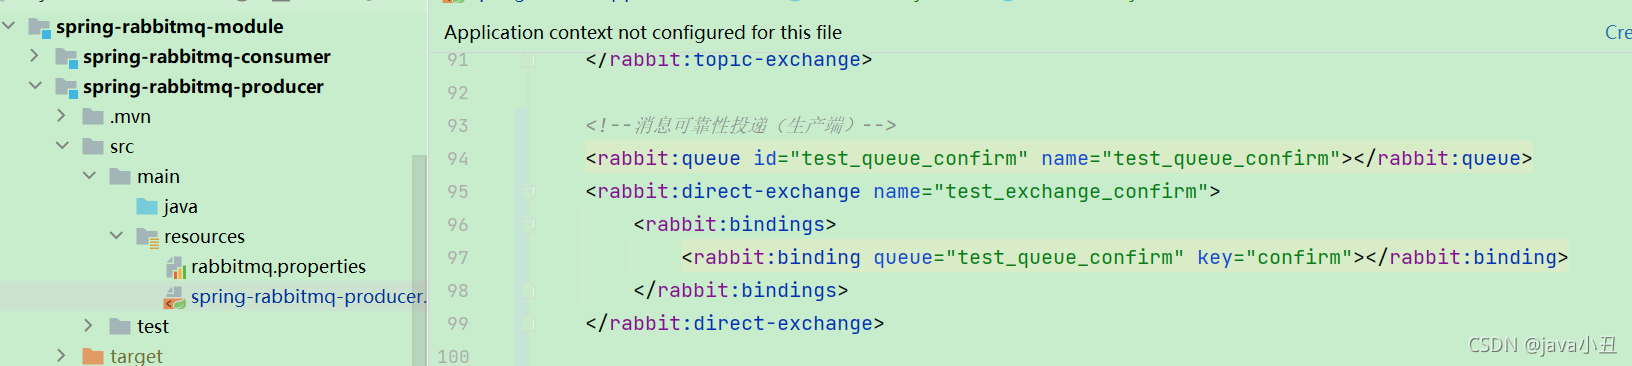 代码:
代码:
    <!--消息可靠性投递(生产端)-->
    <rabbit:queue id="test_queue_confirm" name="test_queue_confirm"></rabbit:queue>
    <rabbit:direct-exchange name="test_exchange_confirm">
        <rabbit:bindings>
            <rabbit:binding queue="test_queue_confirm" key="confirm"></rabbit:binding>
        </rabbit:bindings>
    </rabbit:direct-exchange>
第三处改动:编写Confirm测试方法
//测试Confirm 模式
@Test
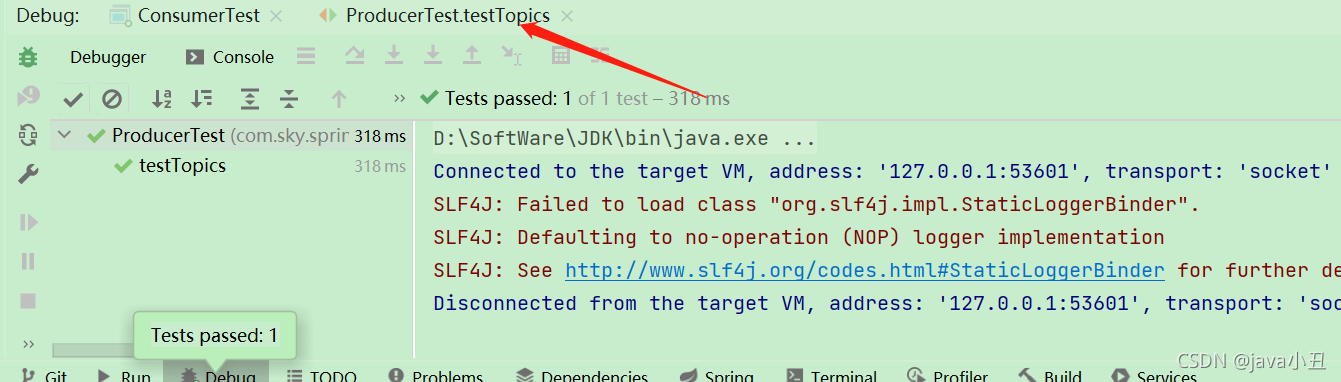
public void testConfirm() {
//定义回调
rabbitTemplate.setConfirmCallback(new RabbitTemplate.ConfirmCallback() {
/**
* @param correlationData 相关配置信息
* @param ack exchange交换机 是否成功收到了消息。true 成功,false代表失败
* @param cause 失败原因
*/
@Override
public void confirm(CorrelationData correlationData, boolean ack, String cause) {
System.out.println("confirm方法被执行了....");
//ack 为 true表示 消息已经到达交换机
if (ack) {
//接收成功
System.out.println("接收成功消息" + cause);
} else {
//如果没有投递到交换机中去就会接收失败,比如:将交换机名称写错
System.out.println("接收失败消息" + cause);
//做一些处理,让消息再次发送。
}
}
});
//进行消息发送
rabbitTemplate.convertAndSend("test_exchange_confirm","confirm","message Confirm...");
//进行睡眠操作
try {
Thread.sleep(5000);
} catch (Exception e) {
e.printStackTrace();
}
}
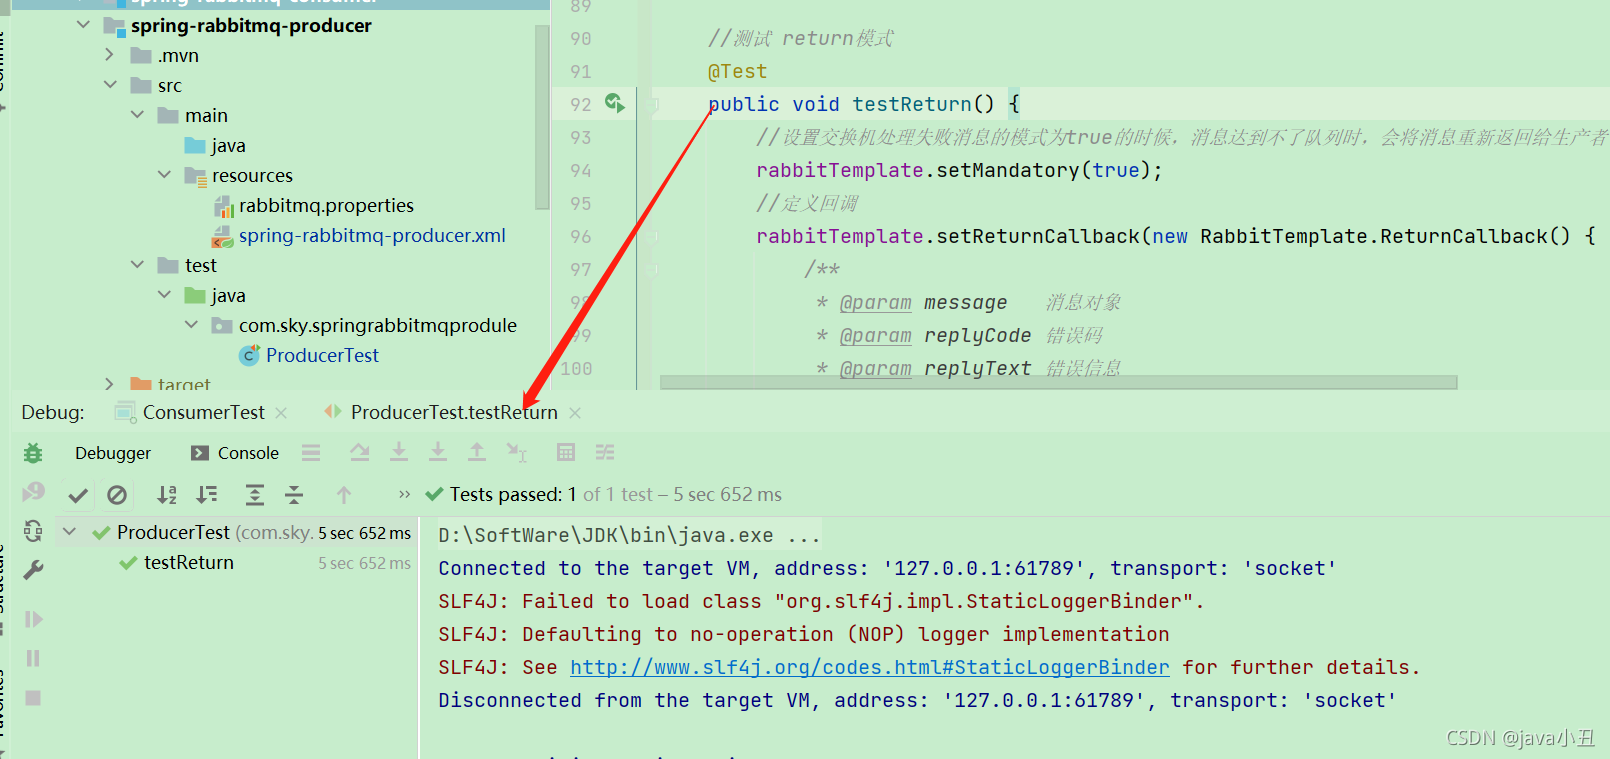
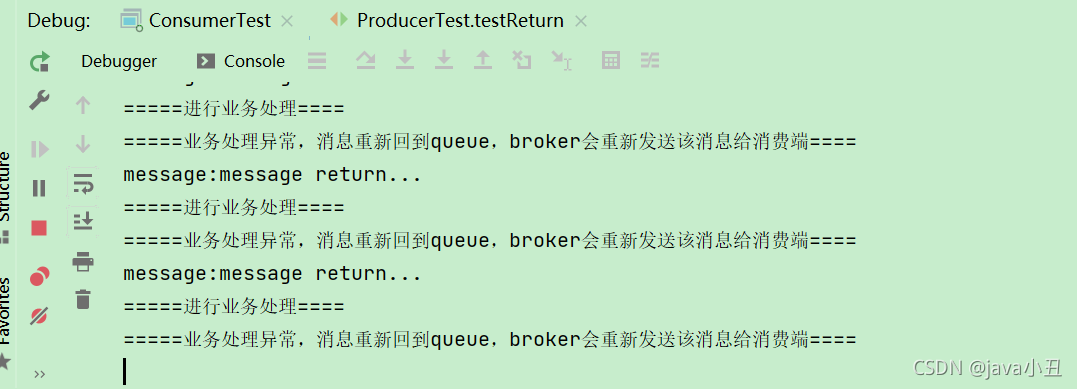
第四处改动:编写Return测试方法
//测试 return模式
@Test
public void testReturn() {
//设置交换机处理失败消息的模式为true的时候,消息达到不了队列时,会将消息重新返回给生产者
rabbitTemplate.setMandatory(true);
//定义回调
rabbitTemplate.setReturnCallback(new RabbitTemplate.ReturnCallback() {
/**
* @param message 消息对象
* @param replyCode 错误码
* @param replyText 错误信息
* @param exchange 交换机
* @param routingKey 路由键
*/
@Override
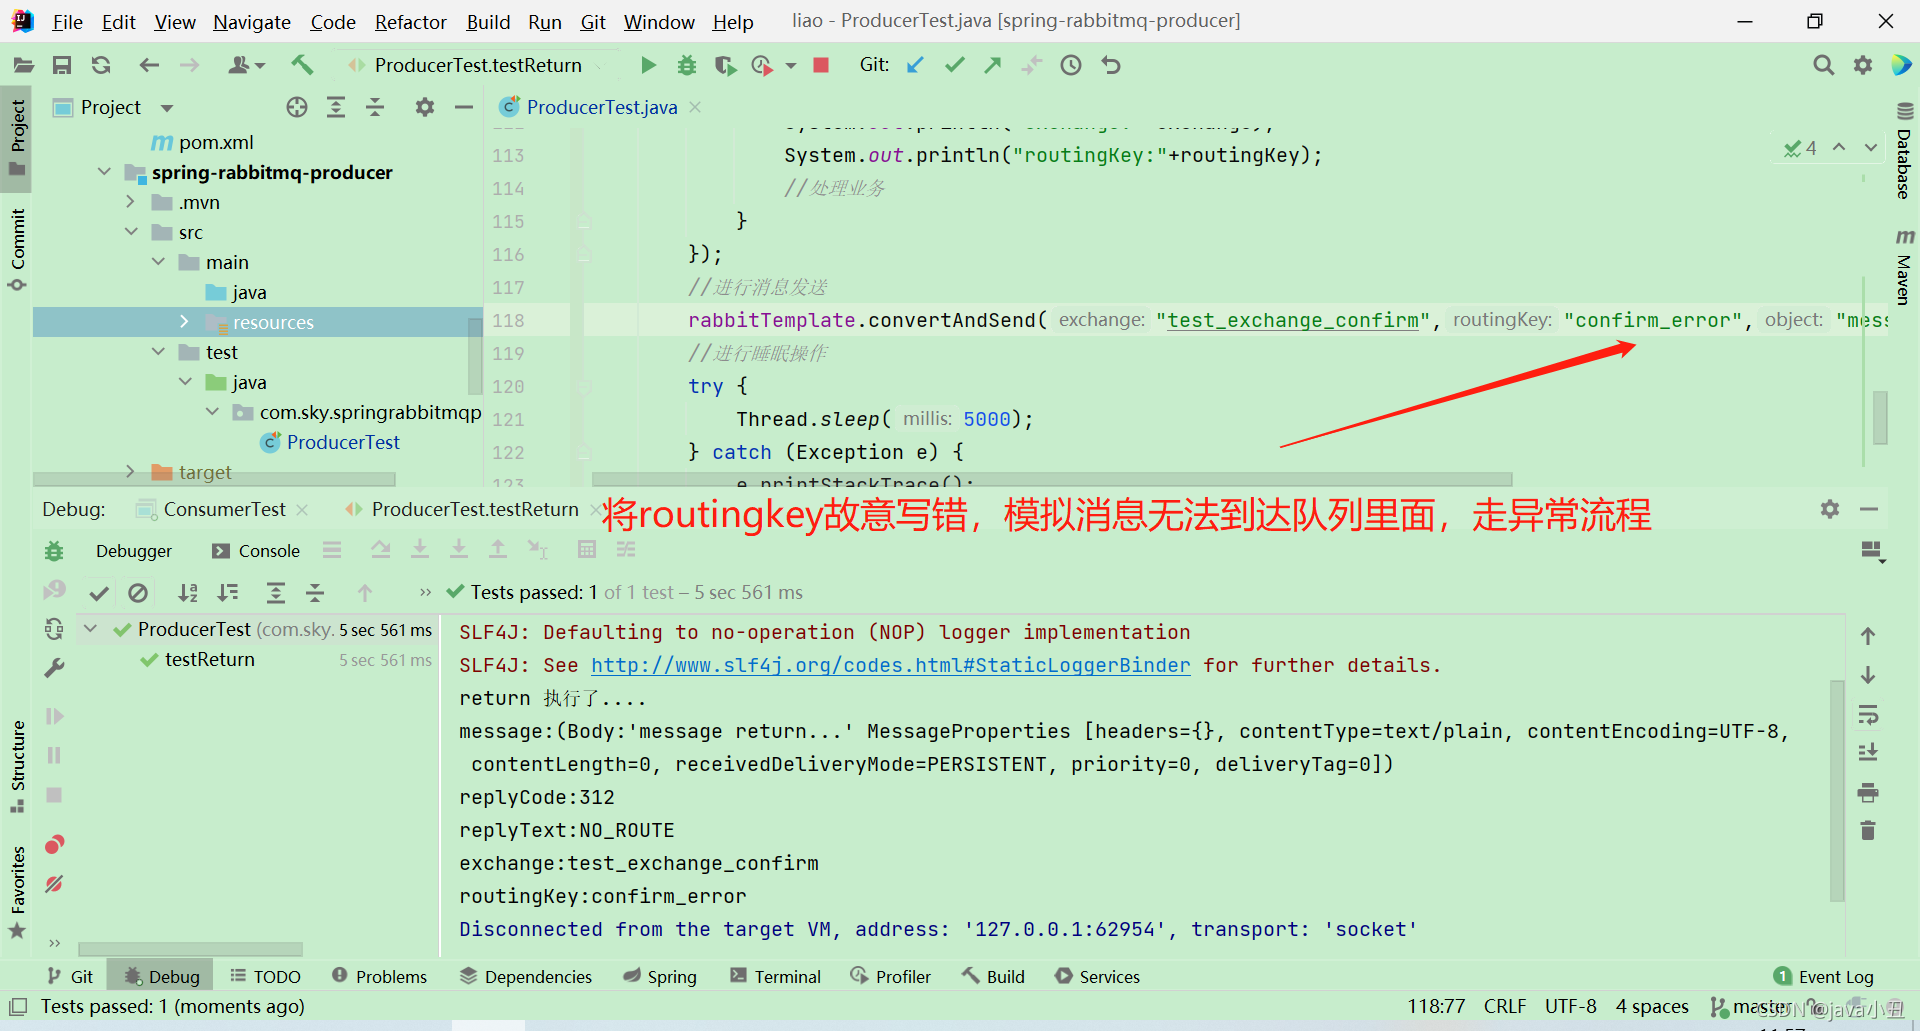
public void returnedMessage(Message message, int replyCode, String replyText, String exchange, String routingKey) {
System.out.println("return 执行了....");
System.out.println("message:"+message);
System.out.println("replyCode:"+replyCode);
System.out.println("replyText:"+replyText);
System.out.println("exchange:"+exchange);
System.out.println("routingKey:"+routingKey);
//处理业务
}
});
//进行消息发送
rabbitTemplate.convertAndSend("test_exchange_confirm","confirm","message return...");
//进行睡眠操作
try {
Thread.sleep(5000);
} catch (Exception e) {
e.printStackTrace();
}
}
消费者
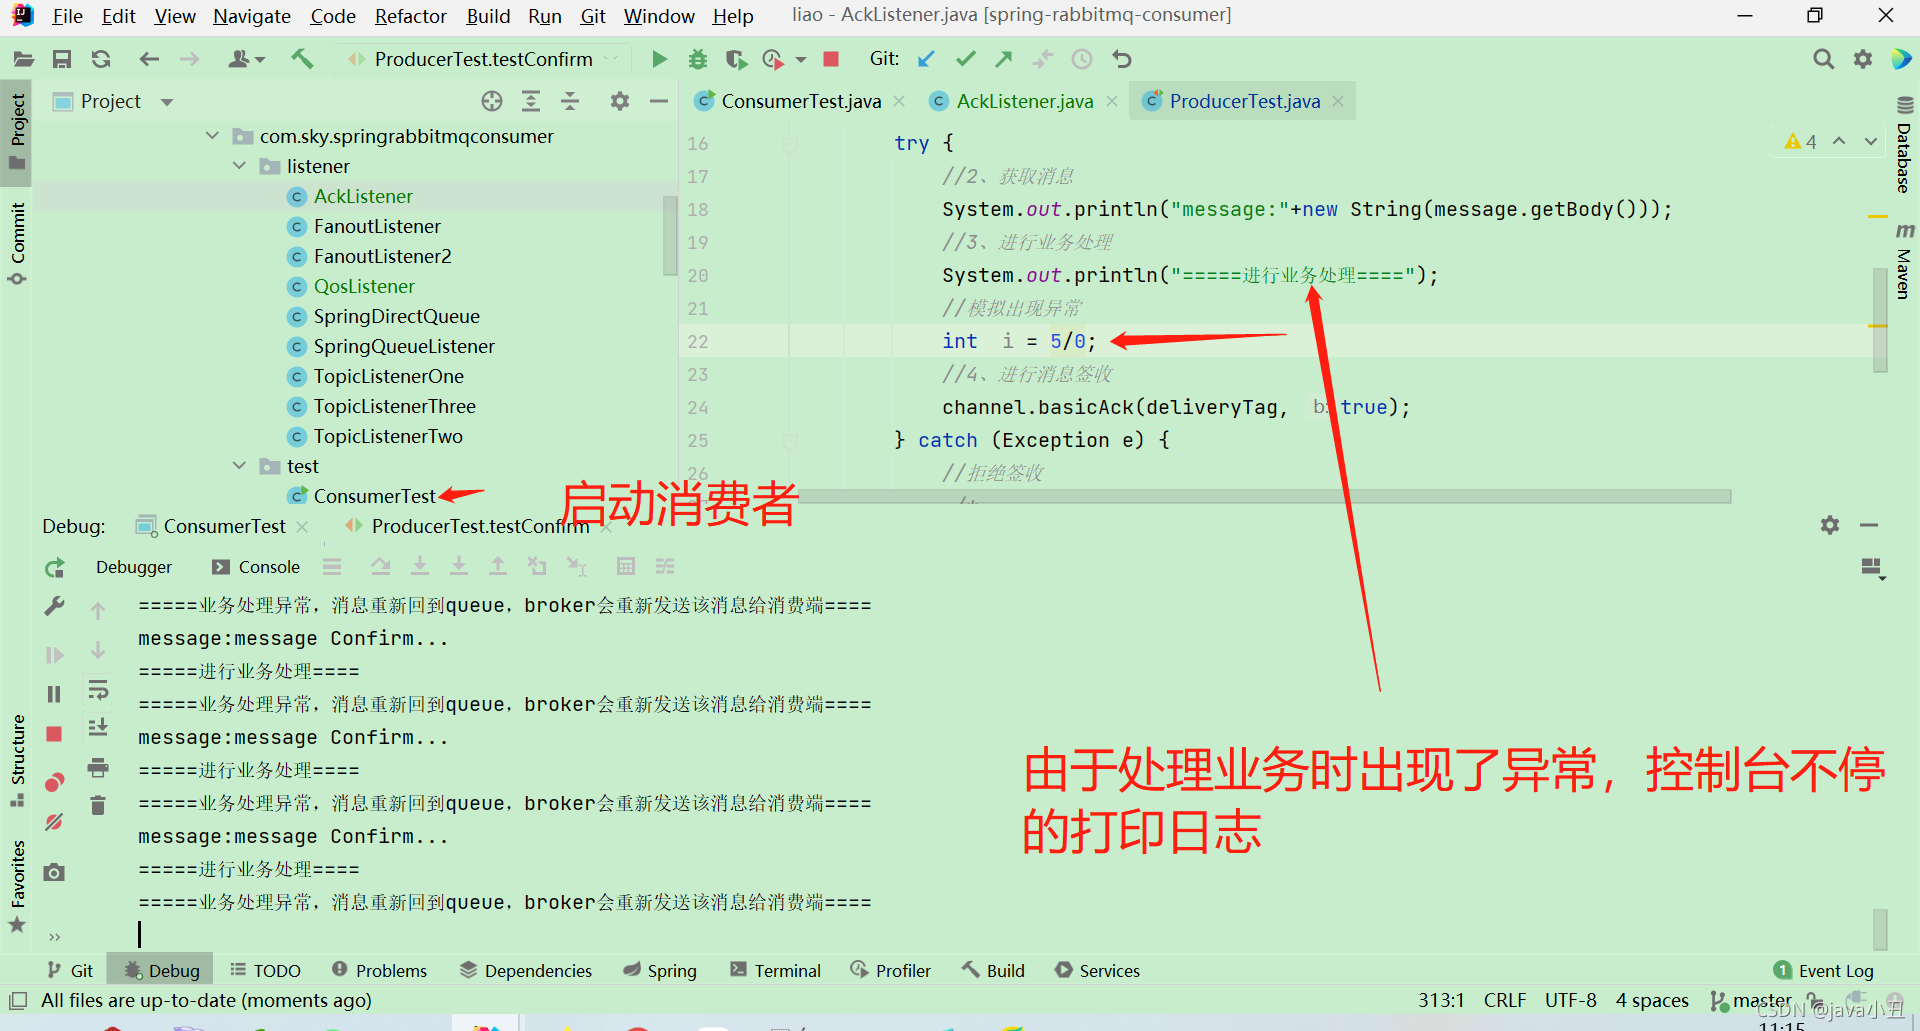
第一处改动:
监听器:AckListener
package com.sky.springrabbitmqconsumer.listener;

import com.rabbitmq.client.Channel;
import org.springframework.amqp.core.Message;
import org.springframework.amqp.rabbit.listener.api.ChannelAwareMessageListener;
import org.springframework.stereotype.Component;


@Component
public class AckListener implements ChannelAwareMessageListener {

    @Override
    public void onMessage(Message message, Channel channel) throws Exception {
        //1、获取消息的id
        long deliveryTag = message.getMessageProperties().getDeliveryTag();
        try {
            //2、获取消息
            System.out.println("message:"+new String(message.getBody()));
            //3、进行业务处理
            System.out.println("=====进行业务处理====");
            //模拟出现异常
            int  i = 5/0;
            //4、进行消息签收
            channel.basicAck(deliveryTag, true);
        } catch (Exception e) {
            //拒绝签收
             /*
              * 第三个参数:requeue:重回队列。如果设置为true,则消息重新回到queue,broker会重新发送该消息给消费端
              */
            System.out.println("=====业务处理异常,消息重新回到queue,broker会重新发送该消息给消费端====");
            channel.basicNack(deliveryTag, true, true);
        }
    }
}
第二处改动:
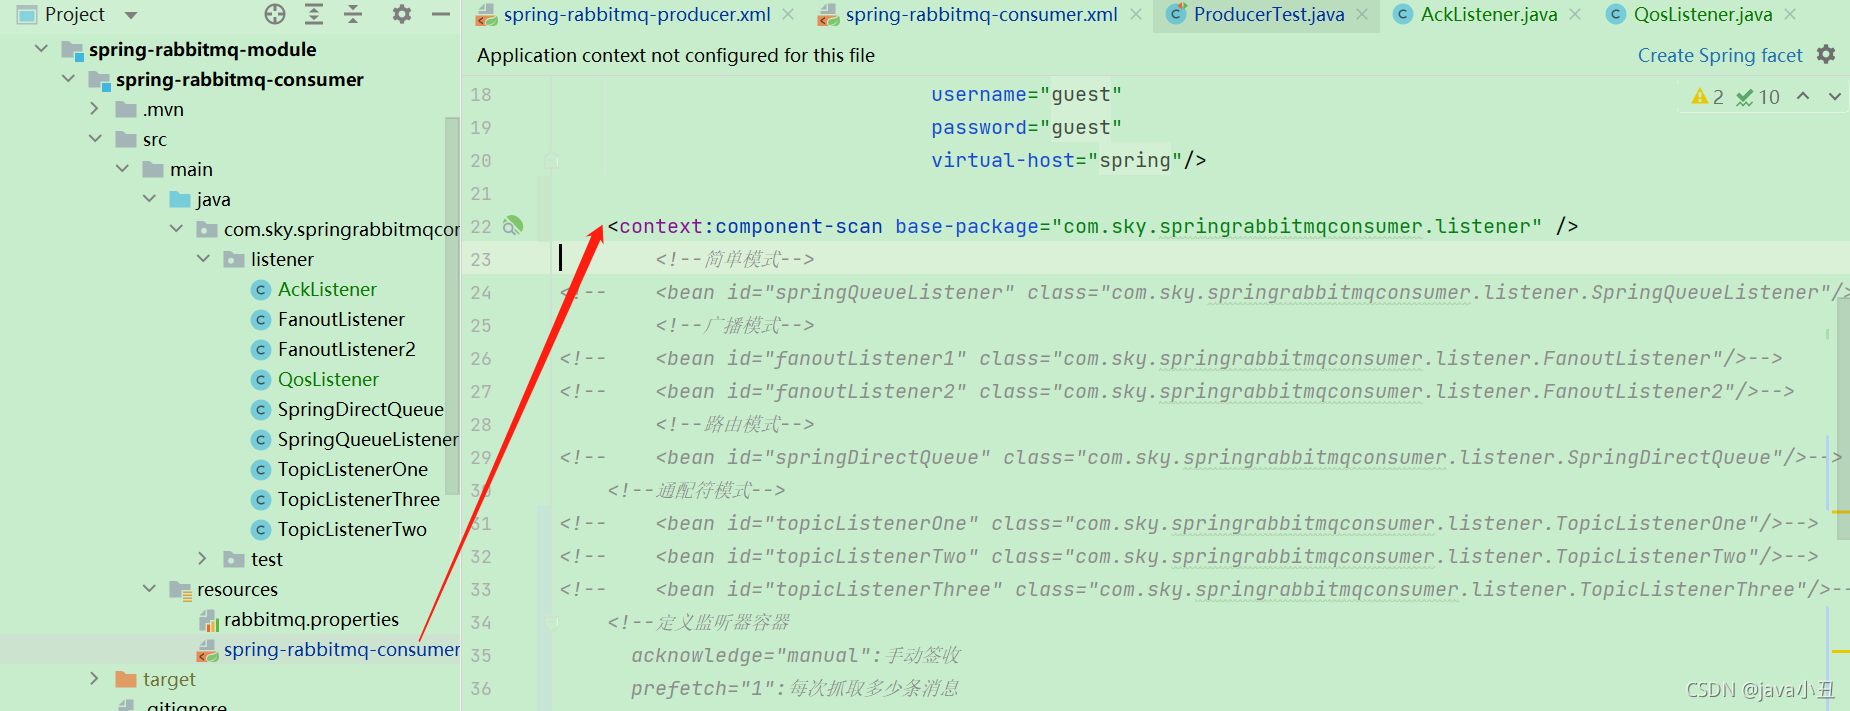 原来是通过声明一个个的bean对象,现在改为了扫描某个包下面的类
<context:component-scan base-package="com.sky.springrabbitmqconsumer.listener" />
第三处改动:
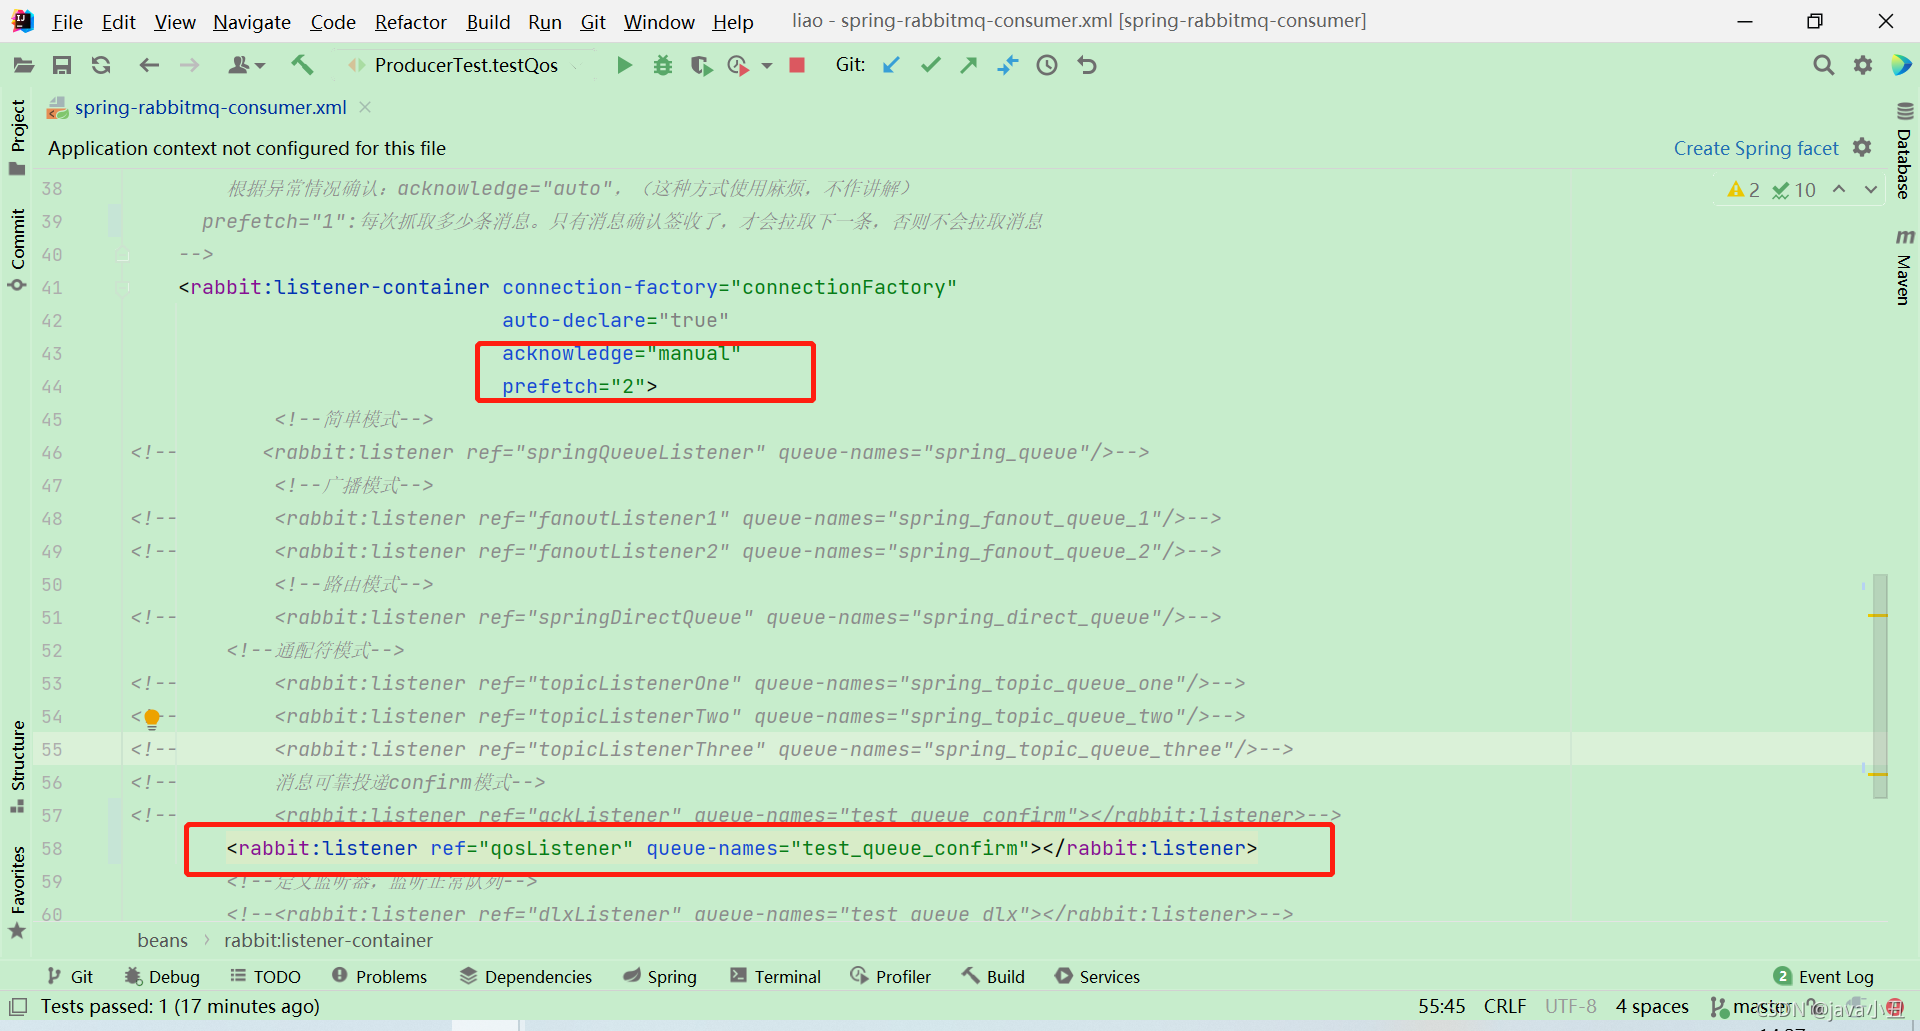
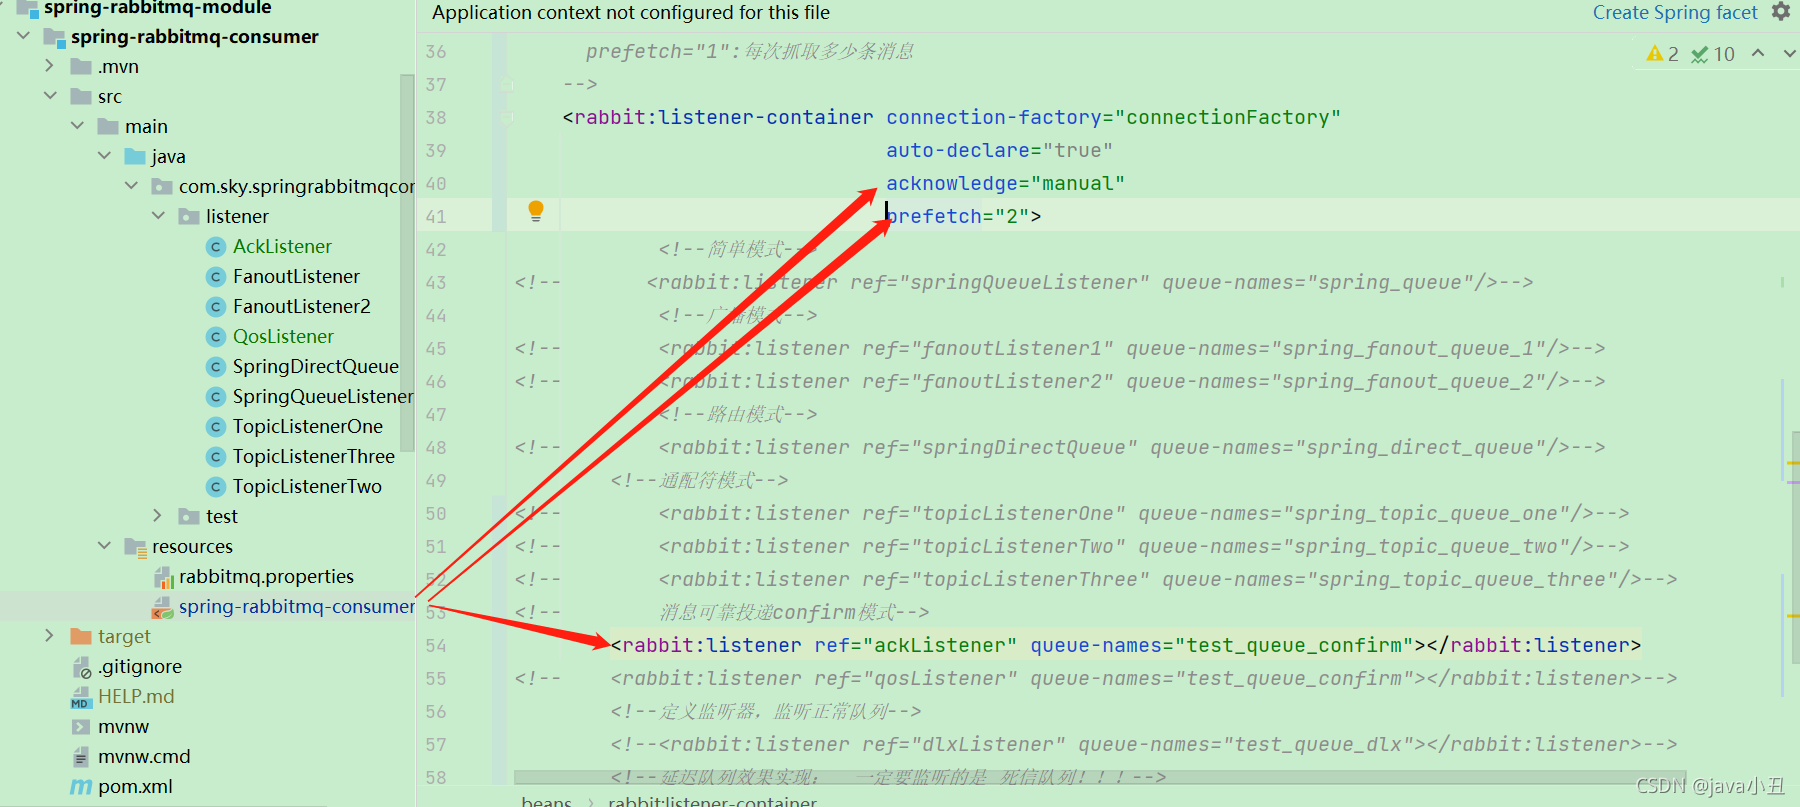 在rabbit:listener-container标签中设置acknowledge属性改为手动确认,(限流设置:prefetch属性改为每次抓取2条消息,并且监听自定义的ackListener)
4.具体实现可靠消息投递的演示
正常发消息Demo演示
启动生产者Confirm模式:
 启动消费者:
 启动生产者Return模式:
 消费者的控制台就会不停的打印:
异常发消息Demo演示
生产者Confirm模式:
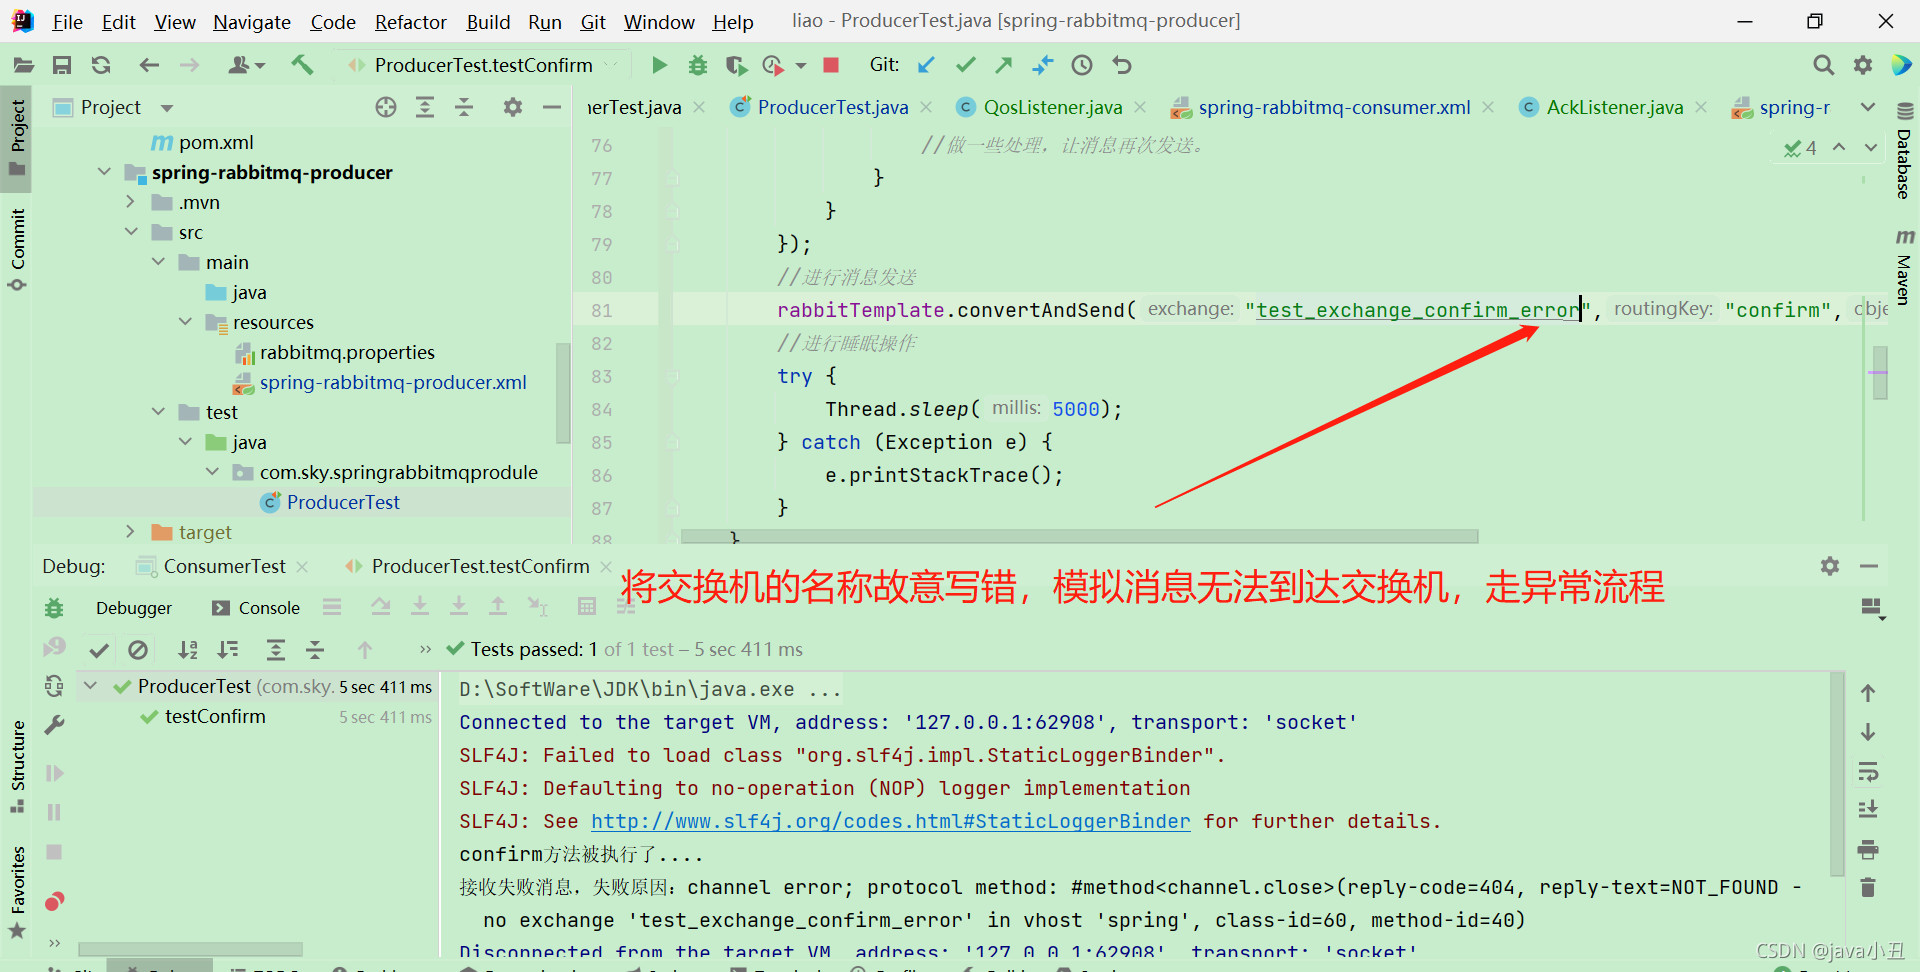 生产者Return模式:
四、消息在消费端限流
1.限流示例图

2.实现步骤
- 在rabbit:listener-container中配置 prefetch属性设置消费端一次拉取多少消息
- 消费端的确认模式一定为手动确认:acknowledge=“manual”
3.具体实现消费端限流代码
消费者
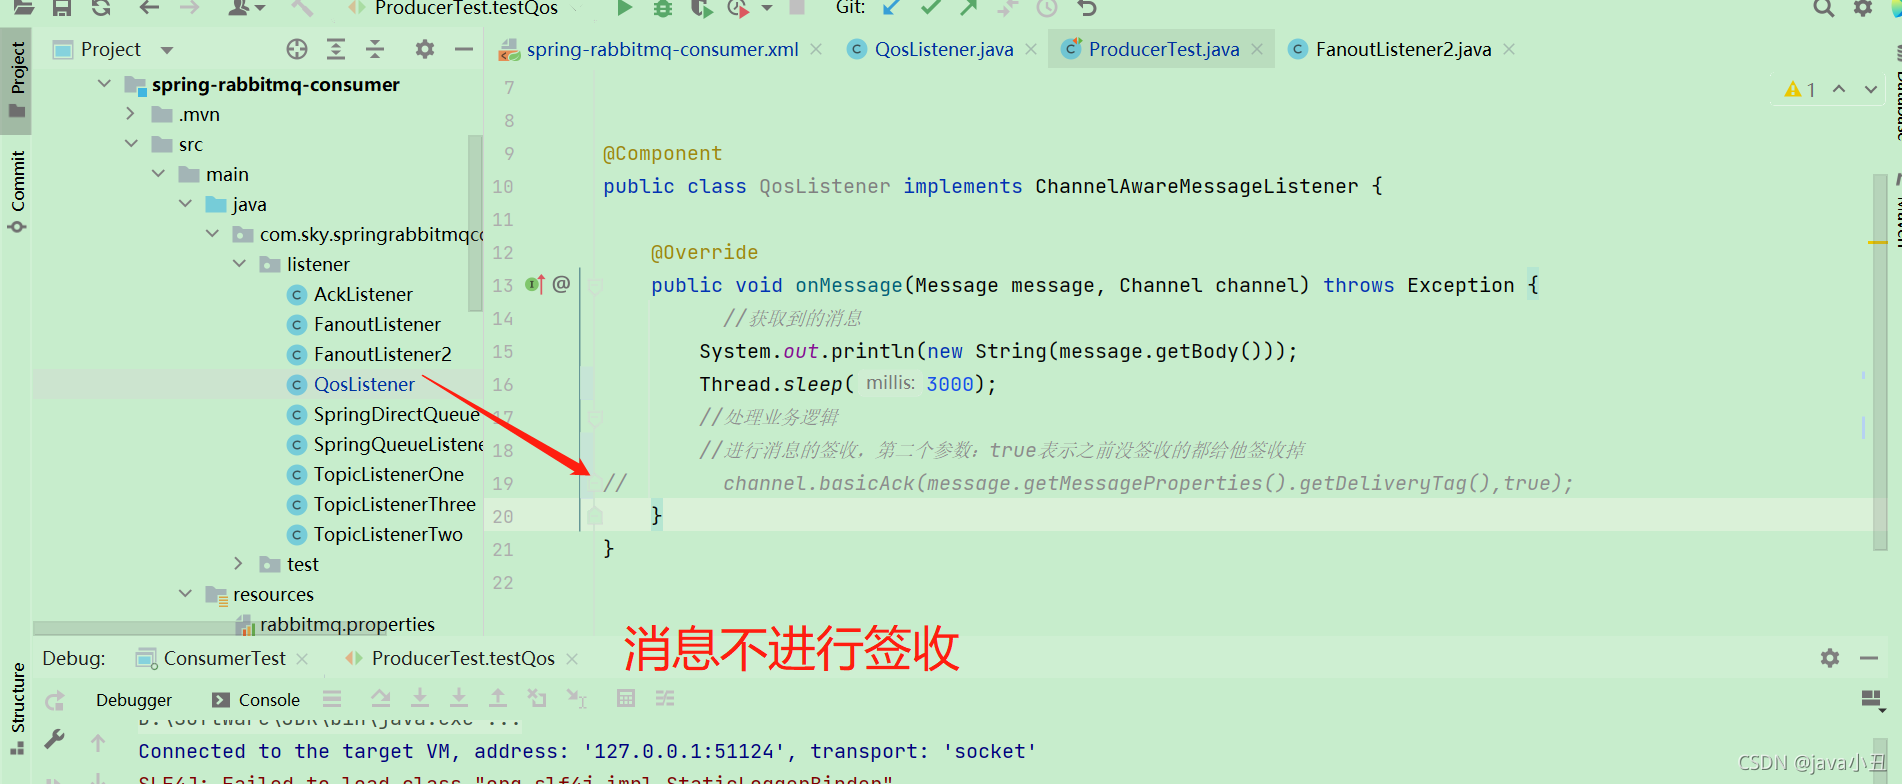
第一处修改:监听器:QosListener
package com.sky.springrabbitmqconsumer.listener;

import com.rabbitmq.client.Channel;
import org.springframework.amqp.core.Message;
import org.springframework.amqp.rabbit.listener.api.ChannelAwareMessageListener;
import org.springframework.stereotype.Component;


@Component
public class QosListener implements ChannelAwareMessageListener {

    @Override
    public void onMessage(Message message, Channel channel) throws Exception {
          //获取到的消息
        System.out.println(new String(message.getBody()));
        Thread.sleep(3000);
        //处理业务逻辑
        //进行消息的签收,第二个参数:true表示之前没签收的都给他签收掉
        channel.basicAck(message.getMessageProperties().getDeliveryTag(),true);
    }
}
第二处修改:
    <!--定义监听器容器
      acknowledge="manual":手动签收
        自动确认:acknowledge="none"
        手动确认:acknowledge="manual"
        根据异常情况确认:acknowledge="auto",(这种方式使用麻烦,不作讲解)
      prefetch="1":每次抓取多少条消息。只有消息确认签收了,才会拉取下一条,否则不会拉取消息
    -->
<rabbit:listener-container connection-factory="connectionFactory"
                               auto-declare="true"
                               acknowledge="manual"
                               prefetch="2">


<rabbit:listener ref="qosListener" queue-names="test_queue_confirm"></rabbit:listener>
生成者
批量发送消息测试方法
    //批量发送消息,让消费者每次拉去指定的数量
    @Test
    public void  testQos(){
        for (int i = 0; i < 10; i++) {
            // 发送消息
            rabbitTemplate.convertAndSend("test_exchange_confirm", "confirm", "message confirm....");
        }
    }
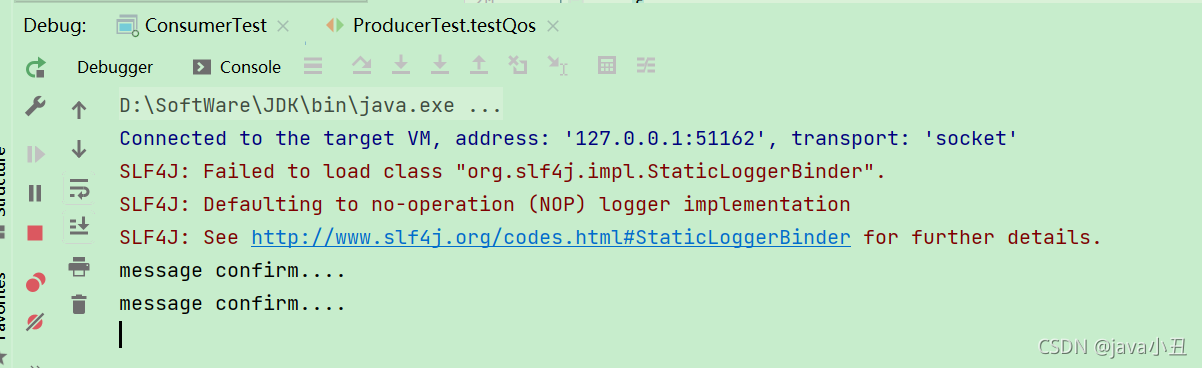
4.具体实现消费端限流Demo演示
启动消费者
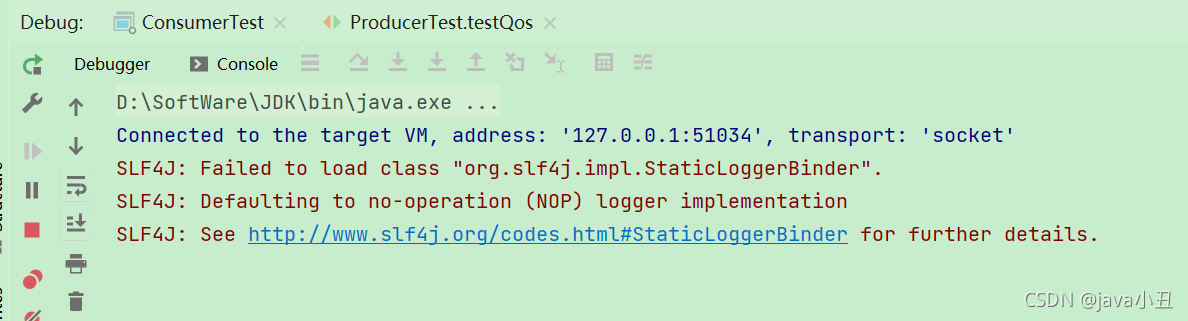
启动生产者

查看消费者控制台日志
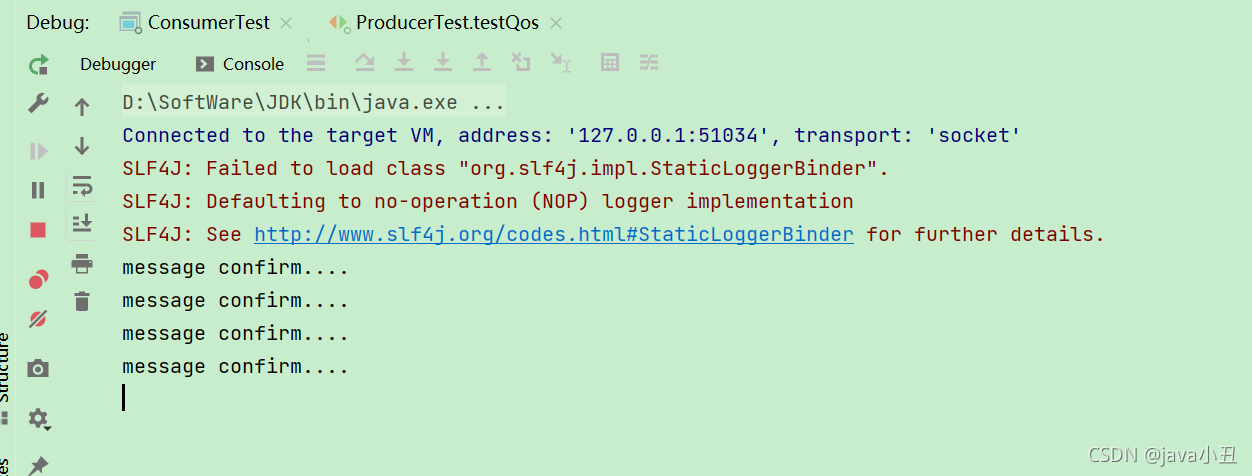 说明:每隔3秒打印一条消息
异常情况,消费未进行签收
 重启消费者和生产者发消息,这个时候会看到,原本发送的十条消息,实际只有二条消息打印在消费者的控制台上面,因为prefetch属性配置了2,所以一次性拉取了二条。
 <hr style=" border:solid; 100px; height:1px;" color=#000000 size=1">
五、TTL
1.业务场景
 比如我们在下订单的时候,如果超过30分钟未支付,就取消这个订单,把当前商品的库存加回去。
2.定义
TTL 全称 Time To Live(存活时间/过期时间),当消息到达存活时间后,还没有被消费,会被自动清除。RabbitMQ可以对消息设置过期时间,也可以对整个队列(Queue)设置过期时间。
3.实现步骤
- 设置队列过期时间使用参数:x-message-ttl,单位:ms(毫秒),会对整个队列消息统一过期。
- 设置消息过期时间使用参数:expiration。单位:ms(毫秒),当该消息在队列头部时(消费时),会单独判断这一消息是否过期。
- 如果两者都进行了设置,以时间短的为准。
4.通过RabbitMQ管理控制台页面实现Demo
1.创建消息
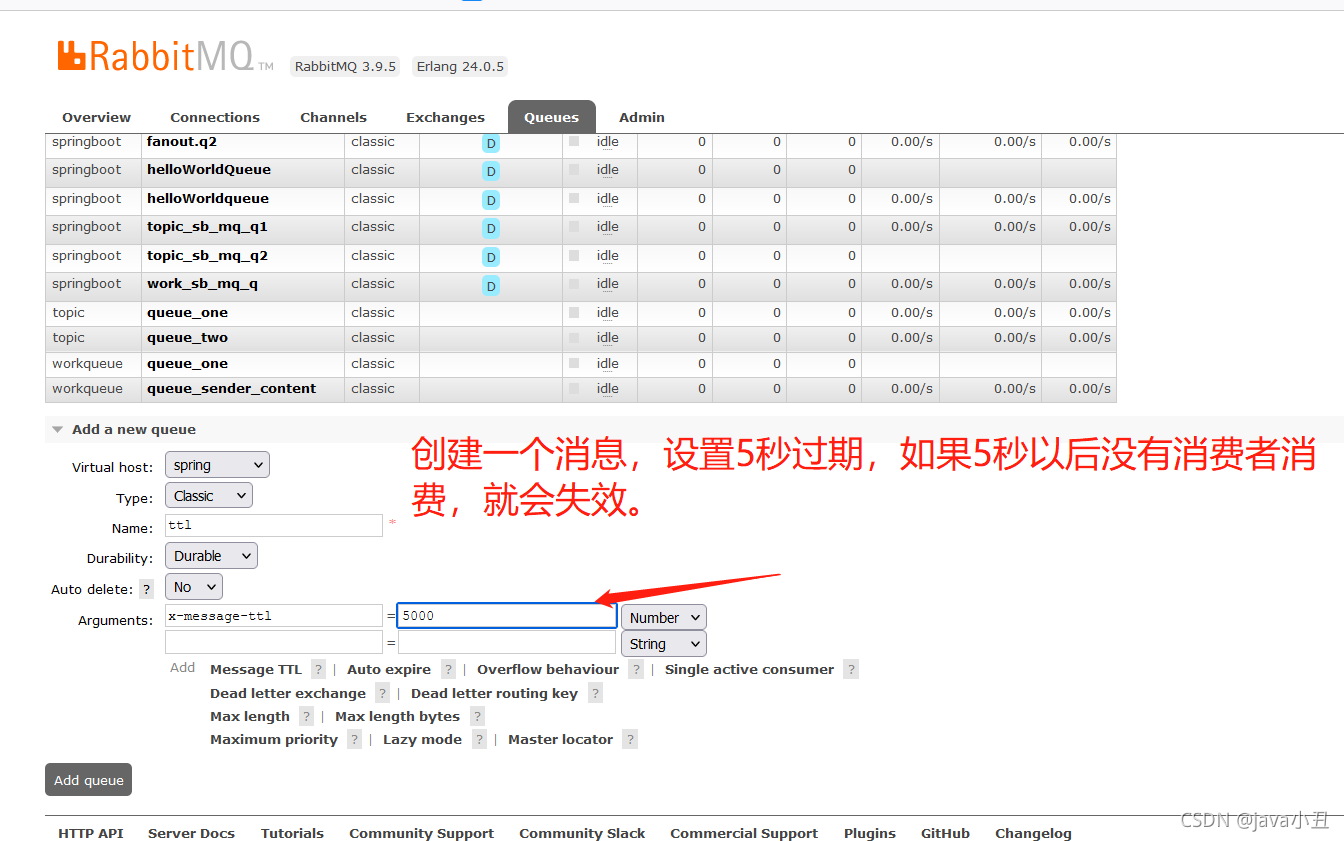
2.创建交换机
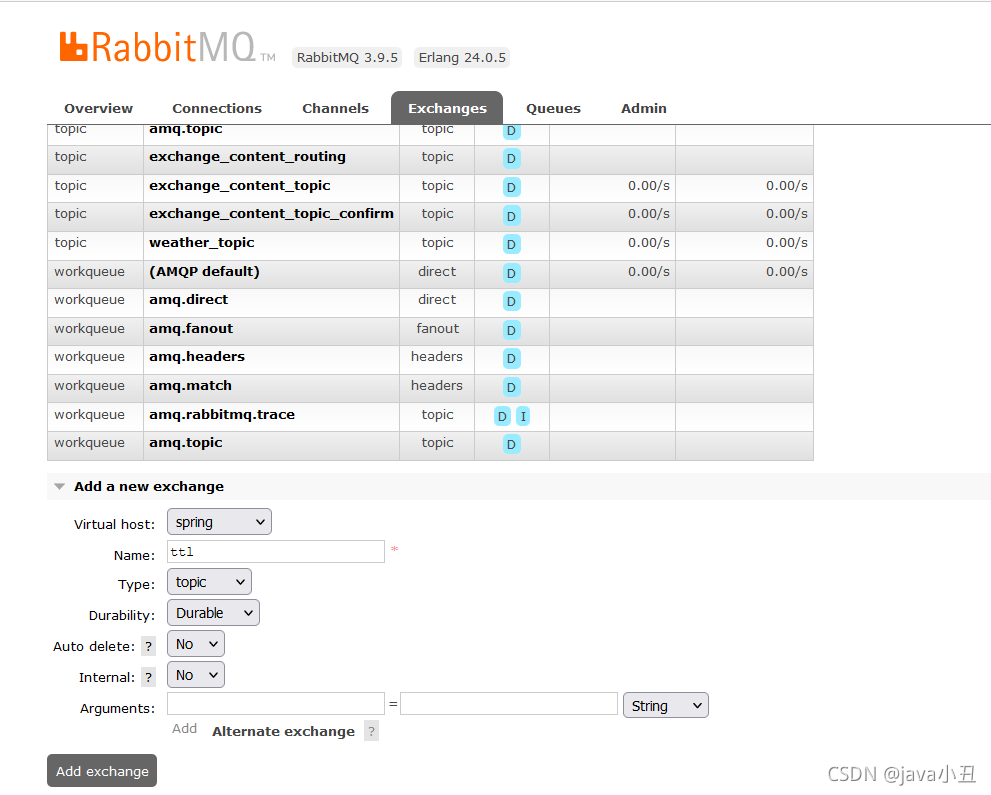
3.将交换机和消息绑定

4.发送消息
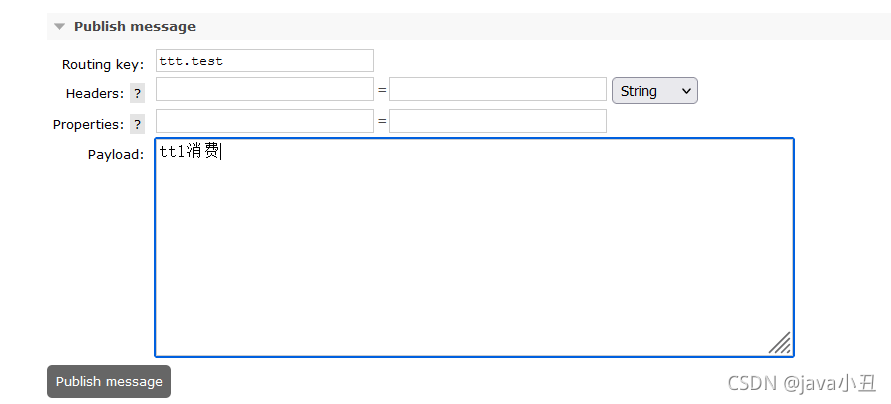 超过5秒没有消费者消费,就自动失效了。
5.通过代码实现TTL
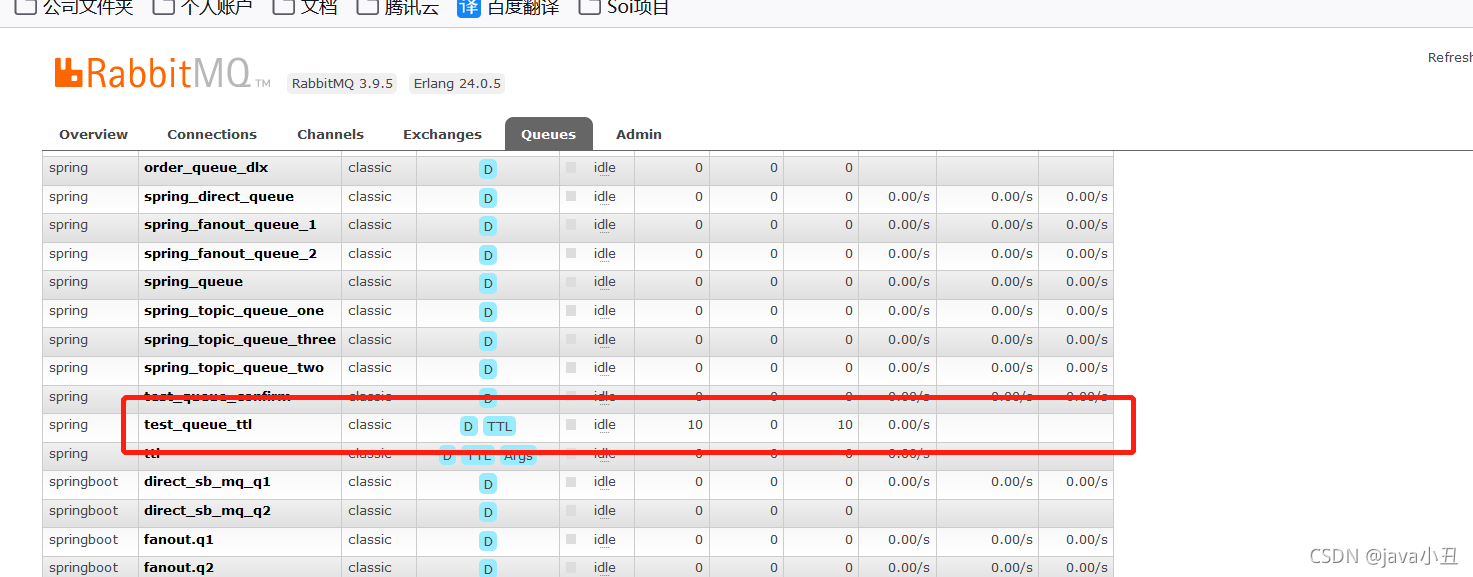
添加ttl队列
    <!--ttl-->
    <rabbit:queue name="test_queue_ttl" id="test_queue_ttl">
        <!--设置queue的参数-->
        <rabbit:queue-arguments>
            <!--x-message-ttl指队列的过期时间-->
            <entry key="x-message-ttl" value="100000" value-type="java.lang.Integer"></entry>
        </rabbit:queue-arguments>
    </rabbit:queue>
     <rabbit:topic-exchange name="test_exchange_ttl" >
         <rabbit:bindings>
             <rabbit:binding pattern="ttl.#" queue="test_queue_ttl"></rabbit:binding>
         </rabbit:bindings>
     </rabbit:topic-exchange>
发送消息测试方法
    //ttl测试
    @Test
    public void  testTtl(){
        for (int i = 0; i < 10; i++) {
            // 发送消息
            rabbitTemplate.convertAndSend("test_exchange_confirm", "ttl.test", "message confirm....");
        }
    }
启动测试方法
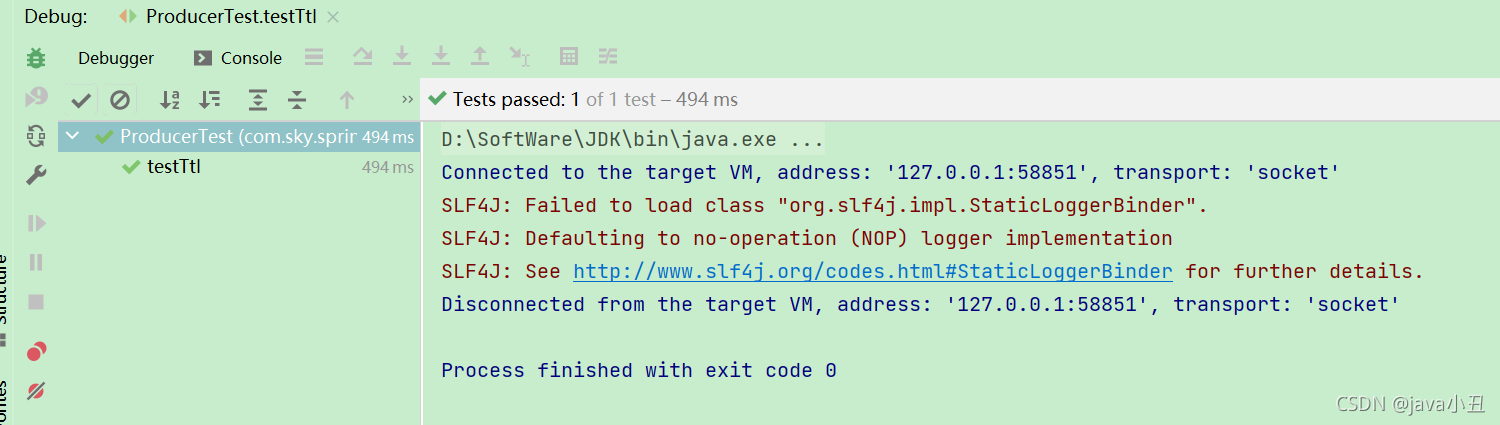
 等待10秒
等待10秒

六、死信队列
1.定义
死信队列,英文缩写:DLX 。Dead Letter Exchange(死信交换机),当消息成为Dead message后,可以被重新发送到另一个交换机,这个交换机就是DLX。
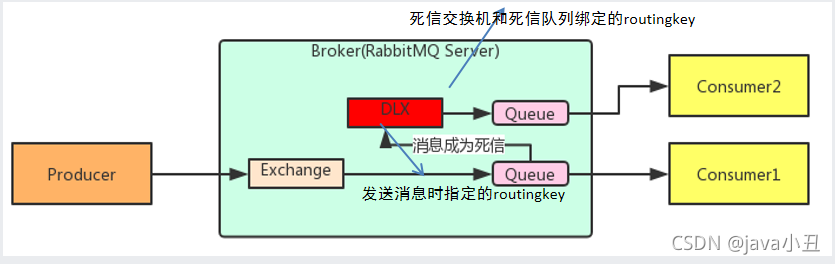 说明:死信交换机和死信队列和普通的没有区别,当消息成为死信后,如果该队列绑定了死信交换机,则消息会被死信交换机重新路由到死信队列。
2.消息成为死信的三种情况
- 队列消息长度到达限制;
- 消费者拒接消费消息,basicNack/basicReject,并且不把消息重新放入原目标队列,requeue=false;
- 原队列存在消息过期设置,消息到达超时时间未被消费;
3.队列绑定死信交换机
给队列设置参数: x-dead-letter-exchange 和 x-dead-letter-routing-key
4.代码实现
在spring-rabbitmq-producer.xml中添加队列和交换机
    <!--
        死信队列:
            1. 声明正常的队列(test_queue_dlx)和交换机(test_exchange_dlx)
            2. 声明死信队列(queue_dlx)和死信交换机(exchange_dlx)
            3. 正常队列绑定死信交换机
                设置两个参数:
                    * x-dead-letter-exchange:死信交换机名称
                    * x-dead-letter-routing-key:发送给死信交换机的routingkey
    -->
    <!--
        1. 声明正常的队列(test_queue_dlx)和交换机(test_exchange_dlx)
    -->
     <rabbit:queue name="test_queue_dlx" id="test_queue_dlx">
         <!--3. 正常队列绑定死信交换机-->
         <rabbit:queue-arguments>
             <!--3.1 x-dead-letter-exchange:死信交换机名称-->
             <entry key="x-dead-letter-exchange" value="exchange_dlx" />
             <!--3.2 x-dead-letter-routing-key:发送给死信交换机的routingkey-->
             <entry key="x-dead-letter-routing-key" value="dlx.test" />
             <!--4.1 设置队列的过期时间 ttl-->
             <entry key="x-message-ttl" value="10000" value-type="java.lang.Integer" />
             <!--4.2 设置队列的长度限制 max-length -->
             <entry key="x-max-length" value="10" value-type="java.lang.Integer" />
         </rabbit:queue-arguments>
     </rabbit:queue>
     <!--    正常的交换机绑定正常的队列-->
     <rabbit:topic-exchange name="test_exchange_dlx">
         <rabbit:bindings>
             <rabbit:binding pattern="test.dlx.#" queue="test_queue_dlx"></rabbit:binding>
         </rabbit:bindings>
     </rabbit:topic-exchange>
    <!--
       2. 声明死信队列(queue_dlx)和死信交换机(exchange_dlx)
   -->
     <rabbit:queue name="queue_dlx" id="queue_dlx"></rabbit:queue>
     <rabbit:topic-exchange name="exchange_dlx">
         <rabbit:bindings>
             <rabbit:binding pattern="dlx.#" queue="queue_dlx"></rabbit:binding>
         </rabbit:bindings>
     </rabbit:topic-exchange>
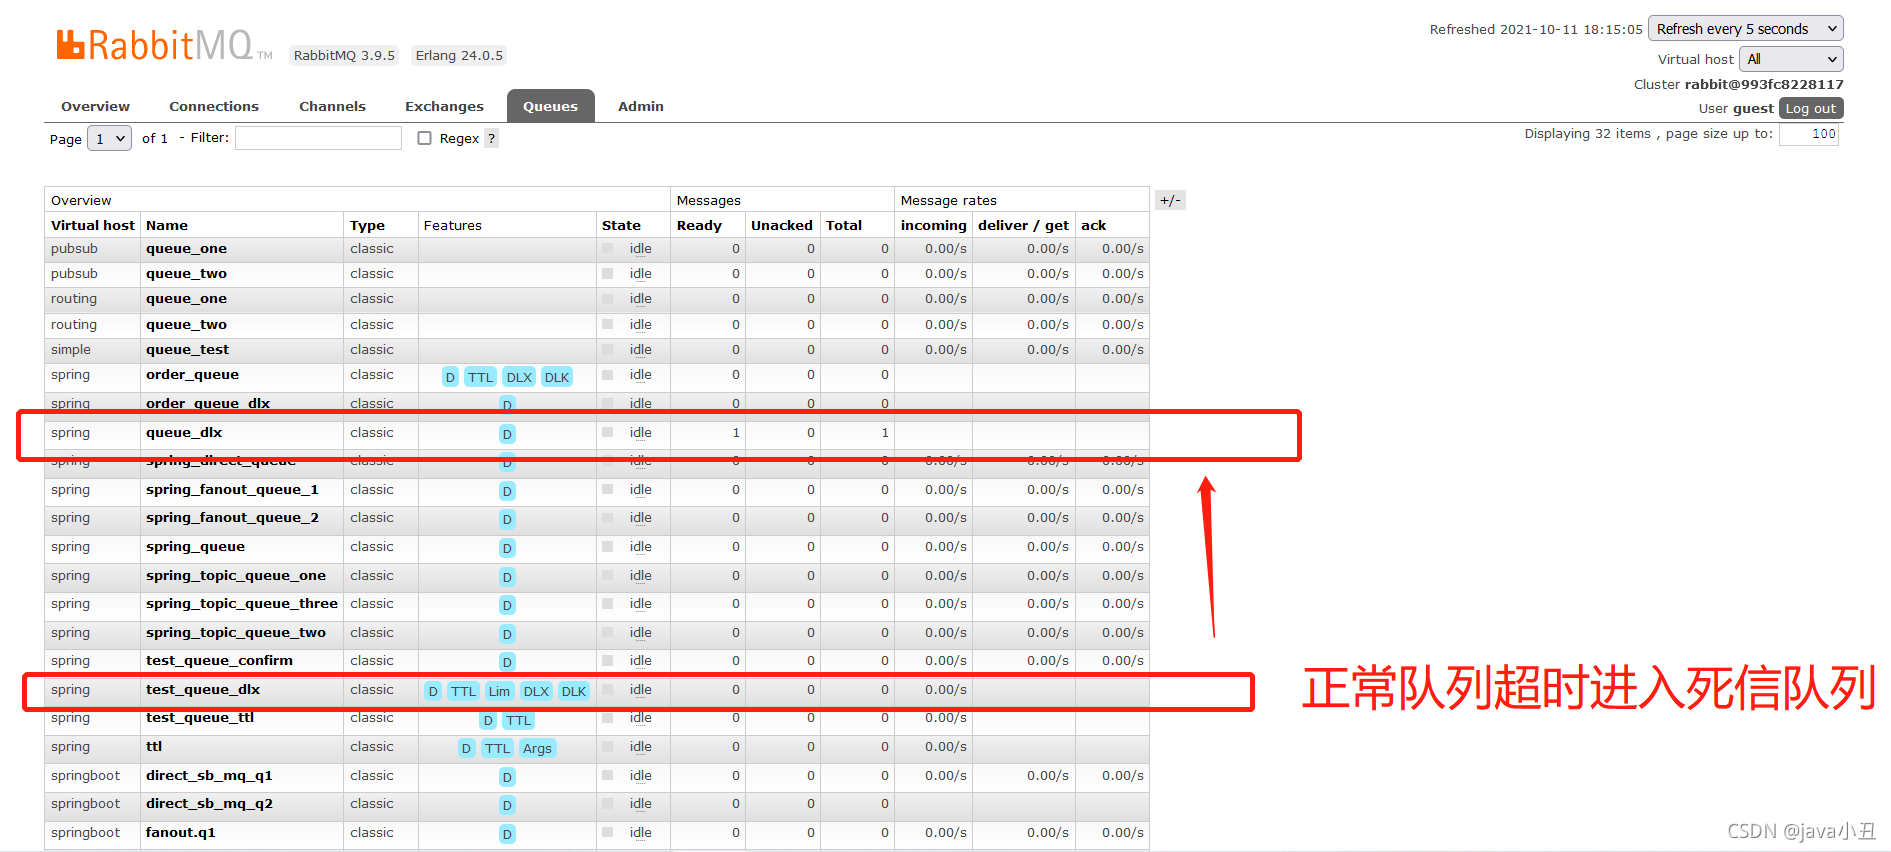
启动生产者:
 RabbitMQ管控页面查看
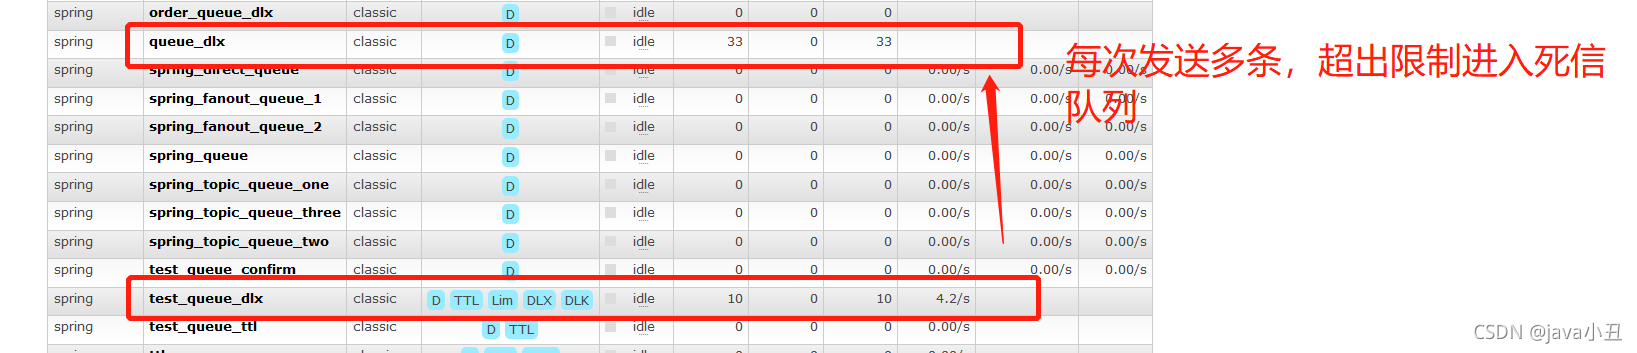 消息拒收同理
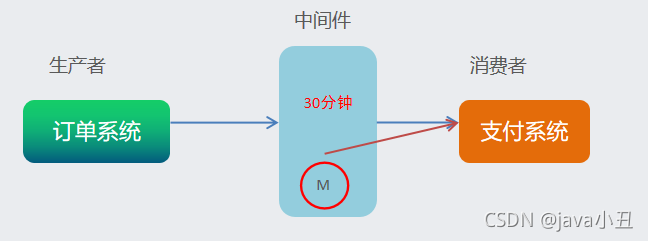
七、延迟队列
1.定义
延迟队列,即消息进入队列后不会立即被消费,只有到达指定时间后,才会被消费。在RabbitMQ中并未提供延迟队列功能,但是可以使用:TTL+死信队列 组合实现延迟队列的效果。
2.场景

-
下单后,30分钟未支付,取消订单,回滚库存。
-
新用户注册成功7天后,发送短信问候。
3.具体实现
1.生产者
在spring-rabbitmq-producer.xml添加以下代码
    <!--
        延迟队列:
            1. 定义正常交换机(order_exchange)和队列(order_queue)
            2. 定义死信交换机(order_exchange_dlx)和队列(order_queue_dlx)
            3. 绑定,设置正常队列过期时间为30分钟
    -->
    <!-- 1. 定义正常交换机(order_exchange)和队列(order_queue)-->
    <rabbit:queue id="order_queue" name="order_queue">
        <!--3. 绑定,设置正常队列过期时间为30分钟-->
        <rabbit:queue-arguments>
            <entry key="x-dead-letter-exchange" value="order_exchange_dlx" />
            <entry key="x-dead-letter-routing-key" value="dlx.order.cancel" />
            <entry key="x-message-ttl" value="10000" value-type="java.lang.Integer" />
        </rabbit:queue-arguments>
    </rabbit:queue>
<!--    订单业务的交换机和队列-->
    <rabbit:topic-exchange name="order_exchange">
        <rabbit:bindings>
            <rabbit:binding pattern="order.#" queue="order_queue"></rabbit:binding>
        </rabbit:bindings>
    </rabbit:topic-exchange>
    <!--2. 定义死信交换机(order_exchange_dlx)和队列(order_queue_dlx)-->
    <rabbit:queue id="order_queue_dlx" name="order_queue_dlx"></rabbit:queue>
    <rabbit:topic-exchange name="order_exchange_dlx">
        <rabbit:bindings>
            <rabbit:binding pattern="dlx.order.#" queue="order_queue_dlx"></rabbit:binding>
        </rabbit:bindings>
    </rabbit:topic-exchange>
发消息测试
/*
* 测试延时消息
* */
@Test
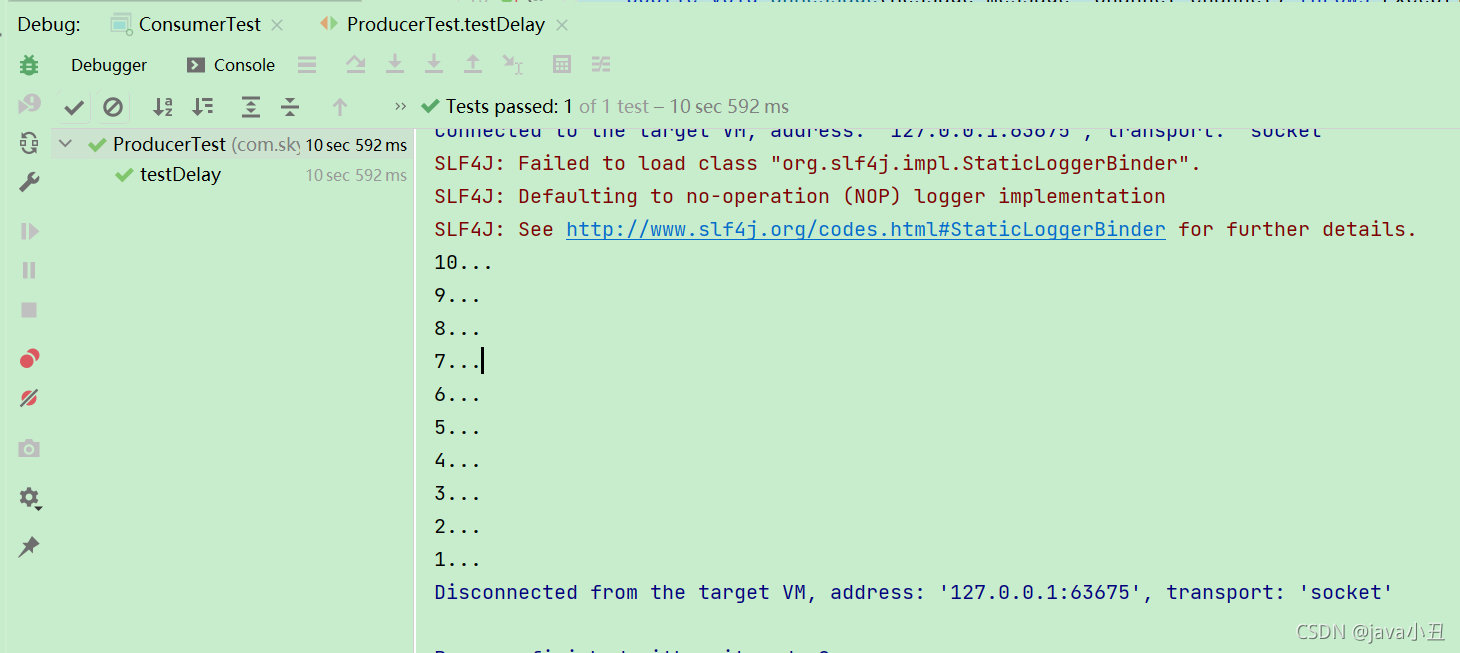
public void testDelay() throws InterruptedException {
//1.发送订单消息。 将来是在订单系统中,下单成功后,发送消息
rabbitTemplate.convertAndSend("order_exchange","order.msg","订单信息:id=1,time=2021年10月...");
//2.打印倒计时10秒
for (int i = 10; i > 0 ; i--) {
System.out.println(i+"...");
Thread.sleep(1000);
}
}
2.消费者
spring-rabbitmq-consumer.xml配置
<!--延迟队列效果实现:  一定要监听的是 死信队列!!!-->
          <rabbit:listener ref="orderListener" queue-names="order_queue_dlx"></rabbit:listener>
添加监听器OrderListener
package com.sky.springrabbitmqconsumer.listener;

import com.rabbitmq.client.Channel;
import org.springframework.amqp.core.Message;
import org.springframework.amqp.rabbit.listener.api.ChannelAwareMessageListener;
import org.springframework.stereotype.Component;


@Component
public class OrderListener implements ChannelAwareMessageListener {

    @Override
    public void onMessage(Message message, Channel channel) throws Exception {
        long deliveryTag = message.getMessageProperties().getDeliveryTag();
        try {
            //1.接收转换消息
            System.out.println(new String(message.getBody()));
            //2. 处理业务逻辑
            System.out.println("处理业务逻辑...");
            System.out.println("根据订单id查询其状态...");
            System.out.println("判断状态是否为支付成功");
            System.out.println("取消订单,回滚库存....");
            //3. 手动签收
            channel.basicAck(deliveryTag,true);
        } catch (Exception e) {
            //e.printStackTrace();
            System.out.println("出现异常,拒绝接受");
            //4.拒绝签收,不重回队列 requeue=false
            channel.basicNack(deliveryTag,true,false);
        }
    }
}
4.Demo演示
启动生产者
 启动消费者
启动消费者
 说明:过了十秒之后才发送消息
八、消息积压
1.场景
- 消费者宕机消息积压
- 消费者消费能力不足
- 发送这发送流量太大
2.解决方案
上线更多的消费者,进行正常消费,上线专门的队列消费访问,先将消息批量取出来,记录到数据库中,再慢慢处理。
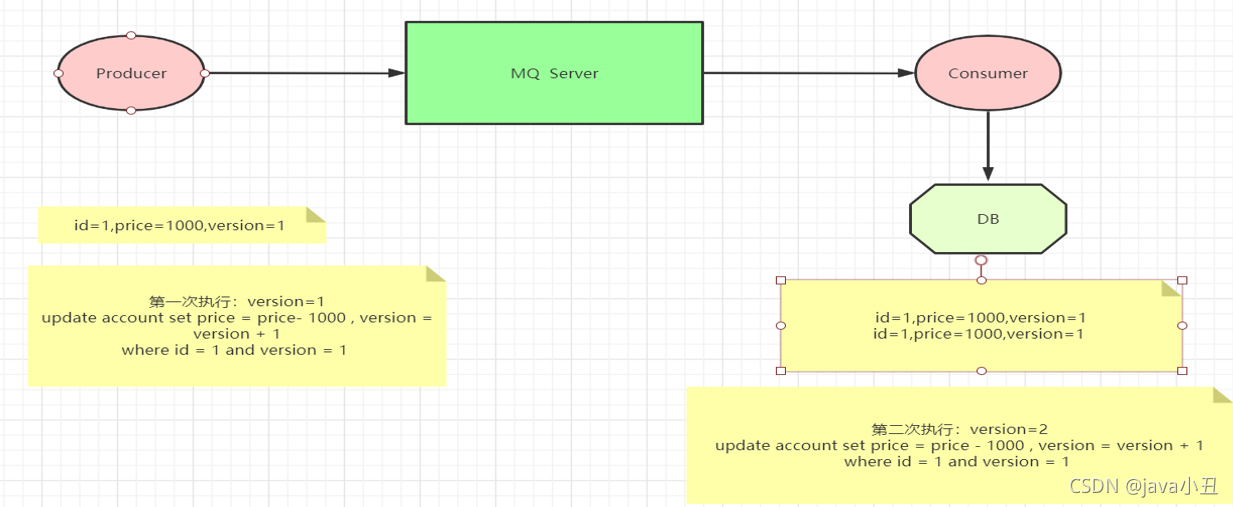
九、消息幂等性
1.定义
幂等性指一次和多次请求某一个资源,对于资源本身应该具有同样的结果。也就是说,其任意多次执行对资源本身所产生的影响均与一次执行的影响相同。在MQ中指,消费多条相同的消息,得到与消费该消息一次相同的结果。
2.解决方案
消息幂等性保障–乐观锁机制
除此之外,我还提供了项目地址提供给大家clone,地址链接:[https://gitee.com/java_wxid/liao](https://gitee.com/java_wxid/liao),项目中的spring-rabbitmq-produle改为了spring-rabbitmq-producer,原意是产品生产消息给消费者消费,怕大家把produle搞错,改为了生产者,更加通俗易懂。
三、Springboot集成RabbitMQ(直连模式,工作队列模式,发布订阅模式,路由模式,通配符模式
提示:Springboot集成Rabbitmq实战案例,通过接口调用的方式演示。
一、集成步骤
一、生产者:
-
创建生产者SpringBoot工程
-
引入pom依赖
<dependency> <groupId>org.springframework.boot</groupId> <artifactId>spring-boot-starter-amqp</artifactId> </dependency> -
编写rabbitmq配置消息
-
定义交换机,队列以及绑定关系的配置类
-
注入RabbitTemplate,调用方法,完成消息发送
二、消费者:
-
创建生产者SpringBoot工程
-
引入pom依赖
<dependency> <groupId>org.springframework.boot</groupId> <artifactId>spring-boot-starter-amqp</artifactId> </dependency> -
编写rabbitmq配置消息
-
定义监听类,使用@RabbitListener注解完成队列监听。
二、实现步骤
1.项目架构图
2.创建项目
代码如下(示例):
1.pom依赖
<?xml version="1.0" encoding="UTF-8"?>
<project xmlns="http://maven.apache.org/POM/4.0.0" xmlns:xsi="http://www.w3.org/2001/XMLSchema-instance"
         xsi:schemaLocation="http://maven.apache.org/POM/4.0.0 https://maven.apache.org/xsd/maven-4.0.0.xsd">
    <modelVersion>4.0.0</modelVersion>
    <parent>
        <groupId>org.springframework.boot</groupId>
        <artifactId>spring-boot-starter-parent</artifactId>
        <version>2.5.5</version>
        <relativePath/> <!-- lookup parent from repository -->
    </parent>
    <groupId>com.sky</groupId>
    <artifactId>springboot-rabbitmq-module</artifactId>
    <version>0.0.1-SNAPSHOT</version>
    <name>springboot-rabbitmq-module</name>
    <description>springboot-rabbitmq-module</description>
    <properties>
        <project.build.sourceEncoding>UTF-8</project.build.sourceEncoding>
        <maven.compiler.source>1.7</maven.compiler.source>
        <maven.compiler.target>1.7</maven.compiler.target>
    </properties>
    <dependencies>
        <dependency>
            <groupId>org.springframework.boot</groupId>
            <artifactId>spring-boot-starter</artifactId>
        </dependency>

        <dependency>
            <groupId>org.springframework.boot</groupId>
            <artifactId>spring-boot-starter-test</artifactId>
            <scope>test</scope>
        </dependency>

        <dependency>
            <groupId>org.springframework.boot</groupId>
            <artifactId>spring-boot-starter-amqp</artifactId>
        </dependency>
        <dependency>
            <groupId>org.springframework.boot</groupId>
            <artifactId>spring-boot-starter-web</artifactId>
        </dependency>

        <dependency>
            <groupId>junit</groupId>
            <artifactId>junit</artifactId>
            <version>4.11</version>
            <scope>test</scope>
        </dependency>
    </dependencies>

    <build>
        <finalName>springboot_rabbitmq</finalName>
        <pluginManagement><!-- lock down plugins versions to avoid using Maven defaults (may be moved to parent pom) -->
            <plugins>
                <plugin>
                    <artifactId>maven-clean-plugin</artifactId>
                    <version>3.1.0</version>
                </plugin>
                <!-- see http://maven.apache.org/ref/current/maven-core/default-bindings.html#Plugin_bindings_for_war_packaging -->
                <plugin>
                    <artifactId>maven-resources-plugin</artifactId>
                    <version>3.0.2</version>
                </plugin>
                <plugin>
                    <artifactId>maven-compiler-plugin</artifactId>
                    <version>3.8.0</version>
                </plugin>
                <plugin>
                    <artifactId>maven-surefire-plugin</artifactId>
                    <version>2.22.1</version>
                </plugin>
                <plugin>
                    <artifactId>maven-war-plugin</artifactId>
                    <version>3.2.2</version>
                </plugin>
                <plugin>
                    <artifactId>maven-install-plugin</artifactId>
                    <version>2.5.2</version>
                </plugin>
                <plugin>
                    <artifactId>maven-deploy-plugin</artifactId>
                    <version>2.8.2</version>
                </plugin>
            </plugins>
        </pluginManagement>
    </build>

</project>
2.application.properties配置
server.port=8080
#spring.rabbitmq.host=localhost
spring.rabbitmq.port=5672
spring.rabbitmq.username=guest
spring.rabbitmq.password=guest
spring.rabbitmq.addresses=110.42.239.246
spring.rabbitmq.virtual-host=springboot

#spring.rabbitmq.addresses=110.42.239.246:5672,110.42.239.247:5672,110.42.239.248:5672
说明:这里免费提供rabbitmq连接方式给大家使用学习
3.config配置
HelloWorldConfig
package com.sky.springbootrabbitmqmodule.config;

import org.springframework.amqp.core.Queue;
import org.springframework.context.annotation.Bean;
import org.springframework.context.annotation.Configuration;

/**
 * HelloWorld rabbitmq课上讲解的第一个工作模式
 * 直连模式只需要声明队列,所有消息都通过队列转发。
 * 无需设置交换机
 */
@Configuration
public class HelloWorldConfig {

	@Bean
	public Queue setQueue() {
		return new Queue("helloWorldqueue");
	}
}
FanoutConfig
package com.sky.springbootrabbitmqmodule.config;

import org.springframework.amqp.core.Binding;
import org.springframework.amqp.core.BindingBuilder;
import org.springframework.amqp.core.FanoutExchange;
import org.springframework.amqp.core.Queue;
import org.springframework.context.annotation.Bean;
import org.springframework.context.annotation.Configuration;

/**
 * Fanout模式需要声明exchange,并绑定queue,由exchange负责转发到queue上。
 * 广播模式 交换机类型设置为:fanout
 */
@Configuration
public class FanoutConfig {

	//声明队列
	@Bean
	public Queue fanoutQ1() {
		return new Queue("fanout.q1");
	}
	@Bean
	public Queue fanoutQ2() {
		return new Queue("fanout.q2");
	}


	//声明exchange
	@Bean
	public FanoutExchange setFanoutExchange() {
		return new FanoutExchange("fanoutExchange");
	}


	//声明Binding,exchange与queue的绑定关系
	@Bean
	public Binding bindQ1() {
		return BindingBuilder.bind(fanoutQ1()).to(setFanoutExchange());
	}
	@Bean
	public Binding bindQ2() {
		return BindingBuilder.bind(fanoutQ2()).to(setFanoutExchange());
	}

}
WorkConfig
package com.sky.springbootrabbitmqmodule.config;


import org.springframework.amqp.core.Queue;
import org.springframework.context.annotation.Bean;
import org.springframework.context.annotation.Configuration;

@Configuration
public class WorkConfig {


    //声明队列
    @Bean
    public Queue workQ1() {
        return new Queue("work_sb_mq_q");
    }

}
DirectConfig
package com.sky.springbootrabbitmqmodule.config;

import org.springframework.amqp.core.*;
import org.springframework.context.annotation.Bean;
import org.springframework.context.annotation.Configuration;


/*
   路由模式|Routing模式   交换机类型:direct
*/
@Configuration
public class DirectConfig {

	//声明队列
	@Bean
	public Queue directQ1() {
		return new Queue("direct_sb_mq_q1");
	}
	@Bean
	public Queue directQ2() {
		return new Queue("direct_sb_mq_q2");
	}


	//声明exchange
	@Bean
	public DirectExchange setDirectExchange() {
		return new DirectExchange("directExchange");
	}

	//声明binding,需要声明一个routingKey
	@Bean
	public Binding bindDirectBind1() {
		return BindingBuilder.bind(directQ1()).to(setDirectExchange()).with("directBind.one");
	}
	@Bean
	public Binding bindDirectBind2() {
			return BindingBuilder.bind(directQ2()).to(setDirectExchange()).with("directBind.two");
	}

}
TopicConfig
package com.sky.springbootrabbitmqmodule.config;

import org.springframework.amqp.core.Binding;
import org.springframework.amqp.core.BindingBuilder;
import org.springframework.amqp.core.Queue;
import org.springframework.amqp.core.TopicExchange;
import org.springframework.context.annotation.Bean;
import org.springframework.context.annotation.Configuration;


/*
Topics模式  交换机类型 topic
* */
@Configuration
public class TopicConfig {

	//声明队列
	@Bean
	public Queue topicQ1() {
		return new Queue("topic_sb_mq_q1");
	}
	@Bean
	public Queue topicQ2() {
		return new Queue("topic_sb_mq_q2");
	}


	//声明exchange
	@Bean
	public TopicExchange setTopicExchange() {
		return new TopicExchange("topicExchange");
	}

	//声明binding,需要声明一个roytingKey
	@Bean
	public Binding bindTopicHebei1() {
		return BindingBuilder.bind(topicQ1()).to(setTopicExchange()).with("directBind.*");
	}
	@Bean
	public Binding bindTopicHebei2() {
		return BindingBuilder.bind(topicQ2()).to(setTopicExchange()).with("#.two");
	}

}
4.消费端component
package com.sky.springbootrabbitmqmodule.component;
import org.springframework.amqp.rabbit.annotation.RabbitListener;
import org.springframework.amqp.rabbit.config.SimpleRabbitListenerContainerFactory;
import org.springframework.amqp.rabbit.connection.ConnectionFactory;
import org.springframework.context.annotation.Bean;
import org.springframework.stereotype.Component;
@Component
public class ConcumerReceiver {
//直连模式的多个消费者,会分到其中一个消费者进行消费。类似task模式
//通过注入RabbitContainerFactory对象,来设置一些属性,相当于task里的channel.basicQos
@RabbitListener(queues="helloWorldqueue")
public void helloWorldReceive(String message) {
System.out.println("helloWorld模式 received message : " +message);
}
//工作队列模式
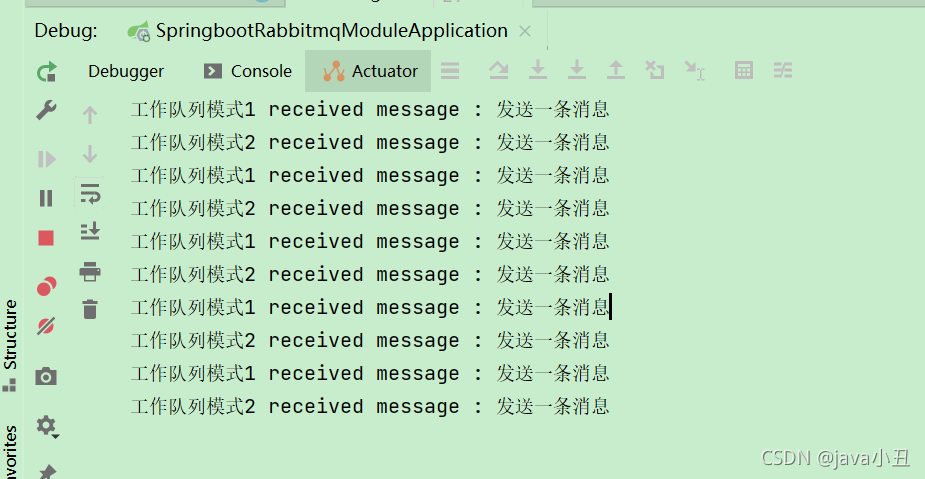
@RabbitListener(queues="work_sb_mq_q")
public void wordQueueReceiveq1(String message) {
System.out.println("工作队列模式1 received message : " +message);
}
@RabbitListener(queues="work_sb_mq_q")
public void wordQueueReceiveq2(String message) {
System.out.println("工作队列模式2 received message : " +message);
}
//pub/sub模式进行消息监听
@RabbitListener(queues="fanout.q1")
public void fanoutReceiveq1(String message) {
System.out.println("发布订阅模式1received message : " +message);
}
@RabbitListener(queues="fanout.q2")
public void fanoutReceiveq2(String message) {
System.out.println("发布订阅模式2 received message : " +message);
}
//Routing路由模式
@RabbitListener(queues="direct_sb_mq_q1")
public void routingReceiveq1(String message) {
System.out.println("Routing路由模式routingReceiveqOne received message : " +message);
}
@RabbitListener(queues="direct_sb_mq_q2")
public void routingReceiveq2(String message) {
System.out.println("Routing路由模式routingReceiveqTwo received message : " +message);
}
//topic 模式
//注意这个模式会有优先匹配原则。例如发送routingKey=hunan.IT,那匹配到hunan.*(hunan.IT,hunan.eco),之后就不会再去匹配*.ITd
@RabbitListener(queues="topic_sb_mq_q1")
public void topicReceiveq1(String message) {
System.out.println("Topic模式 topic_sb_mq_q1 received message : " +message);
}
@RabbitListener(queues="topic_sb_mq_q2")
public void topicReceiveq2(String message) {
System.out.println("Topic模式 topic_sb_mq_q2 received message : " +message);
}
}
5.生产者controller
package com.sky.springbootrabbitmqmodule.controller;
import org.springframework.amqp.AmqpException;
import org.springframework.amqp.core.Message;
import org.springframework.amqp.core.MessageProperties;
import org.springframework.amqp.rabbit.core.RabbitTemplate;
import org.springframework.beans.factory.annotation.Autowired;
import org.springframework.web.bind.annotation.GetMapping;
import org.springframework.web.bind.annotation.RestController;
import java.io.UnsupportedEncodingException;
@RestController
public class ProducerController {
@Autowired
private RabbitTemplate rabbitTemplate;
//helloWorld 直连模式
@GetMapping(value="/helloWorldSend")
public Object helloWorldSend(String message) throws AmqpException, UnsupportedEncodingException {
//设置部分请求参数
MessageProperties messageProperties = new MessageProperties();
messageProperties.setContentType(MessageProperties.CONTENT_TYPE_TEXT_PLAIN);
//发消息
rabbitTemplate.send("helloWorldqueue",new Message(message.getBytes("UTF-8"),messageProperties));
return "message sended : "+message;
}
//工作队列模式
@GetMapping(value="/workqueueSend")
public Object workqueueSend(String message) throws AmqpException, UnsupportedEncodingException {
MessageProperties messageProperties = new MessageProperties();
messageProperties.setContentType(MessageProperties.CONTENT_TYPE_TEXT_PLAIN);
//制造多个消息进行发送操作
for (int i = 0; i <10 ; i++) {
rabbitTemplate.send("work_sb_mq_q", new Message(message.getBytes("UTF-8"),messageProperties));
}
return "message sended : "+message;
}
// pub/sub 发布订阅模式 交换机类型 fanout
@GetMapping(value="/fanoutSend")
public Object fanoutSend(String message) throws AmqpException, UnsupportedEncodingException {
MessageProperties messageProperties = new MessageProperties();
messageProperties.setContentType(MessageProperties.CONTENT_TYPE_TEXT_PLAIN);
//fanout模式只往exchange里发送消息。分发到exchange下的所有queue
rabbitTemplate.send("fanoutExchange", "", new Message(message.getBytes("UTF-8"),messageProperties));
return "message sended : "+message;
}
//routing路由工作模式 交换机类型 direct
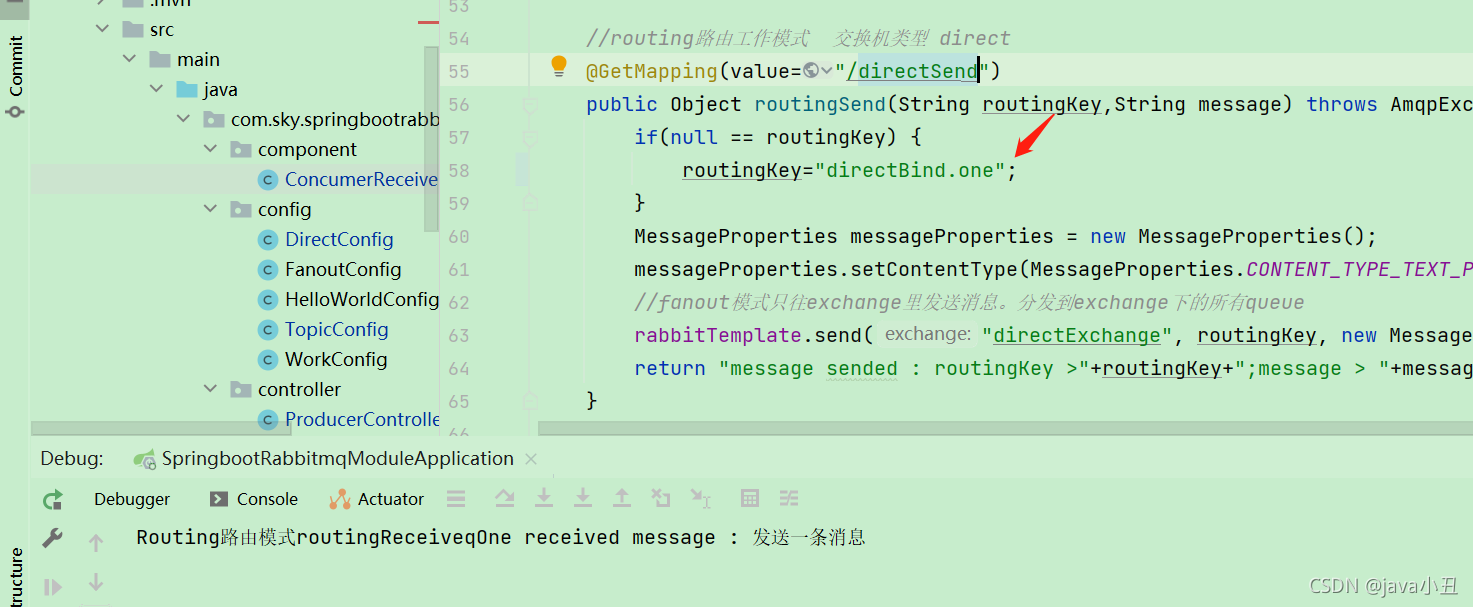
@GetMapping(value="/directSend")
public Object routingSend(String routingKey,String message) throws AmqpException, UnsupportedEncodingException {
if(null == routingKey) {
routingKey="directBind.one";
}
MessageProperties messageProperties = new MessageProperties();
messageProperties.setContentType(MessageProperties.CONTENT_TYPE_TEXT_PLAIN);
//fanout模式只往exchange里发送消息。分发到exchange下的所有queue
rabbitTemplate.send("directExchange", routingKey, new Message(message.getBytes("UTF-8"),messageProperties));
return "message sended : routingKey >"+routingKey+";message > "+message;
}
//topic 工作模式 交换机类型 topic
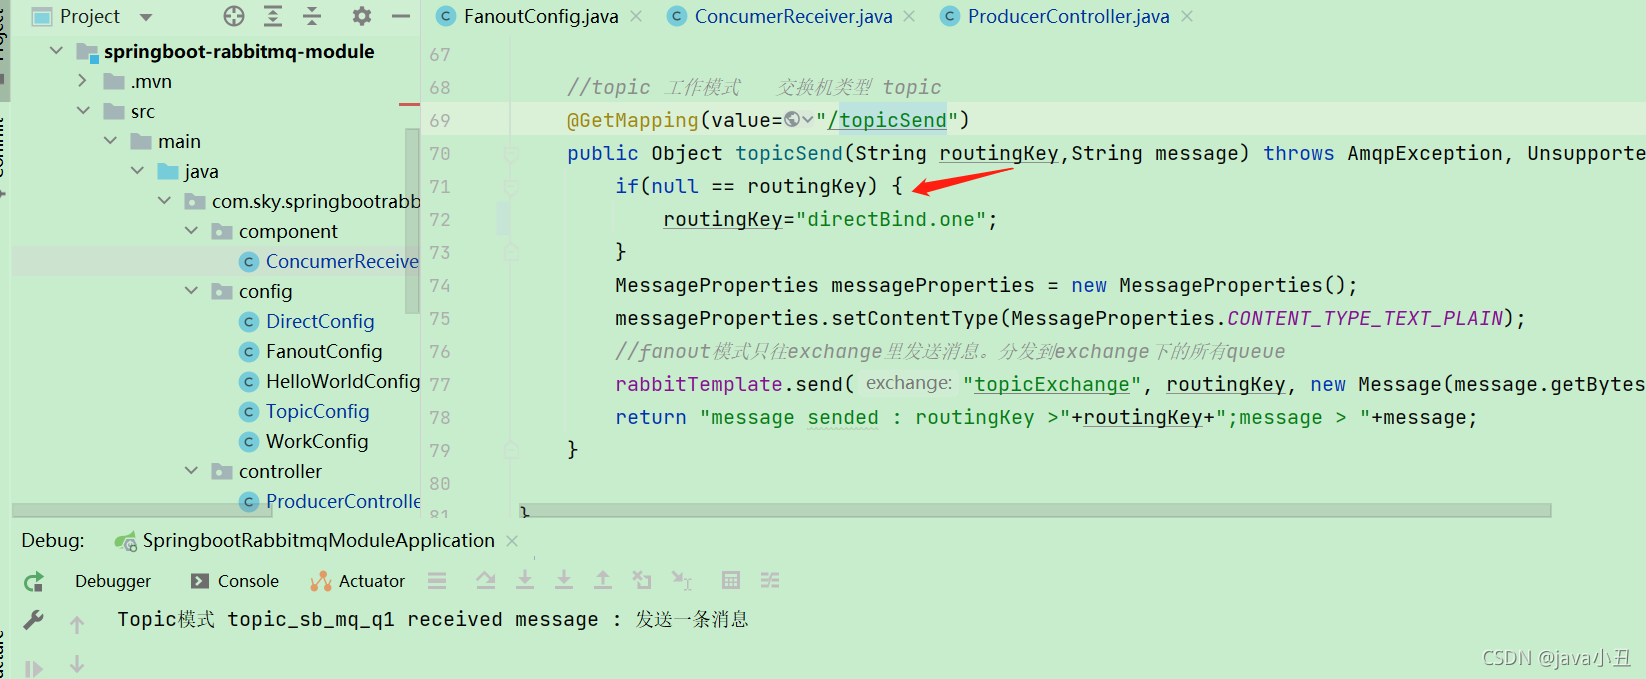
@GetMapping(value="/topicSend")
public Object topicSend(String routingKey,String message) throws AmqpException, UnsupportedEncodingException {
if(null == routingKey) {
routingKey="directBind.one";
}
MessageProperties messageProperties = new MessageProperties();
messageProperties.setContentType(MessageProperties.CONTENT_TYPE_TEXT_PLAIN);
//fanout模式只往exchange里发送消息。分发到exchange下的所有queue
rabbitTemplate.send("topicExchange", routingKey, new Message(message.getBytes("UTF-8"),messageProperties));
return "message sended : routingKey >"+routingKey+";message > "+message;
}
}
上面就是这个项目的所有代码了,下面就是Demo演示内容。
三、演示步骤
1.启动项目

2.调用接口演示
1.直连模式
1.接口调用

2.控制台打印

2.工作队列模式
1.接口调用

2.控制台打印
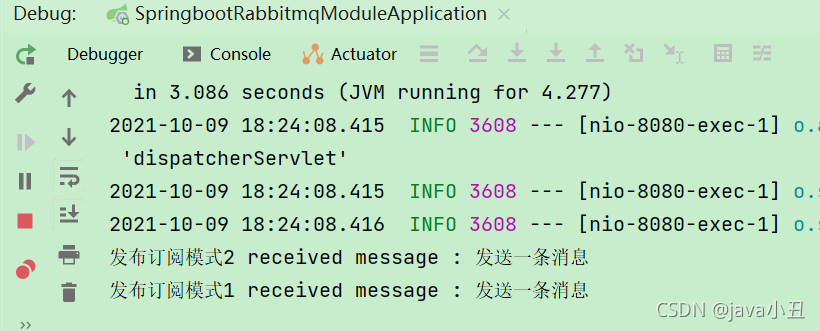
3.发布订阅模式(交换机类型:fanout)
1.接口调用

2.控制台打印
4.路由工作模式(交换机类型:direct)
1.接口调用

2.控制台打印
5.通配符模式(交换机类型:topic)
1.接口调用
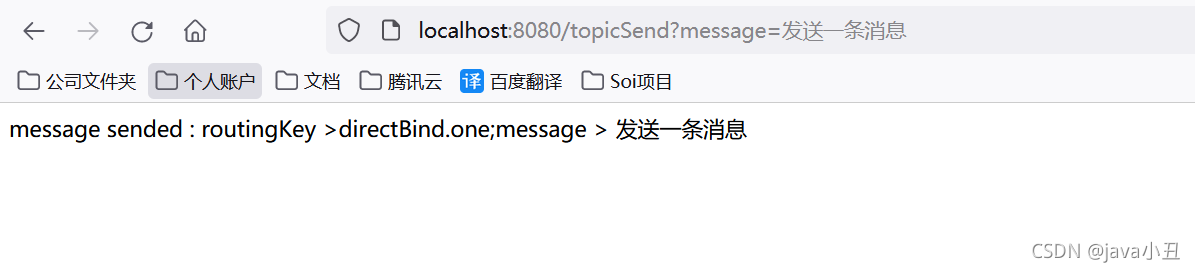
2.控制台打印
 除此之外,我还提供了项目地址提供给大家clone,地址链接:https://gitee.com/java_wxid/liao
四、RabbitMQ集群搭建
一、准备工作
首先搭建好多台独立的RabbitMQ,这里可以使用宝塔图形化页面安装也可自行安装 假设已经单独搭建好二台服务器了,这个时候就需要对服务器之间数据互通。
二、集群搭建
1.集群搭建步骤
设置服务器别名
 - 服务器1:hostnamectl set‐hostname m1
 - 服务器2:hostnamectl set‐hostname m2
在m1服务器中统一 erlang.cookie 文件中 cookie 值 将m1中的 .erlang.cookie 同步到 m2中
scp /var/lib/rabbitmq/.erlang.cookie m2:/var/lib/rabbitmq/.erlang.cookie
说明:上面的命令中m2使用ip也行
Rabbitmq 集群添加节点:重启m2机器中rabbitmq 的服务在m2执行
#停止用户请求
rabbitmqctl stop_app
#将m2合并到集群中
rabbitmqctl join_cluster ‐‐ram rabbit@m2
#开启用户请求
rabbitmqctl start_app
#开启管理页面
rabbitmq‐plugins enable rabbitmq_management
#重启服务
systemctl restart rabbitmq‐server.service
查看集群信息
rabbitmqctl cluster_status
2.集群搭建负载均衡-HAProxy搭建
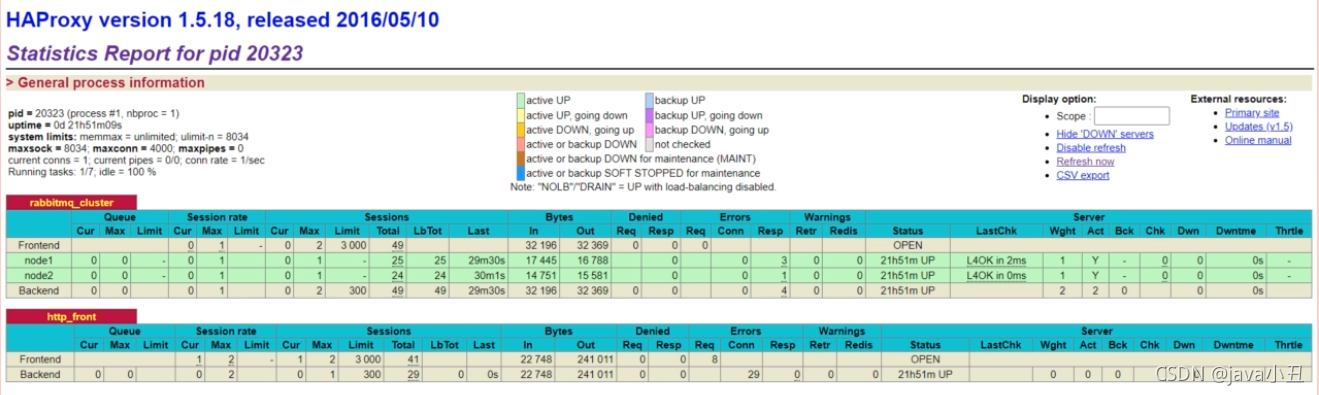
1.执行安装
#1、安装 yum install haproxy
#2、配置haproxy.cfg文件 具体参照 如下配置HAProxy vim /etc/haproxy/haproxy.cfg。进入文件找到maxconn 3000把后面的内容都删除,添加集群监听,开启haproxy监控服务,代码如下:
#对MQ集群进行监听
listen rabbitmq_cluster
	bind 0.0.0.0:5672
	option tcplog
	mode tcp
	option clitcpka
	timeout connect 1s
	timeout client 10s
	timeout server 10s
	balance roundrobin
	server node1 节点1 ip地址:5672 check inter 5s rise 2 fall 3
	server node2 节点2 ip地址:5672 check inter 5s rise 2 fall 3
#开启haproxy监控服务
listen http_front
	bind 0.0.0.0:1080
	stats refresh 30s
	stats uri /haproxy_stats
	stats auth admin:admin
#3、启动haproxy systemctl start haproxy
#4、查看haproxy进程状态 systemctl status haproxy.service
#状态如下说明已经启动成功 Active: active (running)
#访问如下地址对mq节点进行监控 http://服务器IP:1080/haproxy_stats
#代码中访问mq集群地址,则变为访问haproxy地址:5672
2.haproxy.cfg配置详解
listen rabbitmg cluster
	bind 0.0.0.0:5672#通过5672对M1, M2进行映射
	option tcplog #记录tcp连接的状态和时间
	mode tcp#四层协议代理,即对TCP协议转发
	option clitcpka #开启TCP的Keep Alive. (长连接模式)
	timeout connect 1s #haproxy与mq建立连接的超时时间
	timeout client 10s#客户端与haproxy最大空闲时间。
	timeout server 10s #服务器与haproxy最大空闲时间
	balance roundrobin #采用轮询转发消息
	#每5秒发送一次心跳包,如连续两次有响应则代表状态良好。
	#如连续三次没有响应,则视为服务故障,该节点将被剔除。
	server node1 ip1:5672 check inter 5s rise 2 fall 3
	server node2 ip2:5672 check inter 5s rise 2 fall 3
listen http front
	#监听端口
	bind 0.0.0.0:1080
	#统计页面自动刷新时间stats refresh 30s
	#统计页面url
	stats uri /haproxy?stats
	#指定HAproxy访问用户名和密码设置
	stats auth admin:admin
这个时候连接就可以通过haproxy代理连接啦,当然啦,HAProxy也有自己的管理页面,就是你安装服务器的ip加配置的1080端口,可以直接访问啦,当然HA也可以配置多台的。
总结
以上就是今天要讲的内容,全文共计八万八千多字,详细的介绍了RabbitMQ的基本概念,六种工作模式,消息可靠性投递,死信队列,延迟队列等。通过图文代码的方式直观的表述出来给大家演示效果,除此之外,还包含了对Spring框架集成RabbitMQ以及SpringBoot框架集成RabbitMQ。还希望各位读者大大能够在评论区积极参与讨论,给文章提出一些宝贵的意见或者建议,合理的内容,我会采纳更新博文,重新分享给大家。
给读者大大的话
我本身是一个很普通的程序员,放在人堆里,除了与生俱来的盛世美颜、所剩不多的发量,就剩下180的大高个了。就是我这样的一个人,默默坚持写博文也有好多年了,有句老话说的好,牛逼之前都是傻逼式的坚持。希望自己可以通过大量的作品,时间的积累,个人魅力、运气和时机,可以打造属于自己的技术影响力。同时也希望自己可以成为一个懂技术,懂业务,懂管理的综合型人才,作为项目架构路线的总设计师,掌控全局的团队大脑,技术团队中的绝对核心是我未来几年不断前进的目标。
提示:以下都是资源分享,求个一键三连。
博客封面
首先我要说声抱歉,作为一个学习的平台,封面引人注目是营销策略,大家不用太过在意哈,专注博客内容本身即可。当然有同学惦记着我博客的封面,这里也分享出来给大家。
点击:博客封面
提取码:2021
面试资料
福利大放送,我就求个一键三连,拜托了,这对我真的很重要。
点击:面试资料
提取码:2021
200套PPT模板
福利大放送,我就求个一键三连,拜托了,这对我真的很重要。
点击:200套PPT模板
提取码:2021
提问的智慧
福利大放送,我就求个一键三连,拜托了,这对我真的很重要。
点击:提问的智慧
提取码:2021
Java开发学习路线
| 名称 | 链接 |
|---|---|
| JavaSE | 点击: JavaSE |
| MySQL专栏 | 点击: MySQL专栏 |
| JDBC专栏 | 点击: JDBC专栏 |
| MyBatis专栏 | 点击: MyBatis专栏 |
| Web专栏 | 点击: Web专栏 |
| Spring专栏 | 点击: Spring专栏 |
| SpringMVC专栏 | 点击: SpringMVC专栏 |
| SpringBoot专栏 | 点击: SpringBoot专栏 |
| SpringCould专栏 | 点击: SpringCould专栏 |
| Redis专栏 | 点击: Redis专栏 |
| Linux专栏 | 点击: Linux专栏 |
| Maven3专栏 | 点击: Maven3专栏 |
| Spring Security5专栏 | 点击: Spring Security5专栏 |
| 更多专栏 | 更多专栏,请到 java_wxid主页 查看 |
P5学习路线图
 P6学习路线图
 P7学习路线图
 P8学习路线图
图片参考地址:https://www.tulingxueyuan.cn/
以上四张图详细介绍了作为Java开发工作者所需要具备的知识技能,同学们学废了嘛,有想法系统学习的同学可以私聊我,记得点波关注哟。
点击关注博主:java_wxid
点击关注社区:幕后大佬
一键三连
感谢大家的支持,用心写博文分享给大家,你的支持(点赞、收藏、关注)是对我创作的最大帮助。
微信公众号:南北踏尘
主页地址:java_wxid
社区地址:幕后大佬