先贴出官网文档地址:http://fex.baidu.com/ueditor/
前端部分
1、下载源码:https://github.com/fex-team/ueditor#ueditor,我使用的是ueditor-dev-1.4.3
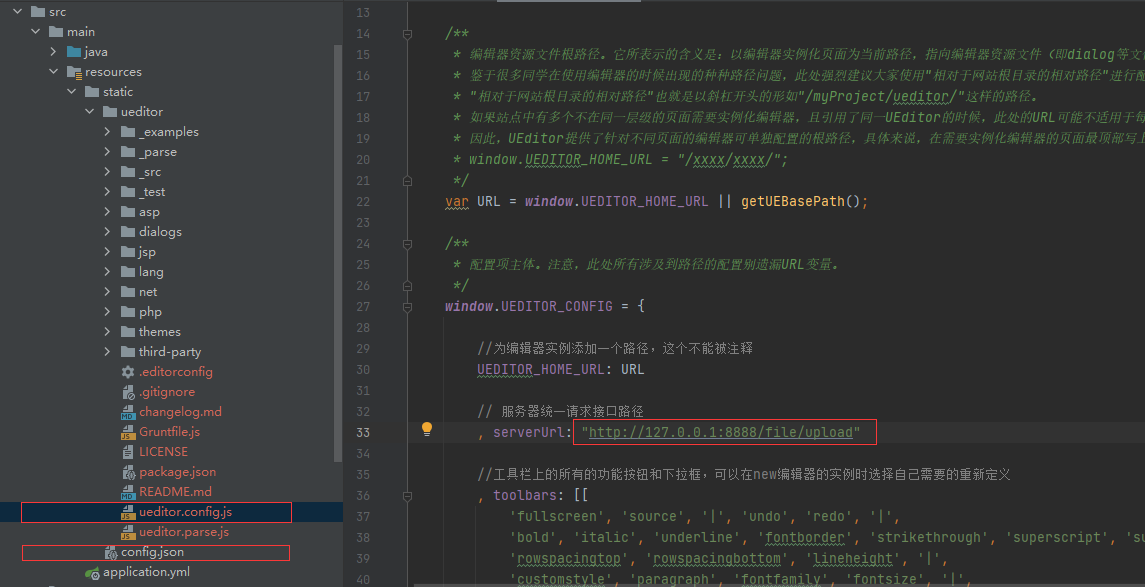
2、解压后用VSCode打开,目录如下:

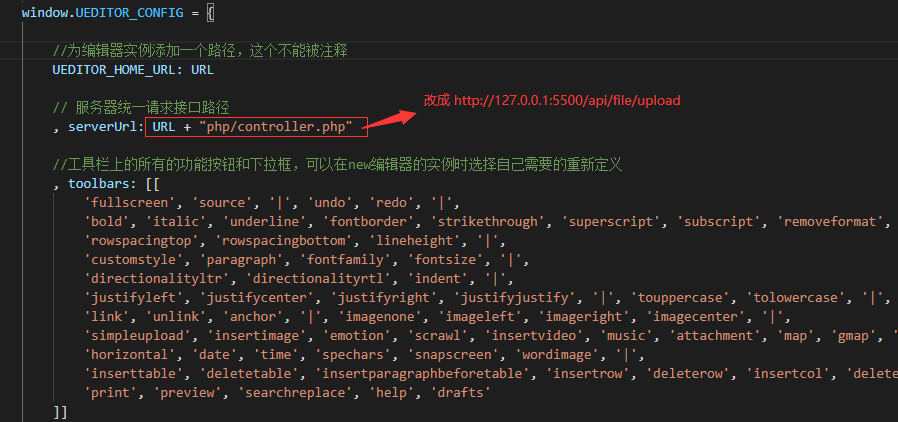
3、修改ueditor.config.js

说明:我用的VSCode的插件Live Server运行的前端项目,为防止跨域问题,要设置一下代理

4、在_examples目录下新建文件mytest.html
<!DOCTYPE HTML>
<html>
<head>
    <meta http-equiv="Content-Type" content="text/html;charset=utf-8"/>
    <title></title>
    <script type="text/javascript" charset="utf-8" src="../ueditor.config.js"></script>
    <script type="text/javascript" charset="utf-8" src="editor_api.js"></script>
</head>
<body>
<script type="text/plain" id="editor" style="margin-bottom:100px;"></script>
<script type="text/javascript">
    UE.getEditor('editor', {
        theme:"default", //皮肤
        lang:'zh-cn' //语言
    });
</script>
</body>
</html>
后端部分
1、引入依赖
 <dependency>
     <groupId>com.gitee.qdbp.thirdparty</groupId>
     <artifactId>ueditor</artifactId>
     <version>1.4.3.3</version>
 </dependency>
2、修改config.json文件
"imageUrlPrefix": "http://localhost:8888", /* 图片访问路径前缀 */
"imagePathFormat": "/upload/image/{yyyy}{mm}{dd}/{time}{rand:6}", /* 上传保存路径,可以自定义保存路径和文件名格式 */
说明:文件的保存路径是:项目根目录+imagePathFormat,返回的地址是:imageUrlPrefix + imagePathFormat
3、java代码示例
@RestController
public class FileController {

    @RequestMapping("/file/upload")
    public void get(HttpServletRequest request, HttpServletResponse response){
        try {
            String rootPath = "xxxx";
            String configPath = "/src/main/resources/static/ueditor";
            String exec = new ActionEnter(request, rootPath, configPath ).exec();
            PrintWriter write = response.getWriter();
            write.write(exec);
            write.flush();
            write.close();
        }catch (Exception e){
            e.printStackTrace();
        }
    }
}
说明:rootPath是项目名称,configPath是config.json的同级目录
(其实/ueditor可以随意写,不存在的路径也行,比如/src/main/resources/static/aaaaa,但必须与config.json同级)如下:

4、映射路径可直接访问
@SpringBootConfiguration
public class WebConfig implements WebMvcConfigurer {
    @Override
    public void addResourceHandlers(ResourceHandlerRegistry registry) {
        registry
                .addResourceHandler("/upload/image/**")
                .addResourceLocations("file:D:/workset/javaset/project/official/BLOG/xxxx/upload/image/");
    }
}
说明:方法的含义是如果路径匹配到/upload/image/开头的路径,则将映射地址替换为D:/workset/javaset/project/official/BLOG/xxxx/upload/image/
比如:http://localhost:8888/upload/image/20220316/1647438546721003297.png 实际访问的是 D:/workset/javaset/project/official/BLOG/xxxx/upload/image//20220316/1647438546721003297.png
演示
运行http://127.0.0.1:8888/ueditor/_examples/mytest.html


备注:上面的相关配置是针对前后端分离项目的,如果不采用前后端分离,只需把整个ueditor的内容copy到java工程中,同时修改ueditor.config.js文件

看来与config.json同一级的目录应该是整个ueditor,只不过在前后端分离中用不着罢了
将项目打包成jar文件,上传功能不好用?
上面的例子在idea中或打成war包时可以运行,但是打成jar包还是无法运行,这是因为在jar包中读取配置文件config.json失败,需要修改源码。
为了省事我直接把config.json拿到jar外面了,配置文件路径:D:\ueditor\config.json。同时做如下修改:
修改config.json文件:
  "imageUrlPrefix": "http://localhost:8888", /* 图片访问路径前缀 */
  "imagePathFormat": "D:/ueditor/upload/image/{yyyy}{mm}{dd}/{time}{rand:6}", /* 上传保存路径,可以自定义保存路径和文件名格式 */
修改FileController:
@RestController
public class FileController {

    @RequestMapping("/file/upload")
    public void get(HttpServletRequest request, HttpServletResponse response){
        try {
            String rootPath = "";
            String configPath = "D:/ueditor/upload";//与config.json同路径
            String exec = new ActionEnter(request, rootPath, configPath ).exec();
            exec = exec.replaceAll("D:","");
            PrintWriter write = response.getWriter();
            write.write(exec);
            write.flush();
            write.close();
        }catch (Exception e){
            e.printStackTrace();
        }
    }
}
修改映射路径:
@SpringBootConfiguration
public class WebConfig implements WebMvcConfigurer {
    @Override
    public void addResourceHandlers(ResourceHandlerRegistry registry) {
        registry
                .addResourceHandler("/ueditor/upload/image/**")
                .addResourceLocations("file:D:/ueditor/upload/image/");
    }
}
这样将项目打成jar文件运行,上传功能就没有问题了。