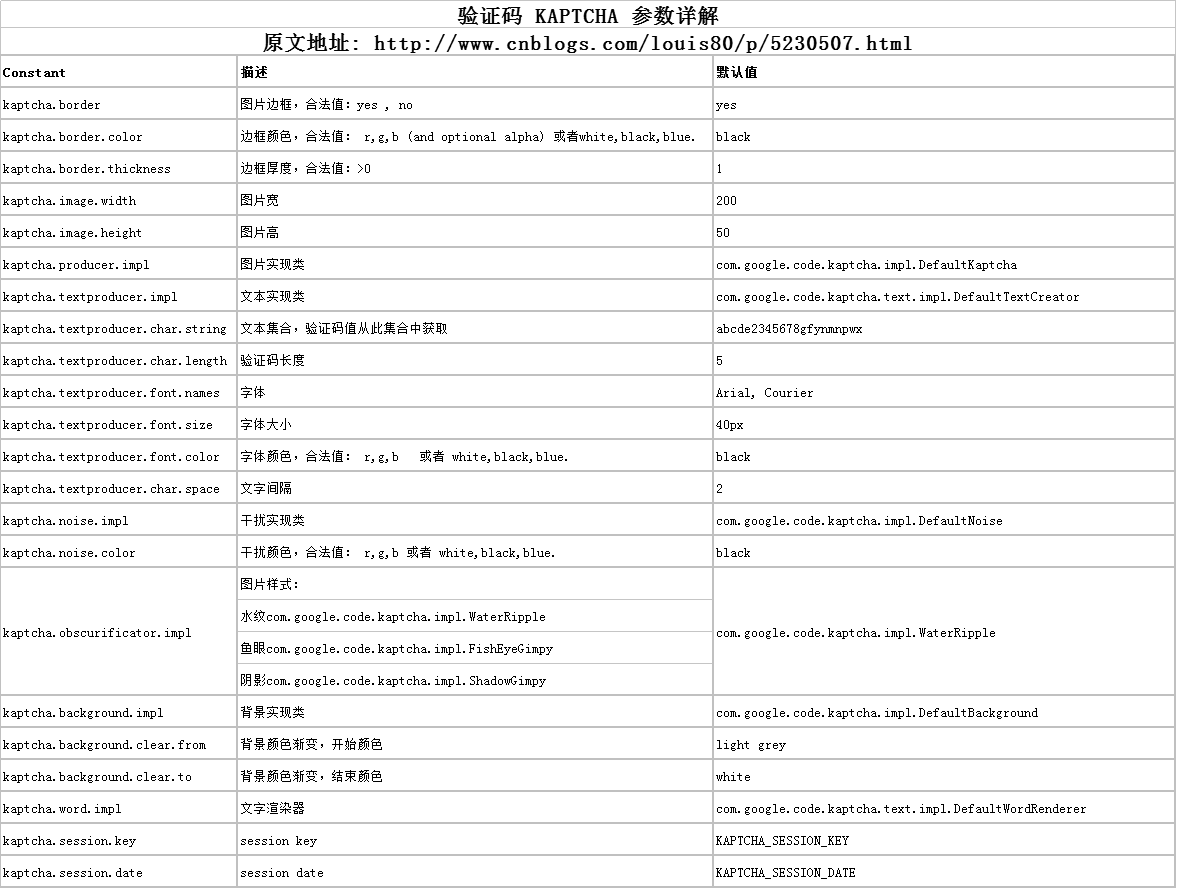
使用kaptcha可以方便的配置:
- 验证码的字体
- 验证码字体的大小
- 验证码字体的字体颜色
- 验证码内容的范围(数字,字母,中文汉字!)
- 验证码图片的大小,边框,边框粗细,边框颜色
- 验证码的干扰线(可以自己继承com.google.code.kaptcha.NoiseProducer写一个自定义的干扰线)
- 验证码的样式(鱼眼样式、3D、普通模糊……当然也可以继承com.google.code.kaptcha.GimpyEngine自定义样式)
……
详细信息请看下面的web.xml文件
下面介绍一下用法:
1.首先去官网下载jar:http://code.google.com/p/kaptcha/
2.建立一个web项目,导入kaptcha-2.3.jar到环境变量中。
3.配置web.xml文件
<!-- Kaptcha验证码配置 -->
  <servlet>
        <servlet-name>Kaptcha</servlet-name>
        <servlet-class>com.google.code.kaptcha.servlet.KaptchaServlet</servlet-class>
        <init-param>
            <param-name>kaptcha.border</param-name>
            <param-value>no</param-value>
        </init-param>
        <init-param>
            <param-name>kaptcha.border.color</param-name>
            <param-value>105,179,90</param-value>
        </init-param>
        <init-param>
            <param-name>kaptcha.textproducer.font.color</param-name>
            <param-value>red</param-value>
        </init-param>
        <init-param>
            <param-name>kaptcha.obscurificator.impl</param-name>
            <param-value>com.google.code.kaptcha.impl.FishEyeGimpy</param-value>
        </init-param>
        <init-param>
            <param-name>kaptcha.image.width</param-name>
            <param-value>250</param-value>
        </init-param>
        <init-param>
            <param-name>kaptcha.image.height</param-name>
            <param-value>90</param-value>
        </init-param>
        <init-param>
            <param-name>kaptcha.textproducer.font.size</param-name>
            <param-value>70</param-value>
        </init-param>
        <init-param>
          <!-- String kaptchaExpected = (String) session.getAttribute(com.google.code.kaptcha.Constants.KAPTCHA_SESSION_KEY);
                     必须改成
                    String kaptchaExpected = (String) session.getAttribute("code"); -->
            <param-name>kaptcha.session.key</param-name>
            <param-value>code</param-value>
        </init-param>
        <init-param>
            <param-name>kaptcha.textproducer.char.length</param-name>
            <param-value>4</param-value>
        </init-param>
        <init-param>
            <param-name>kaptcha.textproducer.font.names</param-name>
            <param-value>宋体,楷体,微软雅黑</param-value>
        </init-param>
</servlet>
<servlet-mapping>
        <servlet-name>Kaptcha</servlet-name>
        <url-pattern>/kaptcha</url-pattern>
</servlet-mapping>
4. jsp 页面使用
<form class="m-t" role="form"  id="loginform" method="post" action="">
                <div class="form-group"><input class="form-control"  name="userAccount" placeholder="用户名" required=""></div>
                <div class="form-group"><input type="password" class="form-control"   name="userPwd"  placeholder="密码" required=""></div>
                <input type="text" class="form-control login-yan-w" id="kaptcha" name="kaptcha" placeholder="验证码">
                 <span class="login-w"><img id="kaptchaImage" src="kaptcha"></span>
                <input type="button"  class="btn btn-primary block full-width m-b" onclick="login()"  value="登 录">
            </form>
function login(){
        $.ajax({
            cache: true,
            type: "POST",
            url:'${pageContext.request.contextPath}/login',
            data:$('#loginform').serialize(),
            dataType:'json',
            success: function(data) {
                if(data.status==200){
                    url="<%=request.getContextPath()%>/index.jsp";
                    window.location.href=url;
                }else{
                    alert(data.msg)
                }
            },
            error: function(){
                alert("请检查用户账户或密码");
            }
        });
        }
5. 如果想设置点击图片更换验证码,可以加上如下js
<script type="text/javascript">
    //点击图片验证码进行更新
    $(function(){
        $('#kaptchaImage').click(function () { $(this).attr('src', 'kaptcha?' + Math.floor(Math.random()*100) ); })
    });
</script>
5. KaptchaServlet会把验证码设置到session中,在Controller可以如下方式获取
@RequestMapping("/login")
@ResponseBody
public CRMResult  login(HttpServletRequest request ,HttpSession session) {
    String kaptcha = request.getParameter("kaptcha");
    String kaptchaExpected = (String) session.getAttribute("code");
    System.out.println(kaptcha +"......"+kaptchaExpected);
    if (!kaptcha.equalsIgnoreCase(kaptchaExpected)) {
        return CRMResult.build(201, "验证码填写错误");
    }
    return CRMResult.ok();
}
上面的配置在普通jsp环境下面是有效的,如果在spring mvc环境下,则取不到session值,对于sping mvc环境验证码配置如下:
1.不用在web.xml进行相关配置,在springmvc.xml中配置
<bean id="captchaProducer" class="com.google.code.kaptcha.impl.DefaultKaptcha">
        <property name="config">
            <bean class="com.google.code.kaptcha.util.Config">
                <constructor-arg>
                    <props>
                        <prop key="kaptcha.border">no</prop>
                        <prop key="kaptcha.border.color">105,179,90</prop>
                        <prop key="kaptcha.textproducer.font.color">red</prop>
                        <prop key="kaptcha.image.width">250</prop>
                        <prop key="kaptcha.textproducer.font.size">90</prop>
                        <prop key="kaptcha.image.height">90</prop>
                        <prop key="kaptcha.session.key">code</prop>
                        <prop key="kaptcha.textproducer.char.length">4</prop>
                        <prop key="kaptcha.textproducer.font.names">宋体,楷体,微软雅黑</prop>
                    </props>
                </constructor-arg>
            </bean>
        </property>
    </bean>
Java代码
import java.awt.image.BufferedImage;
import javax.imageio.ImageIO;
import javax.servlet.ServletOutputStream;
import javax.servlet.http.HttpServletRequest;
import javax.servlet.http.HttpServletResponse;
import org.springframework.beans.factory.annotation.Autowired;
import org.springframework.stereotype.Controller;
import org.springframework.web.bind.annotation.RequestMapping;
import org.springframework.web.servlet.ModelAndView;
import com.google.code.kaptcha.Constants;
import com.google.code.kaptcha.Producer;

@Controller
@RequestMapping("/")
public class CaptchaImageCreateController {

    private Producer captchaProducer = null;

    @Autowired
    public void setCaptchaProducer(Producer captchaProducer) {
        this.captchaProducer = captchaProducer;
    }

    @RequestMapping("/captcha-image")
    public ModelAndView handleRequest(HttpServletRequest request, HttpServletResponse response) throws Exception {

        response.setDateHeader("Expires", 0);
        // Set standard HTTP/1.1 no-cache headers.
        response.setHeader("Cache-Control", "no-store, no-cache, must-revalidate");
        // Set IE extended HTTP/1.1 no-cache headers (use addHeader).
        response.addHeader("Cache-Control", "post-check=0, pre-check=0");
        // Set standard HTTP/1.0 no-cache header.
        response.setHeader("Pragma", "no-cache");
        // return a jpeg
        response.setContentType("image/jpeg");
        // create the text for the image
        String capText = captchaProducer.createText();
        // store the text in the session
        request.getSession().setAttribute(Constants.KAPTCHA_SESSION_KEY, capText);
        // create the image with the text
        BufferedImage bi = captchaProducer.createImage(capText);
        ServletOutputStream out = response.getOutputStream();
        // write the data out
        ImageIO.write(bi, "jpg", out);
        try {
            out.flush();
        } finally {
            out.close();
        }
        return null;
    }

}
前台调用方式
<div class="chknumber">
       <label>验证码:
       <input name="kaptcha" type="text" id="kaptcha" maxlength="4" class="chknumber_input" />
       </label>
        <img src="/ClinicCountManager/captcha-image.do" width="55" height="20" id="kaptchaImage"  style="margin-bottom: -3px"/>
       <script type="text/javascript">
        $(function(){
            $('#kaptchaImage').click(function () {//生成验证码
             $(this).hide().attr('src', '/ClinicCountManager/captcha-image.do?' + Math.floor(Math.random()*100) ).fadeIn(); })
                  });

       </script>
     </div>
取验证码的方式
String code = (String)session.getAttribute(com.google.code.kaptcha.Constants.KAPTCHA_SESSION_KEY);
如果需要全部数字
<init-param>
    <param-name>kaptcha.textproducer.char.string</param-name>
    <param-value>0123456789</param-value>
</init-param>
去掉干扰线
<init-param>
    <param-name>kaptcha.noise.impl</param-name>
    <param-value>com.google.code.kaptcha.impl.NoNoise </param-value>
</init-param>
