本篇主要集成Sping一个重要功能AOP
我们还是先回顾一下以前Spring中是如何使用AOP的,大家可以看看我这篇文章spring5 源码深度解析----- AOP的使用及AOP自定义标签
Spring中使用AOP
引入Aspect
<dependency>
    <groupId>org.aspectj</groupId>
    <artifactId>aspectjweaver</artifactId>
    <version>${aspectj.version}</version>
</dependency>
创建用于拦截的bean
public class TestBean {
    private String message = "test bean";

    public String getMessage() {
        return message;
    }

    public void setMessage(String message) {
        this.message = message;
    }

    public void test(){
        System.out.println(this.message);
    }
}
创建Advisor
@Aspect
public class AspectJTest {
    @Pointcut("execution(* *.test(..))")
    public void test(){
    }

    @Before("test()")
    public void beforeTest(){
        System.out.println("beforeTest");
    }

    @Around("test()")
    public Object aroundTest(ProceedingJoinPoint p){
        System.out.println("around.....before");
        Object o = null;
        try{
            o = p.proceed();
        }catch(Throwable e){
            e.printStackTrace();
        }
        System.out.println("around.....after");
        return o;
    }

    @After("test()")
    public void afterTest()
    {
        System.out.println("afterTest");
    }
 }
创建配置文件
要在Spring中开启AOP功能,还需要在配置文件中作如下声明,开启AOP:
<?xml version="1.0" encoding="UTF-8" ?>
<beans xmlns="http://www.springframework.org/schema/beans"
       xmlns:xsi="http://www.w3.org/2001/XMLSchema-instance"
       xmlns:context="http://www.springframework.org/schema/context"
       xmlns:aop="http://www.springframework.org/schema/aop"
       xsi:schemaLocation="http://www.springframework.org/schema/beans
        http://www.springframework.org/schema/beans/spring-beans.xsd http://www.springframework.org/schema/context http://www.springframework.org/schema/context/spring-context.xsd http://www.springframework.org/schema/aop http://www.springframework.org/schema/aop/spring-aop.xsd">

    <aop:aspectj-autoproxy/>
    <bean id="test" class="com.yhl.myspring.demo.aop.TestBean">
        <property name="message" value="这是一个苦逼的程序员"/>
    </bean>
    <bean id="aspect" class="com.yhl.myspring.demo.aop.AspectJTest"/>
</beans>
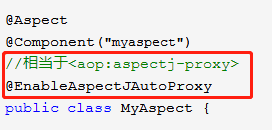
注解开启AOP
开启AOP<aop:aspectj-autoproxy/>也可以使用注解的方式,如下,使用@EnableAspectJAutoProxy配置在任何一个@Configratrion或者@Component上
SpringBoot集成AOP
添加pom依赖
<dependency>
    <groupId>org.springframework.boot</groupId>
    <artifactId>spring-boot-starter-aop</artifactId>
</dependency>
引入了AOP的场景启动器,我们点击去看看
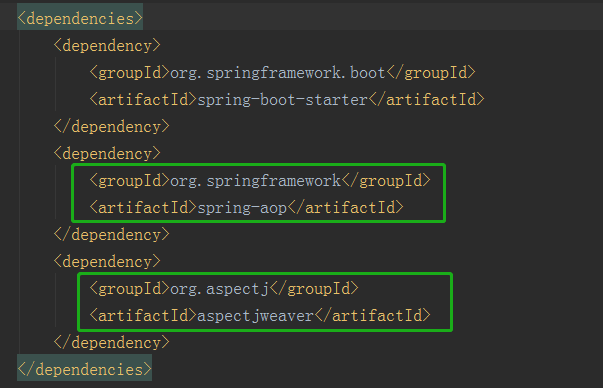
还是引入了spring-aop和aspectj的依赖,和我们Spring集成AOP是引入了相同的包,接着我们直接就可以创建Advisor了,如上AspectJTest这个类,但是我们并没有通过@EnableAspectJAutoProxy开启AOP呢?那是因为AOP的自动配置类帮我们开启了
AopAutoConfiguration
一旦导入了spring-boot-starter-aop依赖后,SpringBoot就会启动AOP的自动配置类AopAutoConfiguration:

我们来看看AopAutoConfiguration这个自动配置类
@Configuration
@ConditionalOnClass({ EnableAspectJAutoProxy.class, Aspect.class, Advice.class })
@ConditionalOnProperty(prefix = "spring.aop", name = "auto", havingValue = "true", matchIfMissing = true)
public class AopAutoConfiguration {

    @Configuration
    //使用注解开启AOP功能
    @EnableAspectJAutoProxy(proxyTargetClass = false)
    @ConditionalOnProperty(prefix = "spring.aop", name = "proxy-target-class", havingValue = "false", matchIfMissing = true)
    public static class JdkDynamicAutoProxyConfiguration {

    }

    @Configuration
    //使用注解开启AOP功能
    @EnableAspectJAutoProxy(proxyTargetClass = true)
    @ConditionalOnProperty(prefix = "spring.aop", name = "proxy-target-class", havingValue = "true", matchIfMissing = false)
    public static class CglibAutoProxyConfiguration {

    }

}
不管使用jdk代理还是cglib代理,都有@EnableAspectJAutoProxy注解,所以只要导入spring-boot-starter-aop依赖后,就自动帮我们开启了AOP,我们可以直接添加切面使用AOP了
@EnableAspectJAutoProxy这个注解是整个AOP的灵魂,其作用和<aop:aspectj-autoproxy/>是一样的,大家可以看看其源码分析spring5 源码深度解析----- AOP的使用及AOP自定义标签