iwehdio的博客园:https://www.cnblogs.com/iwehdio/
代码:https://github.com/iwehdio/SpringBoot-WXDC
1、微信部分
-
微信支付文档:【微信支付】JSAPI支付开发者文档。
-
微信公众账户测试号获取:公众号测试号。
-
使用natapp内网穿透:基于springboot接入微信公众号(内网穿透技术)。以下挨打url中,带有http://xxxx.natappfree.cc格式的均为请求到的不同的穿透域名。
-
此外,还需要设置体验接口权限表下的网页账号的授权回调页面域名(不能填带/的路径)。
-
获取openID:手工方式和SDK方式。
-
请求:
重定向到 /sell/wechat/authorize -
参数:
returnUrl: http://xxx.com/abc //【必填】 -
返回:
http://xxx.com/abc?openid=oZxSYw5ldcxv6H0EU67GgSXOUrVg
-
-
网页回调手动获取openID:微信网页授权
-
第一步:用户同意授权,获取code
-
请求用户授权,访问:
https://open.weixin.qq.com/connect/oauth2/authorize?appid=APPID&redirect_uri=REDIRECT_URI&response_type=code&scope=SCOPE&state=STATE#wechat_redirect ---- https://open.weixin.qq.com/connect/oauth2/authorize?appid=APPID&redirect_uri=http://hpqv53.natappfree.cc/sell/auth&response_type=code&scope=snsapi_base&state=123#wechat_redirect -
具体参数含义:
参数 是否必须 说明 appid 是 公众号的唯一标识 redirect_uri 是 授权后重定向的回调链接地址, 请使用 urlEncode 对链接进行处理 response_type 是 返回类型,请填写code scope 是 应用授权作用域,snsapi_base (不弹出授权页面,直接跳转,只能获取用户openid),snsapi_userinfo (弹出授权页面,可通过openid拿到昵称、性别、所在地。并且, 即使在未关注的情况下,只要用户授权,也能获取其信息 ) state 否 重定向后会带上state参数,开发者可以填写a-zA-Z0-9的参数值,最多128字节 #wechat_redirect 是 无论直接打开还是做页面302重定向时候,必须带此参数 -
如果用户同意授权,页面将跳转至 redirect_uri/?code=CODE&state=STATE。
- code作为换取access_token的票据,每次用户授权带上的code将不一样,code只能使用一次,5分钟未被使用自动过期。
-
-
第二步:通过code换取网页授权access_token
-
获取code后,请求以下链接获取access_token:
https://api.weixin.qq.com/sns/oauth2/access_token?appid=APPID&secret=SECRET&code=CODE&grant_type=authorization_code --- 改成具体的APPID和SECRETID https://api.weixin.qq.com/sns/oauth2/access_token?appid=APPID&secret=SECRETID&code=CODE&grant_type=authorization_code -
参数说明:
参数 是否必须 说明 appid 是 公众号的唯一标识 secret 是 公众号的appsecret code 是 填写第一步获取的code参数 grant_type 是 填写为authorization_code -
返回格式:
//成功时 { "access_token":"ACCESS_TOKEN", "expires_in":7200, "refresh_token":"REFRESH_TOKEN", "openid":"OPENID", "scope":"SCOPE" } //错误时 {"errcode":40029,"errmsg":"invalid code"} -
参数说明:
参数 描述 access_token 网页授权接口调用凭证,注意:此access_token与基础支持的access_token不同 expires_in access_token接口调用凭证超时时间,单位(秒) refresh_token 用户刷新access_token openid 用户唯一标识,请注意,在未关注公众号时,用户访问公众号的网页,也会产生一个用户和公众号唯一的OpenID scope 用户授权的作用域,使用逗号(,)分隔
-
-
代码:
@RestController
public class WeiXinController {
    private final Logger logger = LoggerFactory.getLogger(WeChatController.class);
    @GetMapping("/auth")
    public void auth(@RequestParam("code") String code) {
        logger.info("code={}",code);
        String url = "https://api.weixin.qq.com/sns/oauth2/access_token?appid=APPID&secret=SECRETID&code="+code+"&grant_type=authorization_code";
        RestTemplate restTemplate = new RestTemplate();
        String access = restTemplate.getForObject(url, String.class);
        logger.info(access);
    }
}
-
-
使用SDK方式:MP_OAuth2网页授权
-
maven依赖:
<dependency> <groupId>com.github.binarywang</groupId> <artifactId>weixin-java-mp</artifactId> <version>2.7.0</version> </dependency> <!-- Springboot的配置类 --> <dependency> <groupId>org.springframework.boot</groupId> <artifactId>spring-boot-configuration-processor</artifactId> <optional>true</optional> </dependency> -
配置类:
@Component @ConfigurationProperties(prefix = "wechat") public class WechatAccountConfig { private String mpAppId; private String mpAppSecret; } -
配置文件:
wechat: mpAppId: wx4451dcc6f165f0f4 mpAppSecret: cf93b89968d2fdf90af56d733ccd1a16 -
自动配置:
@Component @Configuration public class WechatMConfig { @Autowired private WechatAccountConfig accountConfig; @Bean public WxMpService wxMPService(){ WxMpService wxMpService = new WxMpServiceImpl(); wxMpService.setWxMpConfigStorage(wxMpConfigStorage()); return wxMpService; } @Bean public WxMpConfigStorage wxMpConfigStorage(){ WxMpInMemoryConfigStorage wxMpConfigStorage = new WxMpInMemoryConfigStorage(); wxMpConfigStorage.setAppId(accountConfig.getMpAppId()); wxMpConfigStorage.setSecret(accountConfig.getMpAppSecret()); return wxMpConfigStorage; } } -
SDK网页授权:
- authorize方法相当于获取code。
- userInfo方法相当于根据code获取openid。
@Controller @RequestMapping("/wechat") public class WechatController { @Autowired private WxMpService wxMpService; @GetMapping("/authorize") public String authorize(@RequestParam("returnUrl") String returnUrl){ String url = "http://hpqv53.natappfree.cc/sell/wechat/userInfo"; String redirectUrl = wxMpService.oauth2buildAuthorizationUrl(url, WxConsts.OAUTH2_SCOPE_BASE, returnUrl); System.out.println(redirectUrl); return "redirect:"+redirectUrl; } @GetMapping("/userInfo") public String userInfo(@RequestParam("code") String code, @RequestParam("state") String returnUrl){ WxMpOAuth2AccessToken accessToken; try { accessToken = wxMpService.oauth2getAccessToken(code); } catch (WxErrorException e) { throw new SellException(ResultEnum.WECHAT_MP_ERROR,e.getError().getErrorMsg()); } String openId = accessToken.getOpenId(); return "redirect:"+returnUrl+"?openid="+openId; } } -
测试请求以下链接:
http://hpqv53.natappfree.cc/sell/wechat/authorize?returnUrl=http://www.imooc.com
-
-
接入前端调试:
-
首先更改前端项目中的/config/index.js中:
sellUrl: 'sell.com', openidUrl: 'http://43bwcy.natappfree.cc/sell/wechat/authorize', -
然后npm run build编译,编译后的文件在dist目录下,再复制到Nginx部署静态资源的位置。
-
获取电脑和手机的IP地址。测试能不能ping通。
-
在手机上设置手动HTTP代理,地址为电脑的IP地址,端口为8888。
-
下载fiddler,设置监听端口为8888,并且允许远程连接。
-
2、支付部分
-
主要用到的是统一下单和支付结果通知两个API。
-
使用SDK:支付SDK。
-
请求:
重定向 /sell/pay/create -
参数:
orderId:16465165415452 returnUrl:http://xxx.com/abc/order/16465165415452 -
返回:
http://xxx.com/abc/order/16465165415452 -
maven依赖:
<dependency>
    <groupId>cn.springboot</groupId>
    <artifactId>best-pay-sdk</artifactId>
    <version>1.1.0</version>
</dependency>
-
-
但是微信测试号不提供支付功能,只能用在微信内拉起支付宝的方式测试,因为支付宝提供了沙箱测试环境。开放平台-沙箱环境 (alipay.com)。
-
使用官方的老SDK
-
引入老SDK的maven依赖:
<dependency> <groupId>com.alipay.sdk</groupId> <artifactId>alipay-sdk-java</artifactId> <version>4.10.167.ALL</version> </dependency> -
根据官方的接入文档,主要是对AlipayClient和AlipayTradeWapPayRequest进行一些配置,然后用
form = alipayClient.pageExecute(alipayRequest).getBody()获取提交到前端的表单,用response.getWriter().write(form)输出。
-
-
支付宝支付相关的配置类:
-
配置类:
@Component @ConfigurationProperties(prefix = "alipay") public class AlipayConfig { String charset = "UTF-8"; String appId; String appPrivateKey; String alipayPublicKey; String serverUrl = "https://openapi.alipaydev.com/gateway.do"; String baseUrl; } -
配置文件:
alipay: app-id: alipay-public-key: app-private-key: base-url: -
可以先用这种方式测试一下。
-
-
支付宝针对官方的老SDK提供了实现的Demo:
- demo中,ap.js提供了跳转逻辑,pay.htm是提供了跳转页面,另外两个是示例。使用需要注意的是要在htm文件中正确配置ap.js的路径。
- 以get方式为例,最终访问的是demo_get.htm下的确认支付的a标签中的href路径。如果使用get方式,需要将后端的请求数据动态传入,可以使用freemaker模板引擎。
-
freemaker模板引擎:
-
maven依赖:
<dependency> <groupId>org.springframework.boot</groupId> <artifactId>spring-boot-starter-freemarker</artifactId> </dependency> -
前端使用:
- 在template目录下创建后缀为.ftl的文件。
- 使用
${键名}的方式获取后端传入的数据,对于对象使用${键名.属性名}。
-
后端数据:
- 返回一个ModelAndView对象,设置viewName为.ftl文件名。
- 设置model为一个map形式的数据。
-
-
实现微信调用支付宝支付:
-
主要就是要传给前端一个拼接好的url。
-
alipayClient.pageExecute(alipayRequest).getBody()返回的String对象是一个form表单,写到前端是用post方式。- 而没有找到单独的获取url等的方法,只好用截取form字符串的方法。(其实用post的demo可能好一点?)
- 在form表单中,只有biz_content属性是在表单属性,其他都被拼接在了action属性中。
-
必须调用
alipayClient.pageExecute(alipayRequest)方法的原因是,需要根据支付宝公钥和应用私钥获得签名sign属性,当然也可以自行实现。而且经过这个方法后,其中的属性都被UrlEncode了(除了biz_content)。 -
所以解决办法是对form字符串进行截取(其实不是一个很好的方法),然后拼接UrlEncode后的biz_content属性。
-
测试控制器:
@Controller @RequestMapping("/pay") public class PayController { @Autowired private AlipayConfig alipayConfig; @GetMapping("/create") public ModelAndView create(@RequestParam("orderId") String orderId, @RequestParam("returnUrl") String returnUrl, HttpServletResponse response){ String CHARSET = alipayConfig.getCharset(); String APP_ID = alipayConfig.getAppId(); String APP_PRIVATE_KEY = alipayConfig.getAppPrivateKey(); String ALIPAY_PUBLIC_KEY = alipayConfig.getAlipayPublicKey(); AlipayClient alipayClient = new DefaultAlipayClient(alipayConfig.getServerUrl(), APP_ID, APP_PRIVATE_KEY, "json", CHARSET, ALIPAY_PUBLIC_KEY, "RSA2"); //获得初始化的AlipayClient AlipayTradeWapPayRequest alipayRequest = new AlipayTradeWapPayRequest();//创建API对应的request String baseUrl = alipayConfig.getBaseUrl(); alipayRequest.setReturnUrl(baseUrl+"/pay/returnUrl"); alipayRequest.setNotifyUrl(baseUrl+"/pay/notifyUrl");//在公共参数中设置回跳和通知地址 alipayRequest.setBizContent("{" + " "out_trade_no":"201603200756150101002"," + " "total_amount":"88.88"," + " "subject":"Iphone6 84G"," + " "product_code":"QUICK_WAP_PAY"" + " }"); String form = ""; try { form = alipayClient.pageExecute(alipayRequest).getBody(); } catch (AlipayApiException e) { e.printStackTrace(); } String oriUrl = StringUtils.substringBetween(form,alipayConfig.getServerUrl(),"">"); String biz_content = ""; try { biz_content = URLEncoder.encode(alipayRequest.getBizContent(),"utf-8"); } catch (UnsupportedEncodingException e) { e.printStackTrace(); } String toUrl = oriUrl + "&biz_content=" + biz_content; toUrl = alipayConfig.getServerUrl() + toUrl; Map<String,String> map = new HashMap<>(); map.put("toUrl",toUrl); return new ModelAndView("confirm_order",map); } } -
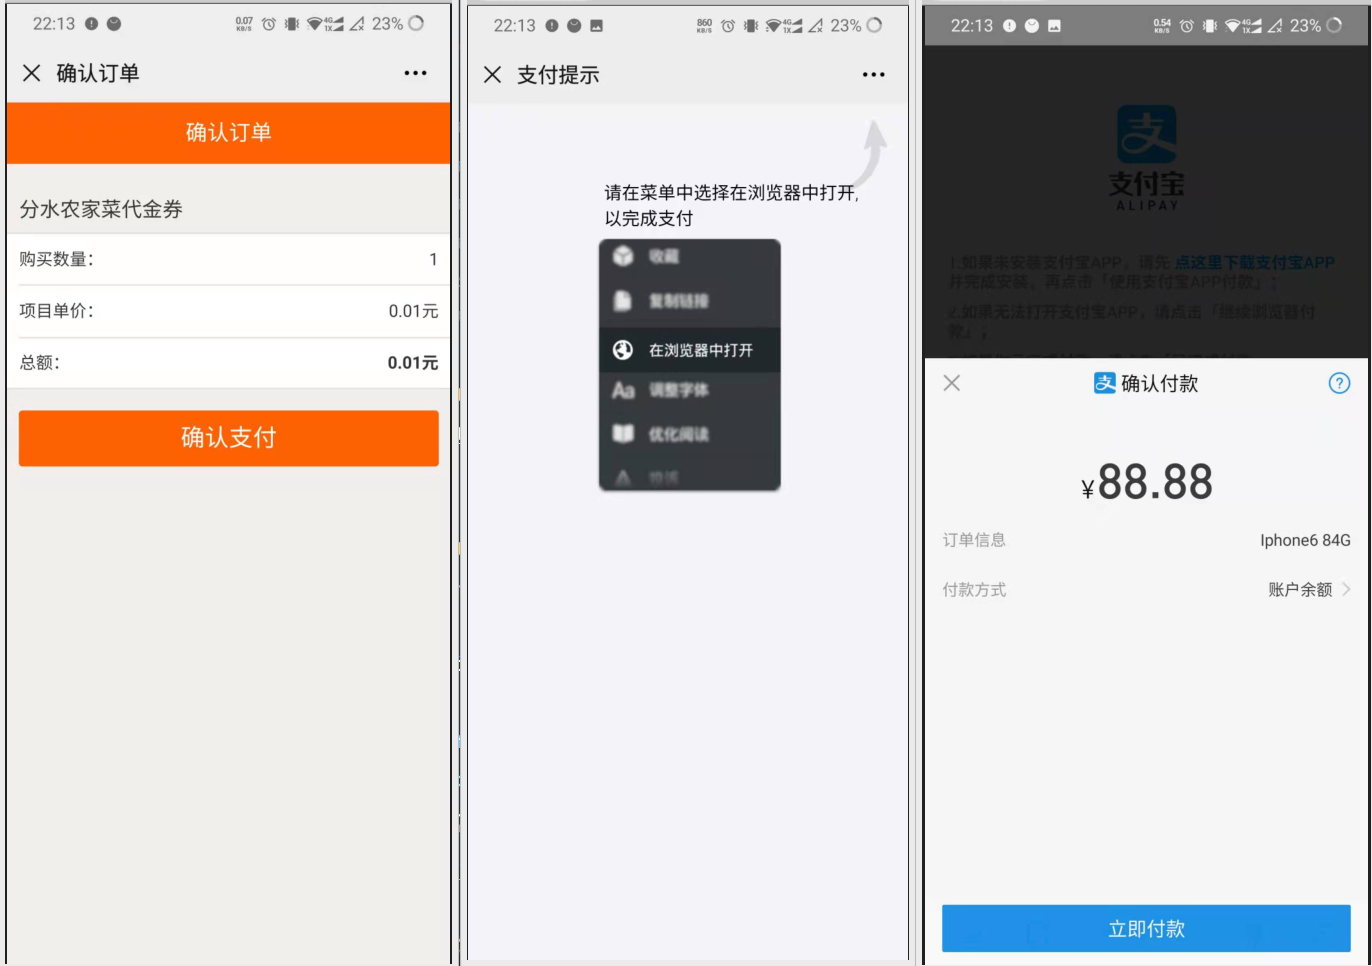
前端模板页面confirm_order.ftl,其实就是把demo_get.htm中a标签中具体的url变成了
${toUrl}。
-
-
实现效果:

-
实现具体业务:
-
根据传入的orderId查询订单详情,获取相关信息并且传到前端。
-
控制器:
@Controller @RequestMapping("/pay") public class PayController { private Logger logger = LoggerFactory.getLogger(PayController.class); @Autowired private OrderMasterService masterService; @Autowired private PayService payService; @GetMapping("/create") public ModelAndView create(@RequestParam("orderId") String orderId, @RequestParam("returnUrl") String returnUrl) { OrderDTO orderDTO = masterService.findOne(orderId); if (orderDTO == null) { logger.error("【支付出错】订单不存在,orderId={}",orderId); throw new SellException(ResultEnum.ORDER_NOT_EXIST); } //拼接订单中的商品名 StringBuilder subject = new StringBuilder(); List<OrderDetail> orderDetailList = orderDTO.getOrderDetailList(); for (OrderDetail orderDetail : orderDetailList) { subject.append(orderDetail.getProductName()).append(" "); } Map<String, String> returnMap = payService.create(orderDTO); Map<String, String> map = new HashMap<>(); map.put("toUrl", returnMap.get("toUrl")); try { map.put("checkUrl", returnMap.get("checkUrl") + "&returnUrl=" + URLEncoder.encode(returnUrl,"utf-8")); } catch (UnsupportedEncodingException e) { e.printStackTrace(); } map.put("productName",subject.toString()); map.put("amount", orderDTO.getOrderAmount().toString()); map.put("buyerName",orderDTO.getBuyerName()); map.put("orderTime", orderDTO.getCreateTime().toString()); map.put("orderId", orderId); return new ModelAndView("confirm_order", map); } } -
业务层:
@Service
public class PayServiceImpl implements PayService {
    @Autowired
    private AlipayConfig alipayConfig;
    @Autowired
    private OrderMasterService masterService;
    private Logger logger = LoggerFactory.getLogger(PayServiceImpl.class);
    @Override
    public Map<String, String> create(OrderDTO orderDTO) {
        String subject = getProductNames(orderDTO);
        String CHARSET = alipayConfig.getCharset();
        String APP_ID = alipayConfig.getAppId();
        String APP_PRIVATE_KEY = alipayConfig.getAppPrivateKey();
        String ALIPAY_PUBLIC_KEY = alipayConfig.getAlipayPublicKey();
        AlipayClient alipayClient = new DefaultAlipayClient(alipayConfig.getServerUrl(), APP_ID, APP_PRIVATE_KEY, "json", CHARSET, ALIPAY_PUBLIC_KEY, "RSA2"); //获得初始化的AlipayClient
        AlipayTradeWapPayRequest alipayRequest = new AlipayTradeWapPayRequest();//创建API对应的request
        String baseUrl = alipayConfig.getBaseUrl();
        alipayRequest.setReturnUrl(baseUrl + "/pay/backwechat");
        alipayRequest.setNotifyUrl(baseUrl + "/pay/notifyUrl");//在公共参数中设置回跳和通知地址
        alipayRequest.setBizContent("{" +
                " "out_trade_no":"" + orderDTO.getOrderId() + ""," +
                " "total_amount":"" + orderDTO.getOrderAmount() + ""," +
                " "subject":"" + subject + ""," +
                " "product_code":"QUICK_WAP_PAY"" +
                " }");
        String form = "";
        try {
            form = alipayClient.pageExecute(alipayRequest).getBody();
        } catch (AlipayApiException e) {
            e.printStackTrace();
        }
        String oriUrl = StringUtils.substringBetween(form, alipayConfig.getServerUrl(), "">");
        String biz_content = "";
        try {
            biz_content = URLEncoder.encode(alipayRequest.getBizContent(), "utf-8");
        } catch (UnsupportedEncodingException e) {
            e.printStackTrace();
        }
        String toUrl = oriUrl + "&biz_content=" + biz_content;

        toUrl = alipayConfig.getServerUrl() + toUrl;
        String checkUrl = baseUrl + "/pay/checkpay?orderId=" + orderDTO.getOrderId();
        Map<String, String> map = new HashMap<>();
        map.put("toUrl",toUrl);
        map.put("checkUrl",checkUrl);

        return map;
    }

    private String getProductNames(OrderDTO orderDTO) {
        StringBuilder subject = new StringBuilder();
        List<OrderDetail> orderDetailList = orderDTO.getOrderDetailList();
        for (OrderDetail orderDetail : orderDetailList) {
            subject.append(orderDetail.getProductName()).append(" ");
      }
        return subject.toString();
    }
}
-
-
异步通知:
-
验证签名。
-
获取返回的支付状态。
-
校验支付金额。
-
全部校验通过后,通知支付平台停止异步通知。
-
具体见支付宝异步回调文档。
-
控制器:
@PostMapping("/notifyUrl") public void notifyUrl(HttpServletRequest request, HttpServletResponse response) { boolean signVerified = payService.notifyUrl(request, response); if (signVerified) { masterService.paid(masterService.findOne(request.getParameter("out_trade_no"))); } logger.info("【异步回调】回调结果{},orderId={}",signVerified,request.getParameter("out_trade_no")); } -
业务层:
@Override
public boolean notifyUrl(HttpServletRequest request, HttpServletResponse response) {
    response.setContentType("text/html;charset=utf-8");

    Map<String, String> paramsMap = new HashMap<>(); //将异步通知中收到的所有参数都存放到map中
    Map<String, String[]> requestParams = request.getParameterMap();
    for (Iterator<String> iter = requestParams.keySet().iterator(); iter.hasNext();) {
        String name = iter.next();
        String[] values = requestParams.get(name);
        String valueStr = "";
        for (int i = 0; i < values.length; i++) {
            valueStr = (i == values.length - 1) ? valueStr + values[i] : valueStr + values[i] + ",";
        }
        paramsMap.put(name, valueStr);
    }

    boolean signVerified = false; //调用SDK验证签名
    try {
        signVerified = AlipaySignature.rsaCheckV1(paramsMap, alipayConfig.getAlipayPublicKey(), alipayConfig.getCharset(), alipayConfig.getSign_type());
    } catch (AlipayApiException e) {
        e.printStackTrace();
    }


    boolean check = checkBotifyRequest(paramsMap);
    try {
        PrintWriter writer = response.getWriter();
        check = checkBotifyRequest(paramsMap);
        if(signVerified && check){
            writer.write("success");
            logger.info("【回调支付成功】,orderId={}",request.getParameter("out_trade_no"));
        }else{
            writer.write("failure");
            logger.info("【回调支付失败】,orderId={}",request.getParameter("out_trade_no"));
        }
        response.getWriter().close();
    } catch (IOException e) {
        e.printStackTrace();
    }

    return signVerified && check;
}
-
-
还要考虑的一点是从外部浏览器支付完成后如何跳转回微信:
-
首先,直接用同步回调returnUrl(固定为/backwechat)回到微信:
-
控制器:
@GetMapping("/backwechat") public ModelAndView backwechat(){ return new ModelAndView("jumpback"); } -
前端:
<script> window.onload =function () { window.location = "weixin://" } </script> -
这样回到的就是跳转之前的微信界面,但是现在的问题是如何进入下一步。
-
-
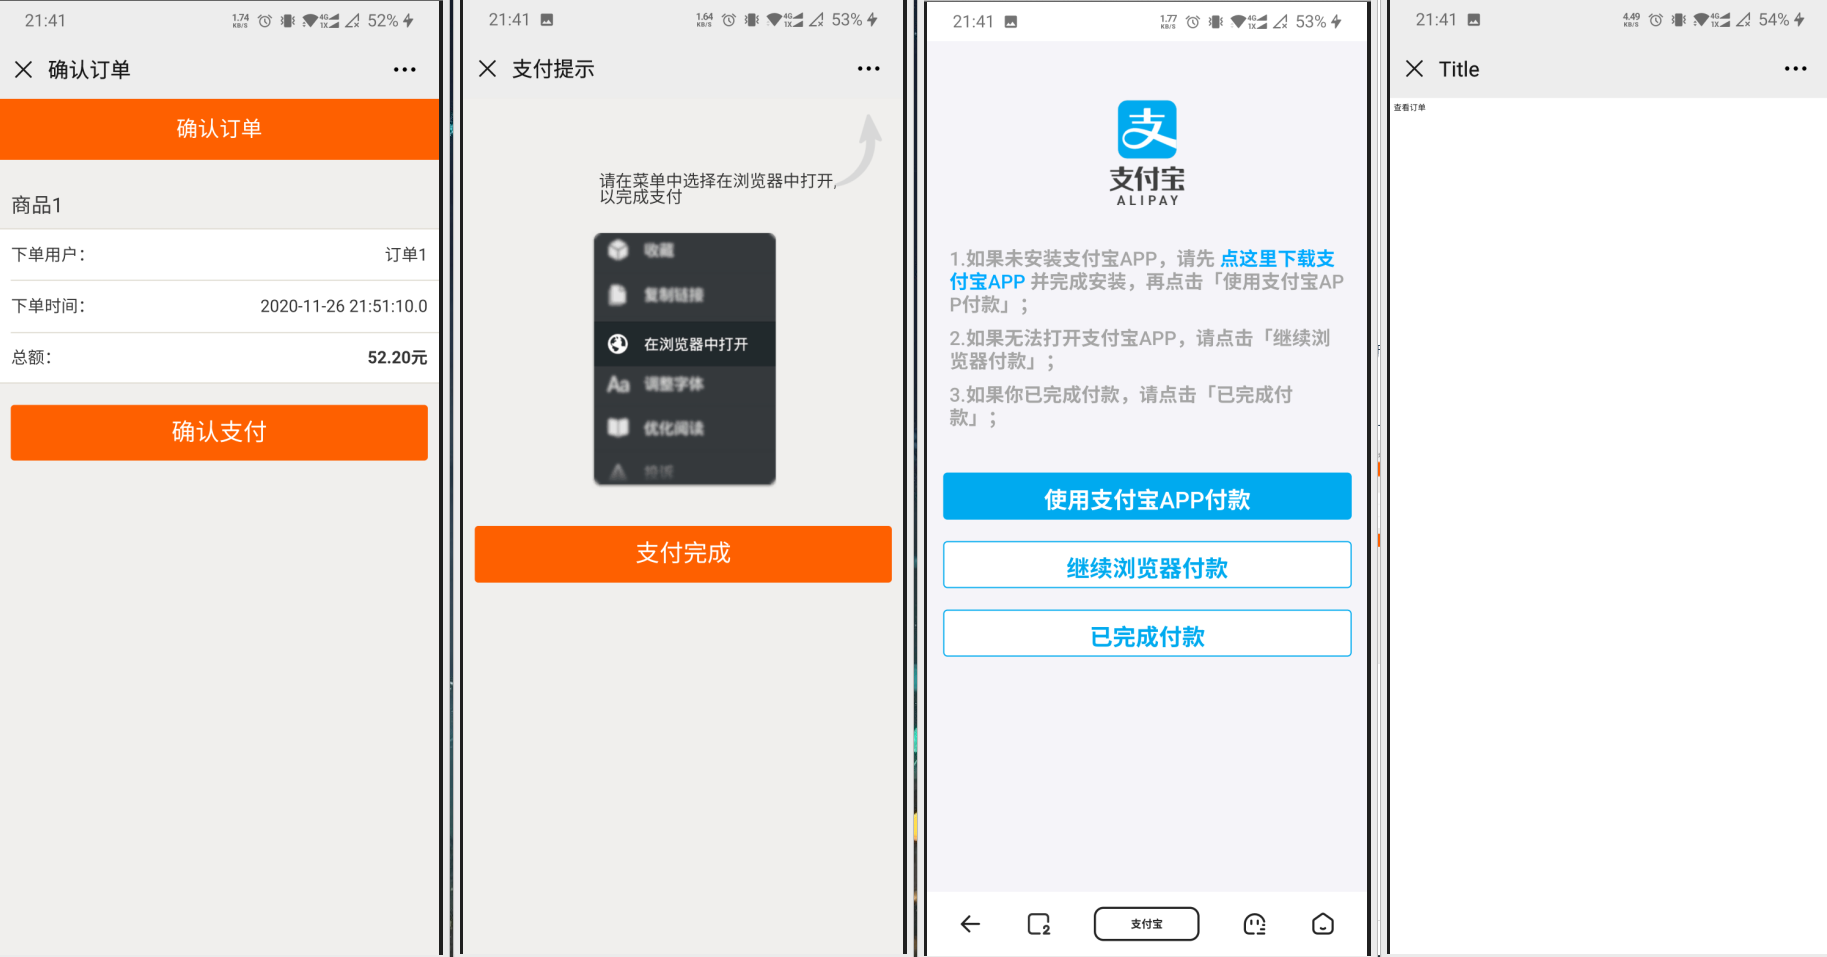
改造原有的跳转页面,增加一个支付完成的按钮。
-
添加在pay.htm中:
<div class="wrapper buy-wrapper">
    <a id="checkpay" class="J-btn-submit btn mj-submit btn-strong btn-larger btn-block">支付完成</a>
</div>
var checkUrl = getQueryString(location.href, "checkUrl"); var returnUrl = getQueryString(location.href, "returnUrl"); document.querySelector("#checkpay").href = checkUrl + "&returnUrl=" + returnUrl; -
为了能获取checkUrl,需要对之前的前端文件进行一些改造:
-
confir_order.ftl:
<input id="orderId" type="hidden" value=${checkUrl} />var checkUrl = document.getElementById("orderId").value; _AP.pay(e.target.href, checkUrl); -
ap.js:
b.pay = function(d, checkUrl) {
    var c = encodeURIComponent(a.encode(d));
    location.href = "pay.htm?goto=" + c + "&checkUrl=" + checkUrl;
};
-
-
后端的处理:
-
PayServiceImpl中拼接checkUrl,同时使用一个map返回toUrl和checkUrl:
String checkUrl = baseUrl + "/pay/checkpay?orderId=" + orderDTO.getOrderId(); -
PayController中放入map中:
map.put("checkUrl", returnMap.get("checkUrl"));
-
-
-
最后的结果:
- 如果支付前直接点支付完成,会查询订单是否完成。
- 支付完成后在浏览器中点击完成付款,会跳转到微信中,然后点击支付完成会跳转到最终页面。

-
-
接入前端调试:
-
首先更改前端项目中的/config/index.js中:
sellUrl: 'http://sell.com', openidUrl: 'http://5w3ab3.natappfree.cc/sell/wechat/authorize', wechatPayUrl: 'http://5w3ab3.natappfree.cc/sell/pay/create' -
重新部署前端。
-
-
退款:
-
使用请求
AlipayTradeRefundRequest,传入orderId和退款金额。 -
业务层:
@Override public void refund(String orderId) { String CHARSET = alipayConfig.getCharset(); String APP_ID = alipayConfig.getAppId(); String APP_PRIVATE_KEY = alipayConfig.getAppPrivateKey(); String ALIPAY_PUBLIC_KEY = alipayConfig.getAlipayPublicKey(); AlipayClient alipayClient = new DefaultAlipayClient(alipayConfig.getServerUrl(), APP_ID, APP_PRIVATE_KEY, "json", CHARSET, ALIPAY_PUBLIC_KEY, "RSA2"); //获得初始化的AlipayClient AlipayTradeRefundRequest request = new AlipayTradeRefundRequest();//创建API对应的request类 OrderDTO orderDTO = masterService.findOne(orderId); request.setBizContent("{" + ""out_trade_no":"" + orderId + ""," + ""out_request_no":"1000001"," + ""refund_amount":"0" + orderDTO.getOrderAmount() + ""}"); //设置业务参数 AlipayTradeRefundResponse response = null;//通过alipayClient调用API,获得对应的response类 try { response = alipayClient.execute(request); } catch (AlipayApiException e) { e.printStackTrace(); } System.out.print(response.getBody()); } -
在orderMasterService的cancel取消订单方法中最后被调用。
-
iwehdio的博客园:https://www.cnblogs.com/iwehdio/