iwehdio的博客园:https://www.cnblogs.com/iwehdio/
1、缓存
-
JSR-107:定义了五个核心接口(CachingProvider、CacheManager、Cache、Entry、Expiry),用于操作缓存。
-
Spring缓存抽象:定义了Cache和CacheManager接口来统一不同的缓存技术。
- CacheManager:缓存管理器,管理各种Cache组件。
- Cache:缓存接口,定义缓存操作,实现有RedisCache等。
@Cacheable注解:针对方法配置,能够根据方法的请求参数(默认作为key)对方法返回值进行缓存。如果有缓存就不再调用方法,而从缓存中获取。@CacheEvict注解:执行该方法后清空缓存。@CachePut注解:方法总是会被调用,而且调用的结果被更新到缓存中。@EnableCaching注解:开启基于注解的缓存。- KeyGenerator:缓存数据时key的生成策略。
- serialize:缓存数据时value序列化策略。
-
创建入门工程:
-
创建工程和数据库文件.
-
整合Mybatis。
-
配置文件:
spring.datasource.url=jdbc:mysql:///jpa spring.datasource.username=root spring.datasource.password=root spring.datasource.driver-class-name=com.mysql.jdbc.Driver mybatis.configuration.map-underscore-to-camel-case=true -
创建Java Bean。
-
创建Mapper,并在主程序中用MapperScan指定。
@Mapper public interface EmployeeMapper { @Select("select * from employee where id=#{id}") public Employee getEmpById(Integer id); @Update("update employee set lastName=#{lastName},email=#{email},gender=#{gender},d_id=#{dId} where id=#{id}") public void updateEmp(Employee employee); @Delete("delete employee where id=#{id}") public void deleteEmpById(Integer id); @Insert("insert into employee(lastName,email,gender,d_id) values(#{lastName},#{email},#{gender},#{dId})") public void insertEmpById(Employee employee); } -
创建service和controller:
@Service
public class EmployeeService {
    @Autowired
    EmployeeMapper employeeMapper;

    public Employee getEmp(Integer id) {
        return employeeMapper.getEmpById(id);
    }
}

@RestController
public class EmployeeController {
    @Autowired
    EmployeeService employeeService;

    @GetMapping("/emp/{id}")
    public Employee getEmp(@PathVariable("id") Integer id){
        return employeeService.getEmp(id);
    }
}
-
-
-
使用缓存:
-
开启基于注解的缓存,在主程序上标注。
@SpringBootApplication @MapperScan("cn.iwehdio.demo.mapper") @EnableCaching public class DemoApplication { public static void main(String[] args) { SpringApplication.run(DemoApplication.class, args); } } -
@Cacheable注解:如加在Service层中的查询方法上。- 先查看缓存,根据缓存中有没有确定是否调用方法。
- 注解的属性:
- value/cacheNames:指定缓存组件的名字,可以指定多个。
- key:缓存数据使用的键。默认使用方法参数的值。支持SpEL表达式。
- keyGenerator:key的生成器,可以指定生成器。与key两个属性二选一。
- cacheManager:缓存管理器组件。
- cacheResolver:缓存解析器,与cacheManager二选一。
- condition:指定符合条件的情况下才缓存,支持SpEL表达式。
- unless:指定条件为true时不缓存,可以获取结果(#result)进行判断。
- sync:是否使用异步模式。
- 运行原理:
- 自动配置类:CacheAutoConfiguration。
- 各种缓存的配置类,包括各种缓存中间件的配置。
- 默认生效的配置类:SimpleCacheConfiguration。
- 在容器中注册了一个CacheManager:ConcurrentMapCacheManager。
- 可以获取和创建ConcurrentMapCache类型的缓存组件,将数据保存在ConcurrentMap。
- 运行流程:
- 方法运行之前,先查询Cache缓存组件,按照
@Cacheable中的cacheNames指定名字获取。也就是cacheManager(ConcurrentMapCacheManager)获取cache(ConcurrentMapCache)。第一次获取缓存cache,如果没有会自动创建。 - 去cache中按照
@Cacheable中的key(或自动生成,默认使用SimpleKeyGenerator)查找缓存的内容。 - 没有查到缓存,就调用目标方法。将目标方法返回的结果放进缓存中。
- 如果查到缓存,就从缓存中获取,不执行方法。
- 方法运行之前,先查询Cache缓存组件,按照
-
@CachePut注解:加在Service层中的更新方法上。-
先调用方法,获取到返回值后存入缓存。
-
如果想要查询和更新共用一个缓存,需要指定key为相同。
@Service
public class EmployeeService {
    @Autowired
    EmployeeMapper employeeMapper;
    @Cacheable(cacheNames = "emp", key ="#id")
    public Employee getEmp(Integer id) {
        System.out.println("查询" + id + "号员工");
        return employeeMapper.getEmpById(id);
    }
    @CachePut(cacheNames = "emp", key ="#employee.id")
    public Employee updateEmp(Employee employee) {
        System.out.println("修改" + employee);
        employeeMapper.updateEmp(employee);
        return employee;
    }
}
-
-
@CacheEvict注解:加在Service层中的删除方法上。- 清除指定的key的缓存。
- 属性:
- allEntries:为true时,会清除所有缓存。
- beforeInvocation:缓存清除是否在方法之前执行。默认在方法执行之后执行。
-
@Caching注解:定义复杂的缓存规则,相当于以上三个注解的组合。-
使用格式:
@Caching(
    cacheable = {
        @Cacheable
    },
    put = {
        @CachePut
    },
    evict = {
        @CacheEvict
    }
)
-
-
@CacheConfig注解:加在Service层的类上。- 指定这个类中相关缓存注解的属性。
-
-
整合redis环境:
-
引入redis的starter:spring-boot-starter-data-redis。
-
配置文件:
spring.redis.host=127.0.0.1 -
引入redis后,RedisAutoConfiguration自动配置类就生效了。提供了模板对象:
@Autowired //操作k-v都是字符串的 StringRedisTemplate stringRedisTemplate; @Autowired //操作k-v都是对象的 RedisTemplate redisTemplate; -
操作redis数据的方法:
//分别操作字符串、列表、集合、散列和有序集合 stringRedisTemplate.opsForValue(). stringRedisTemplate.opsForList(). stringRedisTemplate.opsForSet(). stringRedisTemplate.opsForHash(). stringRedisTemplate.opsForZSet(). //redisTemplate中也有类似方法 //保存和获取方法 stringRedisTemplate.opsForValue().append("message", "hello"); stringRedisTemplate.opsForValue().get("message"); stringRedisTemplate.opsForValue().leftPush("mylist","1"); //保存序列化对象(实体类已实现序列化接口) redisTemplate.opsForValue().set("emp", emp); -
改变默认序列化规则,自动序列化为JSON后保存。编写自动配置类,设置默认序列化机制为转化为JSON(参考RedisAutoConfiguration下的redisTemplate方法):
@Configuration public class ResdisJsonConfiguration { @Bean public RedisTemplate<Object, Employee> EmpRedisTemplate( RedisConnectionFactory redisConnectionFactory) throws UnknownHostException { RedisTemplate<Object, Employee> template = new RedisTemplate<Object, Employee>(); template.setConnectionFactory(redisConnectionFactory); Jackson2JsonRedisSerializer<Employee> jsonRedisSerializer = new Jackson2JsonRedisSerializer<Employee>(Employee.class); template.setDefaultSerializer(jsonRedisSerializer); return template; } }-
测试:
@Autowired
RedisTemplate<Object,Employee> empRedisTemplate;
@Test
public void test01() {
    Employee empById = employeeMapper.getEmpById(1);
    empRedisTemplate.opsForValue().set("emp-01",empById);
}
-
-
运行原理:
-
redis在容器中注册了RedisCacheManager,原来的SimpleCacheManager(检测到容器中已经有CacheManager)不再存在。
-
RedisCacheManager创建RedisCache组件,操作redis使用的是RedisTemplate,默认使用JDK序列化机制。
-
如果要序列化为JSON存入redis,需要自定义RedisCacheManager。此时原生RedisCacheManager不会创建。在配置类中添加(参考RedisCacheConfiguration.java):
@Bean public RedisCacheManager employeeCacheManager(RedisTemplate<Object, Employee> empRedisTemplate) { RedisCacheManager cacheManager = new RedisCacheManager(empRedisTemplate); cacheManager.setUsePrefix(true); return cacheManager; } -
但是这样会导致所有对象从redis存入或读取JSON都是以Employee对象为规则,读取其他对象时会出错。
-
所以需要针对不同对象配置不同的RedisCacheManager和RedisTemplate。在使用时,在注解的属性中指定不同的cacheManager属性。
-
多个CacheManager时,需要有一个作为主CacheManager,在其配置上加
@Primary注解。
-
-
编码的方式存入缓存:
//自动注入缓存管理器
@Autowired
@Qualifier("employeeCacheManager")
RedisCacheManager employeeCacheManager;

//根据id获取缓存
Cache emp = employeeCacheManager.getCache("emp");
//操作缓存
emp.put("emp:1", employee);
-
2、消息
-
在应用中,可通过消息服务中间件来提升系统异步通信、扩展解耦能力。
-
消息服务中的两个重要概念:
-
消息代理。
-
目的地。
-
当消息发送者发送消息以后,将由消息代理接管,消息代理保证消息传递到指定目的地。
-
消息队列主要有两种形式的目的地:
- 队列:点对点消息通信。
- 主题:发布/订阅消息通信。
-
JMS-Java消息服务:
- 基于JVM消息代理的规范。ActiveMQ、HornetMQ是JMS的实现。
-
AMQP:
- 高级消息队列协议,兼容JMS。是网络线级协议,跨平台跨语言的。RabbitMQ是AMQP的实现。
- 提供了五种消息模型。
-
RabbitMQ-AMQP的开源实现:
-
核心概念:
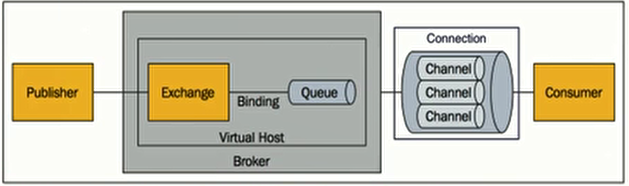
- 消息:由消息头和消息体组成。消息头由一系列可选属性组成,主要包括路由键routing key。
- Publisher:消息的生产者,也是一个向交换器发布消息的客户端应用程序。
- Exchange:交换器,用来接收生产者发送的消息并将这些消息路由给服务器中的队列。有四种类型。
- Queue:消息队列,用来保存消息指导发送给消费者。是消息的容器,也是消息的终点。
- Binding:绑定,用于消息队列和交换器之间的交换。交换器和消息队列是多对多的关系。
- Connection:网络连接。
- Channel:信道,多路复用连接中的一条独立的双向数据流通道。
- Consumer:消费者,表示一个从消息队列中取得消息的客户端应用程序。
- VirtualHost:虚拟主机,表示一批交换器、消息队列和相关对象。
- Broker:表示消息队列服务器实体。
-
运行机制:
- 消息路由:
- 交换器和绑定规则不同,会导致消息被发送到不同的队列中。
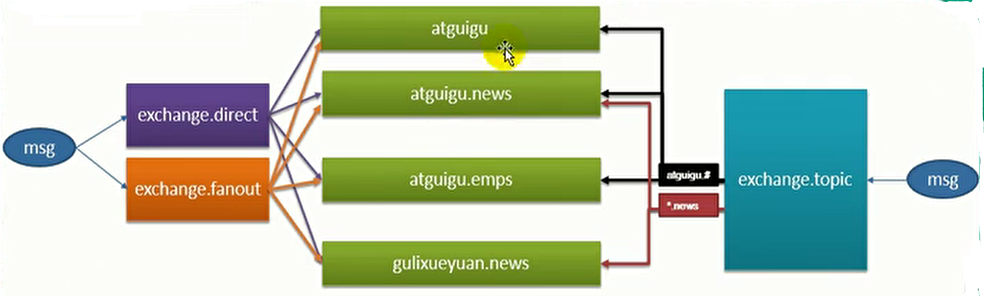
- Exchange类型:
- direct:直连。消息中的路由键如果和Binding中的binding key一致,交换器就将消息发到对应的队列中。 完全匹配、单播的点对点专属。
- fanout:广播。每个发到fanout类型交换器的消息都会分到所有绑定的队列上去。不处理路由键,转发消息是最快的。
- topic:模糊匹配。通过模式匹配分配消息的路由键属性。将路由键和绑定键的字符用点隔开,识别通配符(#匹配0个或多个单词,*匹配一个单词)。
- 消息路由:
-
运行环境:
-
docker下安装:
docker pull rabbitmq:3-management -
运行并暴露端口号(客户端与RabbitMQ通信的:5672;管理界面访问Web页面的:15672):
docker run -d -p 5672:5672 -p 15672:15672 --name myrabbitmq 0067598739d3 -
连接15672端口,输入默认用户名和密码guest,进入管理页面。
-
运行示例:
-
创建交换器exchange.direct、exchange.fanout和exchange.topic。
-
创建队列atguigu、atguigu.news、atguigu.emps和gulixueyuan.news。
-
创建绑定关系。
-
测试发送消息,并查看。
-
-
-
-
SpringBoot整合:
-
引入starter:spring-boot-starter-amqp。
-
自动配置原理:
- 自动配置类RabbitAutoConfiguration。
- 自动配置了连接工程ConnectionFactory。
- RabbitProperties封装了RabbitMQ的配置。
- RabbitTemplate:用于给RabbitMQ发送和接受消息。
- AmqpAdmin:RabbitMQ系统管理功能组件。创建交换器、队列等。
-
配置文件:
spring.rabbitmq.host=ip地址 spring.rabbitmq.username=guest spring.rabbitmq.password=guest spring.rabbitmq.port=5672 spring.rabbitmq.virtual-host=/ -
测试:
-
点对点单播消息(单播、广播还是模糊匹配,只需要更改指定的交换器):
@Autowired RabbitTemplate rabbitTemplate; //自己构造消息体内容和消息头 rabbitTemplate.send(exchange,routeKey,message); //传入要发送的对象,自动序列化 rabbitTemplate.convertAndSend(exchange,routeKey,object); Map<String,Object> map = new HashMap<>(); map.put("msg","第一个消息"); rabbitTemplate.convertAndSend("exchange.direct","atguigu.news",map); -
接收消息:
Object o = rabbitTemplate.receiveAndConvert("atguigu.news");
System.out.println(o.getClass());
-
-
消息序列化为JSON(自定义MessageConverter,参考RabbitTemplate中使用的):
@Configuration
public class MyAmqpConfiguration {
    @Bean
    public MessageConverter messageConverter() {
        return new Jackson2JsonMessageConverter();
    }
}
-
-
@RabbitListener注解:-
需要开启基于注解的RabbitMQ:
@EnableRabbit。 -
queue属性:监听指定的消息队列中的内容,作为方法的输入参数。只要有消息就会被接收。
@Service public class rabbitService { @RabbitListener(queues = "atguigu.news") public void receive(Object o){ System.out.println(o); } } -
也可以获取message消息对象,获取消息头message.getProperties/获取消息体message.getBody。
-
-
AmqpAdmin创建好删除消息队列、交换器和绑定规则:
-
创建交换器:
@Autowired AmqpAdmin amqpAdmin; amqpAdmin.declareExchange(new DirectExchange("amqpAdmin.exchange")); -
创建队列:
amqpAdmin.declareQueue(new Queue("amqpAdmin.queue",true)); -
绑定关系:
//绑定队列到交换器,并且指定路由键
amqpAdmin.declareBinding(new Binding("amqpAdmin.queue", Binding.DestinationType.QUEUE,"amqpAdmin.exchange","amqp.hh",null));
-
iwehdio的博客园:https://www.cnblogs.com/iwehdio/