• 2.SpringMVC源码分析:DispatcherServlet的初始化与请求转发


    一.DispatcherServlet的初始化

    在我们第一次学Servlet编程,学java web的时候,还没有那么多框架。我们开发一个简单的功能要做的事情很简单,就是继承HttpServlet,根据需要重写一下doGet,doPost方法,跳转到我们定义好的jsp页面。Servlet类编写完之后在web.xml里注册这个Servlet类。

    除此之外,没有其他了。我们启动web服务器,在浏览器中输入地址,就可以看到浏览器上输出我们写好的页面。为了更好的理解上面这个过程,你需要学习关于Servlet生命周期的三个阶段,就是所谓的“init-service-destroy”。

    以上的知识,我觉得对于你理解SpringMVC的设计思想,已经足够了。SpringMVC当然可以称得上是一个复杂的框架,但是同时它又遵循Servlet世界里最简单的法则,那就是“init-service-destroy”。我们要分析SpringMVC的初始化流程,其实就是分析DispatcherServlet类的init()方法,让我们带着这种单纯的观点,打开DispatcherServlet的源码一窥究竟吧。

    1.DispacherServlet的初始化

    1.<init-param>配置元素读取

    用Eclipse IDE打开DispatcherServlet类的源码,ctrl+T看一下。

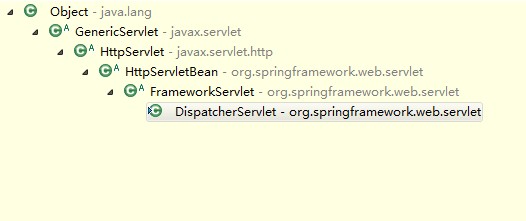
    DispatcherServlet类的初始化入口方法init()定义在HttpServletBean这个父类中,HttpServletBean类作为一个直接继承于HttpServlet类的类,覆写了HttpServlet类的init()方法,实现了自己的初始化行为。

    @Override
    public final void init() throws ServletException {
    if (logger.isDebugEnabled()) {
    logger.debug("Initializing servlet '" + getServletName() + "'");
    }

    // Set bean properties from init parameters.
    try {
               //解析init-param并封装到pvs中,并进行验证
    PropertyValues pvs = new ServletConfigPropertyValues(getServletConfig(), this.requiredProperties);
               //将当前的Servelt类转换成BeanWrapper,从而能够以Spring的方式来对init-param进行注入
    BeanWrapper bw = PropertyAccessorFactory.forBeanPropertyAccess(this);
    ResourceLoader resourceLoader = new ServletContextResourceLoader(getServletContext());
               //注册一个字符串到资源文件的编辑器
    bw.registerCustomEditor(Resource.class, new ResourceEditor(resourceLoader, this.environment));
               //留给子类覆盖
    initBeanWrapper(bw);
    //<init-param>配置元素利用JavaBean的方式,进行属性注入
               bw.setPropertyValues(pvs, true);
    }
    catch (BeansException ex) {
    logger.error("Failed to set bean properties on servlet '" + getServletName() + "'", ex);
    throw ex;
    }

    // Let subclasses do whatever initialization they like.
           //留给子类扩展
    initServletBean();

    if (logger.isDebugEnabled()) {
    logger.debug("Servlet '" + getServletName() + "' configured successfully");
    }
    }


    步骤:

    1.封装以验证初始化参数

    2.将当前的Servelt类转换成BeanWrapper

    3.注册相对于Resource的属性编辑器

    4.属性注入

    5.servletBean的初始化


    我在web.xml中注册的DispatcherServlet配置如下:

    <!-- springMVC配置开始 -->
    <servlet>
    <servlet-name>appServlet</servlet-name>
    <servlet-class>org.springframework.web.servlet.DispatcherServlet</servlet-class>
    <init-param>
    <param-name>contextConfigLocation</param-name>
    <param-value>classpath:spring/spring-servlet.xml</param-value>
    </init-param>
    <load-on-startup>1</load-on-startup>
    </servlet>
    <servlet-mapping>
    <servlet-name>appServlet</servlet-name>
    <url-pattern>/</url-pattern>
    </servlet-mapping>
    <!-- springMVC配置结束 -->

    可以看到,我注册了一个名为contextConfigLocation的<init-param>元素,其值为“classpath:spring/spring-servlet.xml”,这也是大家常常用来指定SpringMVC配置文件路径的方法。上面那段try,catch块包裹的代码发挥的作用,一个是将“classpath:spring/spring-servlet.xml”这段字符串转换成classpath路径下的一个资源文件,供框架初始化读取配置元素。在我的工程中是在spring文件夹下面的配置文件spring-servlet.xml。

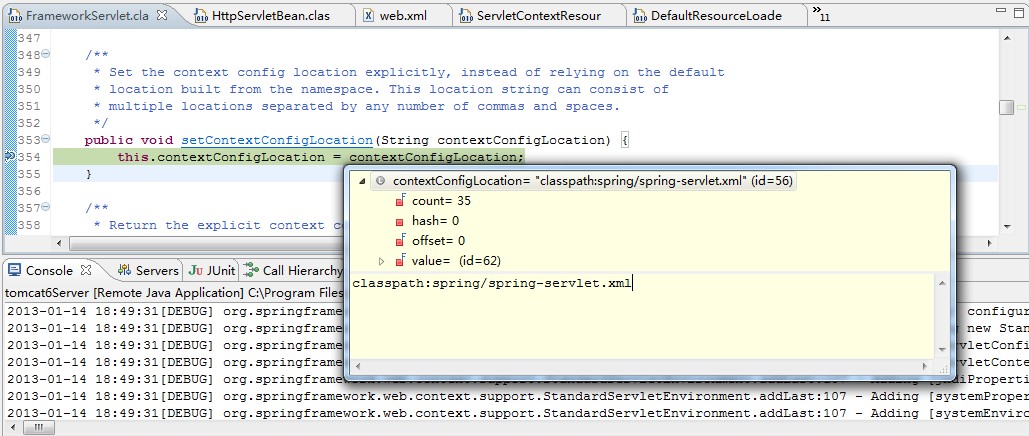
    另外一个作用,就是将contextConfigLocation的值读取出来,然后通过setContextConfigLocation()方法设置到DispatcherServlet中,这个setContextConfigLocation()方法是在FrameworkServlet类中定义的,也就是上面继承类图中DispatcherServlet的直接父类。

    我们在setContextConfigLocation()方法上面打上一个断点,启动web工程,可以看到下面的调试结果。

    在HttpServletBean这个类的设计中,运用了依赖注入思想完成了<init-param>配置元素的读取。他抽离出HttpServletBean这个类的目的也在于此,就是“以依赖注入的方式来读取Servlet类的<init-param>配置信息”,而且这里很明显是一种setter注入。

    明白了HttpServletBean类的设计思想,我们也就知道可以如何从中获益。具体来说,我们继承HttpServletBean类(就像DispatcherServlet做的那样),在类中定义一个属性,为这个属性加上setter方法后,我们就可以在<init-param>元素中为其定义值。在类被初始化后,值就会被注入进来,我们可以直接使用它,避免了样板式的getInitParameter()方法的使用,而且还免费享有Spring中资源编辑器的功能,可以在web.xml中,通过“classpath:”直接指定类路径下的资源文件。

    注意,虽然SpringMVC本身为了后面初始化上下文的方便,使用了字符串来声明和设置contextConfigLocation参数,但是将其声明为Resource类型,同样能够成功获取。鼓励读者们自己继承HttpServletBean写一个测试用的Servlet类,并设置一个参数来调试一下,这样能够帮助你更好的理解获取配置参数的过程。

    2.WebApplicaitonContext的建立

    SpringMVC使用了Spring容器来容纳自己的配置元素,拥有自己的bean容器上下文。在SpringMVC初始化的过程中,非常关键的一步就是要建立起这个容器上下文,而这个建立上下文的过程,发生在FrameworkServlet类中,由上面init()方法中的initServletBean()方法触发。

    protected final void initServletBean() throws ServletException {
    getServletContext().log("Initializing Spring FrameworkServlet '" + getServletName() + "'");
    if (this.logger.isInfoEnabled()) {
    this.logger.info("FrameworkServlet '" + getServletName() + "': initialization started");
    }
    long startTime = System.currentTimeMillis();

    try {
               //初始化WebApplicationContext容器
    this.webApplicationContext = initWebApplicationContext();
    //初始化FrameworkServlet
               initFrameworkServlet();
    }
    catch (ServletException | RuntimeException ex) {
    this.logger.error("Context initialization failed", ex);
    throw ex;
    }

    if (this.logger.isInfoEnabled()) {
    long elapsedTime = System.currentTimeMillis() - startTime;
    this.logger.info("FrameworkServlet '" + getServletName() + "': initialization completed in " +
    elapsedTime + " ms");
    }
    }

    initWebApplicationContext()

    对sevlet功能所使用的变量进行初始化

    protected WebApplicationContext initWebApplicationContext() {
    WebApplicationContext rootContext =
    WebApplicationContextUtils.getWebApplicationContext(getServletContext());
    WebApplicationContext wac = null;

    if (this.webApplicationContext != null) {
    // A context instance was injected at construction time -> use it
            //1.context实例在构造函数中就已经被注入,因为servlet只能被实例化一次
    wac = this.webApplicationContext;
    if (wac instanceof ConfigurableWebApplicationContext) {
    ConfigurableWebApplicationContext cwac = (ConfigurableWebApplicationContext) wac;
    if (!cwac.isActive()) {
    // The context has not yet been refreshed -> provide services such as
    // setting the parent context, setting the application context id, etc
    if (cwac.getParent() == null) {
    // The context instance was injected without an explicit parent -> set
    // the root application context (if any; may be null) as the parent
    cwac.setParent(rootContext);
    }
                       //刷新上下文环境
    configureAndRefreshWebApplicationContext(cwac);
    }
    }
    }
    if (wac == null) {
    //2.根据contextAtrribute属性加载WebApplicaitonContext
    wac = findWebApplicationContext();
    }
    if (wac == null) {
    // No context instance is defined for this servlet -> create a local one
    //3.重新创建WebApplicationContext
               wac = createWebApplicationContext(rootContext);
    }

    if (!this.refreshEventReceived) {
    // Either the context is not a ConfigurableApplicationContext with refresh
    // support or the context injected at construction time had already been
    // refreshed -> trigger initial onRefresh manually here.
    onRefresh(wac);
    }

    if (this.publishContext) {
    // Publish the context as a servlet context attribute.
    String attrName = getServletContextAttributeName();
    getServletContext().setAttribute(attrName, wac);
    if (this.logger.isDebugEnabled()) {
    this.logger.debug("Published WebApplicationContext of servlet '" + getServletName() +
    "' as ServletContext attribute with name [" + attrName + "]");
    }
    }

    return wac;
    }

    步骤:

    1.寻找或者创建对应的WebApplicationContext

    (1)通过构造函数的注入进行初始化


    (2)通过contextAtrribute进行初始化


    (3)重新创建WebApplicationContext实例

    默认创建的是XMLWebApplcaitonContext(org.springframework.web.context.support.XmlWebApplicationContext)

    总结:

    initWebApplicationContext()方法,封装了建立Spring容器上下文的整个过程,方法内的逻辑如下:

    1. 获取由ContextLoaderListener初始化并注册在ServletContext中的RootContext

    2. 如果webApplicationContext已经不为空,表示这个Servlet类是通过编程式注册到容器中的(Servlet 3.0+中的ServletContext.addServlet() ),Context也由编程式传入。若这个传入的Context还没被初始化,将RootContext上设置为它的父Context,然后将其初始化,否则直接使用。

    3. 通过wac变量的引用是否为null,通过第2步的判断来完成Context的设置(即Context是否已经用编程式方式传入),如果wac==null成立,说明该Servlet不是由编程式注册到容器中的。此时以contextAttribute属性的值为key,在ServletContext中查找Context,查找得到,说明Context已经以别的方式初始化并注册在contextAttribute下,直接使用。

    4. 检查wac变量的引用是否为null,如果wac==null成立,说明2、3两步中的上下文初始化策略都没成功,此时调用createWebApplicationContext(rootContext),建立一个全新的以rootContext为父上下文的上下文,作为SpringMVC配置元素的容器上下文。大多数情况下我们所使用的上下文,就是这个新建的上下文。

    5. 以上三种初始化上下文的策略,都会回调onRefresh(ApplicationContext context)方法(回调的方式根据不同策略有不同),onRefresh方法在DispatcherServlet类中被覆写,以上面得到的上下文为依托,完成SpringMVC中默认实现类的初始化。

    6. 最后,将这个上下文发布到ServletContext中,也就是将上下文以一个和Servlet类在web.xml中注册名字有关的值为键,设置为ServletContext的一个属性。你可以通过改变publishContext的值来决定是否发布到ServletContext中,默认为true。


    2.configureAndRefreshWebApplciaitonContext

    构造函数或者单独创建都会调用该方法,对已经创建好的WebApplicationContext配置和刷新

    protected void configureAndRefreshWebApplicationContext(ConfigurableWebApplicationContext wac) {
    if (ObjectUtils.identityToString(wac).equals(wac.getId())) {
    // The application context id is still set to its original default value
    // -> assign a more useful id based on available information
    if (this.contextId != null) {
    wac.setId(this.contextId);
    }
    else {
    // Generate default id...
    wac.setId(ConfigurableWebApplicationContext.APPLICATION_CONTEXT_ID_PREFIX +
    ObjectUtils.getDisplayString(getServletContext().getContextPath()) + '/' + getServletName());
    }
    }

    wac.setServletContext(getServletContext());
    wac.setServletConfig(getServletConfig());
    wac.setNamespace(getNamespace());
    wac.addApplicationListener(new SourceFilteringListener(wac, new ContextRefreshListener()));

    // The wac environment's #initPropertySources will be called in any case when the context
    // is refreshed; do it eagerly here to ensure servlet property sources are in place for
    // use in any post-processing or initialization that occurs below prior to #refresh
    ConfigurableEnvironment env = wac.getEnvironment();
    if (env instanceof ConfigurableWebEnvironment) {
    ((ConfigurableWebEnvironment) env).initPropertySources(getServletContext(), getServletConfig());
    }

    postProcessWebApplicationContext(wac);
    applyInitializers(wac);
      //刷新,调用的是父类abstractApplicationContext的方法
    wac.refresh();
    }

    <1>设置contextId

    <2>设置ServletContext

    <3>设置ServletConfig

    <4>设置Namespace

    <5>添加ApplicationListener

    3.刷新

    DispatcherServlet类覆写了父类FrameworkServlet中的onRefresh(ApplicationContext context)方法

    onRefresh()

    protected void onRefresh(ApplicationContext context) {
    initStrategies(context);
    }
    -------------------------------------------
    protected void initStrategies(ApplicationContext context) {
            //初始化DispatcherServelt的九大组件
    initMultipartResolver(context);
    initLocaleResolver(context);
    initThemeResolver(context);
    initHandlerMappings(context);
    initHandlerAdapters(context);
    initHandlerExceptionResolvers(context);
    initRequestToViewNameTranslator(context);
    initViewResolvers(context);
    initFlashMapManager(context);
    }

    1.初始化MultipartResolver(用于处理文件上传,通过getBean来获取)

    2.初始化LocalResolver(国际化配置3种)

    <1>基于URL参数的国际化配置(AcceptHeaderLocalResolver)

    <2>基于Session的国际化配置(SessionLocalResolver)

    <3>基于Cookie的国际化配置

    3.初始化ThemeResolver(主题资源解析器)

    4.初始化HandleMapping


    initHandlerMappings()

    private void initHandlerMappings(ApplicationContext context) {
    this.handlerMappings = null;
    //判断WebApplicaitonContext中是否HandleMapping
      //detectAllHandlerMapping设置为true
    if (this.detectAllHandlerMappings) {
    // Find all HandlerMappings in the ApplicationContext, including ancestor contexts.
    //在WebApplicaitonContext中找出所有的HandleMapping
               Map<String, HandlerMapping> matchingBeans =
    BeanFactoryUtils.beansOfTypeIncludingAncestors(context, HandlerMapping.class, true, false);
    if (!matchingBeans.isEmpty()) {
    this.handlerMappings = new ArrayList<>(matchingBeans.values());
    // We keep HandlerMappings in sorted order.
    //如果设置了优先级对HandleMapping进行排序
                  AnnotationAwareOrderComparator.sort(this.handlerMappings);
    }
    }
    else {
               
    try {
                   ////detectAllHandlerMapping设置为false,根据名字获取
    HandlerMapping hm = context.getBean(HANDLER_MAPPING_BEAN_NAME, HandlerMapping.class);
    this.handlerMappings = Collections.singletonList(hm);
    }
    catch (NoSuchBeanDefinitionException ex) {
    // Ignore, we'll add a default HandlerMapping later.
    }
    }

    // Ensure we have at least one HandlerMapping, by registering
    // a default HandlerMapping if no other mappings are found.
      //还是没有就根据默认策略,创建HandleMapping
    if (this.handlerMappings == null) {
    this.handlerMappings = getDefaultStrategies(context, HandlerMapping.class);
    if (logger.isTraceEnabled()) {
    logger.trace("No HandlerMappings declared for servlet '" + getServletName() +
    "': using default strategies from DispatcherServlet.properties");
    }
    }
    }

    1.detectAllHandlerMappings变量默认为true,所以在初始化HandlerMapping接口默认实现类的时候,会把WebApplicaitonContext中所有HandlerMapping类型的Bean都注册在HandlerMappings这个List变量中。

    2.如果你手动设置为false,那么将尝试获取id为handlerMapping的Bean,新建一个只有一个元素的List,将其赋给handlerMappings。

    3.如果经过上面的过程,handlerMappings变量仍为空,那么说明你没有在WebApplicaitonContext中提供自己HandlerMapping类型的Bean定义。此时,SpringMVC将采用默认初始化策略(通过从DispatcherServlet.properties 所配置键值对 找到对应的默认HandlerMapping )来初始化handlerMappings。


    getDefaultStrategies ()

    @SuppressWarnings("unchecked")
    protected <T> List<T> getDefaultStrategies(ApplicationContext context, Class<T> strategyInterface) {
           //通过策越接口获取到key
    String key = strategyInterface.getName();
           //根据key获取到对应的value
    String value = defaultStrategies.getProperty(key);
    if (value != null) {
               //将value转换成数组
    String[] classNames = StringUtils.commaDelimitedListToStringArray(value);
    List<T> strategies = new ArrayList<T>(classNames.length);
    //遍历数组
               for (String className : classNames) {
    try {
                      //通过反射来获取默认组件(如:HandleMapping.......)
    Class<?> clazz = ClassUtils.forName(className, DispatcherServlet.class.getClassLoader());
    Object strategy = createDefaultStrategy(context, clazz);
    //将获取到的默认组件添加到list集合中
                       strategies.add((T) strategy);
    }
    catch (ClassNotFoundException ex) {
    throw new BeanInitializationException(
    "Could not find DispatcherServlet's default strategy class [" + className +
    "] for interface [" + key + "]", ex);
    }
    catch (LinkageError err) {
    throw new BeanInitializationException(
    "Error loading DispatcherServlet's default strategy class [" + className +
    "] for interface [" + key + "]: problem with class file or dependent class", err);
    }
    }
    return strategies;
    }
    else {
    return new LinkedList<T>();
    }
    }

    DispatcherServlet.properties 的默认策越配置

    # Default implementation classes for DispatcherServlet's strategy interfaces.
    # Used as fallback when no matching beans are found in the DispatcherServlet context.
    # Not meant to be customized by application developers.
     
    org.springframework.web.servlet.LocaleResolver=org.springframework.web.servlet.i18n.AcceptHeaderLocaleResolver
     
    org.springframework.web.servlet.ThemeResolver=org.springframework.web.servlet.theme.FixedThemeResolver
     
    org.springframework.web.servlet.HandlerMapping=org.springframework.web.servlet.handler.BeanNameUrlHandlerMapping,
    	org.springframework.web.servlet.mvc.annotation.DefaultAnnotationHandlerMapping
     
    org.springframework.web.servlet.HandlerAdapter=org.springframework.web.servlet.mvc.HttpRequestHandlerAdapter,
    	org.springframework.web.servlet.mvc.SimpleControllerHandlerAdapter,
    	org.springframework.web.servlet.mvc.annotation.AnnotationMethodHandlerAdapter
     
    org.springframework.web.servlet.HandlerExceptionResolver=org.springframework.web.servlet.mvc.annotation.AnnotationMethodHandlerExceptionResolver,
    	org.springframework.web.servlet.mvc.annotation.ResponseStatusExceptionResolver,
    	org.springframework.web.servlet.mvc.support.DefaultHandlerExceptionResolver
     
    org.springframework.web.servlet.RequestToViewNameTranslator=org.springframework.web.servlet.view.DefaultRequestToViewNameTranslator
     
    org.springframework.web.servlet.ViewResolver=org.springframework.web.servlet.view.InternalResourceViewResolver
     
    org.springframework.web.servlet.FlashMapManager=org.springframework.web.servlet.support.SessionFlashMapManager


    5.初始化HandlerAdapter

    DiapatcherServelt通过HandlerMapping找到相对应Handler后,会轮询HandlerAdapter模块,查找能够处理当前HTTP请求的HandlerAdapter的实现,HandlerAdapter模块根据HandlerMapping返回相对应的Handler类型,

         <1>HttpRequestHandleAdapter
    
    	仅仅支持对HTTPRequestHandle的适配,它简单地将HTTP请求对象和响应对象传递给HttpRequestHandle的实现,它并不需要返回值,它主要基于HTTP的远程调用的实现上
    
         <2>SimpleControllerHandlerAdapter
    
    	将HTTP请求适配到一个控制器的实现处理
    
    	<3>AnnotationMethodHandlerAdapter


    6.初始化HandlerExceptionResolvers

    作用:可以捕获到不同的异常,根据异常的类型来判断返回不同的ModeAndView,从而可以自定义异常的页面


    7.初始化RequestToViewNameTranslator


    8.初始化ViewResolvers

    当Controller将请求处理结果放入到ModeAndView中以后,DispatcherServlet会根据ModeAndView选择合适的View进行渲染.

    9.初始化FlashMapManager

    SpringMVC的Flash attribures提供了一个请求存储属性,可供其他属性使用.在使用重定向时候非常有必要,比如:Post/Redirect/Get模式.Flash attributes在重定向之前暂存(就像存在session中以便重定向之后还能使用.并立即删除)

    FlashMap 用保持Flash attributes,FlashMapManager用于存储,检索,管理FlashMap实例

    Flash attributes默认开启,而且不会导致HTTP Session的创建 这两个实例都可以通过RequestContextUtils来获取

    3.总结

    回顾整个SpringMVC的初始化流程,我们看到,通过HttpServletBean、FrameworkServlet、DispatcherServlet三个不同的类层次,SpringMVC的设计者将三种不同的职责分别抽象,运用模版方法设计模式分别固定在三个类层次中。其中HttpServletBean完成的是<init-param>配置元素的依赖注入,FrameworkServlet完成的是容器上下文的建立,DispatcherServlet完成的是SpringMVC具体编程元素的初始化策略


    二、请求转发流程详解


    SpringMVC完成初始化流程之后,就进入Servlet标准生命周期的第二个阶段,即“service”阶段。在“service”阶段中,每一次Http请求到来,容器都会启动一个请求线程,通过service()方法,委派到doGet()或者doPost()这些方法,完成Http请求的处理。

    在初始化流程中,SpringMVC巧妙的运用依赖注入读取参数,并最终建立一个与容器上下文相关联的Spring子上下文。这个子上下文,为接下来的Http处理流程中各种编程元素提供了容身之所。如果说将Spring上下文关联到Servlet容器中,是SpringMVC框架的第一个亮点,那么在请求转发流程中,SpringMVC对各种处理环节编程元素的抽象,就是另外一个独具匠心的亮点。

    Struts2采取的是一种完全和Web容器隔离和解耦的事件机制。诸如Action对象、Result对象、Interceptor对象,这些都是完全脱离Servlet容器的编程元素。Struts2将数据流和事件处理完全剥离开来,从Http请求中读取数据后,下面的事件处理流程就只依赖于这些数据,而完全不知道有Web环境的存在。

    反观SpringMVC,无论HandlerMapping对象、HandlerAdapter对象还是View对象,这些核心的接口所定义的方法中,HttpServletRequest和HttpServletResponse对象都是直接作为方法的参数出现的。这也就意味着,框架的设计者,直接将SpringMVC框架和容器绑定到了一起。或者说,整个SpringMVC框架,都是依托着Servlet容器元素来设计的。下面就来看一下,源码中是如何体现这一点的。

    1.请求转发的入口

    就像任何一个注册在容器中的Servlet一样,DispatcherServlet也是通过自己的service()方法来接收和转发Http请求到具体的doGet()或doPost()这些方法的。以一次典型的GET请求为例,经过HttpServlet基类中service()方法的委派,请求会被转发到doGet()方法中。doGet()方法,在DispatcherServlet的父类FrameworkServlet类中被覆写。

    FrameworkServlet

    doGet()

    @Override
    protected final void doGet(HttpServletRequest request, HttpServletResponse response)
    		throws ServletException, IOException {
     
    	processRequest(request, response);
    }


    可以看到,这里只是简单的转发到processRequest()这个方法。

    protected final void processRequest(HttpServletRequest request, HttpServletResponse response)
    			throws ServletException, IOException {
    
    		long startTime = System.currentTimeMillis();
    		Throwable failureCause = null;
            //获取当前的LocaleContext
    		LocaleContext previousLocaleContext = LocaleContextHolder.getLocaleContext();
    		//创建LocaleContext
        	LocaleContext localeContext = buildLocaleContext(request);
    		//获取当前的RequestAttributes
    		RequestAttributes previousAttributes = RequestContextHolder.getRequestAttributes();
    		//创建RequestAttributes
        	ServletRequestAttributes requestAttributes = buildRequestAttributes(request, response, previousAttributes);
    
    		WebAsyncManager asyncManager = WebAsyncUtils.getAsyncManager(request);
    		asyncManager.registerCallableInterceptor(FrameworkServlet.class.getName(), new RequestBindingInterceptor());
    		//将创建的localeContext和requestAttributes绑定到当前线程
    		initContextHolders(request, localeContext, requestAttributes);
    
    		try {
                //核心
    			doService(request, response);
                
                
    		}
    		catch (ServletException | IOException ex) {
    			failureCause = ex;
    			throw ex;
    		}
    		catch (Throwable ex) {
    			failureCause = ex;
    			throw new NestedServletException("Request processing failed", ex);
    		}
    
    		finally {
                //请求处理后恢复线程到原始状态
    			resetContextHolders(request, previousLocaleContext, previousAttributes);
    			if (requestAttributes != null) {
    				requestAttributes.requestCompleted();
    			}
    
    			if (logger.isDebugEnabled()) {
    				if (failureCause != null) {
    					this.logger.debug("Could not complete request", failureCause);
    				}
    				else {
    					if (asyncManager.isConcurrentHandlingStarted()) {
    						logger.debug("Leaving response open for concurrent processing");
    					}
    					else {
    						this.logger.debug("Successfully completed request");
    					}
    				}
    			}
    			//无论成功与否都发布事件通知
    			publishRequestHandledEvent(request, response, startTime, failureCause);
    		}
    	}
    

    步骤:

    (1)获取当前的LocaleContext和RequestAttributes,保证在请求前后都能够被获取

    (2).根据当前Request创建相对应的LocaleContext和RequestAttributes,并绑定到当前线程

    (3).委托doService()做进一步的处理

    (4).请求处理后恢复线程到原始状态

    (5).请求处理结束后无论成功与否都发布事件通知


    FrameworkServlet类中的doService()方法。

    又是一个抽象方法,这也是SpringMVC类设计中的惯用伎俩:父类抽象处理流程,子类给予具体的实现。真正的实现是在DispatcherServlet类中。

    protected void doService(HttpServletRequest request, HttpServletResponse response) throws Exception {
    		if (logger.isDebugEnabled()) {
    			String resumed = WebAsyncUtils.getAsyncManager(request).hasConcurrentResult() ? " resumed" : "";
    			logger.debug("DispatcherServlet with name '" + getServletName() + "'" + resumed +
    					" processing " + request.getMethod() + " request for [" + getRequestUri(request) + "]");
    		}
    
    		// Keep a snapshot of the request attributes in case of an include,
    		// to be able to restore the original attributes after the include.
    		Map<String, Object> attributesSnapshot = null;
    		if (WebUtils.isIncludeRequest(request)) {
    			attributesSnapshot = new HashMap<>();
    			Enumeration<?> attrNames = request.getAttributeNames();
    			while (attrNames.hasMoreElements()) {
    				String attrName = (String) attrNames.nextElement();
    				if (this.cleanupAfterInclude || attrName.startsWith(DEFAULT_STRATEGIES_PREFIX)) {
    					attributesSnapshot.put(attrName, request.getAttribute(attrName));
    				}
    			}
    		}
    
    		// Make framework objects available to handlers and view objects.
    		request.setAttribute(WEB_APPLICATION_CONTEXT_ATTRIBUTE, getWebApplicationContext());
    		request.setAttribute(LOCALE_RESOLVER_ATTRIBUTE, this.localeResolver);
    		request.setAttribute(THEME_RESOLVER_ATTRIBUTE, this.themeResolver);
    		request.setAttribute(THEME_SOURCE_ATTRIBUTE, getThemeSource());
    
    		if (this.flashMapManager != null) {
    			FlashMap inputFlashMap = this.flashMapManager.retrieveAndUpdate(request, response);
    			if (inputFlashMap != null) {
    				request.setAttribute(INPUT_FLASH_MAP_ATTRIBUTE, Collections.unmodifiableMap(inputFlashMap));
    			}
    			request.setAttribute(OUTPUT_FLASH_MAP_ATTRIBUTE, new FlashMap());
    			request.setAttribute(FLASH_MAP_MANAGER_ATTRIBUTE, this.flashMapManager);
    		}
    
    		try {
    			//核心
                doDispatch(request, response);
    		}
    		finally {
    			if (!WebAsyncUtils.getAsyncManager(request).isConcurrentHandlingStarted()) {
    				// Restore the original attribute snapshot, in case of an include.
    				if (attributesSnapshot != null) {
    					restoreAttributesAfterInclude(request, attributesSnapshot);
    				}
    			}
    		}
    	}
    

    调用request.setAttribute()方法注入组件(将前面在初始化流程中实例化的对象设置到http请求的属性中,供下一步处理使用,其中有容器的上下文对象、本地化解析器等SpringMVC特有的编程元素)

    不同于Struts2中的ValueStack,SpringMVC的数据并没有从HttpServletRequest对象中抽离出来再存进另外一个编程元素,这也跟SpringMVC的设计思想有关。因为从一开始,SpringMVC的设计者就认为,不应该将请求处理过程和Web容器完全隔离。

    所以,你可以看到,真正发生请求转发的方法doDispatch()中,它的参数是HttpServletRequest和HttpServletResponse对象。这给我们传递的意思也很明确,从request中能获取到一切请求的数据,从response中,我们又可以往服务器端输出任何响应,Http请求的处理,就应该围绕这两个对象来设计。我们不妨可以将SpringMVC这种设计方案,是从Struts2的过度设计中吸取教训,而向Servlet编程的一种回归和简化。

    总结:封装Request对象

    2.请求转发的抽象描述

    接下来让我们看看doDispatch()这个整个请求转发流程中最核心的方法。DispatcherServlet所接收的Http请求,经过层层转发,最终都是汇总到这个方法中来进行最后的请求分发和处理。doDispatch()这个方法的内容,就是SpringMVC整个框架的精华所在。它通过高度抽象的接口,描述出了一个MVC(Model-View-Controller)设计模式的实现方案。Model、View、Controller三种层次的编程元素,在SpringMVC中都有大量的实现类,各种处理细节也是千差万别。但是,它们最后都是由,也都能由doDispatch()方法来统一描述,这就是接口和抽象的威力,万变不离其宗。

    DispatcherServlet

    doDispatch()

    protected void doDispatch(HttpServletRequest request, HttpServletResponse response) throws Exception {
    		HttpServletRequest processedRequest = request;
    		HandlerExecutionChain mappedHandler = null;
    		boolean multipartRequestParsed = false;
    
    		WebAsyncManager asyncManager = WebAsyncUtils.getAsyncManager(request);
    
    		try {
    			ModelAndView mv = null;
    			Exception dispatchException = null;
    
    			try {
                    //如果是MultipartContent类型的request则转换为MultipartHttpServletReqeust类型的Request
    				processedRequest = checkMultipart(request);
    				multipartRequestParsed = (processedRequest != request);
    
    				// Determine handler for the current request.
                    //根据Request信息寻找到相对应的Handler
    				mappedHandler = getHandler(processedRequest);
    				if (mappedHandler == null) {
    					//没有找到对应的Handle,通过Response反馈错误信息
                        noHandlerFound(processedRequest, response);
    					return;
    				}
    
    				// Determine handler adapter for the current request.
                    //根据当前的Handler获取到相对应HandelrAdapter
    				HandlerAdapter ha = getHandlerAdapter(mappedHandler.getHandler());
    
    				// Process last-modified header, if supported by the handler.
                    //判断当前的Handler是否支持last-modifie头处理
    				String method = request.getMethod();
    				boolean isGet = "GET".equals(method);
    				if (isGet || "HEAD".equals(method)) {
    					long lastModified = ha.getLastModified(request, mappedHandler.getHandler());
    					if (logger.isDebugEnabled()) {
    						logger.debug("Last-Modified value for [" + getRequestUri(request) + "] is: " + lastModified);
    					}
    					if (new ServletWebRequest(request, response).checkNotModified(lastModified) && isGet) {
    						return;
    					}
    				}
    
    				// Apply preHandle methods of registered interceptors.
    				//拦截器链的perHandler的调用
                   HandlerInterceptor[] interceptors = mappedHandler.getInterceptors();
    			if (interceptors != null) {
    				for (int i = 0; i < interceptors.length; i++) {
    					HandlerInterceptor interceptor = interceptors[i];
    					if (!interceptor.preHandle(processedRequest, response, mappedHandler.getHandler())) {
                            
    						triggerAfterCompletion(mappedHandler, interceptorIndex, processedRequest, response, null);
                            
    						return;
    					}
    					interceptorIndex = i;
    				}
    			}
     
    			// Actually invoke the handler.
                  //真正激活handle并返回view,调用Handle的方法
    			mv = ha.handle(processedRequest, response, mappedHandler.getHandler());
     
    			// Do we need view name translation?
                 //视图名称转换应用于需要添加前缀后缀的情况(添加前后缀)   
    			if (mv != null && !mv.hasView()) {
    				mv.setViewName(getDefaultViewName(request));
    			}
     
    			// Apply postHandle methods of registered interceptors.
                    //应用所有拦截器的postHandle方法
    			if (interceptors != null) {
    				for (int i = interceptors.length - 1; i >= 0; i--) {
    					HandlerInterceptor interceptor = interceptors[i];
    					interceptor.postHandle(processedRequest, response, mappedHandler.getHandler(), mv);
    				}
    			}
    		}
    		catch (ModelAndViewDefiningException ex) {
    			logger.debug("ModelAndViewDefiningException encountered", ex);
    			mv = ex.getModelAndView();
    		}
    		catch (Exception ex) {
    			Object handler = (mappedHandler != null ? mappedHandler.getHandler() : null);
    			
                mv = processHandlerException(processedRequest, response, handler, ex);
    			
                errorView = (mv != null);
    		}
     
    		// Did the handler return a view to render?
               //如果在Handler实例的处理中返回了View,那么需要做页面跳转处理
    		if (mv != null && !mv.wasCleared()) {
                //根据视图进行页面跳转
    			render(mv, processedRequest, response);
    			if (errorView) {
    				WebUtils.clearErrorRequestAttributes(request);
    			}
    		}
    		else {
    			if (logger.isDebugEnabled()) {
    				logger.debug("Null ModelAndView returned to DispatcherServlet with name '" + getServletName() +
    						"': assuming HandlerAdapter completed request handling");
    			}
    		}
     
    		// Trigger after-completion for successful outcome.
             //完成处理激活触发器
    		triggerAfterCompletion(mappedHandler, interceptorIndex, processedRequest, response, null);
    	}
     
    	catch (Exception ex) {
    		// Trigger after-completion for thrown exception.
    		triggerAfterCompletion(mappedHandler, interceptorIndex, processedRequest, response, ex);
    		throw ex;
    	}
    	catch (Error err) {
    		ServletException ex = new NestedServletException("Handler processing failed", err);
    		// Trigger after-completion for thrown exception.
    		triggerAfterCompletion(mappedHandler, interceptorIndex, processedRequest, response, ex);
    		throw ex;
    	}
     
    	finally {
    		// Clean up any resources used by a multipart request.
    		if (processedRequest != request) {
    			cleanupMultipart(processedRequest);
    		}
    	}
    }
    

    步骤:

    doDispatch()

    (1).MultipartContent类型的Reqeust的处理

    Request请求如果是MultipartContent类型的request则转换为MultipartHttpServletReqeust类型

    (2).根据Request信息寻找到相对应的Handler

    getHandler()
    
    DispatcherServlet
    @Nullable
    	protected HandlerExecutionChain getHandler(HttpServletRequest request) throws Exception {
    		if (this.handlerMappings != null) {
    			//遍历handlerMappings
                for (HandlerMapping hm : this.handlerMappings) {
    				if (logger.isTraceEnabled()) {
    					logger.trace(
    							"Testing handler map [" + hm + "] in DispatcherServlet with name '" + getServletName() + "'");
    				}
    				//根据当前的Request获取HandlerExecutionChain
    				HandlerExecutionChain handler = hm.getHandler(request);
    				if (handler != null) {
    					return handler;
    				}
    			}
    		}
    		return null;
    	}
    --------------------------------------------------------------------------------------
       AbstractHandleMapping
        public final HandlerExecutionChain getHandler(HttpServletRequest request) throws Exception {
    		//根据Request获取相对应的Handler
        	Object handler = getHandlerInternal(request);
    		if (handler == null) {
    			//没有就使用默认的
    			handler = getDefaultHandler();
    		}
    		//如果在没有,就直接返回Null
    		if (handler == null) {
    			return null;
    		}
    		// Bean name or resolved handler?
    		if (handler instanceof String) {
    			String handlerName = (String) handler;
    			handler = obtainApplicationContext().getBean(handlerName);
    		}
    		//将配置的对应拦截器加入到执行链中,以保证这些拦截器可以有效地作用到目标方法
    		HandlerExecutionChain executionChain = getHandlerExecutionChain(handler, request);
    		if (CorsUtils.isCorsRequest(request)) {
    			CorsConfiguration globalConfig = this.globalCorsConfigSource.getCorsConfiguration(request);
    			CorsConfiguration handlerConfig = getCorsConfiguration(handler, request);
    			CorsConfiguration config = (globalConfig != null ? globalConfig.combine(handlerConfig) : handlerConfig);
    			executionChain = getCorsHandlerExecutionChain(request, executionChain, config);
    		}
    		return executionChain;
    	}
    

    根据Request寻找到对应的Handler,无非就是找到对应的Controller(都是继承于AbstractController),

    getHandlerInternal()

    protected Object getHandlerInternal(HttpServletRequest request) throws Exception {
    		//截取用于匹配的URL有效路径
        	String lookupPath = getUrlPathHelper().getLookupPathForRequest(request);
    		//根据路径寻找到对应的Handler
        	Object handler = lookupHandler(lookupPath, request);
    		//根据URL没有匹配到Handler
        	if (handler == null) {
    			// We need to care for the default handler directly, since we need to
    			// expose the PATH_WITHIN_HANDLER_MAPPING_ATTRIBUTE for it as well.
    			Object rawHandler = null;
    			if ("/".equals(lookupPath)) {
                    //如果请求的路径是'/',使用RootHandelr来处理
    				rawHandler = getRootHandler();
    			}
    			if (rawHandler == null) {
                    //获取默认的Handler
    				rawHandler = getDefaultHandler();
    			}
    			if (rawHandler != null) {
    				// Bean name or resolved handler?
                    //判断handler是否为String
    				if (rawHandler instanceof String) {
    					String handlerName = (String) rawHandler;
    					rawHandler = obtainApplicationContext().getBean(handlerName);
    				}
    				validateHandler(rawHandler, request);
                 
    				handler = buildPathExposingHandler(rawHandler, lookupPath, lookupPath, null);
    			}
    		}
    		return handler;
    	}
    

    1.截取用于匹配的URL路径

    2.根据路径寻找handler

    ->直接匹配情况的处理
    
    ->通配符匹配的处理
    

    3.如果请求路径仅仅是"/",那么使用RootHandler进行处理

    4.无法找到使用默认的Handler

    5.如果返回的Handler为Stirng类型,意味着返回的是配置的BeanName,则需要根据BeanName获取对应的Bean

    6.最后通过getHandlerExecutionChain方法,对返回的Handler封装,目的是将配置中对应的拦截器加入到执行链中,以保证这些拦截器可以有效地作用目标对象

    (3).没有找到对应的Handler的错误处理


    (4).根据当前的Handler寻找相对应的HandlerAdapter

    protected HandlerAdapter getHandlerAdapter(Object handler) throws ServletException {
    		if (this.handlerAdapters != null) {
    			//遍历所有的handlerAdapters
                for (HandlerAdapter ha : this.handlerAdapters) {
    				if (logger.isTraceEnabled()) {
    					logger.trace("Testing handler adapter [" + ha + "]");
    				}
                    //判断某个handlerAdapter是否适用于当前的handler
    				if (ha.supports(handler)) {
    					return ha;
    				}
    			}
    		}
    		throw new ServletException("No adapter for handler [" + handler +
    				"]: The DispatcherServlet configuration needs to include a HandlerAdapter that supports this handler");
    	}
    --------------------------------------------------------------------------------
       SimpleControllerHandlerAdapter
     	@Override
    	public boolean supports(Object handler) {
    		return (handler instanceof Controller);
    	}
    

    遍历所有的handlerAdapters,在遍历中判断某个handlerAdapter是否适用于当前的handler,比如说:SimpleControllerHandlerAdapter,这个判断的依据是当前的handler是否属于Controller接口的实现类

    (5)缓存处理


    (6)HandlerInterceptor的处理

    preHander() -> 该方法在进入Handler方法执行之前执行此方法 应用场景:如身份认证,身份授权。

    postHandle -> 该方法在进入Handler方法之后,返回ModelAndView之前执行 应用场景:如 统一制定视图

    afterCompletion ->应用场景:统一日志处理,统一异常处理

    (7)逻辑处理

    通过适配器中转调用Handle方法并返回视图

    mv = ha.handle(processedRequest, response, mappedHandler.getHandler());
    -----------------------------------------------------------------
    public ModelAndView handle(HttpServletRequest request, HttpServletResponse response, Object handler)
    			throws Exception {
    
    		return ((Controller) handler).handleRequest(request, response);
    	}
    -------------------------------------------------------------------
    public ModelAndView handleRequest(HttpServletRequest request, HttpServletResponse response)
    			throws Exception {
    
    		if (HttpMethod.OPTIONS.matches(request.getMethod())) {
    			response.setHeader("Allow", getAllowHeader());
    			return null;
    		}
    
    		// Delegate to WebContentGenerator for checking and preparing.
        	//委派WebContentGenerator进行检查request和准备response
    		checkRequest(request);
    		prepareResponse(response);
    
    		// Execute handleRequestInternal in synchronized block if required.
        	//如果需要在session内同步执行
    		if (this.synchronizeOnSession) {
    			HttpSession session = request.getSession(false);
    			if (session != null) {
    				Object mutex = WebUtils.getSessionMutex(session);
    				synchronized (mutex) {
    					//调用用户的逻辑,返回ModeAndView对象
                        return handleRequestInternal(request, response);
    				}
    			}
    		}
    		//调用用户的逻辑,返回ModeAndView对象
    		return handleRequestInternal(request, response);
    	}


    (8)异常视图处理


    (9)根据视图跳转页面


    protected void render(ModelAndView mv, HttpServletRequest request, HttpServletResponse response) throws Exception {
    		// Determine locale for request and apply it to the response.
    		Locale locale =
    				(this.localeResolver != null ? this.localeResolver.resolveLocale(request) : request.getLocale());
    		response.setLocale(locale);
    
    		View view;
    		String viewName = mv.getViewName();
    		if (viewName != null) {
    			// We need to resolve the view name.
                //解析视图的名字,获取到对应的View,如ThymleafView.......
    			view = resolveViewName(viewName, mv.getModelInternal(), locale, request);
    			if (view == null) {
    				throw new ServletException("Could not resolve view with name '" + mv.getViewName() +
    						"' in servlet with name '" + getServletName() + "'");
    			}
    		}
    		else {
    			// No need to lookup: the ModelAndView object contains the actual View object.
    			view = mv.getView();
    			if (view == null) {
    				throw new ServletException("ModelAndView [" + mv + "] neither contains a view name nor a " +
    						"View object in servlet with name '" + getServletName() + "'");
    			}
    		}
    
    		// Delegate to the View object for rendering.
    		if (logger.isDebugEnabled()) {
    			logger.debug("Rendering view [" + view + "] in DispatcherServlet with name '" + getServletName() + "'");
    		}
    		try {
    			if (mv.getStatus() != null) {
    				response.setStatus(mv.getStatus().value());
    			}
                //根据获取到的View进行页面跳转
    			view.render(mv.getModelInternal(), request, response);
    		}
    		catch (Exception ex) {
    			if (logger.isDebugEnabled()) {
    				logger.debug("Error rendering view [" + view + "] in DispatcherServlet with name '" +
    						getServletName() + "'", ex);
    			}
    			throw ex;
    		}
    	}


    步骤:

    1.解析视图名字

    InternalResourceViewResolver

    @Nullable
    	protected View resolveViewName(String viewName, @Nullable Map<String, Object> model,
    			Locale locale, HttpServletRequest request) throws Exception {
    
    		if (this.viewResolvers != null) {
                //遍历所有的视图解析器
    			for (ViewResolver viewResolver : this.viewResolvers) {
                    //根据视图的名字找出对应的视图
    				View view = viewResolver.resolveViewName(viewName, locale);
    				if (view != null) {
    					return view;
    				}
    			}
    		}
    		return null;
    	}
    ----------------------------------------------------------
    AbstractCachingViewResolver
        public View resolveViewName(String viewName, Locale locale) throws Exception {
    		if (!isCache()) {
    			//不存在缓存的情况下直接创建视图
    			return createView(viewName, locale);
    		}
    		else {
    		//存在->直接从缓存中提取
    			Object cacheKey = getCacheKey(viewName, locale);
    			View view = this.view	AccessCache.get(cacheKey);
    			if (view == null) {
    				synchronized (this.viewCreationCache) {
    					view = this.viewCreationCache.get(cacheKey);
    					if (view == null) {
    						// Ask the subclass to create the View object.
    						view = createView(viewName, locale);
    						if (view == null && this.cacheUnresolved) {
    							view = UNRESOLVED_VIEW;
    						}
    						if (view != null) {
    							this.viewAccessCache.put(cacheKey, view);
    							this.viewCreationCache.put(cacheKey, view);
    							if (logger.isTraceEnabled()) {
    								logger.trace("Cached view [" + cacheKey + "]");
    							}
    						}
    					}
    				}
    			}
    			return (view != UNRESOLVED_VIEW ? view : null);
    		}
    	}
    

    UrlBasedViewResolver

    createView()

    protected View createView(String viewName, Locale locale) throws Exception {
    		// If this resolver is not supposed to handle the given view,
    		// return null to pass on to the next resolver in the chain.
    		if (!canHandle(viewName, locale)) {
    			return null;
    		}
    		// Check for special "redirect:" prefix.
        	//处理redirect
    		if (viewName.startsWith(REDIRECT_URL_PREFIX)) {
    			String redirectUrl = viewName.substring(REDIRECT_URL_PREFIX.length());
    			RedirectView view = new RedirectView(redirectUrl, isRedirectContextRelative(), isRedirectHttp10Compatible());
    			String[] hosts = getRedirectHosts();
    			if (hosts != null) {
    				view.setHosts(hosts);
    			}
    			return applyLifecycleMethods(viewName, view);
    		}
    		// Check for special "forward:" prefix.
       		 //处理forward
    		if (viewName.startsWith(FORWARD_URL_PREFIX)) {
    			String forwardUrl = viewName.substring(FORWARD_URL_PREFIX.length());
    			return new InternalResourceView(forwardUrl);
    		}
    		// Else fall back to superclass implementation: calling loadView.
    		return super.createView(viewName, locale);
    	}
    ----------------------------------------------------------------------------
        	protected View createView(String viewName, Locale locale) throws Exception {
    		return loadView(viewName, locale);
    	}
    ------------------------------------------------------
        	protected View loadView(String viewName, Locale locale) throws Exception {
    		AbstractUrlBasedView view = buildView(viewName);
    		View result = applyLifecycleMethods(viewName, view);
    		return (view.checkResource(locale) ? result : null);
    	}
    ---------------------------------------------------
        	protected AbstractUrlBasedView buildView(String viewName) throws Exception {
    		AbstractTemplateView view = (AbstractTemplateView) super.buildView(viewName);
    		view.setExposeRequestAttributes(this.exposeRequestAttributes);
    		view.setAllowRequestOverride(this.allowRequestOverride);
    		view.setExposeSessionAttributes(this.exposeSessionAttributes);
    		view.setAllowSessionOverride(this.allowSessionOverride);
    		view.setExposeSpringMacroHelpers(this.exposeSpringMacroHelpers);
    		return view;
    	}
    

    2.页面跳转

    通过ViewName解析到相对应的View,加上前缀和后缀,并将Model中的数据以属性的方式设置到request中,最后,进行跳转到相对应的页面

    步骤:

    1.解析视图名字

    遍历所有的视图解析器,根据视图的名字找出对应的视图,不存在缓存的情况下会根据返回的字符串来创建不同视图,以"redirect"开头创建RedirectView,以"forward"开头创建ForwardView存在的话,存在的话就直接从缓存中提取,最后进行相关设置,并添加数据返回

    2.根据获取到的View进行页面跳转

    先解析需要使用的属性,并添加到modeMap中,然后将modeMap中的数据以属性的方式设置到Request中,最后决定调用RequestDispatcher的include还是forward方法到指定的JSP页面


  • 相关阅读:
    iview采坑记:tooltip组件用到了定位后,内容过长不会自动换行了
    在vue项目中监听键盘事件的方法
    在nodejs项目中使用exceljs读取.xlsx文件
    vue中的provide()和inject() 方法,实现父组件向子子孙孙组件传递数据的方法
    vue 源码详解(一):原型对象和全局 `API`的设计
    promise详解 : 实现promise(附实现代码)
    vue 源码详解(三): 渲染初始化 initRender 、生命周期的调用 callHook 、异常处理机制
    vue 源码详解(二): 组件生命周期初始化、事件系统初始化
    how come this
    闭包的理解
  • 原文地址:https://www.cnblogs.com/itxiaok/p/10357795.html
Copyright © 2020-2023  润新知