Linux创建RAID实战
一、Linux创建RAID0
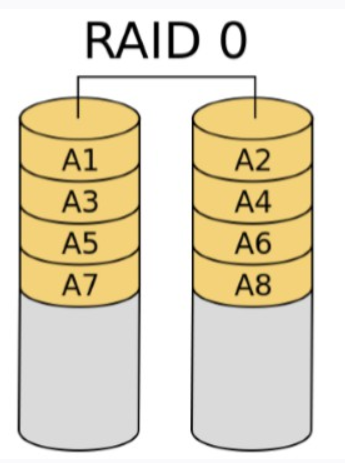
- RAID0俗称条带,它将两个或多个硬盘组成一个逻辑硬盘,容量是所有硬盘之和
- 因为是多个硬盘组合成一个,故可并行写操作,写入速度提高,但此方式硬盘数据没有冗余,没有容错,一旦一个物理硬盘损坏,则所有数据均丢失
- RAID0适合于对数据量大,但安全性要求不高的场景,比如音像、视频文件的存储等
二、创建RAID0,并格式化、挂载使用
- 添加两块10G的虚拟硬盘
[root@localhost ~]# lsblk
NAME          MAJ:MIN RM  SIZE RO TYPE MOUNTPOINT
sda             8:0    0   10G  0 disk      //添加的第一块10G的虚拟硬盘
sdb             8:16   0   10G  0 disk      //添加的第二块10G的虚拟硬盘
sr0            11:0    1  7.3G  0 rom
nvme0n1       259:0    0   80G  0 disk
├─nvme0n1p1   259:1    0    1G  0 part /boot
└─nvme0n1p2   259:2    0   79G  0 part
  ├─rhel-root 253:0    0   50G  0 lvm  /
  ├─rhel-swap 253:1    0    2G  0 lvm  [SWAP]
  └─rhel-home 253:2    0   27G  0 lvm  /home
- 将两块虚拟硬盘分区,分区ID为fd(Linux raid autodetect)
[root@localhost ~]# fdisk /dev/sda
Welcome to fdisk (util-linux 2.32.1).
Changes will remain in memory only, until you decide to write them.
Be careful before using the write command.
Command (m for help): n
Partition type
   p   primary (0 primary, 0 extended, 4 free)
   e   extended (container for logical partitions)
Select (default p): p
Partition number (1-4, default 1):
First sector (2048-20971519, default 2048):
Last sector, +sectors or +size{K,M,G,T,P} (2048-20971519, default 20971519):    //直接回车,将所有空间分成一个主分区
Created a new partition 1 of type 'Linux' and of size 10 GiB.
Command (m for help): t    //更改分区ID类型
Selected partition 1
Hex code (type L to list all codes): fd          //设置分区类型ID为fd
Changed type of partition 'Linux' to 'Linux raid autodetect'.
Command (m for help): p          //查看创建的分区
Disk /dev/sda: 10 GiB, 10737418240 bytes, 20971520 sectors
Units: sectors of 1 * 512 = 512 bytes
Sector size (logical/physical): 512 bytes / 512 bytes
I/O size (minimum/optimal): 512 bytes / 512 bytes
Disklabel type: dos
Disk identifier: 0x3c4b6576

Device     Boot Start      End  Sectors Size Id Type
/dev/sda1        2048 20971519 20969472  10G fd Linux raid autodetect               //刚刚创建的分区,id=fd就是对的

Command (m for help): w      //保存退出
The partition table has been altered.
Calling ioctl() to re-read partition table.
Syncing disks.
同理,第二块虚拟硬盘分区ID也是fd。
- 查看创建的分区
[root@localhost ~]# fdisk -l | grep raid
/dev/sdb1        2048 20971519 20969472  10G fd Linux raid autodetect
/dev/sda1        2048 20971519 20969472  10G fd Linux raid autodetect
- 创建 RAID0
[root@localhost ~]# yum install -y mdadm
[root@localhost ~]# mdadm -C -v /dev/md0 -l0 -n2 /dev/sd{a,b}1
mdadm: chunk size defaults to 512K
mdadm: Defaulting to version 1.2 metadata
mdadm: array /dev/md0 started.
- 查看 raidstat 状态
[root@localhost ~]# cat /proc/mdstat
Personalities : [raid0]
md0 : active raid0 sdb1[1] sda1[0]
      20951040 blocks super 1.2 512k chunks

unused devices: <none>
- 查看 RAID0 的详细信息
[root@localhost ~]# mdadm -D /dev/md0
/dev/md0:
           Version : 1.2
     Creation Time : Tue Dec 15 13:07:37 2020
        Raid Level : raid0
        Array Size : 20951040 (19.98 GiB 21.45 GB)
      Raid Devices : 2
     Total Devices : 2
       Persistence : Superblock is persistent

       Update Time : Tue Dec 15 13:07:37 2020
             State : clean
    Active Devices : 2
   Working Devices : 2
    Failed Devices : 0
     Spare Devices : 0

            Layout : original
        Chunk Size : 512K

Consistency Policy : none

              Name : localhost:0  (local to host localhost)
              UUID : a3aad0f2:ed4fc982:e7dec94f:4d481ef0
            Events : 0

    Number   Major   Minor   RaidDevice State
       0       8        1        0      active sync   /dev/sda1
       1       8       17        1      active sync   /dev/sdb1
- 格式化 /dev/md0,类型为xfs
[root@localhost ~]# mkfs.xfs /dev/md0
meta-data=/dev/md0               isize=512    agcount=16, agsize=327296 blks
         =                       sectsz=512   attr=2, projid32bit=1
         =                       crc=1        finobt=1, sparse=1, rmapbt=0
         =                       reflink=1
data     =                       bsize=4096   blocks=5236736, imaxpct=25
         =                       sunit=128    swidth=256 blks
naming   =version 2              bsize=4096   ascii-ci=0, ftype=1
log      =internal log           bsize=4096   blocks=2560, version=2
         =                       sectsz=512   sunit=0 blks, lazy-count=1
realtime =none                   extsz=4096   blocks=0, rtextents=0
- 挂载 /dev/md0
[root@localhost ~]# mkdir /raid0
[root@localhost ~]# mount /dev/md0 /raid0/
[root@localhost ~]# df -h
Filesystem             Size  Used Avail Use% Mounted on
devtmpfs               887M     0  887M   0% /dev
tmpfs                  904M     0  904M   0% /dev/shm
tmpfs                  904M  8.7M  895M   1% /run
tmpfs                  904M     0  904M   0% /sys/fs/cgroup
/dev/mapper/rhel-root   50G  4.5G   46G   9% /
/dev/nvme0n1p1        1014M  173M  842M  18% /boot
/dev/mapper/rhel-home   27G  225M   27G   1% /home
tmpfs                  181M     0  181M   0% /run/user/0
/dev/md0                20G  176M   20G   1% /raid0