Linux系统运维与架构设计之系统基本使用
3.1 用户登录
3.1.1 CentOS6.10系统登录
启动虚拟机之后,第一件要做的事情就是登录系统,只有在输入正确的用户名/密码成功登录之后才能在系统上进行相关的操作。
图形界面下的CentOS6.10和CentOS7.6的登录界面不尽相同,如下图所示展示了CentOS6.10的登录界面。

默认是推荐使用普通用户(例如这里的guanglei)登录系统,如果想要使用其他用户登录,可以点击Other...

然后输入密码,点击登录按钮即可

因为root用户的权限强大到几乎可以进行任何操作,在以root用户登录系统时,系统会给出提示,如下图所示关闭了root登录的提示

root登录成功之后的界面

不过生产环境下一般不推荐直接使用root用户,点击右上角的root,然后点击switch user切换用户

然后以普通用户guanglei登录系统

输入密码,点击Login In即可登录系统

登录成功之后将会看到如下所示的系统界面

那么系统如何区分登录的用户是普通用户还是管理员(超级)用户呢?
CentOS7.6系统中可以使用 id -u命令查看用户的id,其中root用户的id为0,普通用户id从1000开始编号,如下命令所示
[root@centos7 ~]# id -u
0
[root@centos7 ~]# su guanglei
[guanglei@centos7 root]$ id -u
1000
[guanglei@centos7 root]$
而centOS6.10中的root用户id为0,但是普通用户的id是从500开始编号,如下命令所示
[root@centOS6 ~]# id -u
0
[root@centOS6 ~]# id -u guanglei
500
3.1.2 CentOS7.6系统登录
CentOS7.6系统的登录和CentOS6.10的系统界面不同,但是功能是类似的,都默认是以普通用户登录系统,然后想要切换其他用户,可以点击Not Listed?

然后输入想要登录的用户名(这里以root为例),然后点击Next

接下来输入密码,点击Sign in便可以登录系统

系统登录成功之后会出现之前安装CentOS7.6系统时需要完成对应的初始化操作,这里不再赘述。
登录成功之后会看到如下所示的系统界面

为了安全性考虑,还是注销之后切换回普通用户后登录


然后选择普通用户guanglei

输入密码点击Sign in后登录系统

登录成功之后会看到如下图所示的系统界面

3.1.3 CentOS图形界面系统自动登录
在学习环境使用CentOS图形界面时,需要输入用户名/密码登录系统,那样有时候不是太便捷,这里提供一种方式,通过修改配置文件添加root用户自动登录。
首先鼠标右键打开终端,然后切换成root用户(需要输入密码),再使用gedit命令修改/etc/gdm/custom.conf文件,如下图所示是CentOS7.6的修改
只要在[daemon]下添加AutomaticLoginEnabled=true和AutomaticLogin=root,然后按Ctrl+s保存后重启(使用reboot命令)系统即可。

如下图所示是CentOS6.10的修改

3.1.4 实现登录提示
如果想要在系统登录成功后给用户相关的提示(例如植入点广告),可以修改/etc目录下的mtcd文件,该文件的默认内容为空,可以参考如下命令实现
[root@centos7 ~]#echo "欢迎跟光磊一起学习Linux系统运维与架构设计" > /etc/motd然后使用exit命令退出当前会话,再次登录系统后,会看到如下提示内容(广告植入)
Last login: Sun Jan 13 03:31:16 2019 from 192.168.190.1
欢迎跟光磊一起学习Linux系统运维与架构设计
[root@centos7 ~]#
3.2 终端
3.2.1 为什么需要终端
我们(开发者,普通用户)平常使用的操作系统绝大多数都是Windows(Windows7或者Windows10) ,主要用它来完成聊天,购物,听音乐,看电影等日常需求,而且Windows之所以广受欢迎的原因就是其图形化界面简单易懂,能够快速上手。
但是Linux(CentOS)一般都是运行在服务器端,提供后台的各种服务(HTTP,SFTP,分布式存储,分布式计算),通常都是没有图形化界面进行相关操作,而且之前提到过安装系统时,生产环境一般都是选择最小化安装,这样有利于系统瘦身,也能够减少问题的发生,提高系统运行性能。
而且一般特大型互联网公司(谷歌,苹果,亚马逊)生产环境的服务器都是放置在世界各地的机房,现在国内的大部分中小型互联网公司也已经将服务部署在阿里云、腾讯云,一般不会再单独购买服务器。
那么我们(开发者、运维工程师)如何操作Linux呢?
这时候就可以借助终端来进行相关的操作了,之前在CentOS6.10上安装过VMareTools,使用鼠标右键Open In Terminal,这时候就启动了一个终端。
如果要将终端进行分类,常用的终端类型可以分为如下几大类:
- 设备终端
- 鼠标键盘显示器
- 物理终端(/dev/console)
- 虚拟终端(tty)
- 虚拟终端可以有N个,系统默认提供了6个虚拟终端,通过Ctrl+Alt+[F1-F6]切换
- 图形终端
- CentOS6:Ctrl+Alt+F7
- CentOS7:在哪个虚拟终端启动,即位于哪个虚拟终端
3.2.2 虚拟终端的使用
在运维应用场景中最常使用的就是虚拟终端,在安装CentOS系统之后,一般会自带1个桌面终端和5个字符终端(字符终端也就意味着不能使用鼠标),在进入系统之后可以使用Ctrl+Alt+F1切换图形界面终端,Ctrl+Alt+[F2-F6]来切换不同的字符界面终端。
如下图所示是使用Ctrl+Alt+F2切换的CentOS7.6的字符界面

可以通过输入用户名和密码来登录终端

如果想要切回图形界面终端,只需要按Ctrl+Alt+F1即可。
如果在切换Ctrl+Alt+F2-Ctrl+Alt+F6之间的五个字符界面窗口时忘记是哪个窗口,则可以使用ttty命令查看,如下图所示,如果是tty6则表示为Ctrl+Alt+F6对应的字符界面。

在字符界面中同时还可以使用chvt加上数字实现字符界面的切换,如下命令所示
[root@centos6 ~]# chvt 5在SecureCRT中登录CentOS7.6系统之后,可以使用who命令查看当前登录的终端信息,如下命令输出显示tty为本机终端登录,而pts表示远程终端登录。
[root@centos7 ~]# who
root     :0           2019-01-11 07:53 (:0)
guanglei tty4         2019-01-11 08:08
guanglei tty2         2019-01-11 08:11
root     pts/0        2019-01-11 08:15 (192.168.190.1)
如果想要查看终端设备信息,可以使用tty命令,如下命令输出结果显示终端的路径
[root@centos7 ~]# tty
/dev/pts/0
还可以通过whoami 查看当前登录系统的用户身份(命令)
[root@centos7 ~]# whoami
root
通过who am i 查看当前登录用户以及终端信息
root@centos7 ~]# who am i
root     pts/0        2019-01-11 08:15 (192.168.190.1)
通过w命令可以查看到更多信息输出,包含当前登录的用户及其正在运行的程序
[root@centos7 ~]# w
 08:20:21 up 26 min,  4 users,  load average: 0.00, 0.01, 0.02
USER     TTY      FROM             LOGIN@   IDLE   JCPU   PCPU WHAT
root     :0       :0               07:53   ?xdm?  36.60s  0.30s /usr/libexec/gnome-session-bi
guanglei tty4                      08:08   11:57   0.02s  0.02s -bash
guanglei tty2                      08:11    8:21   0.02s  0.02s -bash
root     pts/0    192.168.190.1    08:15    5.00s  0.06s  0.03s w
日常运维工作中为了提高系统运行性能,通常不会使用到图形界面,如果想要关闭图形界面,可以使用init 3来切换系统的运行模式为字符界面模式。
[root@centOS6 ~]# init 3如果想要查看当前系统的运行模式,可以使用runlevel查看,如下命令输出
的结果展示从5切换到3,即init 5表示切换到图形界面运行模式,init 3表示切换到字符界面运行模式
[root@centOS6 ~]# runlevel
5 3
还可以使用who -r查看
[guanglei@centos7 ~]$who -r
         run-level 5  2019-02-11 10:26                   last=3
图形界面和字符界面的区别是,字符界面的日常操作都是通过键盘来完成的,而且可以实现自动化,批量化,自能化,相比图形界面更加高效便捷,而图形界面可以借助鼠标加键盘完成日常任务。
而Linux的图形界面和Windows不同,Linux的图形界面只是运行在内核之上的应用程序,可以通过运行startx命令启动图形界面程序,当然前提条件是系统安装时已经安装了图形界面,例如KDE,GNOME。
[root@centOS6 ~]# startx当再次输入runlevel(SecureCRT需要新开个会话)查看系统运行模式时,发现系统的运行模式依然是字符界面模式,只是额外开启了一个图形界面的程序而已,而且init 5和startx不同的是,它还会启动一些额外的服务。
[root@centOS6 ~]# runlevel
5 3
如果想要关闭startx启动的图形界面,只需要按键盘ctrl+x即可退出图形界面。
如果想要退出当前会话,可以使用exit或者logout命令退出,退出之后会看到如下的效果

如果想要重新登录系统,只需要选择当前会话,使用SecureCRT提供的Reconnect重新连接即可。

重新连接成功之后,就会看到如下的效果

3.3 使用SecureCRT远程连接CentOS
在日常运维的工作场景中通常都不会直接接触机房的机器,都是使用SSH 客户端通过网络连接远程的服务器。
3.3.1 ip查看以及网络检测
在使用SecureCRT连接CentOS之前,需要首先获取CentOS6.10的ip地址,在登陆系统之后,通过右键Open in Terminal,打开CentOS系统的终端。

然后通过ifconfig命令来查看系统的ip地址,如下图所示

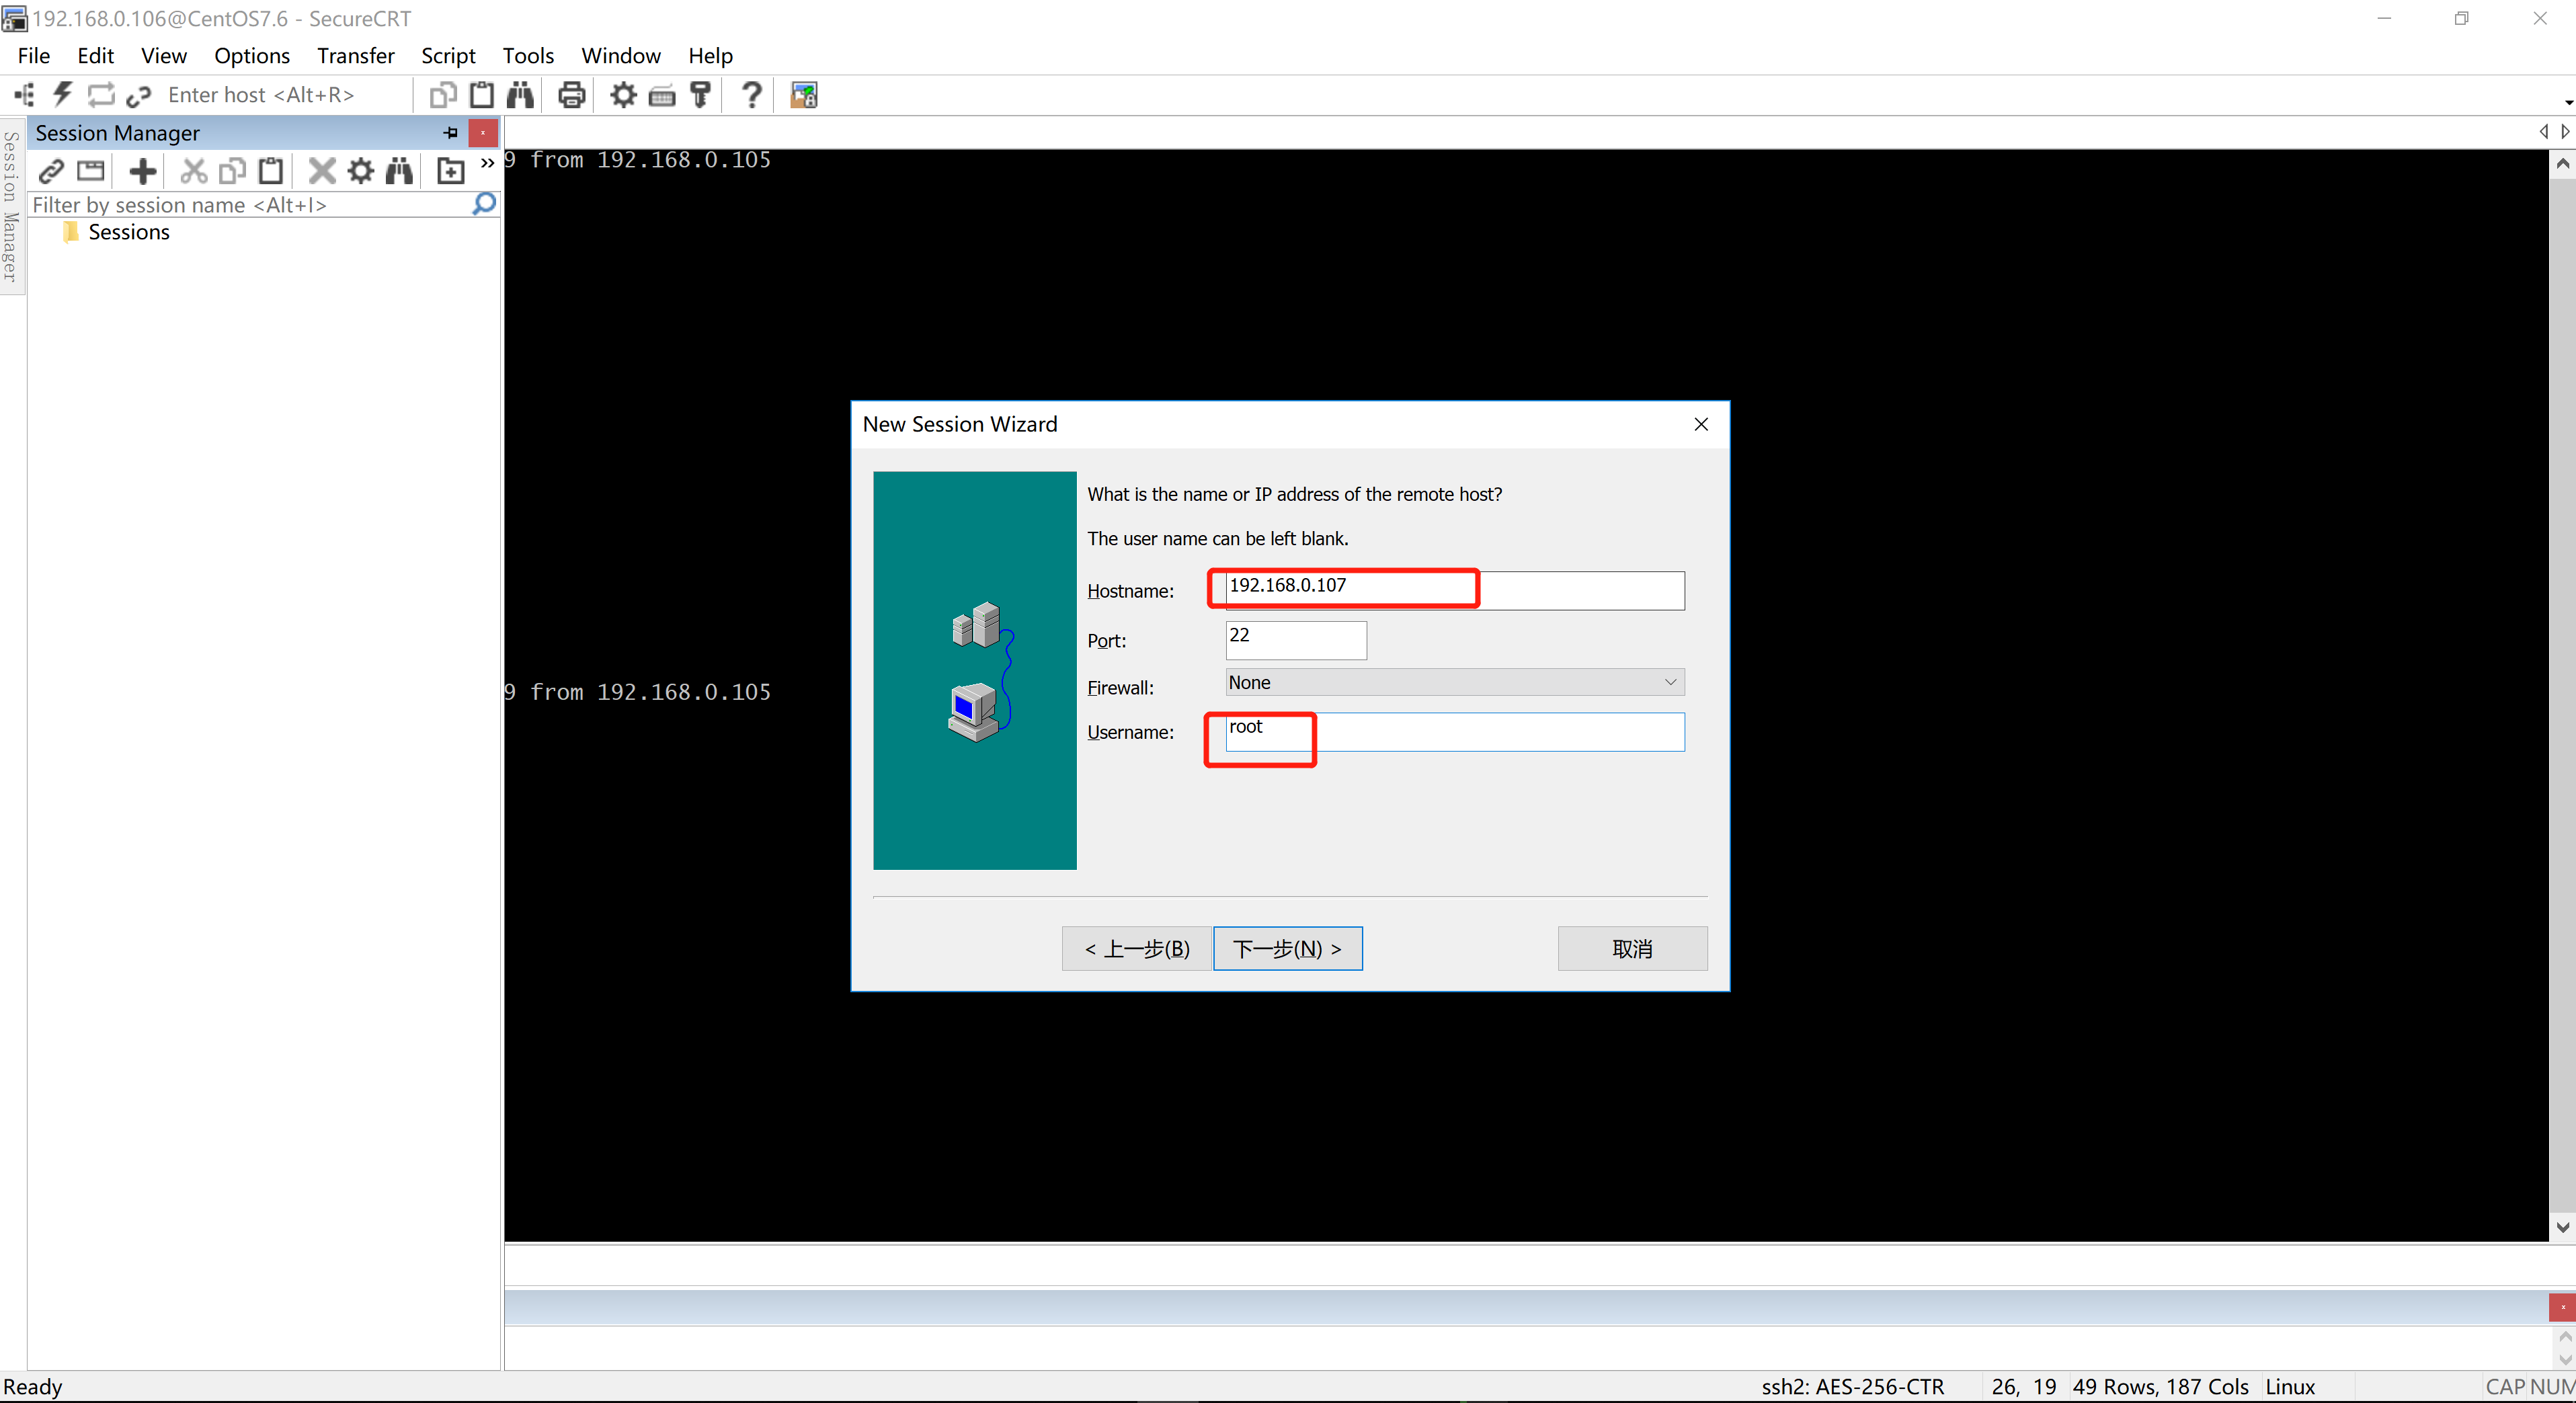
ip地址是192.168.0.107
然后在windows的dos窗口下使用ping命令检测是否能够ping通,如果ping通就会看到如下图所示的效果

3.3.2 SecureCRT连接CentOS6.10
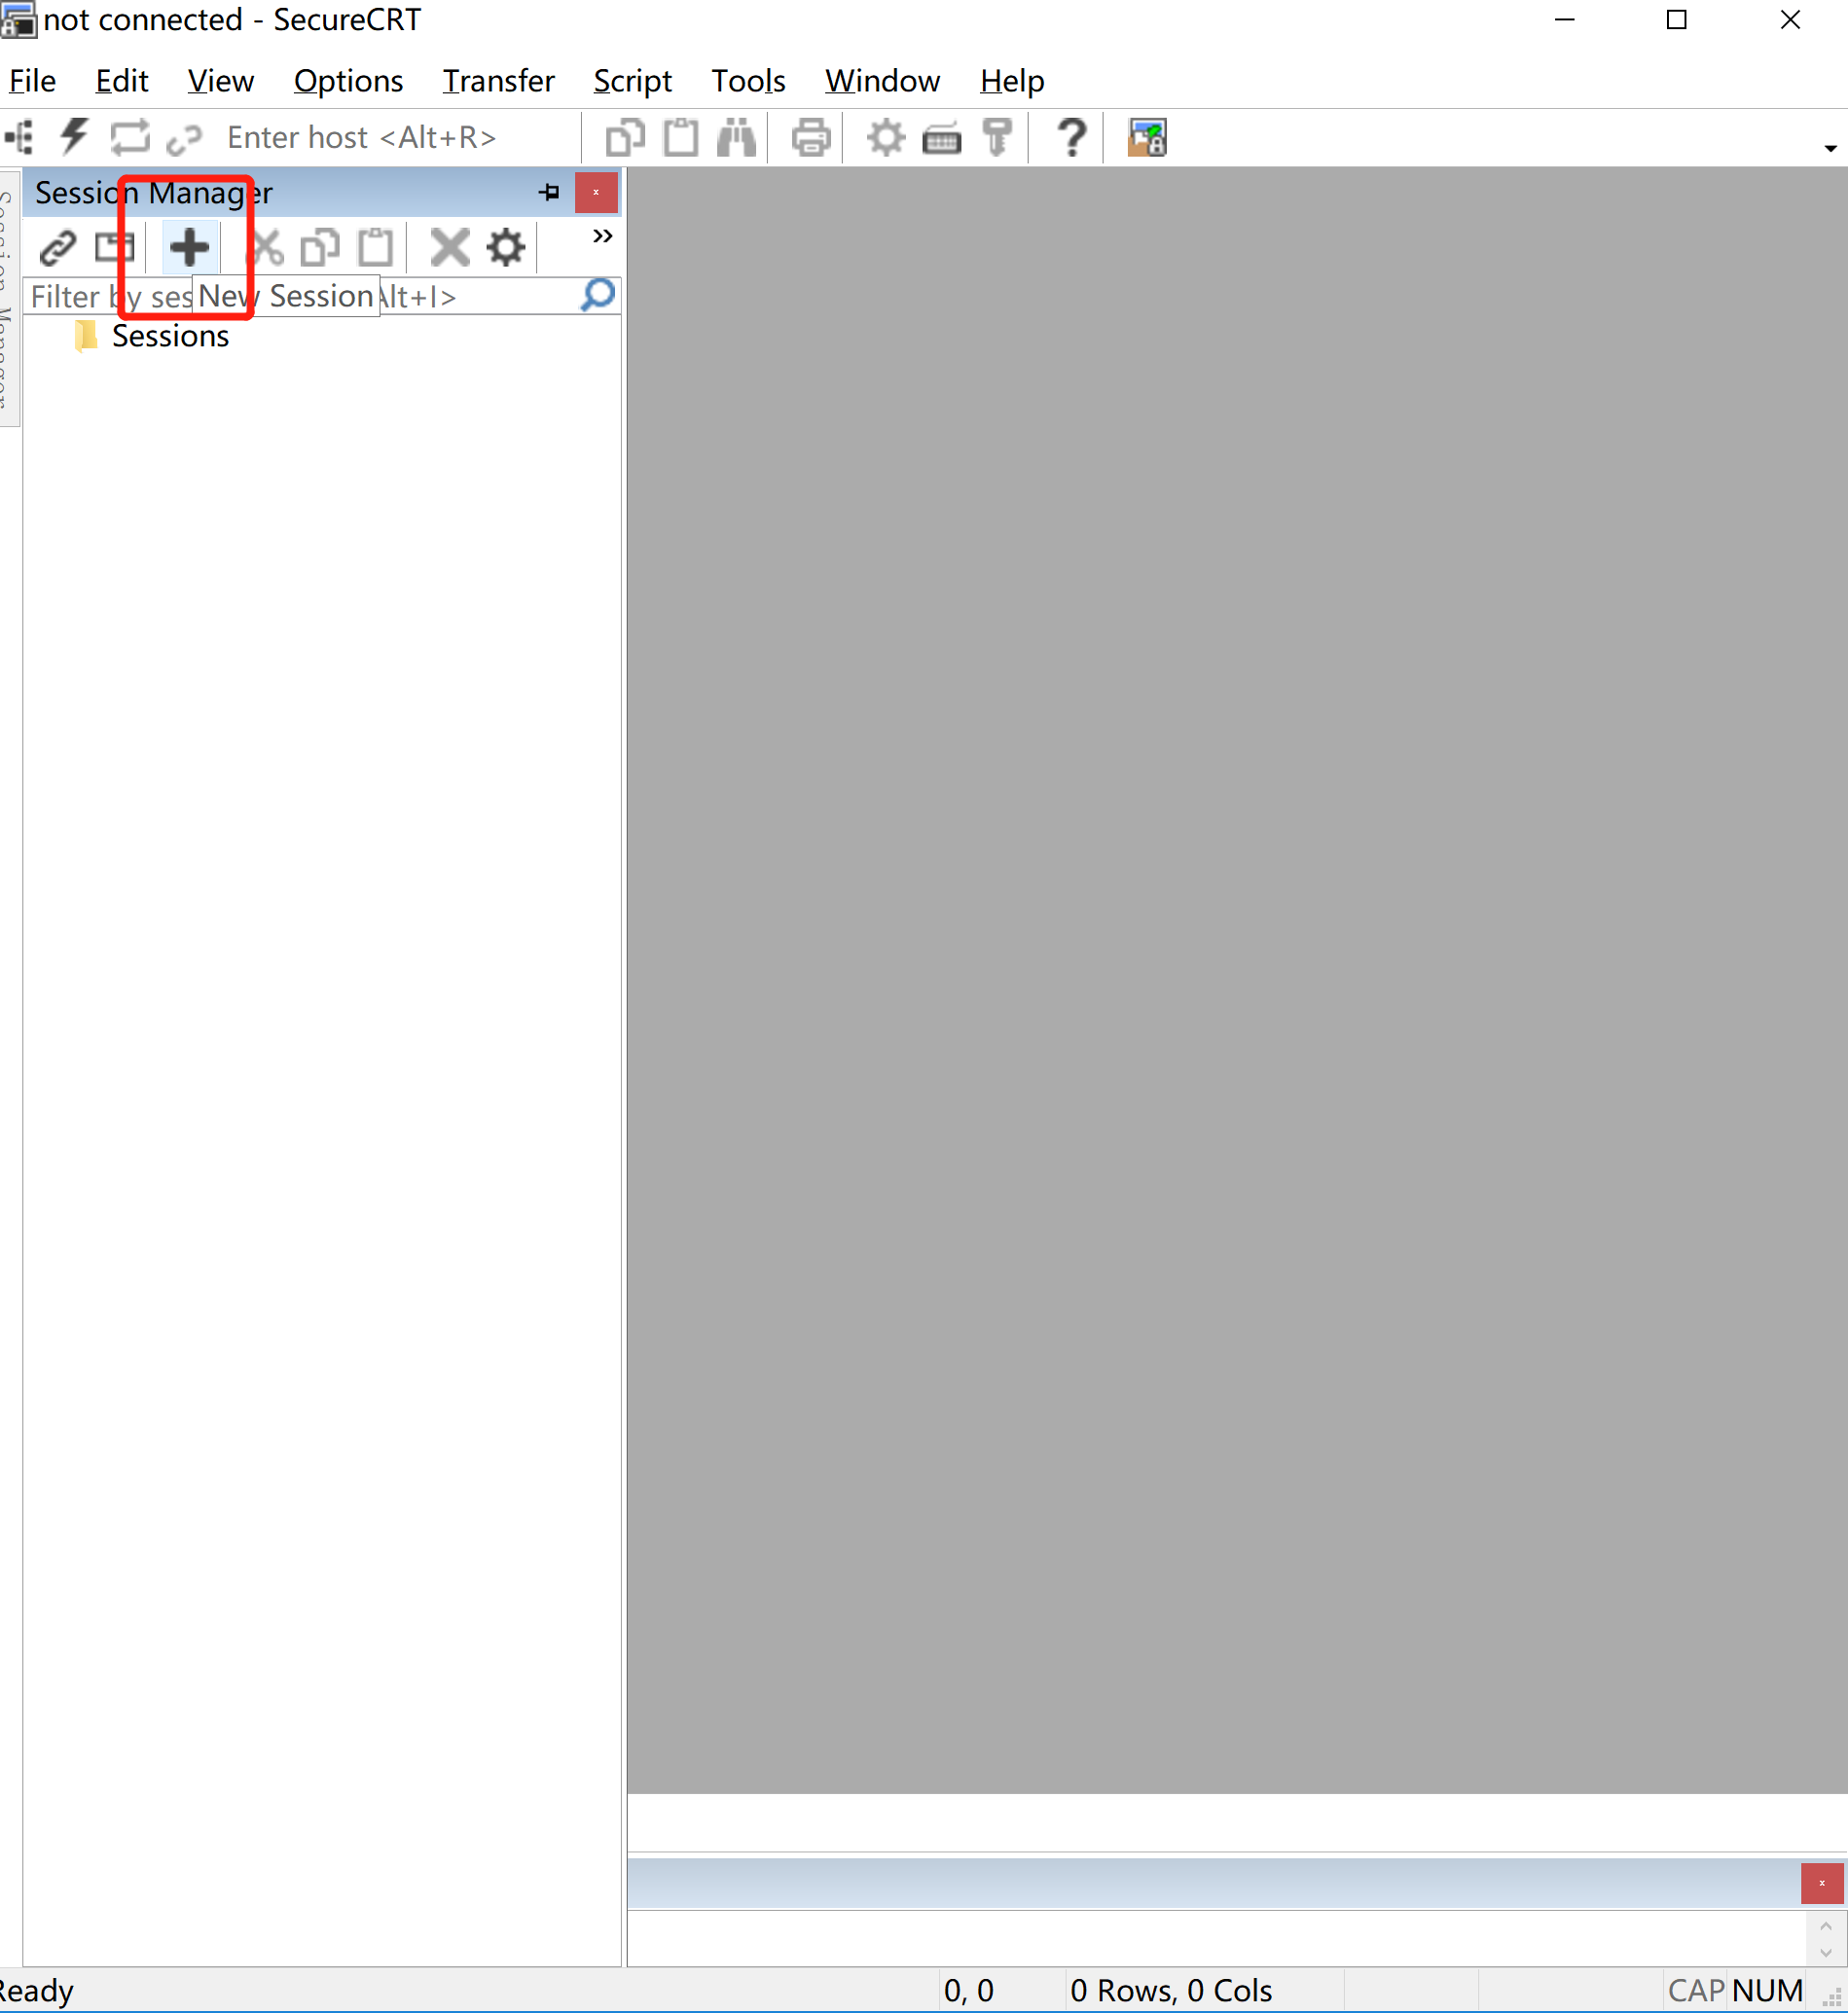
- 在启动SecureCRT之后可以点击如下图所示的加号创建会话
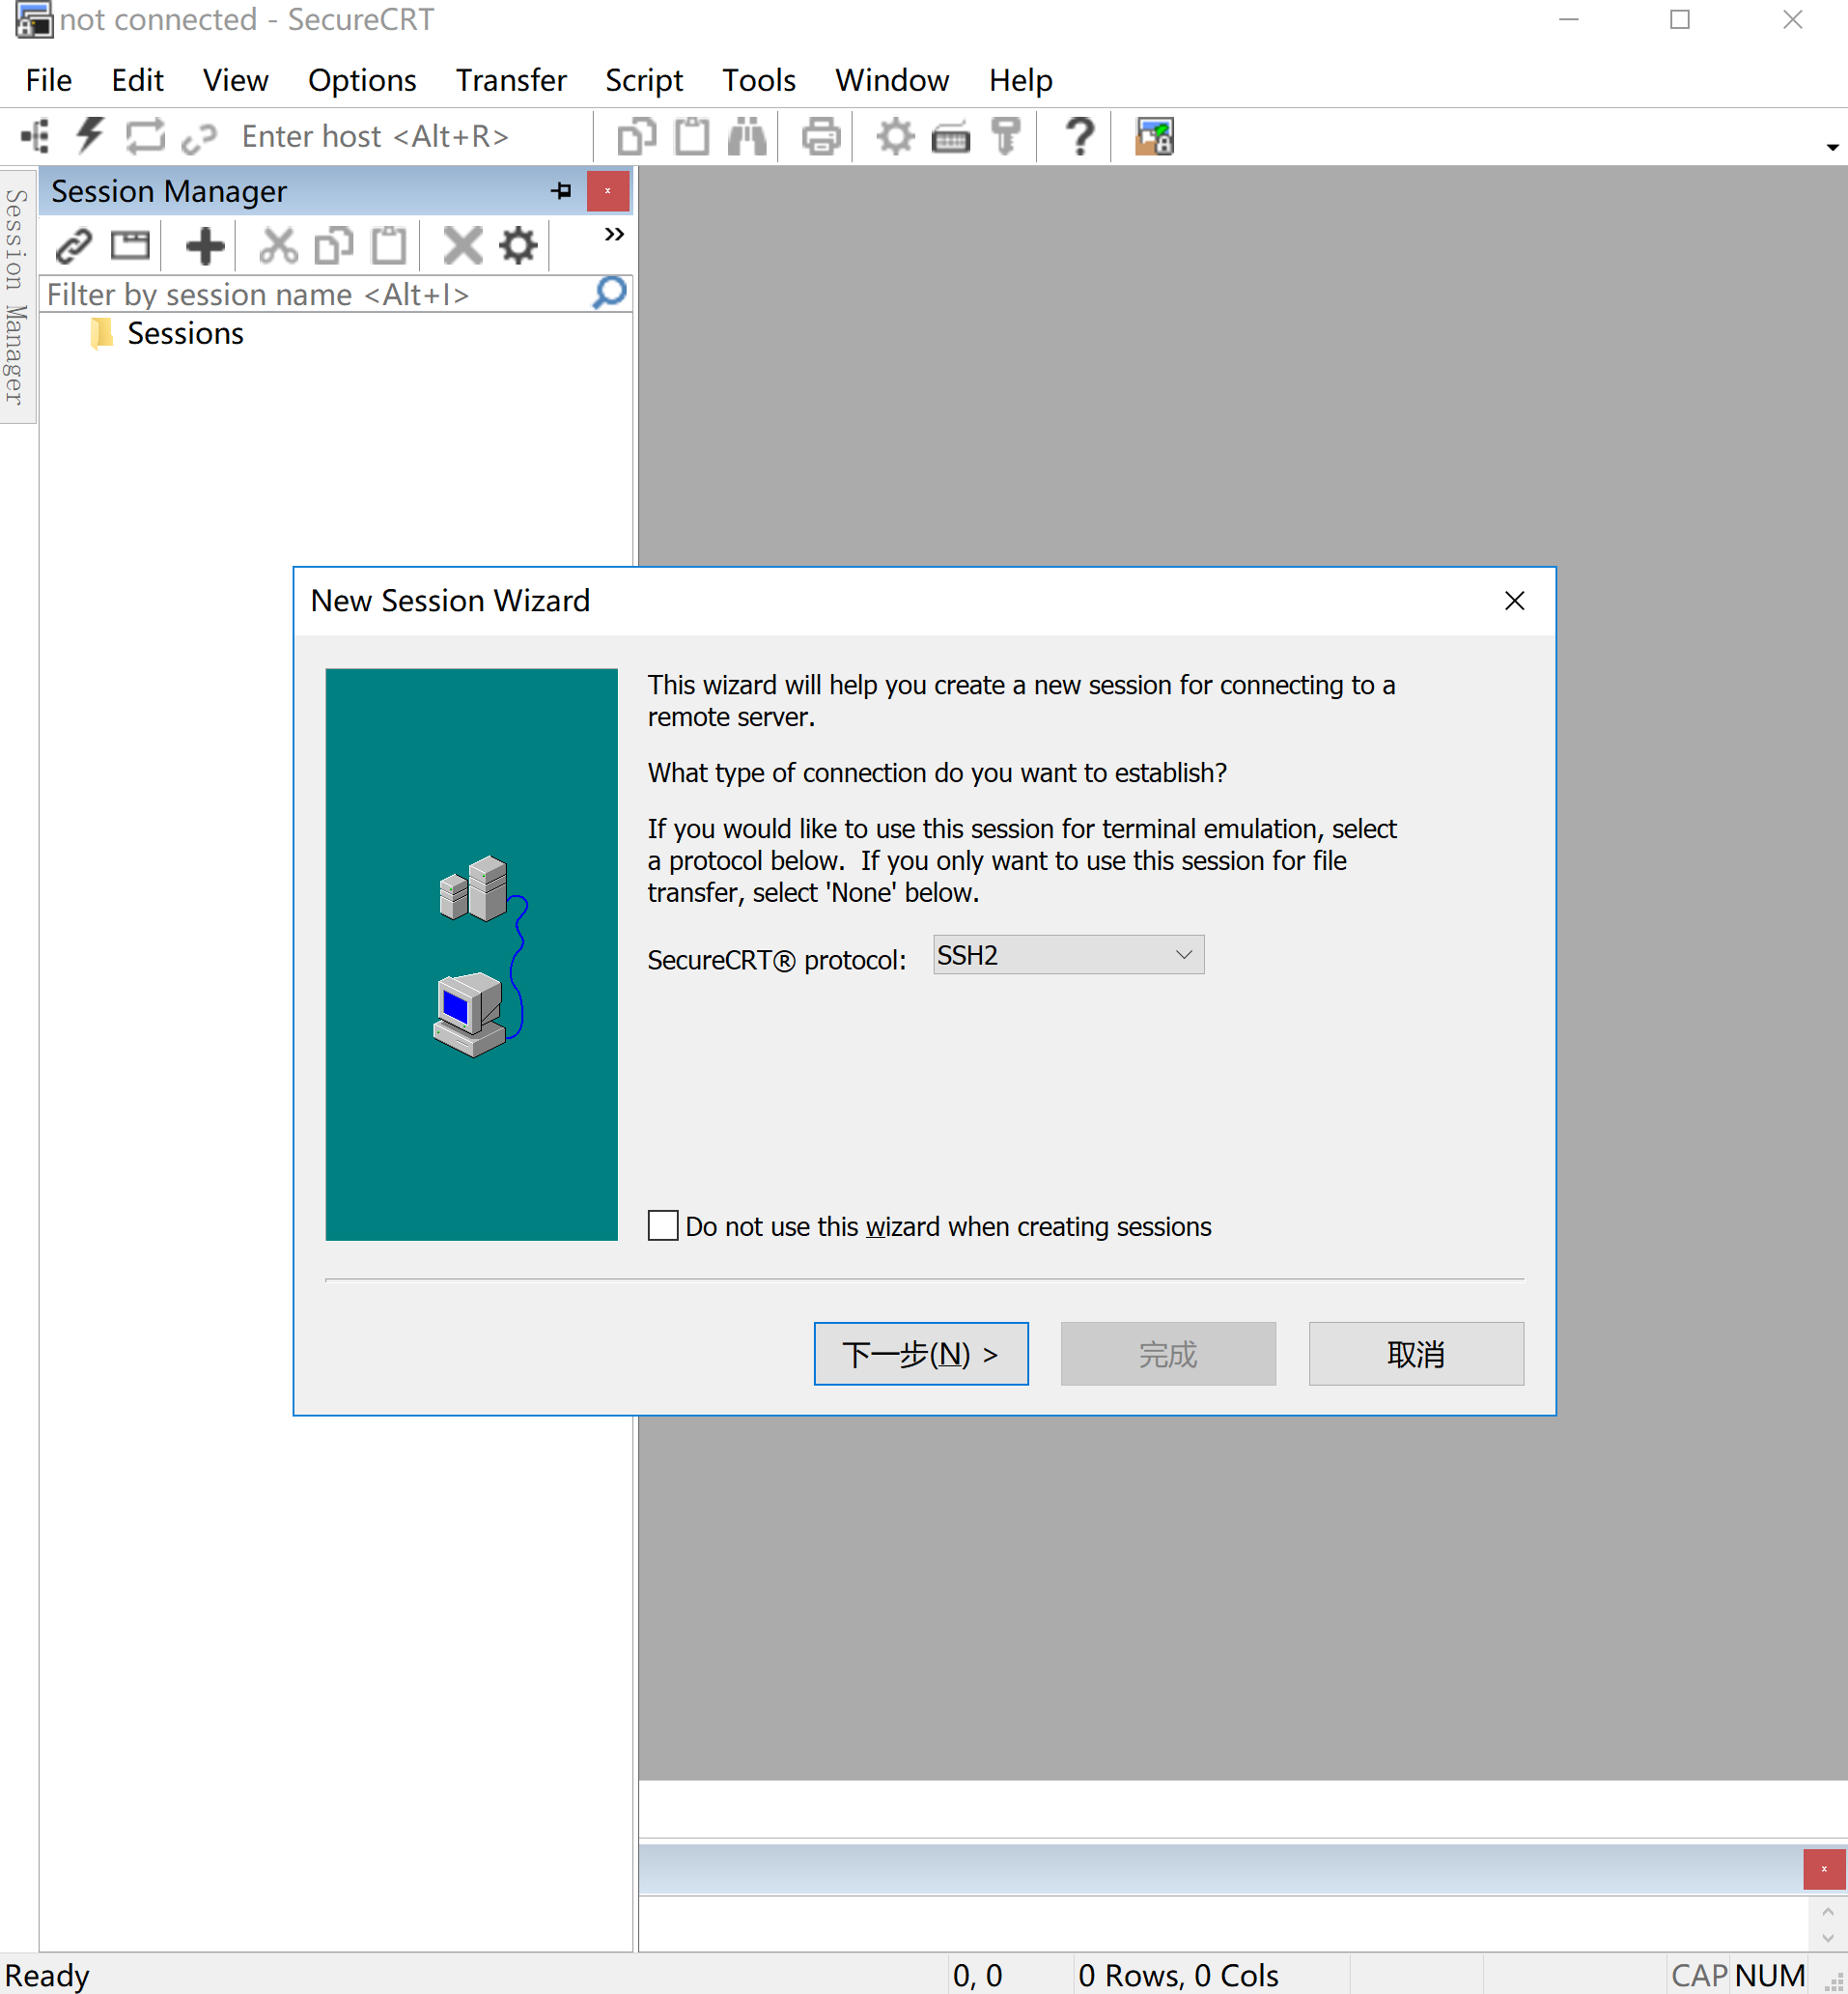
- 然后创建基于SSH2协议的会话
- 输入主机和登录的用户信息,默认的通讯端口是22
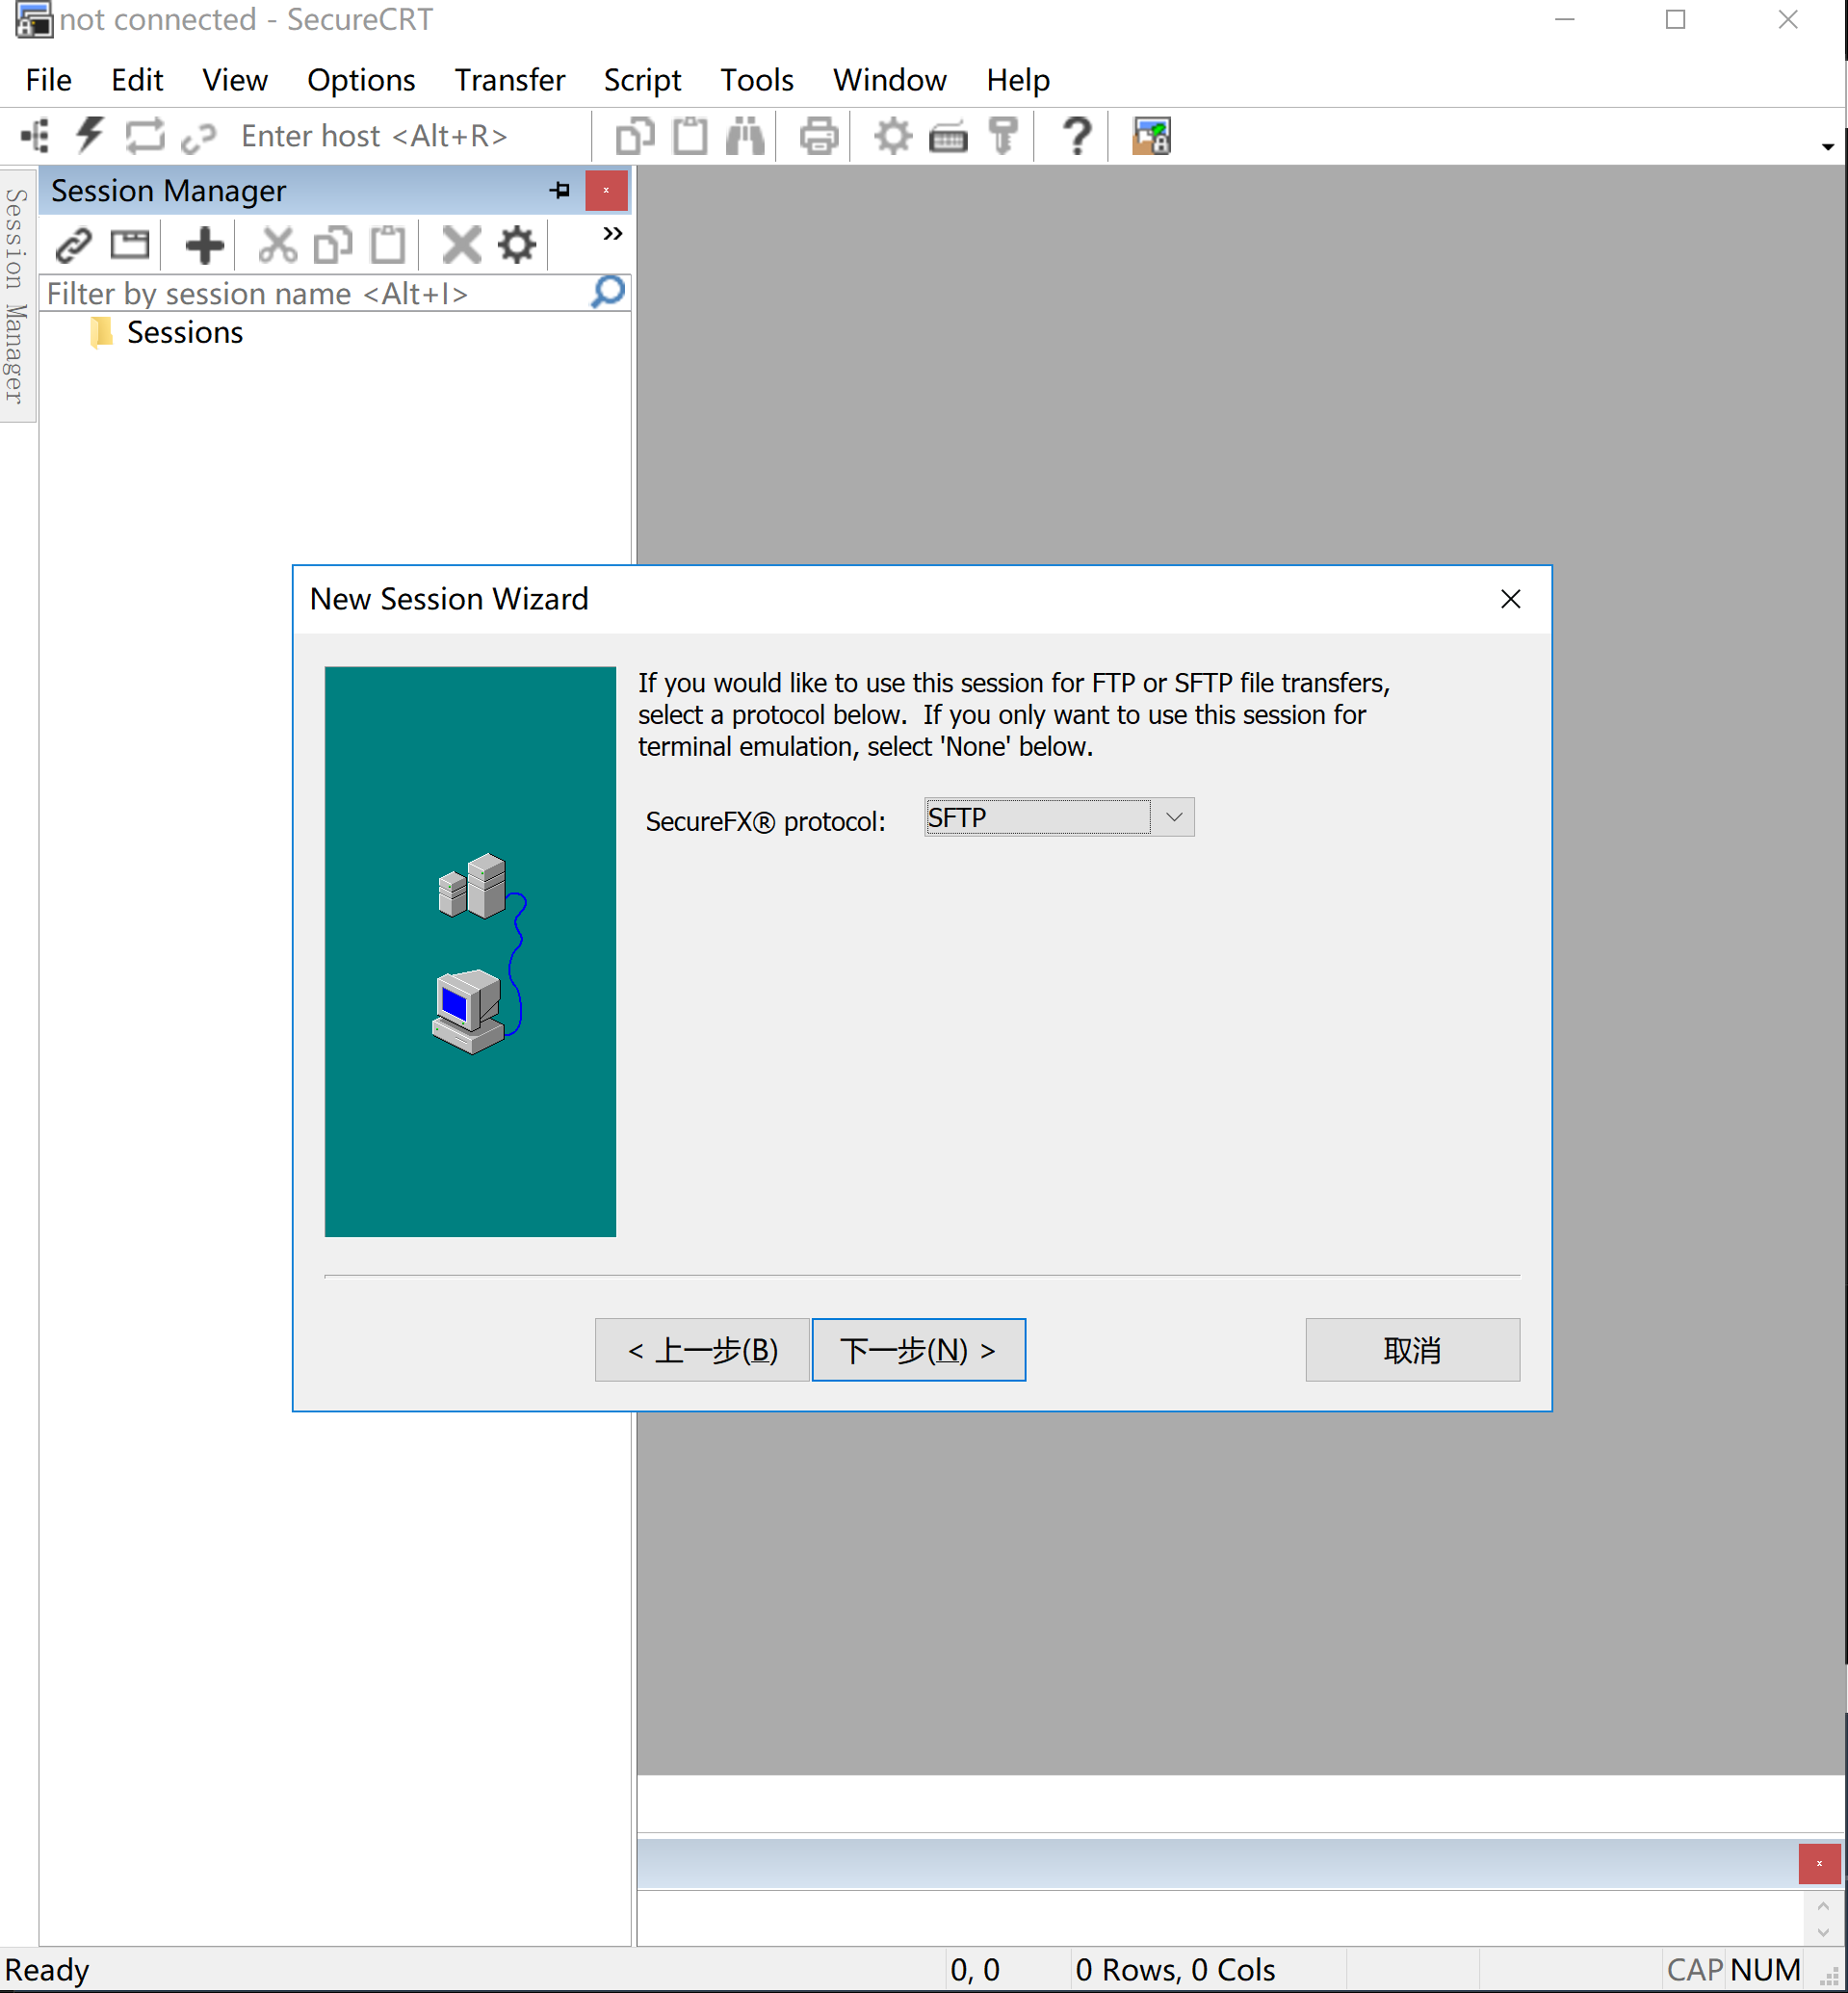
- 文件传输协议选择SFTP
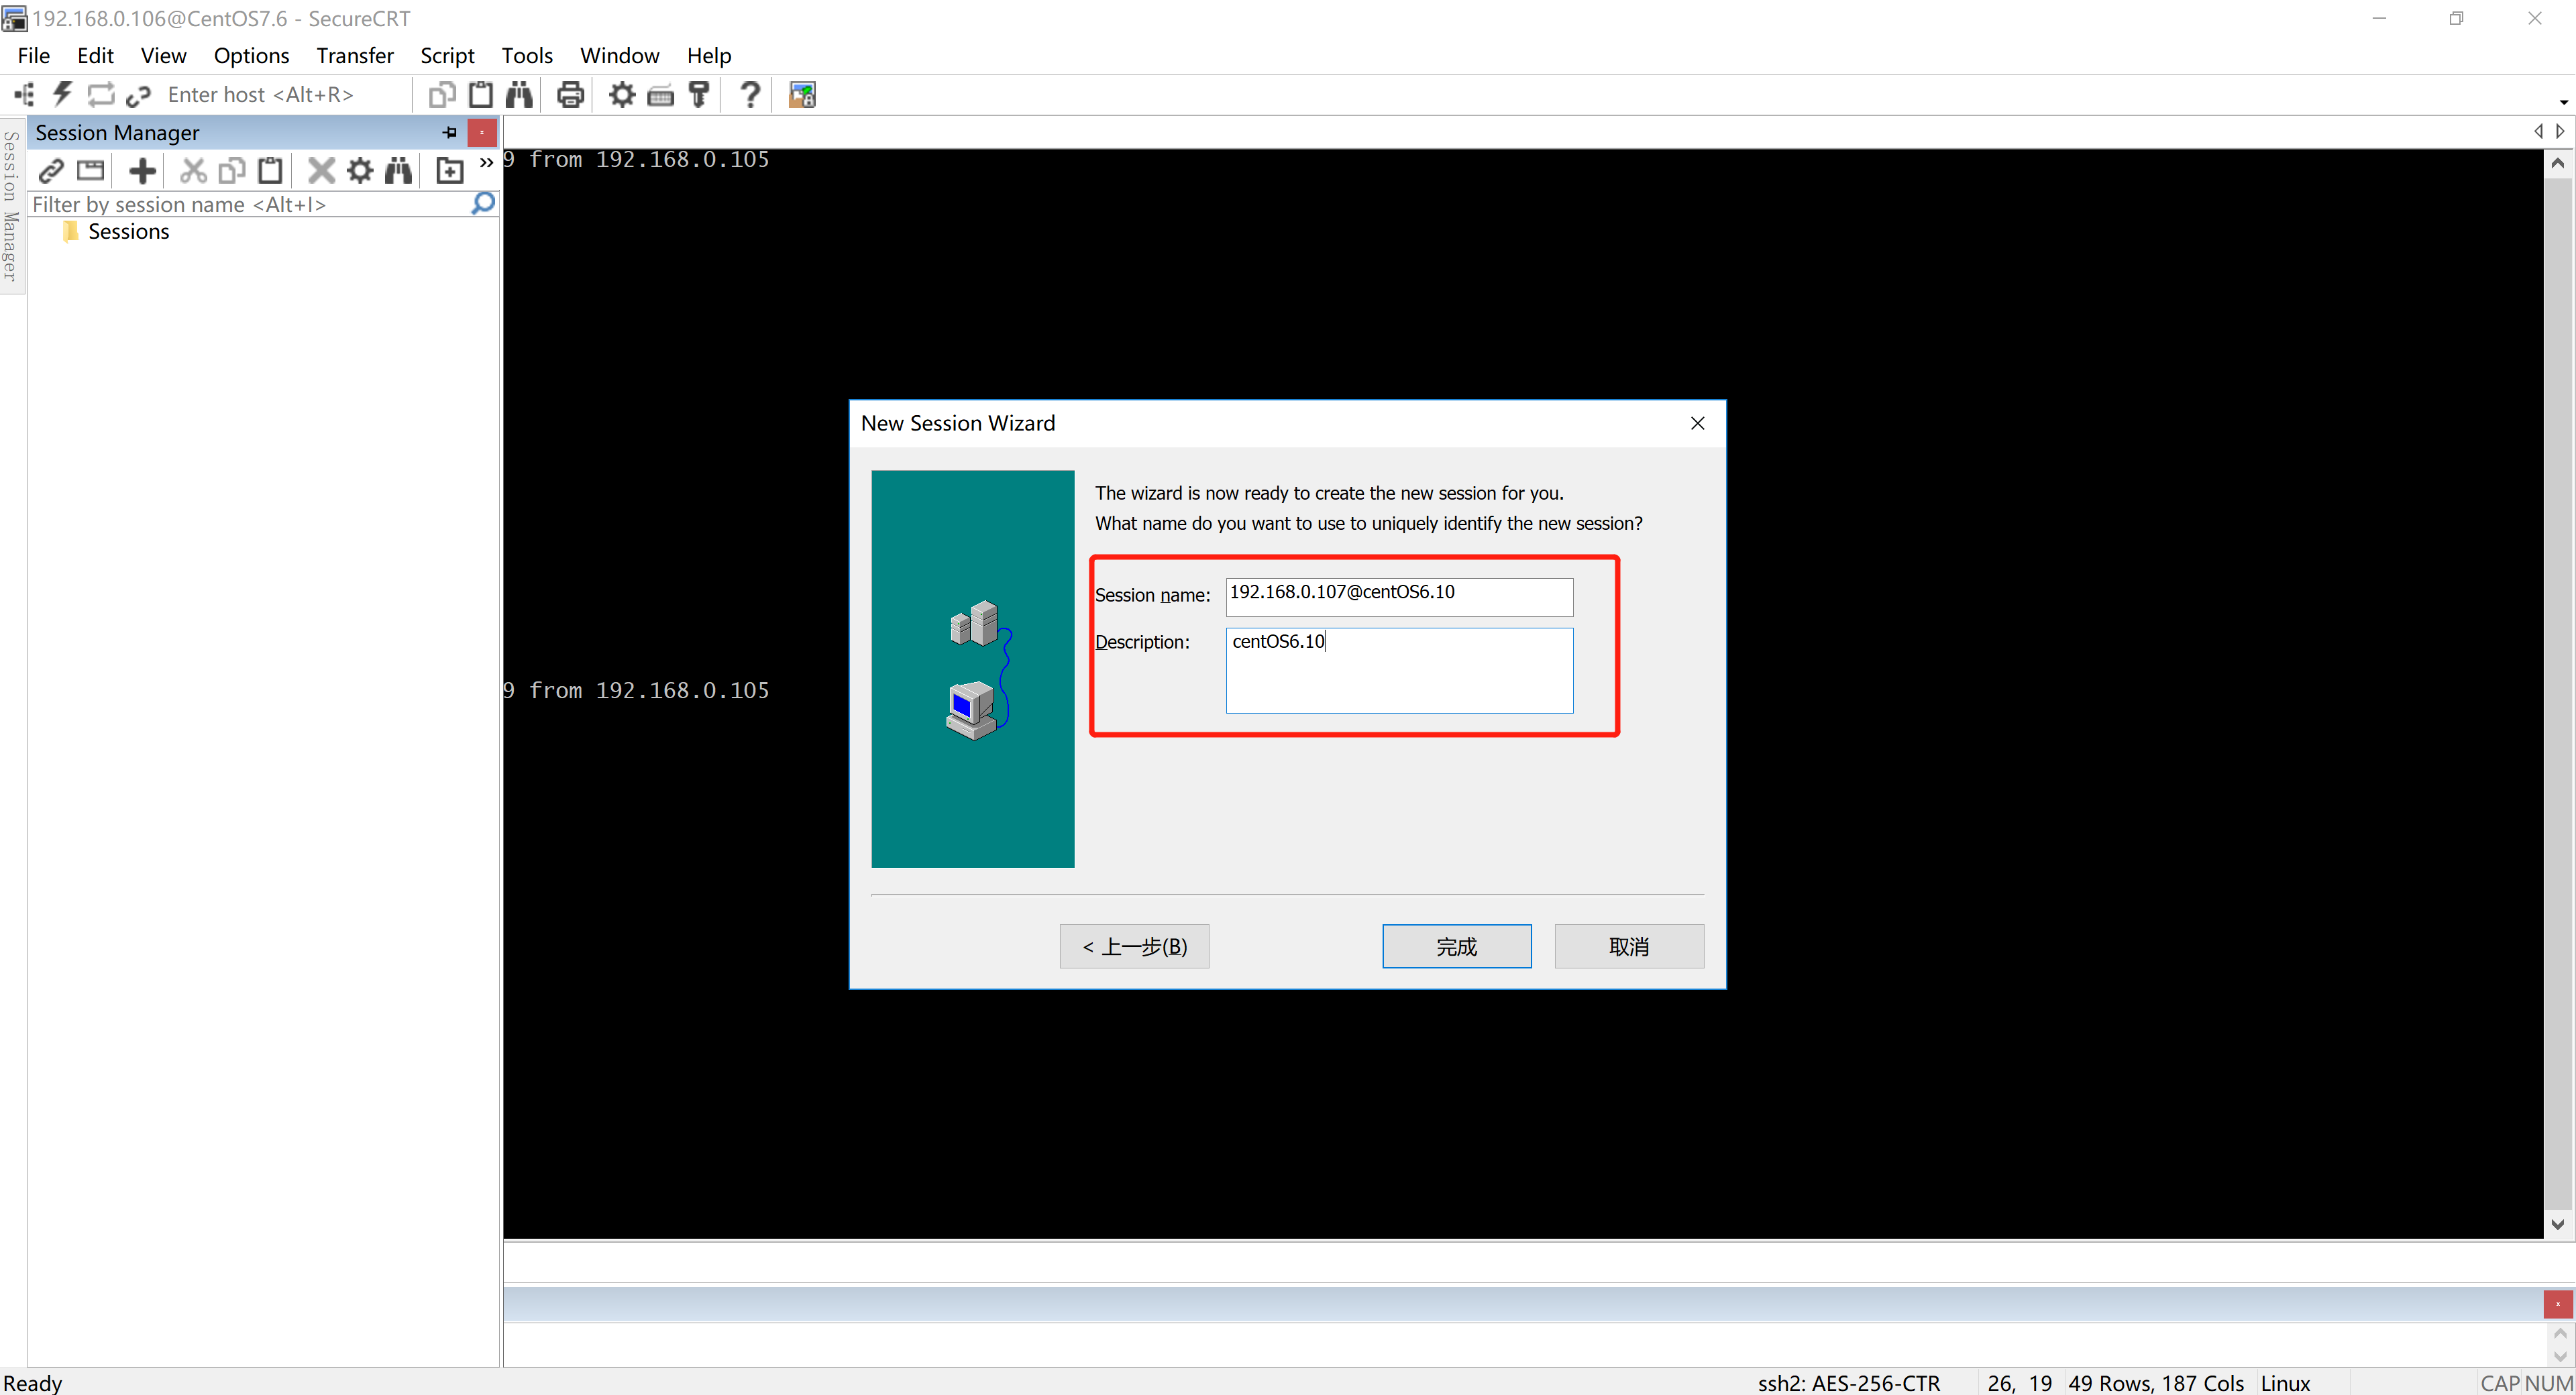
- 设置会话名称以及描述
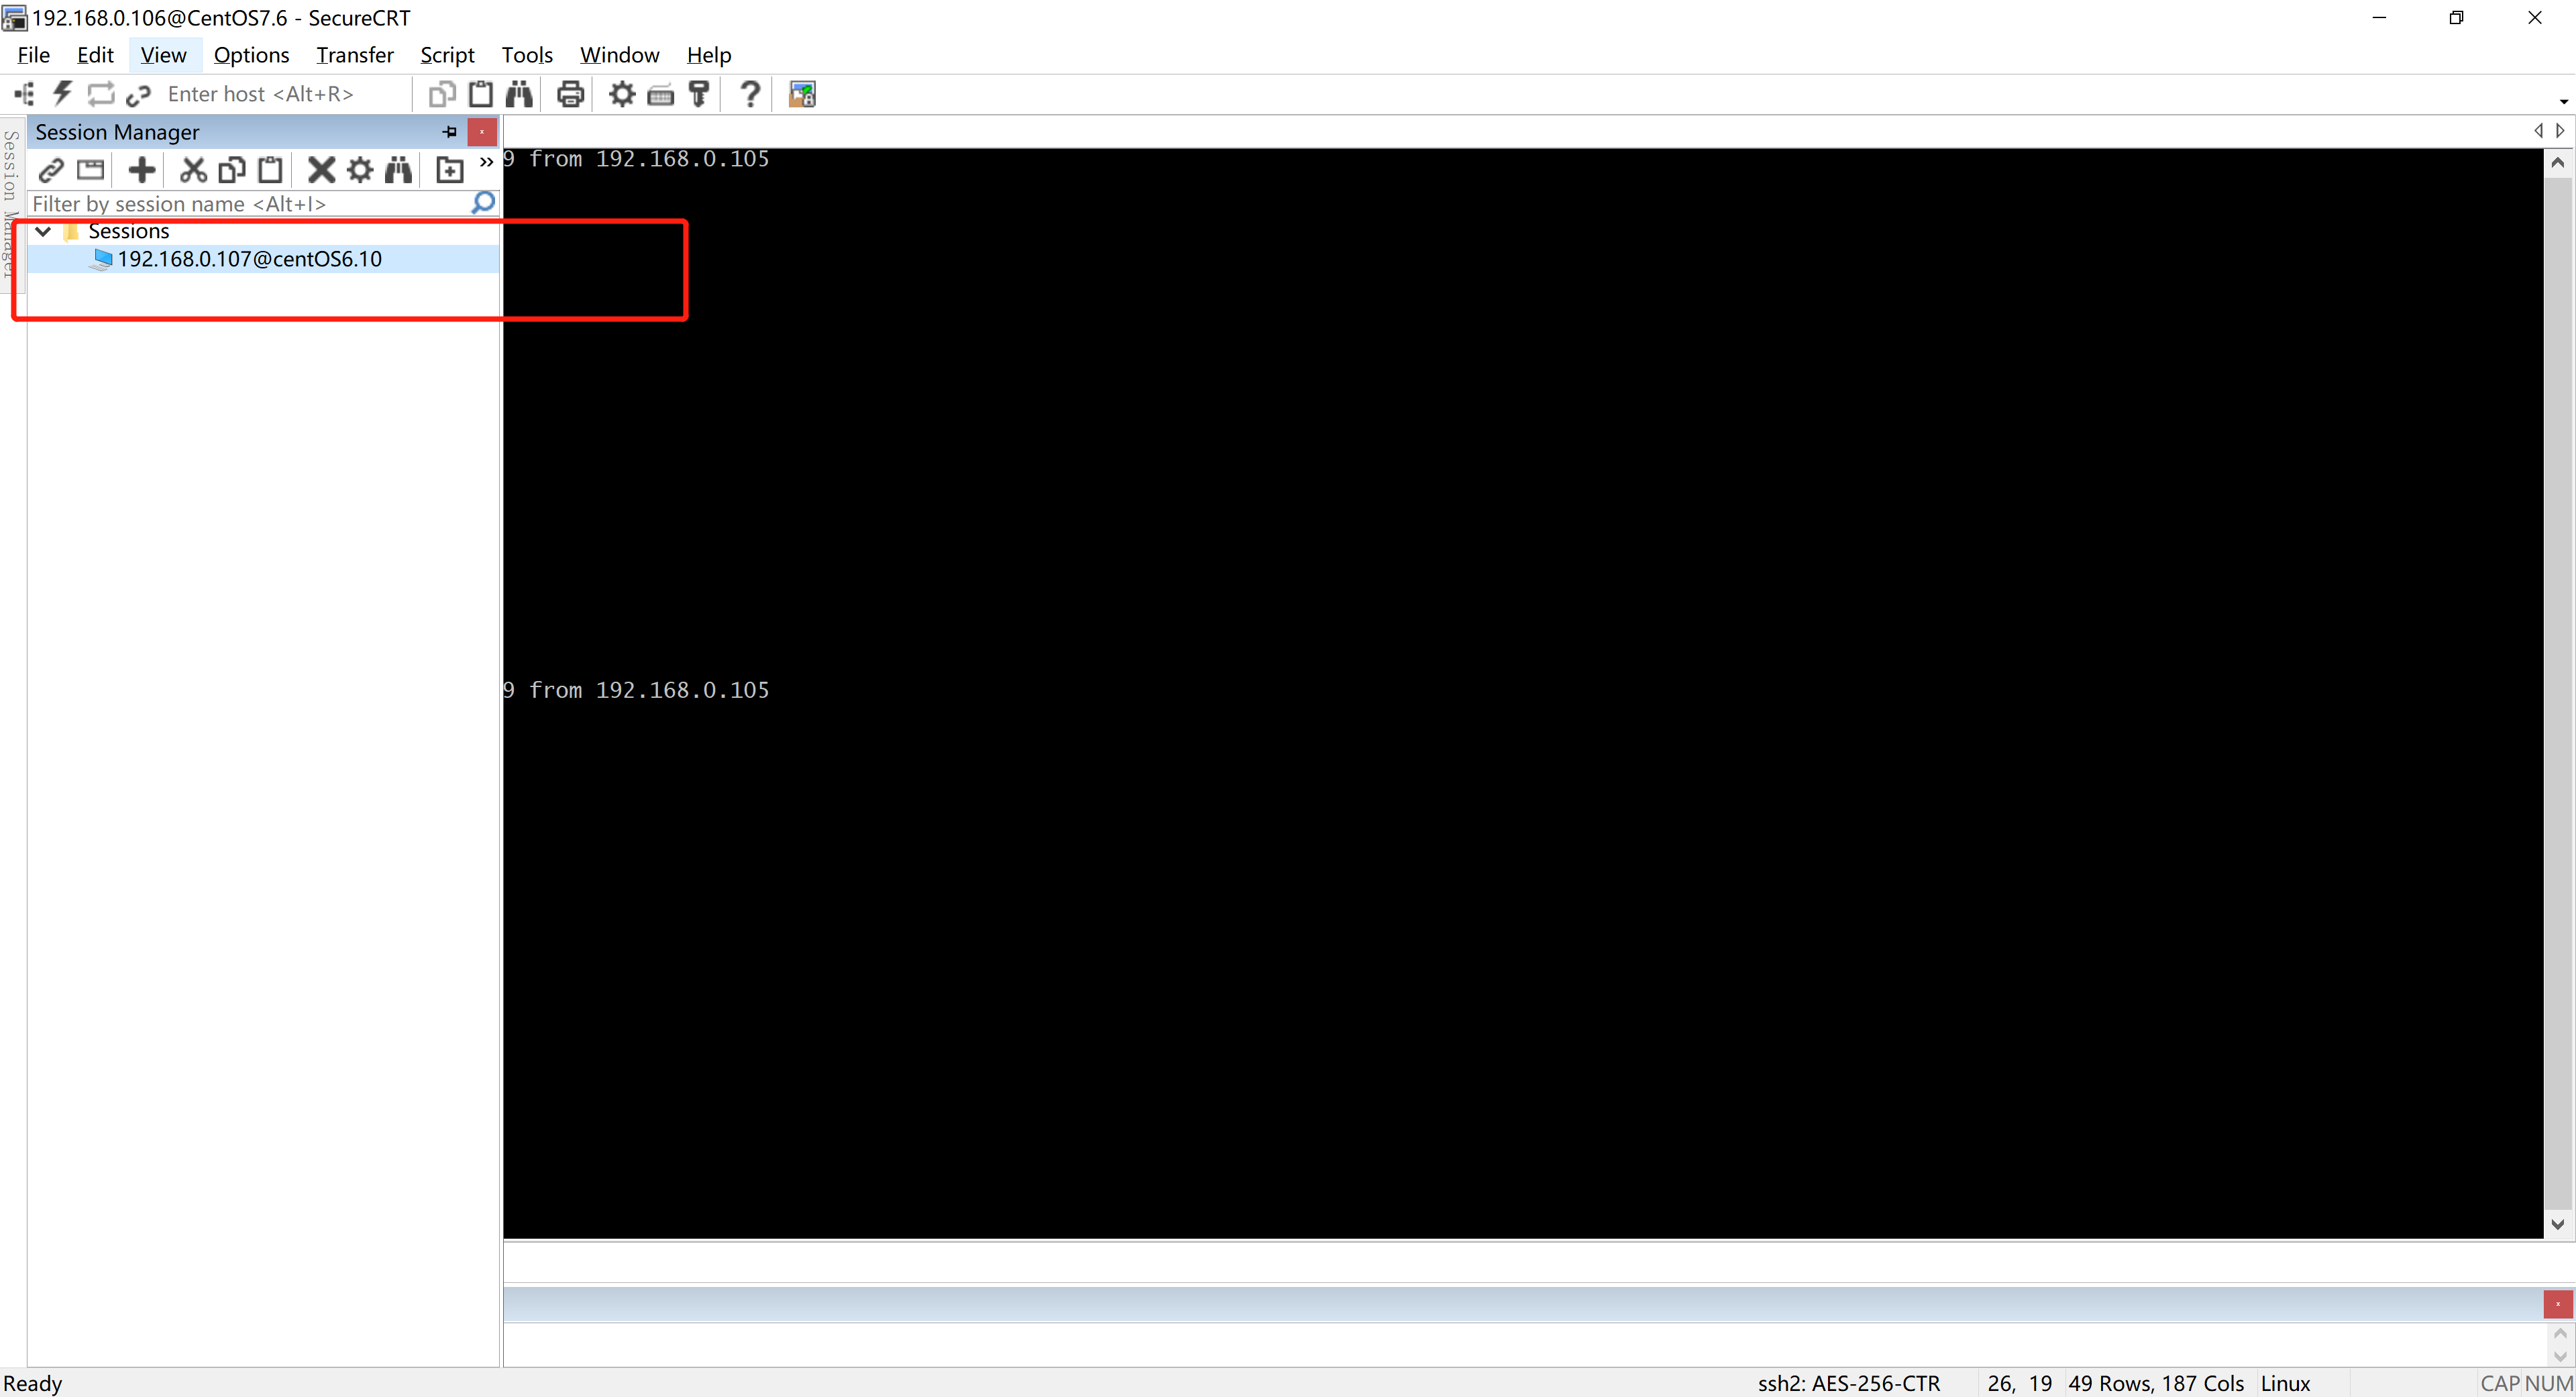
- 双击会话名称
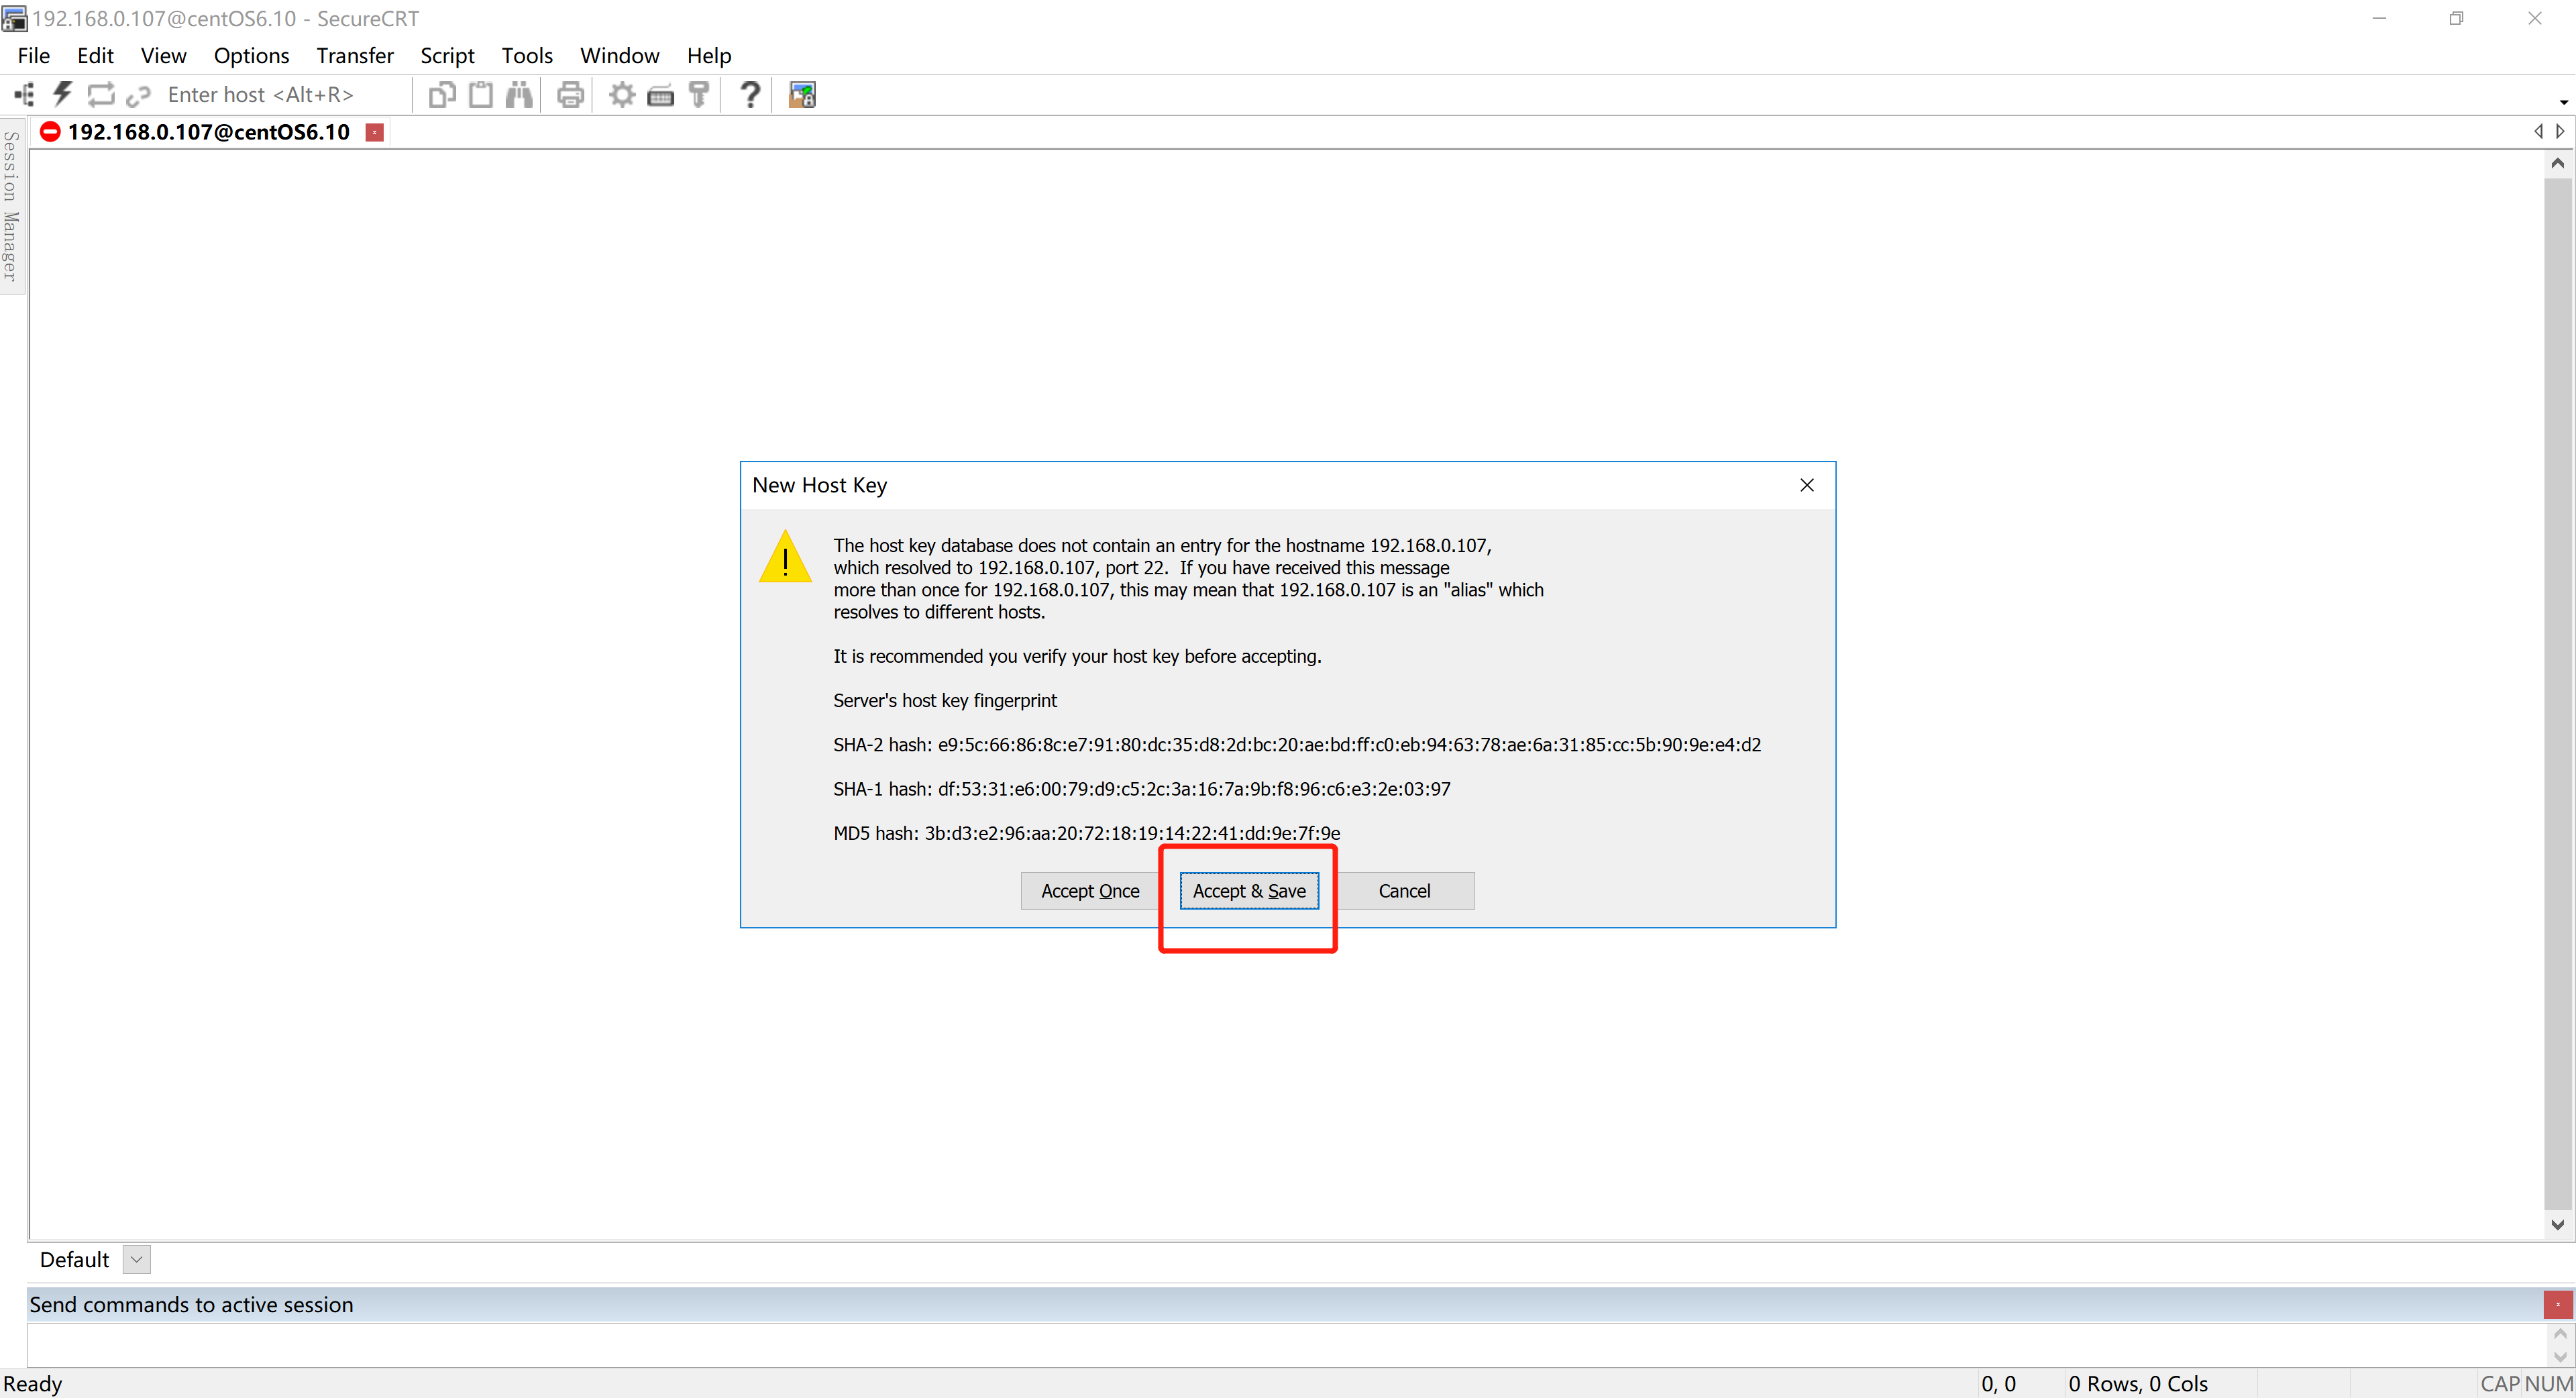
- 同意并保存host key
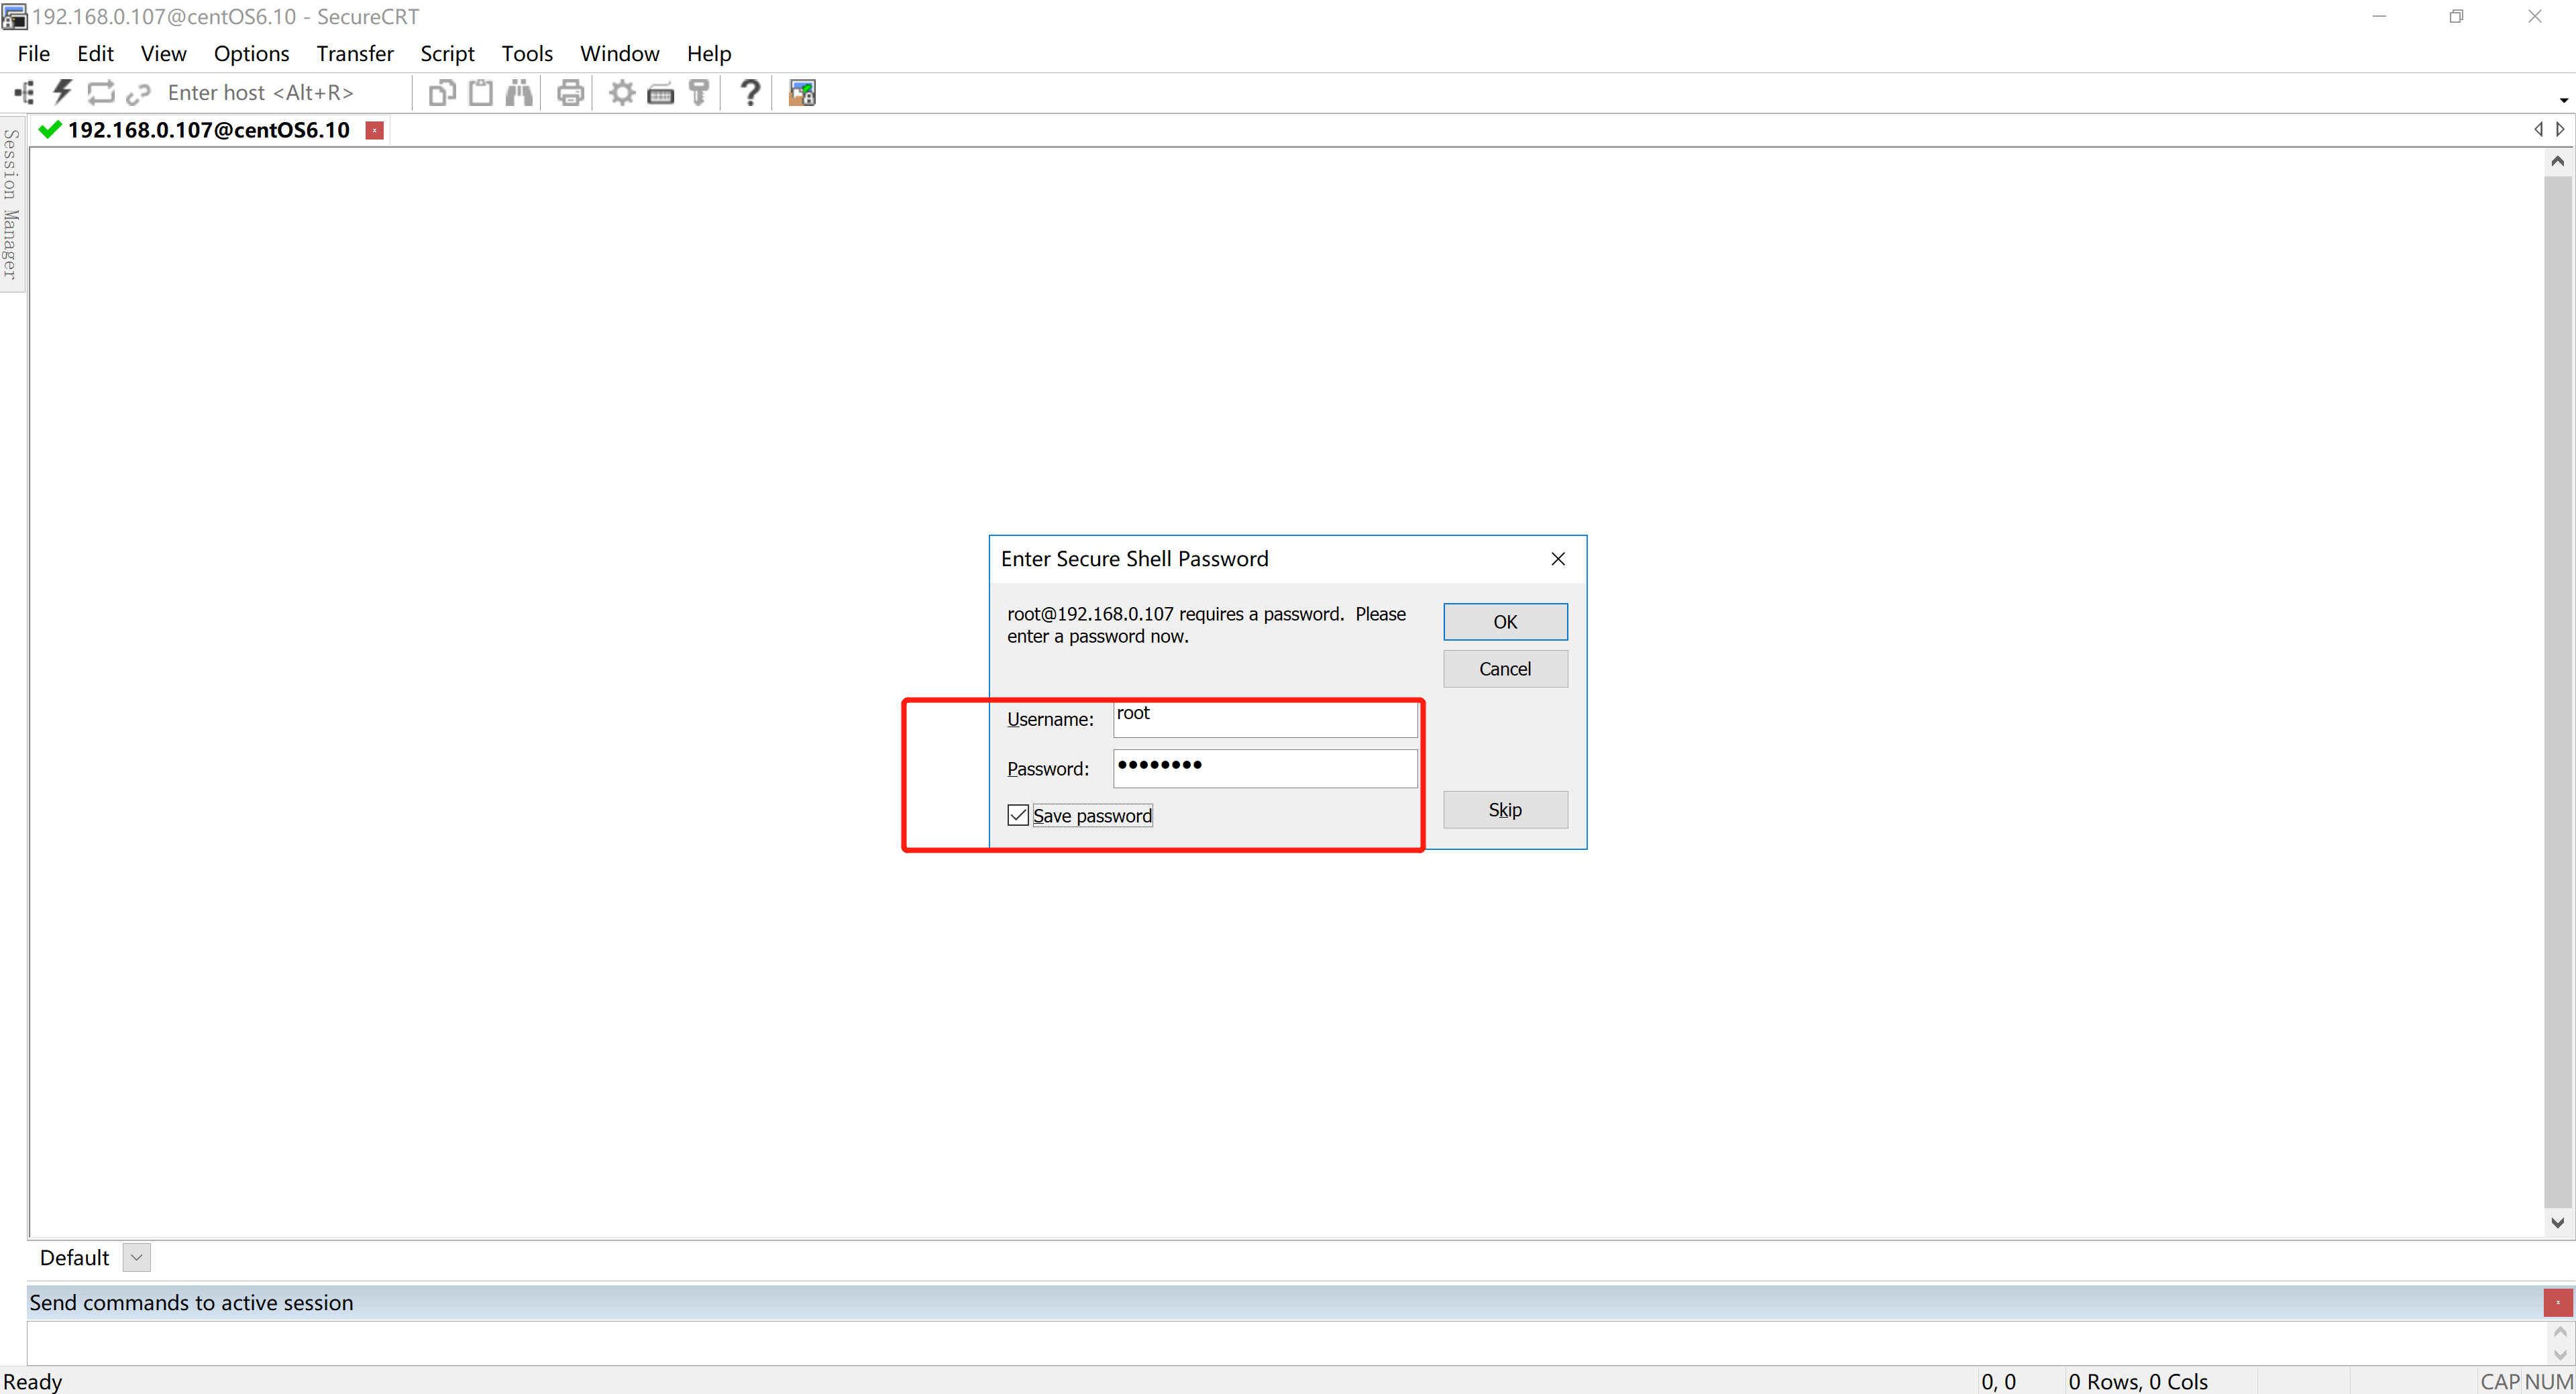
- 输入账号密码登录系统
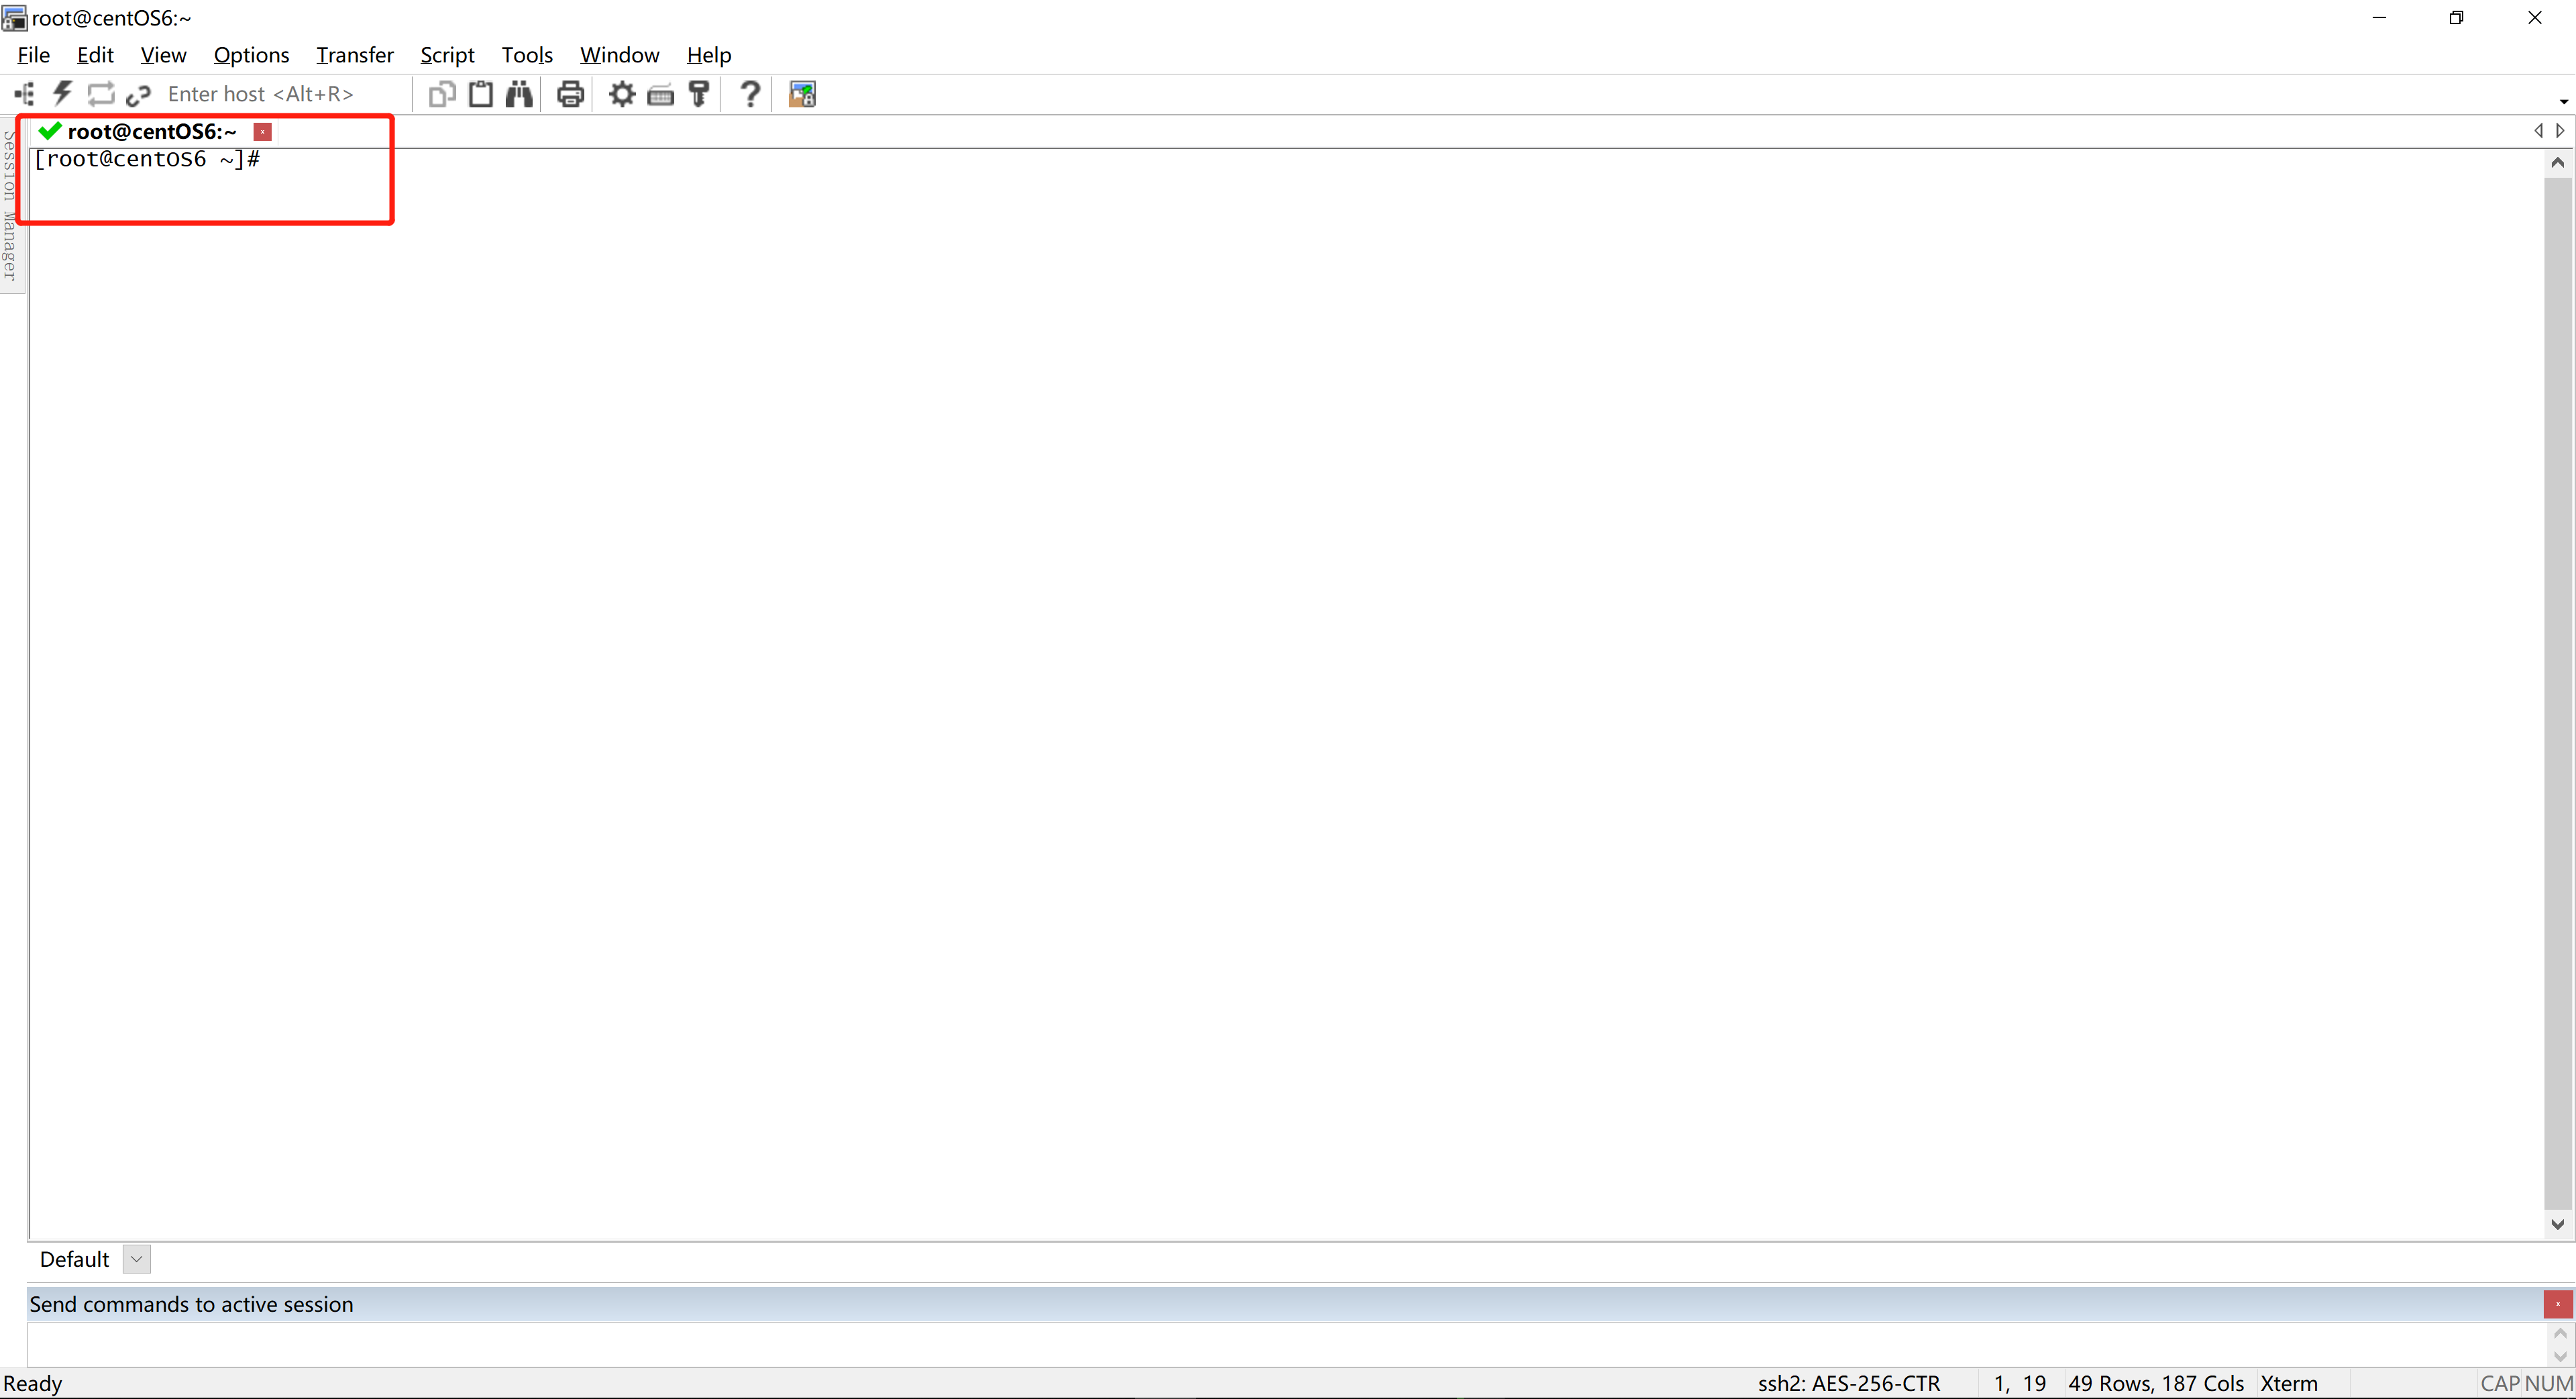
3.3.3 SecureCRT连接CentOS7.6
首先在CentOS7.6的桌面鼠标右键,打开终端后输入ifconfig命令查看CentOS7.6的ip地址

然后将SecureCRT原来连接CentOS6.10的会话配置复制一份并重命名为192.168.0.106@CentOS7.6,并将原来的会话改为192.168.0.107@CentOS6.10。

当然如果想要登录CentOS7.6,还需要在192.168.0.106@CentOS7.6的属性中修改SSH2通讯的主机IP地址以及登录的用户名(这里是以root用户登录),如下图所示

登录成功之后会看到如下图所示的结果

3.3.4 SecureCRT个性化设置
首先在SecureCRT的菜单栏中找到Options->Session Options,然后做相关的设置。
- 设置终端的外观
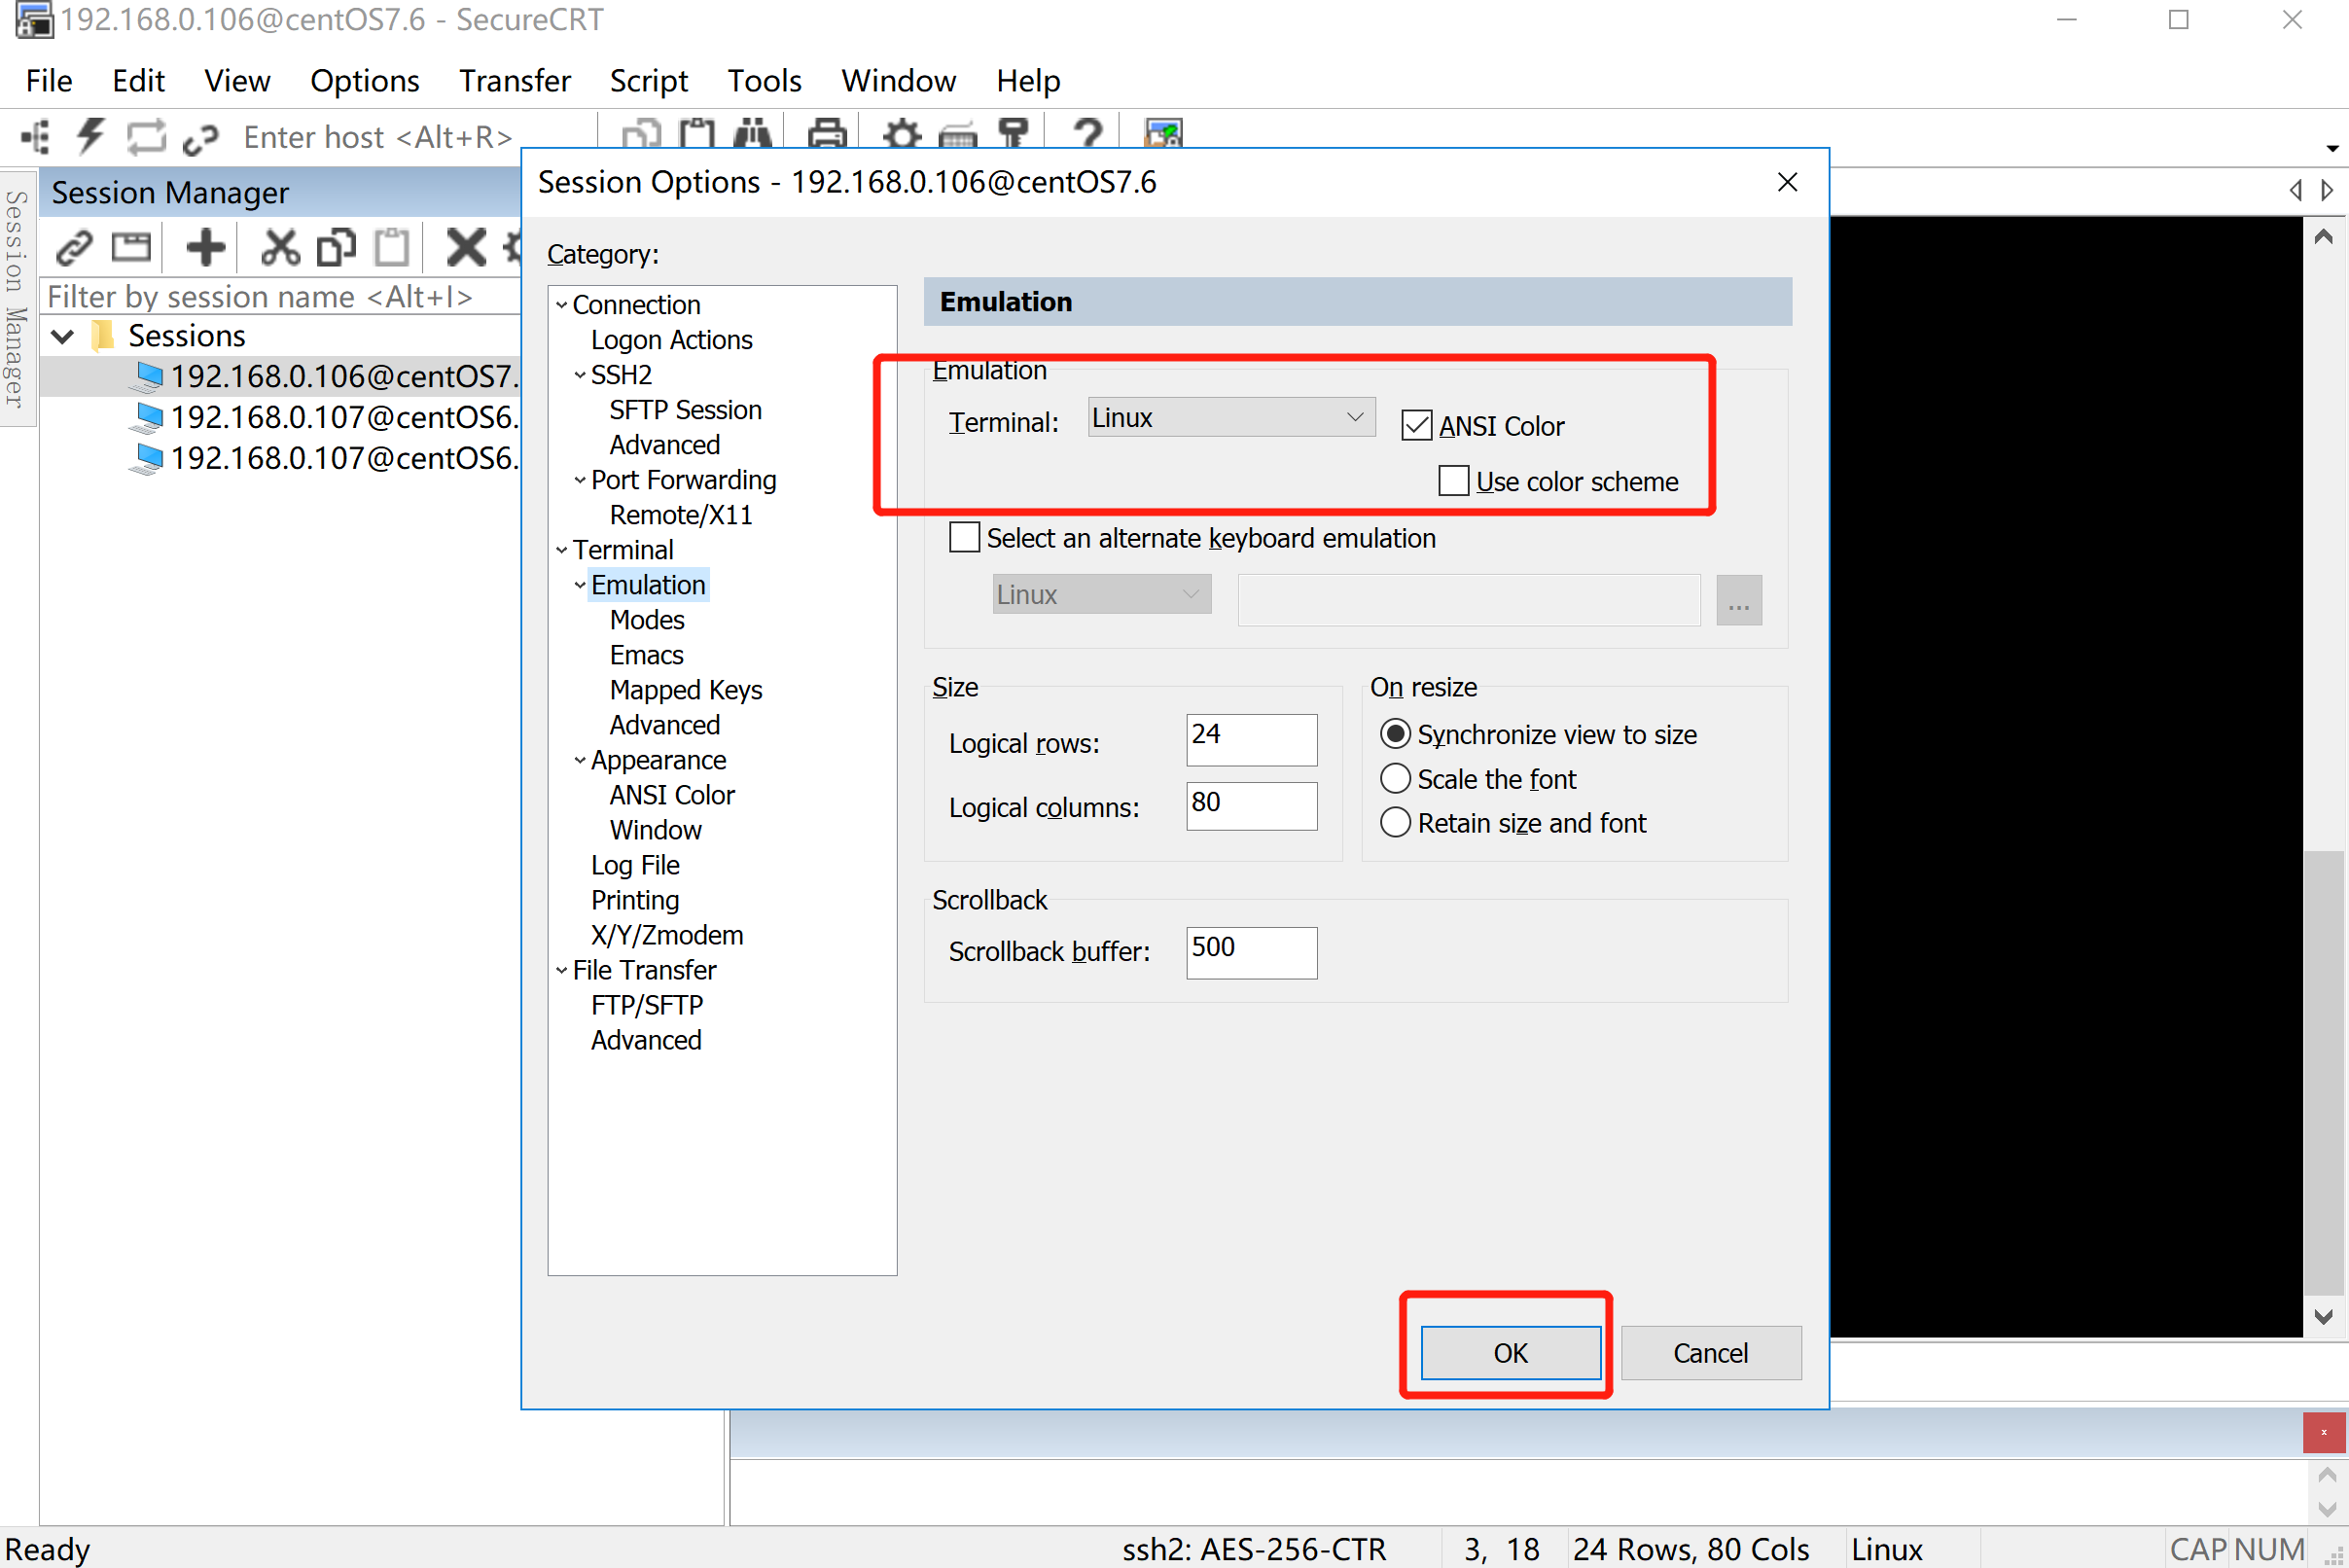
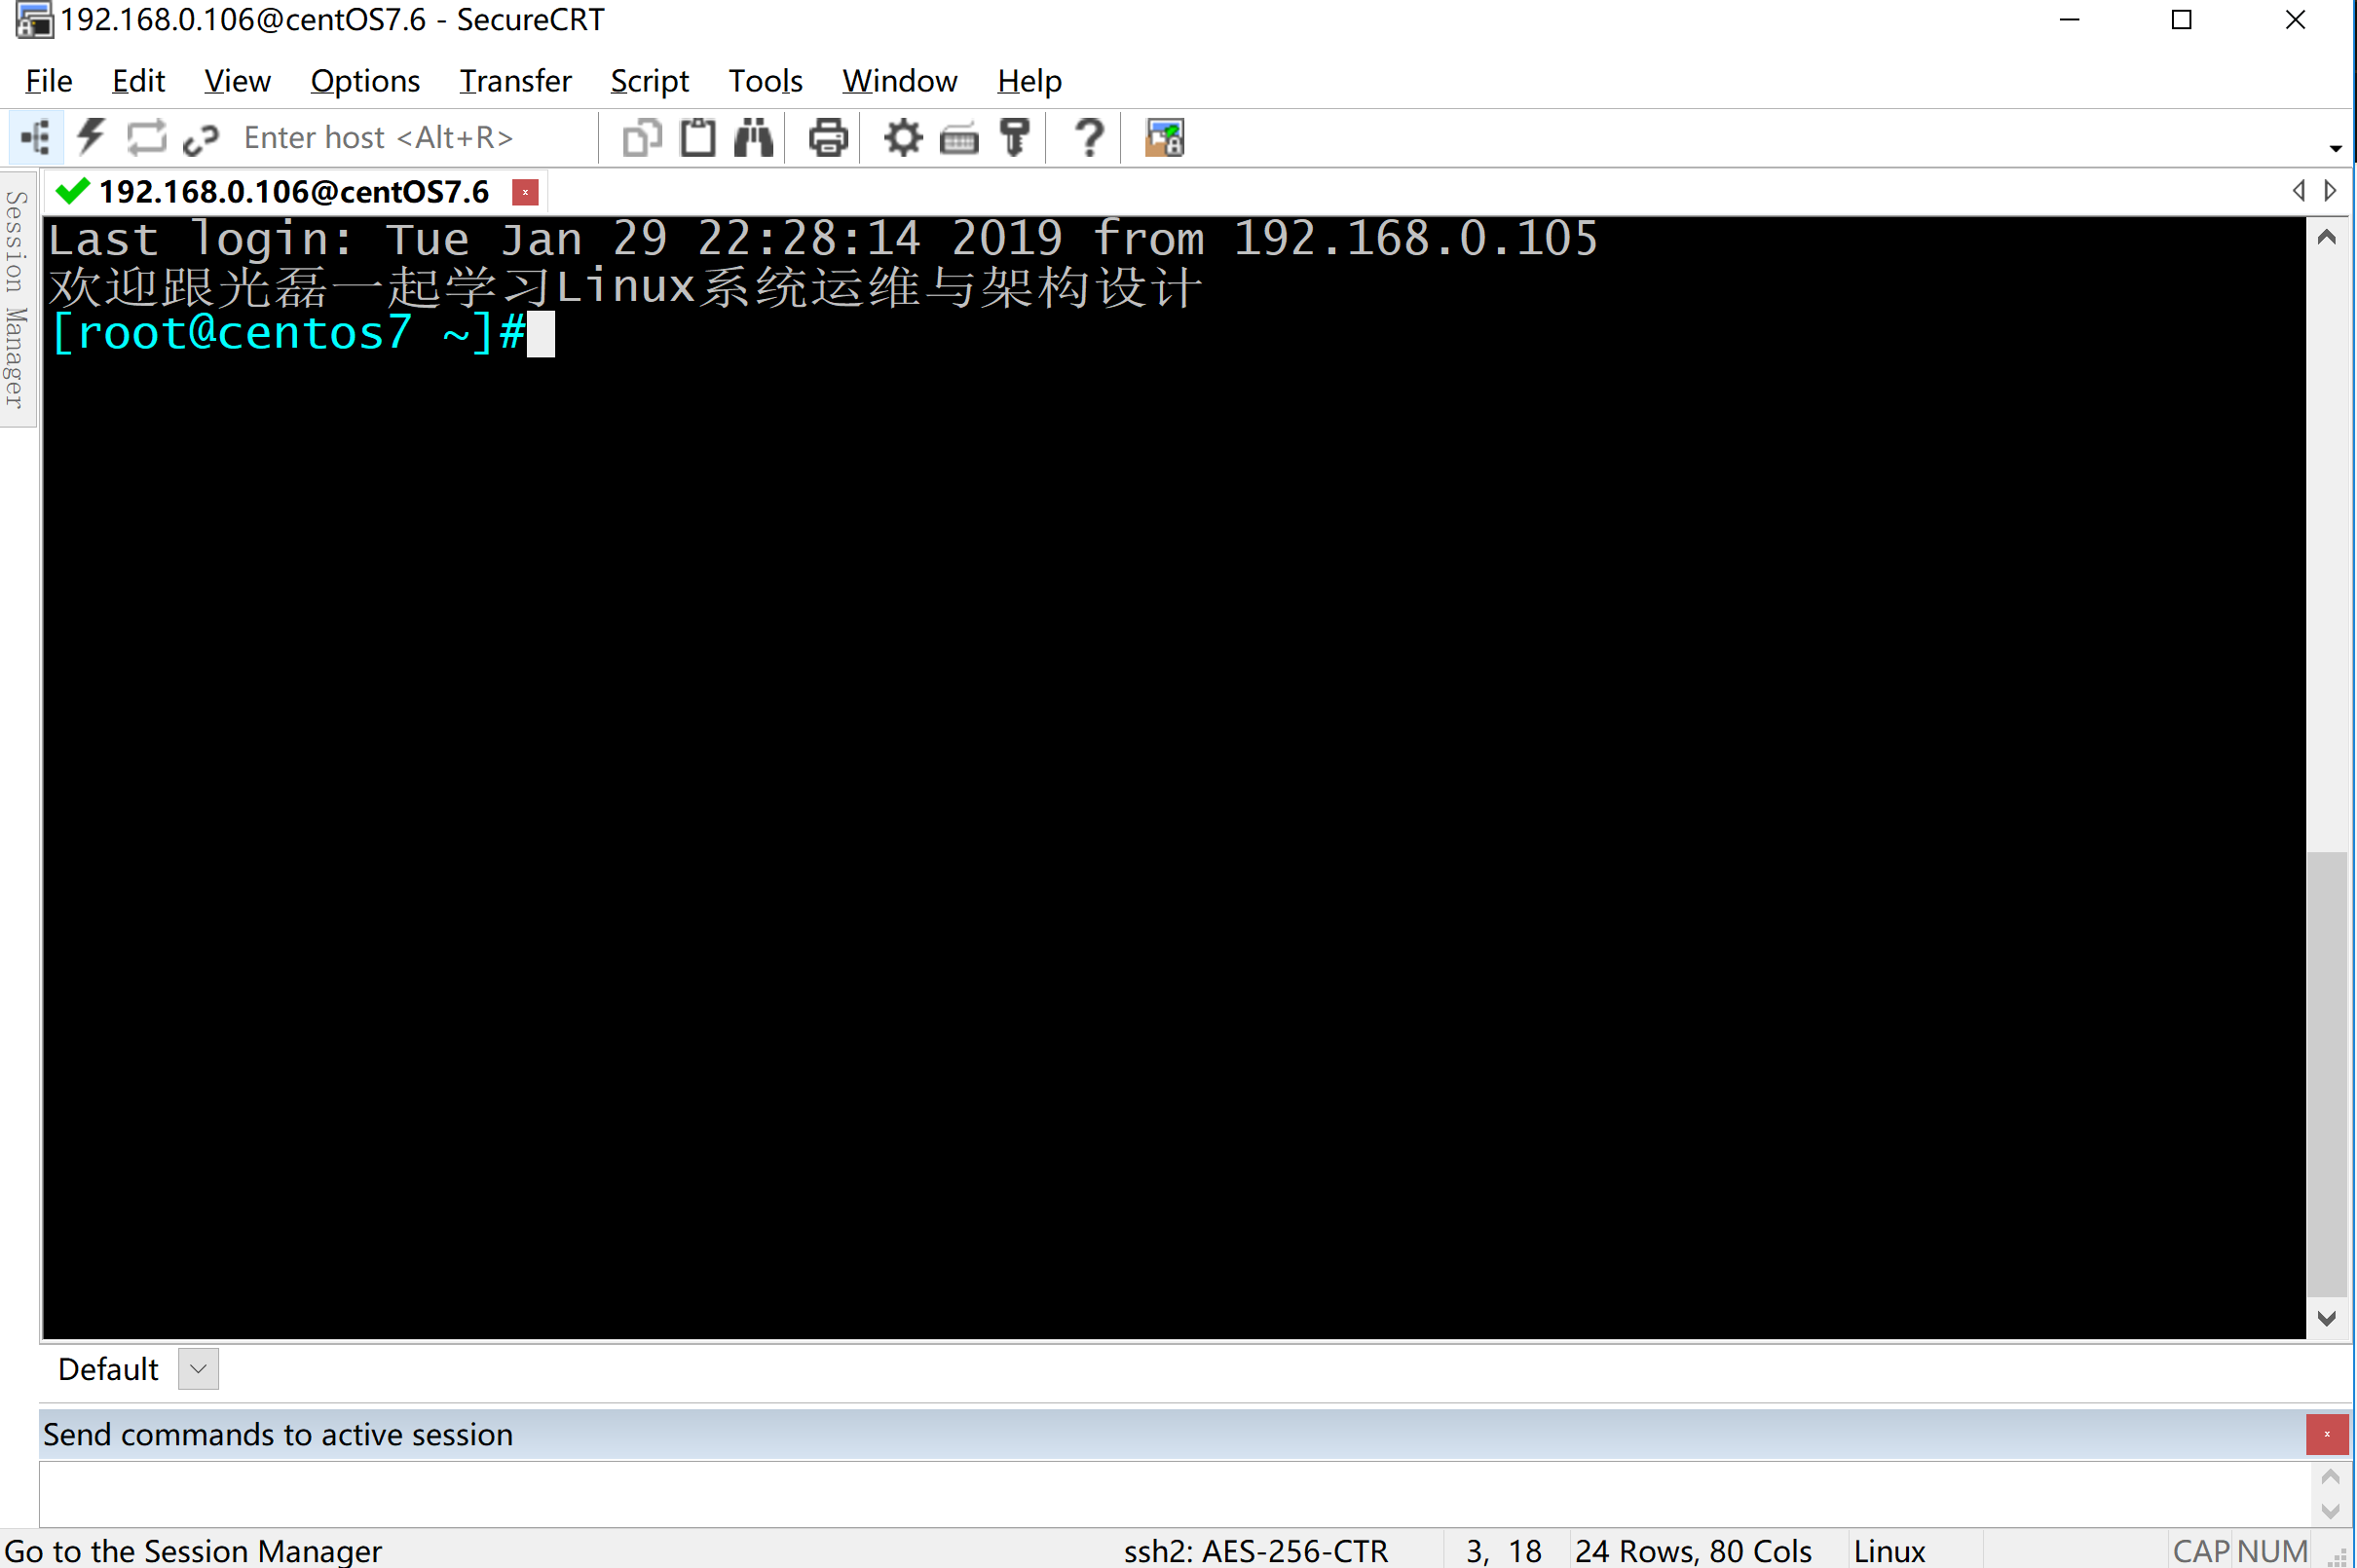
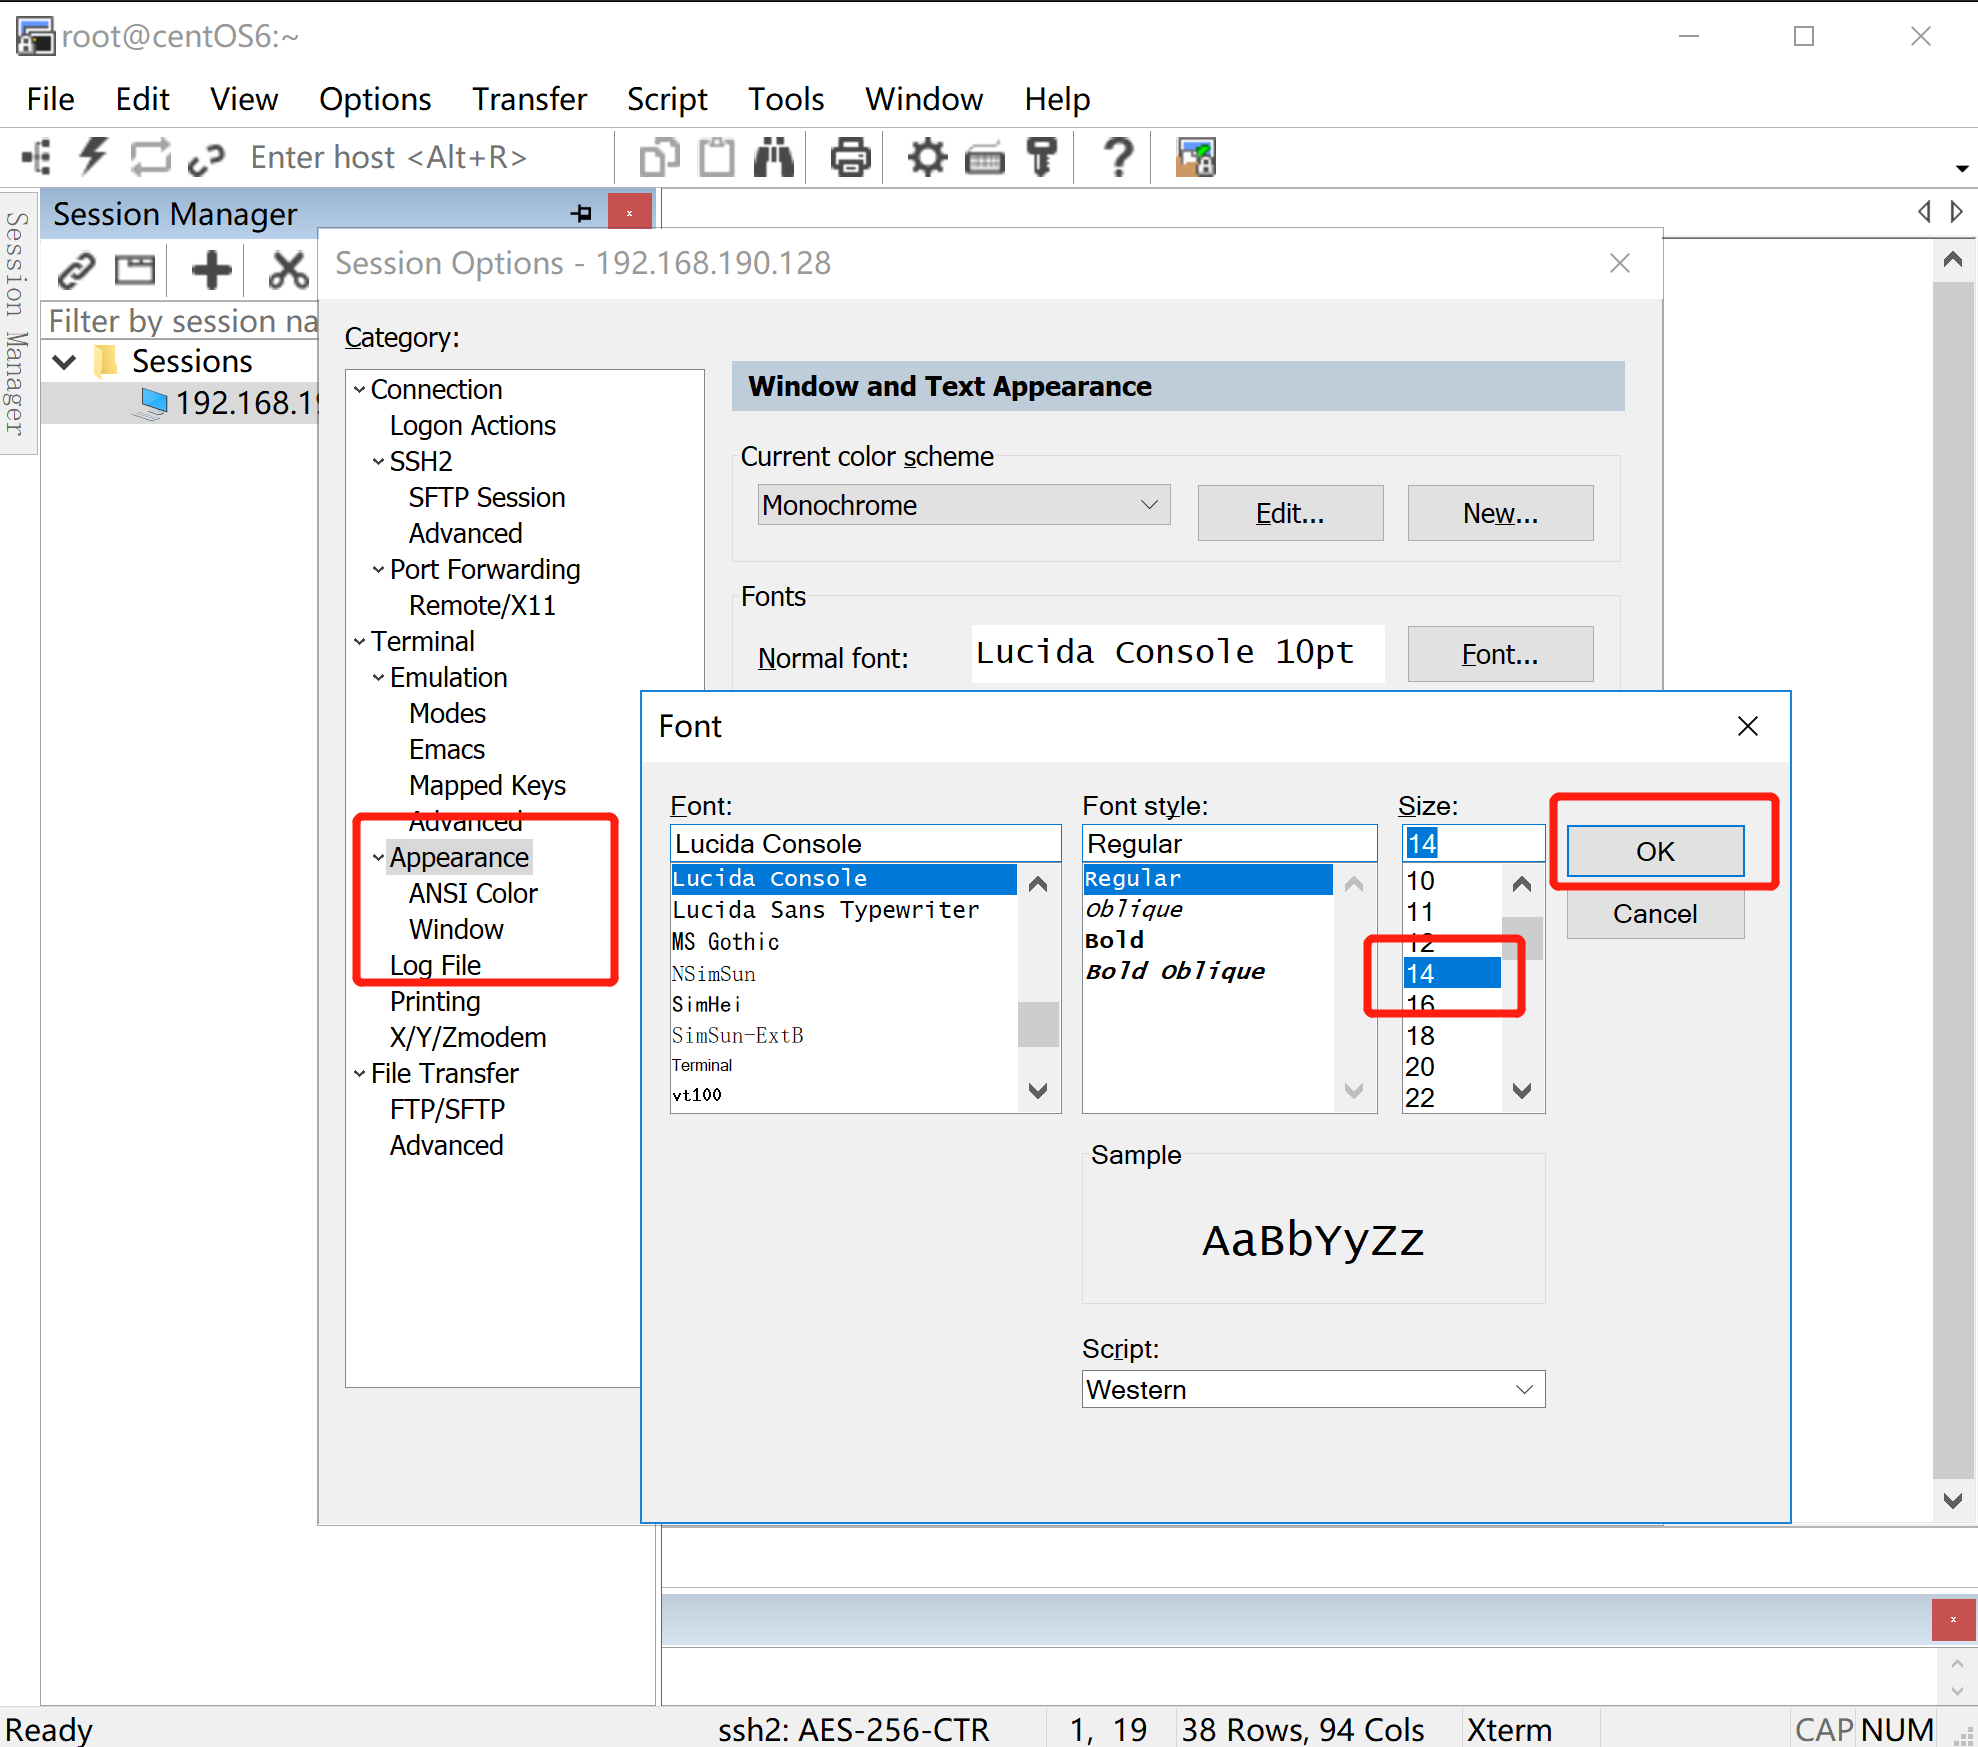
- 调整字体大小
默认的字体大小是10,这里改为14
3.4 人机交互方式
3.4.1 人机交互方式的发展史
随着计算机的发展,其人机交互方式也是在不断地演进,从最早出现的基于字符界面交互的Unix系统到后来的基于图形界面交互的Windows,macOS系统以及借助语音手势,声音触控的交互方式的Android和IOS。
而绝大部分Linux都是作为后台服务器的系统,绝大部分操作都是由字符界面的命令行完成。
3.4.2 初识 Linux Shell
当用户输入命令时,Shell程序会负责将用户输入的命令提交给内核,并接收内核的执行结果返回给用户,sHell还是一种高级程序设计语言,可以编写Shell脚本完成复杂的任务,如下图所示展示了Shell在系统中的结构图。

Linux下的可用Shell有许多实现,可以通过cat命令查看/etc/shells文件的输出结果得知
[root@centOS6 ~]# cat /etc/shells
/bin/sh
/bin/bash
/sbin/nologin
/bin/dash
/bin/tcsh
/bin/csh而系统启动之后,默认启动的shell是bash shell,可以使用echo $SHELL查看当前使用的shell程序是什么?如下命令输出结果显示默认的就是/bin目下的bash shell。
[root@centOS6 ~]# echo $SHELL
/bin/bash
那么如何切换不同的shell呢?从之前的cat /etc/shells文件中可以获取各种shell程序的路径,只要输入它们的路径便可以实现切换,如下命令所示
[root@centOS6 ~]# /bin/csh然后再使用echo $SHELL查看当前使用的shell程序
[root@centOS6 ~]# echo  $SHELL
/bin/bash
而且每种shell所支持的命令是不尽相同的,例如我们可以在bash shell中使用重定向 > liuguanglei.txt创建一个文件
[root@centOS6 ~]# > guanglei.txt然后使用ls -al |grep guanglei.txt查看之前创建的文件信息,如下命令执行输出结果显示
[root@centOS6 ~]# ls -al|grep guanglei.txt
-rw-r--r--.  1 root root     0 Jan 12 10:40 guanglei.txt
但是如果切换到csh shell之后会发现重定向>变成了无效的命令,如下命令执行输出结果显示
[root@centOS6 ~]# cat /etc/shells # 查看可用的shell列表
/bin/sh
/bin/bash
/sbin/nologin
/bin/dash
/bin/tcsh
/bin/csh
[root@centOS6 ~]# /bin/csh
[root@centOS6 ~]# > guanglei.txt
Invalid null command.
如果想要从csh shell切换到bash shell,可以使用exit命令实现,如下命令执行输出结果显示
[root@centOS6 ~]# exit
exit
如果想要查看命令的系统调用情况,可以使用strace查看,
[root@centos7 ~]# strace ls3.4.3 命令提示符
当登录系统之后,系统会提供一个命令提示符,用于展示一些系统的相关信息,例如使用普通用户guanglei登录CentOS6.10后会看到如下格式的命令提示符
[guanglei@centOS6 ~]$使用管理员用户root登录CentOS6.10后会看到如下的格式命令提示符
[root@centOS6 ~]#它们的不同之处在于普通用户使用$表示,管理员用户(root)使用#表示,而且命令提示符的固定格式为[用户名@主机名 路径],主机名也只显示部分,可以通过hostname查看完整的主机名
[guanglei@centOS6 ~]$ hostname
centOS6.ittimeline.net
路径只显示最后一个目录,通过pwd命令查看当前所处的目录对比得出结论,~表示home目录。
[root@centOS6 ~]# pwd #root用户的目录
/root

[guanglei@centOS6 ~]$ pwd #普通用户的目录
/home/guanglei
这里我们可以定制命令提示符的格式,工作中可以用来区分测试环境和生产环境,防止误操作。
命令提示符的格式定义保存在$PS1变量中,可以使用echo $PS1查看命令提示符的格式
[guanglei@centOS6 ~]$ echo $PS1
[u@h W]$
首先我们使用vim编辑器在/etc/profile.d目录下创建一个prompt.sh文件,
[root@centOS6 ~]# vim /etc/profile.d/prompt.sh
回车以后默认进入的是命令模式,此时我们需要输入i键进入插入模式,然后添加如下内容(建议直接复制该内容)
PS1="[e[1;32m][u@h W]\$[e[0m]"添加完成后按键esc后按shift和冒号(:),再按wq保存退出。
再重新开启一个会话后会看到如下格式的命令提示符

CentOS7.6系统可以使用同样的方式实现修改,首先使用vim编辑器创建一个prompt.sh文件
[root@centos7 ~]# vim /etc/profile.d/prompt.sh
然后在该文件中添加如下内容
PS1="[e[1;36m][u@h W]\$[e[0m]"
再关闭会话后,重新开启一个会话窗口后会看到如下图所示的效果

3.5 Linux命令
3.5.1 Linux命令的执行流程
运维人员使用CentOS时,通常都是使用命令来完成日常任务,例如之前使用过的vim,cat,pwd等等。
当Bash Shell随着系统启动后,负责监听用户从键盘输入的命令,而用户输入命令并回车以后,Bash Shell会判断它是内部命令还是外部命令,如果是内部命令,则直接从内存中缓存的内部命令列表查找后提交给内核执行,然后将返回结果返回给用户,如果是外部命令,首先从$PATH环境变量中查找命令所对应的二进制程序,如果没有找到则直接输出 command not found...,如果找到会将命令的二进制程序提交给内核执行,然后将执行的结果返回给用户,并会将外部命令缓存在内存中,下次执行时能够直接从内存中的缓存获取,提高执行效率。
3.5.2 Linux命令的分类
在Linux Shell中可以执行的命令分为两类,内部命令和外部命令,如果想要查看运行的命令是内部命令或者是外部命令,可以使用type命令查看,如下命令输出显示cd和pwd是内置命令,init是外部命令,如果是内部命令。输出 comand is a shell builtin,如果是外部命令输出命令对应的执行路径。
[root@centos7 ~]#type cd
cd is a shell builtin
[root@centos7 ~]#type pwd
pwd is a shell builtin

[root@centos7 ~]#type init
init is /usr/sbin/init
内部命令是Shell(默认是bash shell)自带的,内部命令在系统启动后随Shell加载到内存,因此相对于外部命令执行效率高,如果想要查看哪些可以使用的内部命令,可以使用enable命令实现,如下命令输出显示bash shell的内置命令。
[root@centos7 ~]#enable
enable .
enable :
enable [
enable alias
enable bg
enable bind
enable break
enable builtin
enable caller
enable cd
enable command
enable compgen
enable complete
enable compopt
enable continue
enable declare
enable dirs
enable disown
enable echo
enable enable
enable eval
enable exec
enable exit
enable export
enable false
enable fc
enable fg
enable getopts
enable hash
enable help
enable history
enable jobs
enable kill
enable let
enable local
enable logout
enable mapfile
enable popd
enable printf
enable pushd
enable pwd
enable read
enable readarray
enable readonly
enable return
enable set
enable shift
enable shopt
enable source
enable suspend
enable test
enable times
enable trap
enable true
enable type
enable typeset
enable ulimit
enable umask
enable unalias
enable unset
enable wait
如果想要禁用或者启用某个内部命令可以使用enable -n command命令实现。
当禁用之后再使用禁用的命令则会输出command not found,使用enable命令也查不到对应的命令,如果命令输出显示禁用了type命令
[root@centos7 ~]#enable -n type
[root@centos7 ~]#type
bash: type: command not found...
如果想要再次启用之前被禁用的内部命令,只需要使用enable command即可。
[root@centos7 ~]#enable type
[root@centos7 ~]#type mkdir #使用type查看mkdri的命令类型
mkdir is /usr/bin/mkdir而外部命令是存放在磁盘路径的可执行的二进制程序,Shell在首次执行外部命令时需要查找的目录是根据$PATH环境变量的路径顺序去查找,然后将外部命令的路径缓存在内存中,如下命令输出显示环境变量对应的路径,Linux下多个路径之间使用:分割。
[root@centos7 ~]#echo $PATH
/usr/local/sbin:/usr/local/bin:/usr/sbin:/usr/bin:/root/bin
如果在$PATH中查找不到命令对应的路径,则会输出 command not found...,如下命令输出显示
[root@centos7 ~]#xxx
bash: xxx: command not found...
如果想要查看内存中缓存的外部命令,可以使用hash查看,如下命令输出显示。
[root@centos7 ~]#hash
hits    command
   2    /usr/bin/who
   3    /usr/bin/clear
如果想要删除某个hash的缓存,可以使用hash -d command实现,如下命令输出显示。其中hits表示缓存命中的次数。
[root@centos7 ~]#hash -d who
[root@centos7 ~]#hash
hits    command
   3    /usr/bin/clear
当退出会话之后hash的缓存会被清空,如果想要手动清除缓存,可以使用hash -r实现,如下命令输出显示。
[root@centos7 ~]#hash -r
[root@centos7 ~]#hash
hash: hash table empty
如果想要查看执行外部命令的路径,可以使用which实现,如下命令输出显示。
[root@centos7 ~]#which pwd
/usr/bin/pwd
而whereis 命令不仅可以显示外部命令的路径,还可以显示命令对应的帮助文件,如下命令输出显示。
[root@centos7 ~]#whereis pwd
pwd: /usr/bin/pwd /usr/share/man/man1/pwd.1.gz /usr/share/man/man1p/pwd.1p.gz
3.5.3 Linux命令别名使用
在后续使用命令操作时,可以通过命令的别名机制来简化命令,例如在网络管理中经常要进入到/etc/sysconfig/network-scripts/目录下,如果未使用别名,通过如下命令实现
[root@centos7 ~]#cd /etc/sysconfig/network-scripts/
[root,就要使用alias 别名=命令 的格式实现
,如下命令所示
``` shell
alias cdns='cd /etc/sysconfig/network-scripts/
然后便可以使用cdns命令实现cd /etc/sysconfig/network-scripts/的功能了,如下命令输出显示
[root@centos7 network-scripts]#cdns
[root@centos7 network-scripts]#pwd
/etc/sysconfig/network-scripts
当我们使用which查看ls的路径时,根据命令的输出实际上也可以得知ls也创建了别名,即 ls='ls --color=auto',如下命令输出显示
[root@centos7 network-scripts]#which ls
alias ls='ls --color=auto'
        /usr/bin/ls
如果想要查看当前系统的内置别名列表,可以直接使用alias命令查看,如下命令输出显示
[root@centos7 network-scripts]#alias
alias cdns='cd /etc/sysconfig/network-scripts/'
alias cp='cp -i'
alias egrep='egrep --color=auto'
alias fgrep='fgrep --color=auto'
alias grep='grep --color=auto'
alias l.='ls -d .* --color=auto'
alias ll='ls -l --color=auto'
alias ls='ls --color=auto'
alias mv='mv -i'
alias rm='rm -i'
alias which='alias | /usr/bin/which --tty-only --read-alias --show-dot --show-tilde'
需要注意的是使用alias命令创建的别名只能在当前会话有效,如果退出会话(通常使用exit命令退出会话)后便无法使用。
[root@centos7 network-scripts]#exit退出之后可以使用SecureCRT提供的重连菜单,重新建立一个会话。
当再次输入alias命令查看别名时发现之前创建的别名cdns已经不存在
[root@centos7 ~]#alias
alias cp='cp -i'
alias egrep='egrep --color=auto'
alias fgrep='fgrep --color=auto'
alias grep='grep --color=auto'
alias l.='ls -d .* --color=auto'
alias ll='ls -l --color=auto'
alias ls='ls --color=auto'
alias mv='mv -i'
alias rm='rm -i'
alias which='alias | /usr/bin/which --tty-only --read-alias --show-dot --show-tilde'
那么系统内置的那些别名存储在哪里呢?
如果想要别名永远生效,需要将别名配置在文件中,如果是普通用户一般配置在/home/{user.name}/.bashrc文件中,我们可以使用ls -al |grep .bashrc查看,因为Linux系统中以.开头的文件都是隐藏文件,而ls 命令的-a选项可以查看隐藏文件,然后使用grep命令实现文件过滤,只看.bashrc的详细信息。
[guanglei@centos7 ~]$ls -al|grep .bashrc
-rw-r--r--.  1 guanglei guanglei  124 Mar 23  2017 .bashrc
然后使用vim .bashrc编辑文件,将之前的别名添加到.bashrc中

当编辑完成以后,输入alias命令会发现找不到添加的cdns别名
[guanglei@centos7 ~]$alias
alias l.='ls -d .* --color=auto'
alias ll='ls -l --color=auto'
alias ls='ls --color=auto'
alias vi='vim'
alias which='alias | /usr/bin/which --tty-only --read-alias --show-dot --show-tilde'
这时我们需要使用source .bashrc命令将修改的配置刷新到内存中
[guanglei@centos7 ~]$source .bashrc当再次使用alias命令查看,就会看到cdns别名已经加入到命令的别名列表中
[guanglei@centos7 ~]$alias
alias cdns='cd /etc/sysconfig/network-scripts/'
alias l.='ls -d .* --color=auto'
alias ll='ls -l --color=auto'
alias ls='ls --color=auto'
alias vi='vim'
alias which='alias | /usr/bin/which --tty-only --read-alias --show-dot --show-tilde'
然后便可以使用cdns别名直接切换到/etc/sysconfig/network-scripts目录中了,即使关闭会话或者重启系统也不会失效。
[guanglei@centos7 ~]$cdns
[guanglei@centos7 network-scripts]$pwd
/etc/sysconfig/network-scripts
而别名和内部命令以及外部命令的优先级顺序从高到低的优先级顺序是
别名>内部命令>外部命令。
后期在学习其他相关的命令时,可以根据自己的喜好添加别名到.bashrc文件中,以达到快速输入命令的,实现快捷操作。
需要指出的是之前修改的/home/guanglei/.bashrc文件只会针对普通用户guanglei生效,如果此时切换到root用户,再运行cdns别名,系统会提示command not found
[root@centos7 ~]#cdns
-bash: cdns: command not found
如果想要普通用户和管理员用户都可以使用cdns这个别名,可以使用root用户登录系统后,修改/etc目录下的bashrc文件
[root@centos7 ~]#vim /etc/bashrc在bashrc文件的最后一行添加alias cdns ='/etc/sysconfig/network-scripts',如下图所示

然后使用source命令将刚才添加的命令刷新到内存中
[root@centos7 ~]#source /etc/bashrc接下来就可以使用cdns实现快速切换到/etc/sysconfig/network-scripts目录下了
[root@centos7 ~]#cdns
[root@centos7 network-scripts]#pwd
/etc/sysconfig/network-scripts
如果别名和Linux命令相同,例如ls的别名就是ls,可以使用alias ls查看
[root@centos7 network-scripts]#alias ls
alias ls='ls --color=auto'
那么根据优先级,默认执行的是别名,那么我们想要执行ls的原始命令咋办呢?
首先我们可以根据which --skip-alias ls 命令查看ls命令所在的路径
[root@centos7 network-scripts]#which  --skip-alias ls
/bin/ls
根据which命令的输出结果得知ls命令位于/bin/ls路径下,即我们可以输入/bin/ls就可以执行ls的原始命令,如下所示
[root@centOS6 network-scripts]#/bin/ls
ifcfg-eth0   ifdown-ippp    ifdown-sit     ifup-ib     ifup-post      init.ipv6-global
ifcfg-lo     ifdown-ipv6    ifdown-tunnel  ifup-ippp   ifup-ppp       net.hotplug
ifdown       ifdown-isdn    ifup           ifup-ipv6   ifup-routes    network-functions
ifdown-bnep  ifdown-post    ifup-aliases   ifup-isdn   ifup-sit       network-functions-ipv6
ifdown-eth   ifdown-ppp     ifup-bnep      ifup-plip   ifup-tunnel
ifdown-ib    ifdown-routes  ifup-eth       ifup-plusb  ifup-wireless
但是这种方式对于内部命令来说是没法使用的,还有另外一种通用的方式,就是使用一对单引号('')将命令括起来,如下命令所示,即可使用ls的原始命令。
[root@centOS6 network-scripts]#'ls'
ifcfg-eth0   ifdown-ippp    ifdown-sit     ifup-ib     ifup-post      init.ipv6-global
ifcfg-lo     ifdown-ipv6    ifdown-tunnel  ifup-ippp   ifup-ppp       net.hotplug
ifdown       ifdown-isdn    ifup           ifup-ipv6   ifup-routes    network-functions
ifdown-bnep  ifdown-post    ifup-aliases   ifup-isdn   ifup-sit       network-functions-ipv6
ifdown-eth   ifdown-ppp     ifup-bnep      ifup-plip   ifup-tunnel
ifdown-ib    ifdown-routes  ifup-eth       ifup-plusb  ifup-wireless
如果想要取消别名可以使用unalias alias_name实现,取消之后别名就无法使用,当然该命令只在当前会话生效,因为重新开启会话后系统会读取之前在/etc/bashrc的配置文件中配置的别名。
[root@centOS6 network-scripts]#unalias cdns
[root@centOS6 network-scripts]#alias
alias cp='cp -i'
alias l.='ls -d .* --color=auto'
alias ll='ls -l --color=auto'
alias ls='ls --color=auto'
alias mv='mv -i'
alias rm='rm -i'
alias which='alias | /usr/bin/which --tty-only --read-alias --show-dot --show-tilde'
如果想要禁用所有的别名,可以使用unalias -a实现。
[root@centOS6 network-scripts]#unalias -a
[root@centOS6 network-scripts]#alias
3.5.4 Linux命令的组成
通常情况下一个完整的Linux命令是由command [options] [arguments]三部分组成的,选项和参数都是可选的
- 命令(Command):即执行的命令,例如之前使用过的ls,which,cd等等
- 选项:用于启动或者关闭命令的某些功能,选项可以分为短选项和长选项,短选项使用-开头,例如之前使用过的ls -al,其中-al就是命令的短选项,多个短选项可以同时使用。长选项使用 --表示,例如之前使用which --skip-alias ls 其中--skip-alias就是which命令的长选项,用于忽略别名。
- 参数:命令作用的对象,例如文件名,用户名等等,例如id -u guanglei命令的guanglei就是id作用的用户。
在使用命令时还需要注意以下注意事项
- 多个选项以及多个参数和命令之间使用空白符分隔
- 如果想要取消和结束命令,可以使用Ctrl+c或者Ctrl+d实现
- 多个命令可以使用管道符(|)隔开,完成复杂的功能
- 如果一条命令太长,一个命令可以使用分成多行(每行都要使用)
3.5.5 TAB键补全
3.5.5.1 TAB键路径补全
在运维工作场景中,经常会使用大量的命令以及操作文件系统的某些目录,这时可以使用TAB键来补全命令或者目录的路径。
TAB补全路径:如下所示输入cd /e然后按TAB键,会自动补全为cd /etc,然后再输入cd sys按TAB键,没有任何结果因为以sys开头的目录不止一个,TAB无法补全路径,
如果此时再按TAB,则会输出sys开头的目录列表。
[root@centos7 ~]#cd /etc
[root@centos7 etc]#cd sys
sysconfig/ sysctl.d/  systemd/
因此如果想要使用TAB补全目录,输入的目录字符串经过TAB不全之后必须是唯一一个文件夹名,否则再次TAB会给出列表。
3.5.5.2 命令补全
无论是系统命令还是外部命令,都可以使用TAB键补全,和路径补全一样,前提条件是输入的字符串只有唯一一条对应的命令,否则再次TAB会给出命令列表,如下命令输出显示
[root@centos7 etc]#w ##TAB TAB 效果如下所示
w                     wc                    which                 wnck-urgency-monitor  wvdialconf
wait                  wdctl                 while                 wodim                 wvgain
wall                  weak-modules          whiptail              wpa_cli               wvunpack
watch                 wftopfa               who                   wpa_passphrase
watchgnupg            wget                  whoami                wpa_supplicant/
wavpack               whatis                wipefs                write
wayland-scanner       whereis               withsctp              wvdial
3.5.5.3 TAB键的常见应用
- 使用系统根路径(/)+2次TAB键补全实现查看Linux系统根目录的下一级目录,包括隐藏目录
[root@centos7 etc]#/
bin/   data/  etc/   lib/   media/ opt/   root/  sbin/  sys/   usr/
boot/ dev/ home/ lib64/ mnt/ proc/ run/ srv/ tmp/ var/ - 使用$+2次TAB实现查看内置的变量(CentOS7.6不支持)
[root@centOS6 ~]#$
$_                          $CVS_RSH                    $LINES                      $QTLIB
$BASH                       $DIRSTACK                   $LOGNAME                    $RANDOM
$BASH_ALIASES               $EUID                       $LS_COLORS                  $SECONDS
$BASH_ARGC                  $G_BROKEN_FILENAMES         $MACHTYPE                   $SELINUX_LEVEL_REQUESTED
$BASH_ARGV                  $GROUPS                     $MAIL                       $SELINUX_ROLE_REQUESTED
$BASH_CMDS                  $HISTCMD                    $MAILCHECK                  $SELINUX_USE_CURRENT_RANGE
$BASH_COMMAND               $HISTCONTROL                $OPTERR                     $SHELL
$BASH_LINENO                $HISTFILE                   $OPTIND                     $SHELLOPTS
$BASHOPTS                   $HISTFILESIZE               $OSTYPE                     $SHLVL
$BASHPID                    $HISTSIZE                   $PATH                       $SSH_ASKPASS
$BASH_SOURCE                $HOME                       $PIPESTATUS                 $SSH_CLIENT
$BASH_SUBSHELL              $HOSTNAME                   $PPID                       $SSH_CONNECTION
$BASH_VERSINFO              $HOSTTYPE                   $PS1                        $SSH_TTY
$BASH_VERSION               $ID                         $PS2                        $TERM
$colors                     $IFS                        $PS4                        $UID
$COLORS                     $LANG                       $PWD                        $USER
$COLUMNS                    $LESSOPEN                   $QTDIR
$COMP_WORDBREAKS $LINENO $QTINC - 使用~和2次TAB实现查看系统的所有用户
[root@centOS6 ~]#~
~abrt/          ~daemon/        ~gopher         ~mail/          ~postfix/       ~rtkit/         ~tcpdump/
~adm            ~dbus/          ~guanglei/      ~nfsnobody/     ~pulse          ~saslauth       ~usbmuxd/
~apache/        ~ftp            ~haldaemon/     ~nobody/        ~root/          ~shutdown/      ~uucp
~avahi-autoipd  ~games/         ~halt/          ~ntp/           ~rpc            ~sshd/          ~vcsa/
~bin/ ~gdm/ ~lp/ ~operator/ ~rpcuser/ ~sync/ - 使用./和2次TAB实现查看当前目录下的子目录,包含隐藏目录
[root@centOS6 ~]#./
.abrt/     .config/   Desktop/   Downloads/ .gnome2/   .gnupg/    .local/    .nautilus/ Public/    .ssh/      Videos/
.cache/    .dbus/     Documents/ .gconf/    .gnote/    .gvfs/     Music/     Pictures/  .pulse/    Templates/
[root@centOS6 ~]#./
.abrt/     .config/   Desktop/   Downloads/ .gnome2/   .gnupg/    .local/    .nautilus/ Public/    .ssh/      Videos/
.cache/ .dbus/ Documents/ .gconf/ .gnote/ .gvfs/ Music/ Pictures/ .pulse/ Templates/ - 使用*/和2次TAB实现查看当前目录下的子目录,不包含隐藏目录
[root@centOS6 ~]#*/
Desktop/    Documents/  Downloads/  Music/      Pictures/   Public/     Templates/  Videos/
3.5.6 Linux命令历史
在Linux系统中,系统会保存你输入命令的历史记录,可以用它来重复执行命令,而在登录bash shell时,系统会读取命令历史文件.bash_history中记录下来的命令,登录进bash shell后新执行的命令只会缓存在内存中,这些命令在退出之后会追缴到历史命令文件中。
如果想要查看命令历史,可以使用history命令实现
[root@centOS6 ~]#history #历史命令输出结果只截取了部分
    1  reboot
    2  tar -xvf VMwareTools-10.3.2-9925305.tar.gz
    3  CLEAR
    4  CLS
    5  EXIT
    6  ./vmware-tools-distrib/vmware-install.pl
    7  gedit /etc/gdm/custom.conf
    8  reboot
    9  ifconfig
   10  tty
   11  tty
   12  whoami
   13  who am i
   14  pts
如果想要执行命令历史中的命令,只需要使用!加上命令历史的编号即可,如下命令所示
[root@centOS6 ~]#!9 #执行ifconfig命令
ifconfig
eth0      Link encap:Ethernet  HWaddr 00:0C:29:18:1B:DE
          inet addr:192.168.190.128  Bcast:192.168.190.255  Mask:255.255.255.0
          inet6 addr: fe80::20c:29ff:fe18:1bde/64 Scope:Link
          UP BROADCAST RUNNING MULTICAST  MTU:1500  Metric:1
          RX packets:3053 errors:0 dropped:0 overruns:0 frame:0
          TX packets:7588 errors:0 dropped:0 overruns:0 carrier:0
          collisions:0 txqueuelen:1000
          RX bytes:313791 (306.4 KiB)  TX bytes:795539 (776.8 KiB)

lo        Link encap:Local Loopback
          inet addr:127.0.0.1  Mask:255.0.0.0
          inet6 addr: ::1/128 Scope:Host
          UP LOOPBACK RUNNING  MTU:65536  Metric:1
          RX packets:640 errors:0 dropped:0 overruns:0 frame:0
          TX packets:640 errors:0 dropped:0 overruns:0 carrier:0
          collisions:0 txqueuelen:0
          RX bytes:32120 (31.3 KiB)  TX bytes:32120 (31.3 KiB)
当然如果想要倒着执行history中的命令,只需要使用!加上负号开头加上编号即可,如下命令所示
  225  history
  226  clear
  227  vim /etc/profile
  228  source /etc/profile
  229  clear
  230  history
  231  ifconfig
  232  clear
  233  history
  234  clear
  235  history
  236  vim .bash_history
  237  history
[root@centOS6 ~]#!-7
ifconfig
eth0      Link encap:Ethernet  HWaddr 00:0C:29:18:1B:DE
          inet addr:192.168.190.128  Bcast:192.168.190.255  Mask:255.255.255.0
          inet6 addr: fe80::20c:29ff:fe18:1bde/64 Scope:Link
          UP BROADCAST RUNNING MULTICAST  MTU:1500  Metric:1
          RX packets:5452 errors:0 dropped:0 overruns:0 frame:0
          TX packets:19401 errors:0 dropped:0 overruns:0 carrier:0
          collisions:0 txqueuelen:1000
          RX bytes:540056 (527.3 KiB)  TX bytes:1878467 (1.7 MiB)

lo        Link encap:Local Loopback
          inet addr:127.0.0.1  Mask:255.0.0.0
          inet6 addr: ::1/128 Scope:Host
          UP LOOPBACK RUNNING  MTU:65536  Metric:1
          RX packets:1808 errors:0 dropped:0 overruns:0 frame:0
          TX packets:1808 errors:0 dropped:0 overruns:0 carrier:0
          collisions:0 txqueuelen:0
          RX bytes:90524 (88.4 KiB)  TX bytes:90524 (88.4 KiB)
还可以通过键盘上的上下方向键快速切换之前输入过的命令。
如果想要调用前一个命令的最后一个参数,可以使用!$表示,如下命令输出显示
[root@centOS6 ~]#ll /etc/profile
-rw-r--r--. 1 root root 1841 Jan 12 22:21 /etc/profile
[root@centOS6 ~]#cat !$ #这里会实现查看profile文件的内容
如果想要搜索历史命令中的命令,可以使用Ctrl+r实现模糊搜索,如下图所示,当使用Ctrl+r搜索sys,系统会将sys关联的命令显示出来,然后回车即可执行。

如果想退出搜索,可以使用Ctrl+g。
系统默认只会缓存最近的1000条历史命令,而如果想要记录更多的历史命令,可以通过修改系统配置文件/etc/profile文件中HISTSIZE的值,如下图所示

如果想要清除history中存储在内存中的命令历史,可以使用history -c实现,如下命令输出所示
[root@centOS6 ~]#history -c #清除内存中存储的命令历史
[root@centOS6 ~]#history
    1  history
如果想要彻底的删除命令历史,正确的姿势应该是首先删除.bash_history文件,然后再使用history -c实现删除内存中的命令历史,如下命令所示
[root@centOS6 ~]#rm -rf .bash_history
[root@centOS6 ~]#history -c
如果想要实现将history默认存储在内存中的命令历史存储到.bash_history文件中,而不是等到退出会话后存储到.bash_history文件,可以使用history -a实现,如下命令所示
[root@centOS6 ~]#history -a
[root@centOS6 ~]#cat .bash_history
如果不想要系统记录历史命令,可以使用history -p command实现,如下命令输出显示
[root@centOS6 ~]#history -c
[root@centOS6 ~]#history
    1  history
[root@centOS6 ~]#history -p `ls`
anaconda-ks.cfg
Desktop
Documents
Downloads
guanglei.new
guanglei.txt
install.log
install.log.syslog
Music
Pictures
Public
Templates
Videos
[root@centOS6 ~]#history
    1  history
3.6 Linux基础命令
3.6.1 Linux硬件配置信息查看
在系统安装完成以后,可以通过命令查看硬件(CPU,内存,磁盘信息)相关配置。
3.6.1.1 查看CPU配置信息
命令名称:lscpu
命令功能:查看CPU配置信息
执行如下命令输出结果显示CentOS6.10系统的CPU配置信息
[root@centOS6 ~]#lscpu
Architecture:          x86_64
CPU op-mode(s):        32-bit, 64-bit
Byte Order:            Little Endian
CPU(s):                12
On-line CPU(s) list:   0-11
Thread(s) per core:    1
Core(s) per socket:    6
Socket(s):             2
NUMA node(s):          1
Vendor ID:             GenuineIntel
CPU family:            6
Model:                 158
Model name:            Intel(R) Core(TM) i9-8950HK CPU @ 2.90GHz
Stepping:              10
CPU MHz:               2904.004
BogoMIPS:              5808.00
Hypervisor vendor:     VMware
Virtualization type:   full
L1d cache:             32K
L1i cache:             32K
L2 cache:              256K
L3 cache:              12288K
NUMA node0 CPU(s):     0-11
执行如下命令输出结果显示CentOS7.6系统的CPU配置信息
[root@centos7 ~]#lscpu
Architecture:          x86_64
CPU op-mode(s):        32-bit, 64-bit
Byte Order:            Little Endian
CPU(s):                12
On-line CPU(s) list:   0-11
Thread(s) per core:    1
Core(s) per socket:    6
Socket(s):             2
NUMA node(s):          1
Vendor ID:             GenuineIntel
CPU family:            6
Model:                 158
Model name:            Intel(R) Core(TM) i9-8950HK CPU @ 2.90GHz
Stepping:              10
CPU MHz:               2904.000
BogoMIPS:              5808.00
Hypervisor vendor:     VMware
Virtualization type:   full
L1d cache:             32K
L1i cache:             32K
L2 cache:              256K
L3 cache:              12288K
NUMA node0 CPU(s):     0-11
Flags:                 fpu vme de pse tsc msr pae mce cx8 apic sep mtrr pge mca cmov pat pse36 clflush mmx fxsr sse sse2 ss ht syscall nx pdpe1gb rdtscp lm constant_tsc arch_perfmon nopl xtopology tsc_reliable nonstop_tsc eagerfpu pni pclmulqdq ssse3 fma cx16 pcid sse4_1 sse4_2 x2apic movbe popcnt tsc_deadline_timer aes xsave avx f16c rdrand hypervisor lahf_lm abm 3dnowprefetch ssbd ibrs ibpb stibp fsgsbase tsc_adjust bmi1 hle avx2 smep bmi2 invpcid rtm mpx rdseed adx smap clflushopt xsaveopt xsavec arat spec_ctrl intel_stibp flush_l1d arch_capabilities
3.6.1.2 内存配置查看
命令名称:free
命令功能:查看内存,默认单位是字节
常用选项:
- -m:内存存储单位使用MB查看
- -g:内存存储单位使用GB查看,注意该选项显示的内存误差较大
执行如下命令输出结果显示CentOS7.6系统的内存配置信息
[root@centos7 ~]#free -m
              total        used        free      shared  buff/cache   available
Mem:           7964         738        6294          42         930        6867
Swap:          4095           0        4095
更详细的内存信息可以使用cat /proc/meminfo查看,如下命令执行结果输出显示
[root@centos7 ~]#cat /proc/meminfo
MemTotal:        8155144 kB
MemFree:         6443356 kB
MemAvailable:    7030460 kB
Buffers:            2124 kB
Cached:           827496 kB
SwapCached:            0 kB
Active:           790976 kB
Inactive:         603604 kB
Active(anon):     566180 kB
Inactive(anon):    42576 kB
Active(file):     224796 kB
Inactive(file):   561028 kB
Unevictable:           0 kB
Mlocked:               0 kB
SwapTotal:       4194300 kB
SwapFree:        4194300 kB
Dirty:                 0 kB
Writeback:             0 kB
AnonPages:        565000 kB
Mapped:           166484 kB
Shmem:             43796 kB
Slab:             123504 kB
SReclaimable:      45424 kB
SUnreclaim:        78080 kB
KernelStack:       11504 kB
PageTables:        34984 kB
NFS_Unstable:          0 kB
Bounce:                0 kB
WritebackTmp:          0 kB
CommitLimit:     8271872 kB
Committed_AS:    4242784 kB
VmallocTotal:   34359738367 kB
VmallocUsed:      191876 kB
VmallocChunk:   34359310332 kB
HardwareCorrupted:     0 kB
AnonHugePages:    258048 kB
CmaTotal:              0 kB
CmaFree:               0 kB
HugePages_Total:       0
HugePages_Free:        0
HugePages_Rsvd:        0
HugePages_Surp:        0
Hugepagesize:       2048 kB
DirectMap4k:      190272 kB
DirectMap2M:     2955264 kB
DirectMap1G:     7340032 kB
3.6.1.3 磁盘配置信息查看
命令名称:lsblk
命令功能:列出系统上所有的磁盘
执行如下命令输出结果显示CentOS7.6系统的磁盘配置信息
当前只有一块硬盘(sda)以及一个镜像CentOS 7 x86_64
[root@centos7 ~]#lsblk
NAME   MAJ:MIN RM  SIZE RO TYPE MOUNTPOINT
sda      8:0    0  200G  0 disk
├─sda1   8:1    0  500M  0 part /boot
├─sda2   8:2    0   50G  0 part /
├─sda3   8:3    0   30G  0 part /data
├─sda4   8:4    0    1K  0 part
└─sda5   8:5    0    4G  0 part [SWAP]
sr0     11:0    1   10G  0 rom  /run/media/root/CentOS 7 x86_64
3.6.1.4 ip查看
CentOS中可以使用ifconfig或者ip add查看网络的ip信息,在CentOS7.6中,ens33表示默认的网卡名称,其ip地址是192.168.0.106。
[root@centos7 ~]#ifconfig
ens33: flags=4163<UP,BROADCAST,RUNNING,MULTICAST>  mtu 1500
        inet 192.168.0.106  netmask 255.255.255.0  broadcast 192.168.0.255
        inet6 fe80::483f:14a3:763e:2f4b  prefixlen 64  scopeid 0x20<link>
        ether 00:0c:29:cd:a5:0a  txqueuelen 1000  (Ethernet)
        RX packets 3813  bytes 1449499 (1.3 MiB)
        RX errors 0  dropped 0  overruns 0  frame 0
        TX packets 1587  bytes 219797 (214.6 KiB)
        TX errors 0  dropped 0 overruns 0  carrier 0  collisions 0

lo: flags=73<UP,LOOPBACK,RUNNING>  mtu 65536
        inet 127.0.0.1  netmask 255.0.0.0
        inet6 ::1  prefixlen 128  scopeid 0x10<host>
        loop  txqueuelen 1000  (Local Loopback)
        RX packets 216  bytes 22416 (21.8 KiB)
        RX errors 0  dropped 0  overruns 0  frame 0
        TX packets 216  bytes 22416 (21.8 KiB)
        TX errors 0  dropped 0 overruns 0  carrier 0  collisions 0

virbr0: flags=4099<UP,BROADCAST,MULTICAST>  mtu 1500
        inet 192.168.122.1  netmask 255.255.255.0  broadcast 192.168.122.255
        ether 52:54:00:28:7e:9d  txqueuelen 1000  (Ethernet)
        RX packets 0  bytes 0 (0.0 B)
        RX errors 0  dropped 0  overruns 0  frame 0
        TX packets 0  bytes 0 (0.0 B)
        TX errors 0  dropped 0 overruns 0  carrier 0  collisions 0
ip add查看ip
[root@centOS6 ~]#ip add
1: lo: <LOOPBACK,UP,LOWER_UP> mtu 65536 qdisc noqueue state UNKNOWN
    link/loopback 00:00:00:00:00:00 brd 00:00:00:00:00:00
    inet 127.0.0.1/8 scope host lo
    inet6 ::1/128 scope host
       valid_lft forever preferred_lft forever
2: eth0: <BROADCAST,MULTICAST,UP,LOWER_UP> mtu 1500 qdisc pfifo_fast state UP qlen 1000
    link/ether 00:0c:29:9f:c5:52 brd ff:ff:ff:ff:ff:ff
    inet 192.168.0.107/24 brd 192.168.0.255 scope global eth0
    inet6 fe80::20c:29ff:fe9f:c552/64 scope link
       valid_lft forever preferred_lft forever
3.6.2 查看系统版本
通常我们所说的Linux都是指的Linux内核,目前CentOS7.6使用的Linux 3.10版本的内核,而CentOS6.10使用的是Linux2.6的内核。
CenOS6.10内核版本查看
[root@centOS6 ~]#uname -r
2.6.32-754.el6.x86_64
CentOS7.6内核版本查看
[root@centos7 ~]#uname -r
3.10.0-957.el7.x86_64
而如果想要查看Linux的发行版CentOS,可以使用cat命令查看/etc/redhat-release文件即可。
CentOS7版本信息查看
[root@centos7 ~]#cat /etc/redhat-release
CentOS Linux release 7.6.1810 (Core)
CentOS6.10版本信息查看
[root@centOS6 ~]#cat /etc/redhat-release
CentOS release 6.10 (Final)
在CentOS6.10中还可以使用lsb_release -a查看系统版本信息
[root@centOS6 ~]#lsb_release -a
LSB Version:    :base-4.0-amd64:base-4.0-noarch:core-4.0-amd64:core-4.0-noarch:graphics-4.0-amd64:graphics-4.0-noarch:printing-4.0-amd64:printing-4.0-noarch
Distributor ID: CentOS
Description:    CentOS release 6.10 (Final)
Release:        6.10
Codename:       Final
3.6.3 Linux系统日期和时间
3.6.3.1 Linux系统时钟和硬件时钟
在Linux中有硬件时钟与系统时钟等两种时钟。硬件时钟是指主机板上的时钟设备,也就是通常可在BIOS画面设定的时钟。系统时钟则是指kernel中的时钟。当Linux启动时,系统时钟会去读取硬件时钟的设定,之后系统时钟即独立运作。所有Linux相关指令与函数都是读取系统时钟的设定,而且硬件时钟和系统时钟可能不一样。
3.6.3.2 系统时间和硬件时间显示与同步
我们可以使用date命令查看当前系统时间,如下命令输出显示。
[root@centOS6 ~]#date --date=now
Sun Jan 13 16:11:18 CST 2019

[root@centOS6 ~]#date
Sun Jan 13 16:11:46 CST 2019
还可以通过clock命令查看当前硬件时钟,如下命令输出显示
[root@centOS6 ~]#clock
Sat 12 Jan 2019 01:50:07 PM CST  -0.688997 seconds
在有些情况下硬件时钟和系统时钟可能不一致,例如这里使用date命令来修改系统时间,修改的日期格式为月日小时分年.秒,如下命令所示
[root@centOS6 ~]#date 123112302019.45
Tue Dec 31 12:30:45 CST 2019

[root@centOS6 ~]#date #修改之后再次使用date命令查看当前系统日期
Tue Dec 31 12:30:45 CST 2019

[root@centOS6 ~]#clock #查看硬件时钟
Sat 12 Jan 2019 01:57:21 PM CST  -1.298448 seconds
修改之后此时系统时钟和硬件时钟就会不一致,那么如何让系统时间和硬件保持一致呢?可以使用clock -s实现将系统时间同步硬件时间,然后再使用date查看系统时间,发现系统时间和硬件时间已经保持一致了。
[root@centOS6 ~]#clock -s
[root@centOS6 ~]#date
Sat Jan 12 14:01:47 CST 2019
[root@centOS6 ~]#clock
Sat 12 Jan 2019 02:01:51 PM CST  -1.187966 seconds
如果想要硬件时间同步系统时间,可以使用clock -w实现,如下所示
[root@centOS6 ~]#clock -w3.6.3.3 date命令
date命令主要用来显示或者修改系统日期时间,而通常只有超级用户能够修改时间,普通用户只能够查看系统时间,date的命令语法如下所示
date [选项] 显示时间的格式(以加号开头,后面接对应的时间格式)
date命令的选项及其说明如下所示
- -s --set:设置系统时间
- -d --date 显示描述的日期
常用时间格式如下表格所示
| 格式 | 表示含义 |
|---|---|
| %Z | 显示时区 |
| %Y | 显示完整年份 |
| %m | 显示月份,表示格式从0~12 |
| %d | 显示一个月的第几天 |
| %H | 显示小时,表示范围00~23 |
| %M | 显示分钟,表示格式从00~59 |
| %S | 显示秒钟,显示格式为00~59 |
| %A | 显示星期几,例如Sunday表示星期日 |
| %F | 等同于%Y-%m-%d |
| %T | 等同于%H:%M:%S |
| %s | 计算自1970-01-01 00:00:00到当前时间的秒数 |
关于date命令的完整日期格式说明,可以使用date --help查看对应的帮助文档获取,如下命令所示
[root@centOS6 ~]#date --help在没有网络连接的工作环境中,学习查帮助是获取知识的最佳方式。
date常用案例1:显示当前日期,使用年-月-日表示,例如2019-01-15,如下命令输出显示
[root@centos7 ~]#date +%F
2019-01-15
date常用案案例2:显示当前日期时间,使用年月日 时分秒表示,例如2019-01-15 14:05:26
[root@centOS6 ~]#date +'%F %T'
2019-01-15 14:05:26
date常用案例3:计算自1970-01-01 00:00:00到当前时间的秒数
[root@centos7 ~]#date +%s
1547534021
date案例4:计算指定的秒数对应的日期时间
[root@centOS6 ~]#date -d @1547534021
Sat Jan 12 14:04:24 CST 2019
date常用案例5:显示昨天的时间日期
[root@centos7 ~]#date -d "-1 day" +"%F %T"
2019-01-14 14:41:13
date常用案例6:显示两天前是星期几
[root@centos7 ~]#date -d "-2 day" +%A
Sunday
3.6.3.4 系统时区
CentOS7.6系统中提供了timedatectl用来查看时区,如下命令输出结果所示
Local time显示当前的时间日期,Universal time显示的是格林威治时间,Time zone显示当前的时区是亚洲/上海。而UTC时间和本地时间相比刚好相差八个小时。
[root@centos7 ~]#timedatectl
      Local time: Sat 2019-01-12 14:20:23 CST
  Universal time: Sat 2019-01-12 06:20:23 UTC
        RTC time: Sat 2019-01-12 14:20:22
       Time zone: Asia/Shanghai (CST, +0800)
     NTP enabled: no
NTP synchronized: no
 RTC in local TZ: no
      DST active: n/a
如果想要获取当前系统可用的时区,可以使用timedatectl list-timezones命令列出
系统失去列表
[root@centos7 ~]#timedatectl list-timezones如果想要修改系统的时区,可以使用timedatectl set-timezone实现,如下命令所示,将当前的系统时区改为欧洲/柏林,然后使用timedatectl可以查看修改后的结果
[root@centos7 ~]#timedatectl set-timezone Europe/Berlin
[root@centos7 ~]#timedatectl
      Local time: Sat 2019-01-12 07:32:03 CET
  Universal time: Sat 2019-01-12 06:32:03 UTC
        RTC time: Sat 2019-01-12 14:32:02
       Time zone: Europe/Berlin (CET, +0100)
     NTP enabled: no
NTP synchronized: no
 RTC in local TZ: no
      DST active: no
 Last DST change: DST ended at
                  Sun 2018-10-28 02:59:59 CEST
                  Sun 2018-10-28 02:00:00 CET
 Next DST change: DST begins (the clock jumps one hour forward) at
                  Sun 2019-03-31 01:59:59 CET
                  Sun 2019-03-31 03:00:00 CEST
时区修改完成以后,当再次使用date命令查看当前系统日期时,会发现系统日期也会随着改变。而且命令输出的结果显示柏林时间比北京时间晚七个小时
[root@centos7 ~]#date
Sat Jan 12 07:34:54 CET 2019
因为本人目前所处的位置正是亚洲/上海,所以再次将系统的时区修改为亚洲/上海
[root@centos7 ~]#timedatectl set-timezone Asia/Shanghai
[root@centos7 ~]#timedatectl
      Local time: Sat 2019-01-12 14:37:30 CST
  Universal time: Sat 2019-01-12 06:37:30 UTC
        RTC time: Sat 2019-01-12 14:37:29
       Time zone: Asia/Shanghai (CST, +0800)
     NTP enabled: no
NTP synchronized: no
 RTC in local TZ: no
      DST active: n/a
[root@centos7 ~]#
3.6.3.5 日历
如果想要查看日历,可以使用cal命令实现,该命令默认只显示当月的命令,如下输出结果显示
[guanglei@centOS6 network-scripts]$cal
    January 2019
Su Mo Tu We Th Fr Sa
       1  2  3  4  5
 6  7  8  9 10 11 12
13 14 15 16 17 18 19
20 21 22 23 24 25 26
27 28 29 30 31
如果想要显示一整年的日历,可以加上- y选项实现如下命令输出结果。
[guanglei@centOS6 network-scripts]$cal -y
                               2019

       January               February                 March
Su Mo Tu We Th Fr Sa   Su Mo Tu We Th Fr Sa   Su Mo Tu We Th Fr Sa
       1  2  3  4  5                   1  2                   1  2
 6  7  8  9 10 11 12    3  4  5  6  7  8  9    3  4  5  6  7  8  9
13 14 15 16 17 18 19   10 11 12 13 14 15 16   10 11 12 13 14 15 16
20 21 22 23 24 25 26   17 18 19 20 21 22 23   17 18 19 20 21 22 23
27 28 29 30 31         24 25 26 27 28         24 25 26 27 28 29 30
                                              31
        April                   May                   June
Su Mo Tu We Th Fr Sa   Su Mo Tu We Th Fr Sa   Su Mo Tu We Th Fr Sa
    1  2  3  4  5  6             1  2  3  4                      1
 7  8  9 10 11 12 13    5  6  7  8  9 10 11    2  3  4  5  6  7  8
14 15 16 17 18 19 20   12 13 14 15 16 17 18    9 10 11 12 13 14 15
21 22 23 24 25 26 27   19 20 21 22 23 24 25   16 17 18 19 20 21 22
28 29 30               26 27 28 29 30 31      23 24 25 26 27 28 29
                                              30
        July                  August                September
Su Mo Tu We Th Fr Sa   Su Mo Tu We Th Fr Sa   Su Mo Tu We Th Fr Sa
    1  2  3  4  5  6                1  2  3    1  2  3  4  5  6  7
 7  8  9 10 11 12 13    4  5  6  7  8  9 10    8  9 10 11 12 13 14
14 15 16 17 18 19 20   11 12 13 14 15 16 17   15 16 17 18 19 20 21
21 22 23 24 25 26 27   18 19 20 21 22 23 24   22 23 24 25 26 27 28
28 29 30 31            25 26 27 28 29 30 31   29 30

       October               November               December
Su Mo Tu We Th Fr Sa   Su Mo Tu We Th Fr Sa   Su Mo Tu We Th Fr Sa
       1  2  3  4  5                   1  2    1  2  3  4  5  6  7
 6  7  8  9 10 11 12    3  4  5  6  7  8  9    8  9 10 11 12 13 14
13 14 15 16 17 18 19   10 11 12 13 14 15 16   15 16 17 18 19 20 21
20 21 22 23 24 25 26   17 18 19 20 21 22 23   22 23 24 25 26 27 28
27 28 29 30 31         24 25 26 27 28 29 30   29 30 31
3.6.4 Linux系统的关机和重启
3.6.4.1 Linux系统的关机
服务器一般都是要保证7*24小时服务高可用,如果关机,会导致服务不可用,
通常只有在测试环境会使用关机来关闭系统,关机一般用于,迁移,停服,硬件升级。
如果想要关机,可以使用halt或者poweroff命令来实现,如下命令是使用poweroff命令实现关机的输出效果,使用poweroff关机时它会发送一个关闭电源的信号。
[guanglei@centOS6 ~]$poweroff

Broadcast message from guanglei@centOS6.ittimeline.net
        (/dev/pts/1) at 14:42 ...

The system is going down for power off NOW!
VMware WorkStation中也可以查看到CentOS6.10是处于关机状态,如下图所示

当关机之后,SecureCRT需要重新连接CentOS6.10才能正常访问。
如果想要正常开启系统,需要点击开启虚拟机菜单。

而halt命令也可以实现关机,但是和poweroff执行的结果是不一样的,halt只是关闭系统,而不会切断电源,可以从VMware WorkStation中看出

当尝试关闭虚拟机时,VMWare WorkStation会提示系统仍然处于开启状态

如果想要再次启动CentOS7.6,可以选择如下图所示的菜单

Linux下关于关机的操作还提供了一个showdown的命令,它提供了一些常用的选项,可以实现一些特定的功能,如下表格所示
| 选项名称 | 选项功能 |
|---|---|
| -r | 重启系统 |
| -h | 关机 |
| -c | 取消正在执行的shutdown指令 |
应用案例1:在指定的时间下关机,例如我想要在十分钟之后关机,可以使用如下命令实现
[root@centOS6 ~]#shutdown -h +10应用案例2:如果想要取消关机可以使用Ctrl+c中断程序或者使用shutdown -c实现取消关机
[root@centOS6 ~]#shutdown -c应用案例3:如果想要使用重启系统,可以使用shutdown -r now 实现,如下命令执行结果所示
[root@centOS6 ~]#shutdown -r now

Broadcast message from root@centOS6.ittimeline.net
        (/dev/pts/0) at 10:59 ...

The system is going down for reboot NOW!
3.6.4.2 Linux系统的重启
当我们在使用Linux系统的过程中,可能会遇到某些问题无法解决,这时候重启系统变成了一个解决办法,当然服务器系统不能随便重启,因为重启会导致服务器上的服务不可用,影响用户体验,所以重启最好在半夜或者访问用户量少的时候进行。
Linux系统的重启可以使用reboot命令实现,如下所示
[root@centOS6 ~]#reboot

Broadcast message from root@centOS6.ittimeline.net
        (/dev/pts/2) at 15:05 ...

The system is going down for reboot NOW!
重启之后当前会话也会自动关闭,当重启完成以后,可以使用SecureCRT提供的重连功能快速连接,然后进行后续操作

3.6.5 桌面共享
3.6.5.1 screen的安装
在工作或者学习的过程中,可能会遇到一些自己无法解决的问题,而迫切需要寻求别别人的帮助,而有些问题无法用语言描述清楚,这时候就需要使用到桌面共享的功能了,通过远程连接,让大神看到你的屏幕来解决问题。
Windows下可以通过Teamviewer或者QQ可以实现远程桌面共享
Linux下通过screen命令来实现桌面共享,当在系统中执行screen命令时发现Shell告诉我们该命令找不到,因此我们需要安装screen。
[guanglei@centos7 ~]$screen
bash: screen: command not found...
那么CentOS下如何安装软件呢?
首先我们在VMware WorkStation中找到CentOS7.6的虚拟机设置,确保CD/DVD的设置项中配置了使用ISO镜像文件,如下图所示

并且光盘已经是连接状态

然后在SecureCRT终端中使用df命令查看该ISO文件挂在的路径
[root@centos7 ~]#df
Filesystem     1K-blocks     Used Available Use% Mounted on
/dev/sda2       52403200  3671724  48731476   8% /
devtmpfs         3979308        0   3979308   0% /dev
tmpfs            3995144        0   3995144   0% /dev/shm
tmpfs            3995144    12888   3982256   1% /run
tmpfs            3995144        0   3995144   0% /sys/fs/cgroup
/dev/sda3       31441920    32992  31408928   1% /data
/dev/sda1        1038336   178052    860284  18% /boot
tmpfs             799032       20    799012   1% /run/user/0
/dev/sr0        10491772 10491772         0 100% /run/media/root/CentOS 7 x86_64
tmpfs             799032        0    799032   0% /run/user/1000
根据命令输出结果显示ISO镜像文件的挂载目录是/run/media/root/CentOS 7 x86_64/,然后使用rpm -ivh命令便可安装screen
[root@centos7 ~]#rpm -ivh /run/media/root/CentOS 7 x86_64/Packages/screen-4.1.0-0.25.20120314git3c2946.el7.x86_64.rpm
warning: /run/media/root/CentOS 7 x86_64/Packages/screen-4.1.0-0.25.20120314git3c2946.el7.x86_64.rpm: Header V3 RSA/SHA256 Signature, key ID f4a80eb5: NOKEY
Preparing...                          ################################# [100%]
Updating / installing...
1:screen-4.1.0-0.25.20120314git3c29################################# [100%]CentOS6.10和CentOS7.6一样,首先要保证虚拟机的设置中的CD/DVD的设置项中配置了使用ISO镜像文件,并且是已经连接的状态,然后使用如下命令便可安装。
[root@centOS6 ~]#rpm -ivh /media/CentOS_6.10_Final/Packages/screen-4.0.3-19.el6.x86_64.rpm
warning: /media/CentOS_6.10_Final/Packages/screen-4.0.3-19.el6.x86_64.rpm: Header V3 RSA/SHA1 Signature, key ID c105b9de: NOKEY
Preparing...                ########################################### [100%]
   1:screen                 ########################################### [100%]
3.6.5.2 screen的使用
首先必须保持有同一用户(例如root)的两个SecureCRT客户端已经连接上了同一台CentOS,这里以CentOS6.10为例。

然后在左边(小白)的窗口中输入screen -S helpme回车后开启一个会话
[root@centOS6 ~]#screen -S helpme然后再右边的窗口(大神)输入screen -x helpme加入一个会话,其中helpme是会话名称。
[root@centOS6 ~]#screen -x helpme然后左右两边的操作就可以同步了,这时就实现了桌面共享,如下图所示

如果大神想要退出桌面共享,只需要Ctrl+a,d就可以实现。
而小白想要退出桌面共享,也可以使用Ctrl+a,d可以实现,如果想要再次加如会话,只需要使用screen -r便可重新加入会话,如下命令所示
[root@centOS6 ~]#screen -r helpme3.6.6 使用echo显示字符串
3.6.6.1 echo命令概述
echo默认是显示字符串并完成换行,之前使用过echo查看环境变量,如下命令所示
[root@centos7 ~]#echo $PATH
/usr/local/sbin:/usr/local/bin:/usr/sbin:/usr/bin:/root/bin
也使用过echo查看命令提示符的格式
[root@centos7 ~]#echo $PS1
[e[1;36m][u@h W]$[e[0m]
然后可以使用-e选项控制输出内容的格式,如下命令所示输出字符串并在换行的基础之上再换行一次
[root@centos7 ~]#echo -e "hello
"
hello
如果想要取消echo的默认换行,可以使用-e选项,然后在输出的内容后面加c,如下命令输出显示
[root@centos7 ~]#echo -e "helloc"
hello[root@centos7 ~]#
如果想要输出的内容实现tab的效果,可以使用-e选项,然后在输出的内容中间加上 ,如下命令所示
[root@centos7 ~]#echo -e "hello	world"
hello   world
如果想要实现声音提示(前提是系统的声音已经打开),可以使用-e选项后加上'a'实现,如下命令所示
[root@centos7 ~]#echo -e "a" 如果想要在输出的内容中插入,需要使用,如下命令所示
[root@centos7 ~]#echo -e 'hello\world'
helloworld
3.6.6.2 文本是如何存储的
计算机中的数据(文本、图片,音频、视频)都是以二进制的格式存储数据的,那么如何来验证这一点呢?
首先使用touch命令创建一个文件hello,和Windows不同的是Linux的文件不需要后缀名来判断格式。
[root@centos7 ~]#touch hello然后使用echo 结合重定向将a字符输入到hello.txt中。
[root@centos7 ~]#echo "a" > hello再使用cat命令查看hello的内容
[root@centos7 ~]#cat hello
a
然后使用hexdump -C命令查看hello文件中的a存储对应的十六进制的值
[root@centos7 ~]#hexdump -C hello
00000000  61 0a                                             |a.|
00000002
输出结果刚好是十六进制的61,换算成十进制就是97,字符和数字的对应关系由ASC||码规定。
而97转换为8进制为141,可以使用echo -e输出8进制141对应的字符,命令如下所示
[root@centos7 ~]#echo -e '�141'
a3.6.6.3 echo的特殊符号
在使用echo命令输出文本内容是,可以借助``(反向单引号,数字1左边的那个键) 实现命令扩展:把一个命令的输出当成另外一个命令参数,如下命令所示
[root@centos7 ~]#echo my host name is `hostname`
my host name is centos7.ittimeline.net

[root@centos7 ~]#echo my name is `whoami`
my name is root
``的应用场景1:如下命令输出显示,使用当前日期创建日志文件
[root@centos7 ~]#touch `date +%F`.log
[root@centos7 ~]#ll
total 12
-rw-r--r--. 1 root root    0 Jan 13 04:08 2019-01-13.log
``的应用场景2:如下命令实现将ls命令对应的文件复制到/data目录下
[root@centos7 ~]#which --skip-alias ls #查看ls命令的路径
/usr/bin/ls
[root@centos7 ~]#cp `which --skip-alis ls` /data
[root@centos7 ~]#ls -la /data #查看复制的文件
total 116
drwxr-xr-x.  2 root root     16 Jan 13 04:14 .
dr-xr-xr-x. 18 root root    236 Jan 10 10:08 ..
-rwxr-xr-x.  1 root root 117680 Jan 13 04:14 ls
echo默认会将命令后面的内容以字符串("包含起来的内容")的形式输出,如果输出的内容中包含了变量(例如这里的$PATH),会顺便将变量的值输出,如下命令输出结果所示。
[root@centos7 ~]#echo env path is $PATH
env path is /usr/local/sbin:/usr/local/bin:/usr/sbin:/usr/bin:/root/bin
即使输出的内容加上双引号(""),也不会影响输出的结果,如下命令输出结果所示。
[root@centos7 ~]#echo "env path is $PATH"
env path is /usr/local/sbin:/usr/local/bin:/usr/sbin:/usr/bin:/root/bin
如果不想echo在执行时输出变量的值,可以使用单引号(''),如下命令所示
[root@centos7 ~]#echo 'env path is $PATH'
env path is $PATH
echo还可以结合{}实现打印重复字符串的简化形式,如下命令所示
[root@centos7 ~]#echo {1..10} #输出1-10
1 2 3 4 5 6 7 8 9 10
[root@centos7 ~]#echo {a..z} #输出a-z的26个小写字母
a b c d e f g h i j k l m n o p q r s t u v w x y z
[root@centos7 ~]#echo {A..Z} #输出A-Z的26个大写字母
A B C D E F G H I J K L M N O P Q R S T U V W X Y Z
[root@centos7 ~]#echo file{1..10}.log #输出10个文件名
file1.log file2.log file3.log file4.log file5.log file6.log file7.log file8.log file9.log file10.log
3.7 获取帮助
3.7.1 获取帮助的几种方式
在日常学习和生产环境使用Linux的过程中,可能需要使用到的命令以及相关的服务有几百个之多,我们不可能记得住所有的命令以及选项的对应的功能,这时我们就需要通过查看帮助来了解他们的使用,如下列表所示,列出了可能用到的查看帮助的方法,平时也不用刻意去记,使用熟练之后自然就记住了。
- whatis查看命令的功能说明
- 内部命令使用help command查看
- 外部命令使用command --help或者command -h查看
- 外部命令也可以使用帮助手册(也就是man命令)
- 官方站点,例如MySQL,Nginx等等
- 搜索引擎:百度,谷歌
3.7.2 whatis
whatis命令是用来查看命令简要的功能说明,其应用场景就是首次使用一个陌生的命令时,可以使用它来了解命令的功能,如下命令输入显示
[root@centOS6 ~]#whatis ls #查看ls命令的说明
ls                   (1)  - list directory contents
ls                   (1p)  - list directory contents

[root@centOS6 ~]#whatis rm
rm                   (1p)  - remove directory entries
rm                   (1)  - remove files or directories
需要注意的是whatis命令可能在刚刚装完系统之后不能立即使用,whatis是从数据库中获取命令的功能说明,我们可以手动使用相关的命令来创建whatis的数据库,CentOS6.10可以使用makewhatis命令创建,
[root@centOS6 ~]#makewhatis而CentOS7.6可以使用mandb命令创建。
[root@centos7 etc]#mandb3.7.3 内部命令帮助查看
如果是想要查看内部命令,可以直接使用help command即可查看,如下命令输出所示。
[root@centOS6 ~]#help cd
cd: cd [-L|-P] [dir]
    Change the shell working directory.

    Change the current directory to DIR.  The default DIR is the value of the
    HOME shell variable.

    The variable CDPATH defines the search path for the directory containing
    DIR.  Alternative directory names in CDPATH are separated by a colon (:).
    A null directory name is the same as the current directory.  If DIR begins
    with a slash (/), then CDPATH is not used.

    If the directory is not found, and the shell option `cdable_vars' is set,
    the word is assumed to be  a variable name.  If that variable has a value,
    its value is used for DIR.

    Options:
        -L      force symbolic links to be followed
        -P      use the physical directory structure without following symbolic
        links

    The default is to follow symbolic links, as if `-L' were specified.

    Exit Status:
    Returns 0 if the directory is changed; non-zero otherwise.
3.7.4 外部命令查看帮助
外部命令可以使用--help或者-h选项查看帮助,例如之前使用过的date --help就是典型的例子。
如下命令显示,使用date --help查看date命令的帮助信息
[root@centOS6 ~]#date --help需要注意的是不是每个外部命令都支持--help或者-h选项,如下命令输出显示date不支持-h选项
[root@centOS6 ~]#date -h
date: invalid option -- 'h'
Try `date --help' for more information.
3.7.5 man命令的使用
3.7.5.1 man命令概述
在日常运维场景中,通常都是使用man命令(对应的是manual手册)查看外部命令的帮助手册,其使用格式为man 参数选项 命令/文件
在安装软件时,系统会将软件的帮助手册存放在/usr/share/man路径下,如下命令输出显示可以查看帮助手册列表
[root@centos7 man]#ls -al /usr/share/man
total 616
drwxr-xr-x.  48 root root   4096 Jan 10 10:06 .
drwxr-xr-x. 235 root root   8192 Jan 13 01:16 ..
drwxr-xr-x.   3 root root     18 Jan 10 10:05 ca
drwxr-xr-x.   7 root root     66 Jan 10 10:05 cs
drwxr-xr-x.   5 root root     42 Jan 10 10:03 da
drwxr-xr-x.   6 root root     54 Jan 10 10:03 de
drwxr-xr-x.   7 root root     66 Jan 10 10:06 en
drwxr-xr-x.   5 root root     42 Jan 10 10:05 es
drwxr-xr-x.   6 root root     54 Jan 10 10:03 fr
drwxr-xr-x.   5 root root     42 Jan 10 10:03 hu
drwxr-xr-x.   5 root root     42 Jan 10 10:05 id
drwxr-xr-x.   6 root root     54 Jan 10 10:03 it
drwxr-xr-x.   5 root root     42 Jan 10 10:03 ja
drwxr-xr-x.   3 root root     18 Jan 10 10:03 ko
drwxr-xr-x.   2 root root   4096 Jan 10 10:06 man0p
drwxr-xr-x.   2 root root  53248 Jan 13 01:16 man1
drwxr-xr-x.   2 root root   8192 Jan 10 10:06 man1p
drwxr-xr-x.   2 root root      6 Apr 11  2018 man1x
drwxr-xr-x.   2 root root  16384 Jan 10 10:06 man2
drwxr-xr-x.   2 root root      6 Apr 11  2018 man2x
drwxr-xr-x.   2 root root 237568 Jan 10 10:06 man3
drwxr-xr-x.   2 root root  40960 Jan 10 10:06 man3p
drwxr-xr-x.   2 root root      6 Apr 11  2018 man3x
drwxr-xr-x.   2 root root   4096 Jan 10 10:06 man4
drwxr-xr-x.   2 root root      6 Apr 11  2018 man4x
drwxr-xr-x.   2 root root  20480 Jan 10 10:06 man5
drwxr-xr-x.   2 root root      6 Apr 11  2018 man5x
drwxr-xr-x.   2 root root     24 Jan 10 10:06 man6
drwxr-xr-x.   2 root root      6 Apr 11  2018 man6x
drwxr-xr-x.   2 root root   8192 Jan 10 10:06 man7
drwxr-xr-x.   2 root root      6 Apr 11  2018 man7x
drwxr-xr-x.   2 root root  40960 Jan 10 10:06 man8
drwxr-xr-x.   2 root root      6 Apr 11  2018 man8x
drwxr-xr-x.   2 root root      6 Apr 11  2018 man9
drwxr-xr-x.   2 root root      6 Apr 11  2018 man9x
drwxr-xr-x.   2 root root      6 Apr 11  2018 mann
drwxr-xr-x.   5 root root     42 Jan 10 10:05 nl
drwxr-xr-x.  17 root root    173 Jan 10 10:06 overrides
drwxr-xr-x.   6 root root     54 Jan 10 10:05 pl
drwxr-xr-x.   3 root root     18 Jan 10 10:05 pt
drwxr-xr-x.   5 root root     42 Jan 10 10:03 pt_BR
drwxr-xr-x.   6 root root     54 Jan 10 10:03 ru
drwxr-xr-x.   3 root root     18 Jan 10 10:03 sk
drwxr-xr-x.   6 root root     54 Jan 10 10:03 sv
drwxr-xr-x.   5 root root     42 Jan 10 10:03 tr
drwxr-xr-x.   3 root root     18 Jan 10 10:05 uk
drwxr-xr-x.   6 root root     54 Jan 10 10:03 zh_CN
drwxr-xr-x.   4 root root     30 Jan 10 10:03 zh_TW
这里可以使用whereis命令查看命令对应的帮助文件的路径,以ls为例,如下命令输出显示,即ls命令的帮助文件对应的是/usr/share/man/man1/ls.1.gz,以.gz为后缀的通常是压缩文件,但是我们在查看命令帮助时不需要去解压该文件
[root@centos7 man]#whereis ls
ls: /usr/bin/ls /usr/share/man/man1/ls.1.gz /usr/share/man/man1p/ls.1p.gz
只需要使用man 1 ls即可,如下命令所示,其中1表示查看第一章节(即用户命令)
的帮助手册。
[root@centos7 man]#man 1 ls几乎每个命令都有man的"页面",以便使用man命令查看帮助手册,而且不同的命令,函数的帮助手册是按照不同的章节存放的,如下列表所示
| 章节名称 | 章节功能 |
|---|---|
| 章节1 | 用户命令 |
| 章节2 | 系统调用 |
| 章节3 | C库调用 |
| 章节4 | 设备文件以及特殊文件 |
| 章节5 | 配置文件格式 |
| 章节6 | 游戏 |
| 章节7 | 杂项 |
| 章节8 | 管理类命令 |
| 章节9 | Linux内核API |
通常运维人员只需要关注章节1,章节4,章节5和章节8即可,而开发人员需要关注章节2,章节3和章节9。
在使用man命令查看帮助时,需要加上对应的章节,用于区分查看帮助的类型,因为同一个命令可能对应的既是用户命令,又是配置文件格式,例如passwd
我们可以使用whatis passwd命令查看对应的章节,如下命令输出显示
[root@centos7 man]#whatis passwd
passwd (1)           - update user's authentication tokens
sslpasswd (1ssl)     - compute password hashes
passwd (5)           - password file
passwd(1) 表示用户命令,用于更新用户的密码
passwd(5)表示配置文件格式,用于存储密码。
因此如果我们如果要查看passwd命令的帮助,需要使用如下命令
[root@centos7 man]#man 1 passwd我们如果要查看passwd配配置文件帮助,需要使用如下命令
[root@centos7 man]#man 5 passwd
3.7.5.2 man帮助段落说明
当我们在使用man command查看对应命令的帮助时,帮助内容中的标题格式对应的含义如下表格所示
| man帮助中的标题 | 功能说明 |
|---|---|
| NAME | 命令说明及介绍 |
| SYNOPSIS | 命令的基本用法 []表示可选,<>表示必选内容,a |
| DESCRIPTION | 命令使用详细描述,以及相关参数选项说明 |
| OPTIONS | 命令相关参数选项说明(有的命令帮助没有此选项) |
| EXAMPLES | 示例 |
| FILES | 相关文件 |
| AUTHOR | 作者 |
| COPYRIGHT | 版本信息 |
| REPORTING BUGS | bug信息 |
| SEE ALSO | 和命令相关的说明 |
3.10.5.3 man帮助页面快捷功能使用
执行man command查看命令的帮助信息时,实际上就是相当于浏览一个文件,可以利用如下列表所示的快捷键查阅相关功能。
| 功能键 | 功能说明 |
|---|---|
| PgDn | 向下翻页(可以使用空格代替) |
| PgUp | 向上翻页 |
| Home | 调到第一页 |
| End | 调到最后一页 |
| /keyword | 向下依次查找关键字 |
| ?keyword | 向上依次查找关键字 |
| n/N | n: 向下查找下一个关键字 N:向上查找上一个关键字 |
| q | 退出man帮助 |
如果想要了解更多man命令使用的信息,可以使用man man来查看,如下命令所示
[root@centos7 man]#man man使用man查看bash帮助
[root@centos7 man]#man bash3.8 bash shell的快捷方式
在使用bash shell访问linux时,它提供了一些快捷键,用于实现特定的功能,在工作和学习的过程中可以使用这些快捷键提高效率,如下列表所示展示了最常用的快捷键。
| 快捷键 | 功能 |
|---|---|
| Ctrl+l | 清屏 |
| Ctrl+o | 执行当前命令,并且重新显示当前命令 |
| Ctrl+s | 阻止屏幕输出,锁定 |
| Ctrl+q | 解除屏幕锁定 |
| Ctrl+c | 终止命令,强行退出 |
| Ctrl+z | 挂起命令 |
| Ctrl+a | 光标移到命令行首 |
| Ctrl+e | 光标移动到命令行尾 |
| Ctrl+u | 从光标处删除至命令行首 |
| Ctrl+k | 从光标删除至命令行尾 |
| Alt+r | 删除当前整行 |
1.使用ctrl+l清除屏幕,如下图所示

2.使用ctrl+o执行当前命令并且显示当前命令,效果如下命令输出所示
[root@centos7 man]#hostname
centos7.ittimeline.net
[root@centos7 man]#hostname
3.使用ctrl+s阻止屏幕输出,保持锁定
当屏幕锁定之后,再次输入其他内容没有显示

4.使用ctrl+q解锁屏幕
解锁屏幕之后就可以看到之前锁定时输入的内容

5.使用Alt+r删除整行内容时需要在SecureCRT中设置如下快捷键


