四种布局:
一.LinearLayout:线性布局
二.RelativeLayout:相对布局
1.根据父容器定位:
android:layout_alignParentLeft 左对齐
android:layout_alignParentRight 右对齐
android:layout_alignParentTop 上对齐
android:layout_alignParentBottom 下对齐
android:layout_centerHorizontal 水平居中
android:layout_centerVertical 垂直居中
android:layout_centerInParent 父控件中间位置
2.根据兄弟组件定位
android:laytou_toLeftOf 参考组件左边
android:laytou_toRightOf 参考组件左边
android:laytou_above 参考组件上边
android:laytou_below 参考组件下边
android:layout_alignTop 对齐参考组件上边界
android:layout_alignBottom 对齐参考组件下边界
android:layout_alignLeft 对齐参考组件左边界
android:layout_alignRight 对齐参考组件右边界
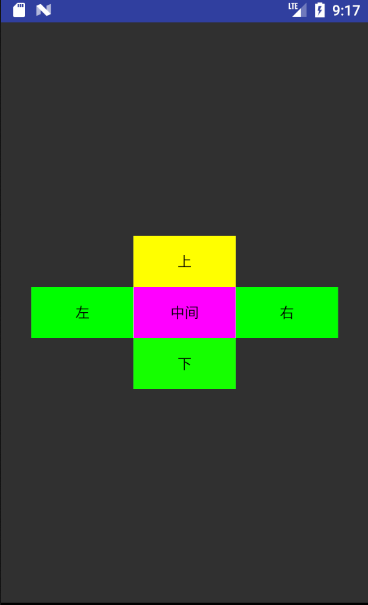
经典梅花布局

xml代码:
<RelativeLayout xmlns:android="http://schemas.android.com/apk/res/android"
xmlns:tools="http://schemas.android.com/tools"
android:id="@+id/activity_main"
android:layout_width="match_parent"
android:layout_height="match_parent"
tools:context="com.example.guo.relativelayout.MainActivity">
<TextView
android:layout_width="100dp"
android:layout_height="50dp"
android:layout_centerInParent="true"
android:gravity="center"
android:text="中间"
android:id="@+id/tv1"
android:background="#ff00ff"
android:textColor="#000000"/>
<TextView
android:text="左"
android:layout_width="100dp"
android:layout_height="50dp"
android:layout_toLeftOf="@id/tv1"
android:layout_centerVertical="true"
android:id="@+id/tv2"
android:gravity="center"
android:background="#00ff00"
android:textColor="#000000"/>
<TextView
android:text="右"
android:layout_width="100dp"
android:layout_height="50dp"
android:layout_toRightOf="@id/tv1"
android:layout_centerVertical="true"
android:id="@+id/tv3"
android:gravity="center"
android:background="#00ff00"
android:textColor="#000000"/>
<TextView
android:text="上"
android:layout_width="100dp"
android:layout_height="50dp"
android:layout_above="@id/tv1"
android:layout_centerHorizontal="true"
android:id="@+id/tv4"
android:gravity="center"
android:background="#ffff00"
android:textColor="#000000"/>
<TextView
android:text="下"
android:layout_width="100dp"
android:layout_height="50dp"
android:layout_below="@id/tv1"
android:layout_centerHorizontal="true"
android:id="@+id/tv5"
android:gravity="center"
android:background="#15ff00"
android:textColor="#000000"/>
</RelativeLayout>
三.FrameLayout(帧布局):
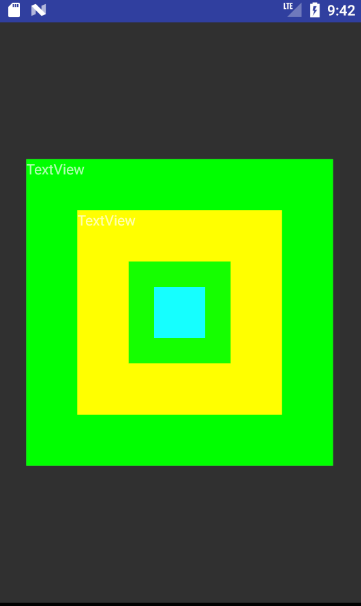
后放置的组件将会在前面放置组件的上层
经典布局放射图

xml代码:
<FrameLayout
xmlns:android="http://schemas.android.com/apk/res/android"
android:layout_width="match_parent"
android:layout_height="match_parent"
>
<TextView
android:text="TextView"
android:layout_width="300dp"
android:layout_height="300dp"
android:id="@+id/tv1"
android:layout_gravity="center"
android:background="#00ff00"/>
<TextView
android:text="TextView"
android:layout_width="200dp"
android:layout_height="200dp"
android:id="@+id/tv2"
android:layout_gravity="center"
android:background="#ffff00"/>
<TextView
android:text=""
android:layout_width="100dp"
android:layout_height="100dp"
android:id="@+id/tv3"
android:layout_gravity="center"
android:background="#15ff00"/>
<TextView
android:text=""
android:layout_width="50dp"
android:layout_height="50dp"
android:id="@+id/tv4"
android:layout_gravity="center"
android:background="#15ffff"/>
</FrameLayout>
四.TableLayout(表格布局):
每个TableRow表示一行,TableRow中的控件代表一列,无法在TableRow中指定控件宽度
重要属性
android:layout_span //合并列
android:stretchColumns //指定第几列拉伸,在TableLayout中指定
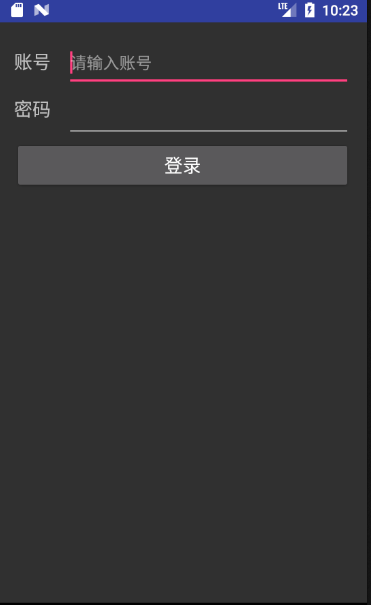
登录界面:

xml布局:
<TableLayout xmlns:android="http://schemas.android.com/apk/res/android"
android:layout_width="match_parent"
android:layout_height="match_parent"
android:stretchColumns="1"
android:padding="15dp">
<TableRow>
<TextView
android:layout_height="50dp"
android:text="账号"
android:textSize="18sp"
android:layout_marginRight="15dp"/>
<EditText
android:layout_height="50dp"
android:hint="请输入账号"
android:textSize="16sp"
/>
</TableRow>
<TableRow>
<TextView
android:layout_height="50dp"
android:text="密码"
android:textSize="18sp"/>
<EditText
android:layout_height="50dp"
android:hint="请输入密码"
android:textSize="16sp"/>
</TableRow>
<TableRow>
<Button
android:textSize="18sp"
android:layout_height="50dp"
android:text="登录"
android:gravity="center"
android:layout_span="2"
/>
</TableRow>
</TableLayout>