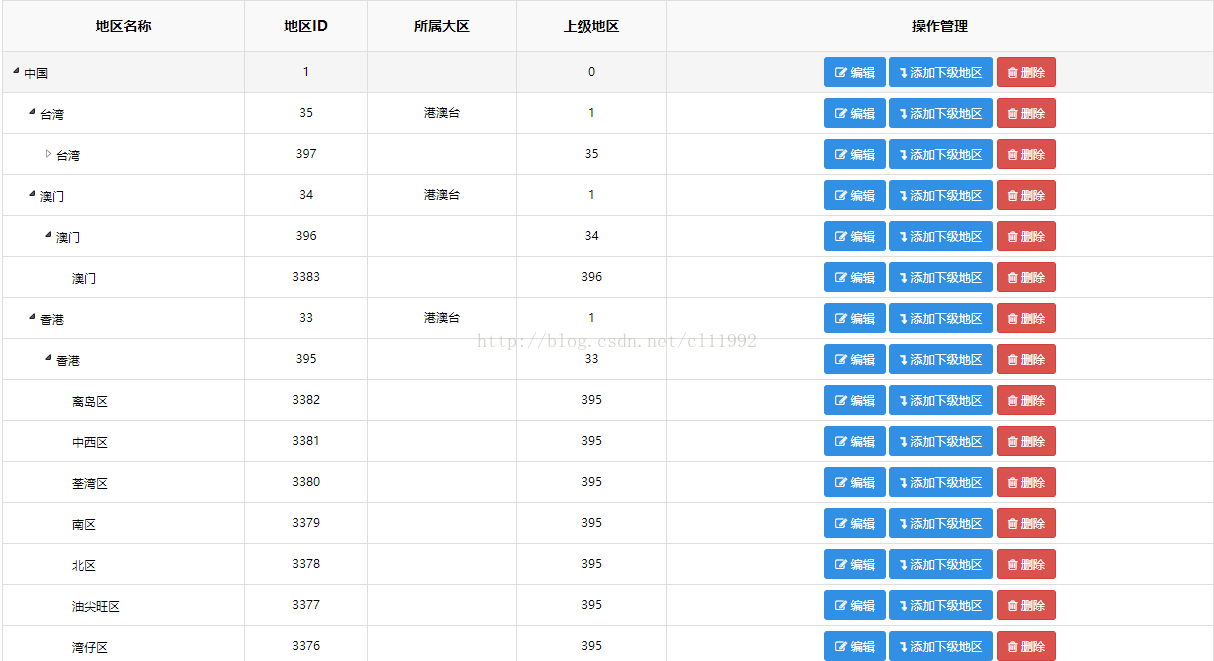
1
使用实例代码
1.jsp代码
<!DOCTYPE html>
<html lang="zh-CN">
<head>
<title>地区管理</title>
<!-- 表格树控件 -->
<link href="${ctxStatic}/treeTable/themes/vsStyle/treeTable.min.css" rel="stylesheet" type="text/css" />
<script src="${ctxStatic}/treeTable/jquery.treeTable.min.js" type="text/javascript"></script>
<!-- Mustache -->
<script src="${ctxStatic}/common/mustache.min.js" type="text/javascript"></script>
<!-- 业务js -->
<script src="${ctx}/views/admin/logistics/logisticsAreaList.js" type="text/javascript"></script>
</head>
<body>
    <table id="treeTable" class="table table-striped table-bordered table-condensed">
        <thead><tr><th>区域名称</th><th>区域编码</th><th>区域类型</th><th>备注</th><shiro:hasPermission name="sys:area:edit"><th>操作</th></shiro:hasPermission></tr></thead>
        <tbody id="treeTableList"></tbody>
    </table>
    <script type="text/template" id="treeTableTpl">
        <tr id="{{row.id}}" pId="{{pid}}">
            <td><a href="${ctxa}/sys/area/form.do?id={{row.id}}">{{row.name}}</a></td>
            <td>{{row.code}}</td>
            <td>{{dict.type}}</td>
            <td>{{row.remarks}}</td>
            <shiro:hasPermission name="sys:area:edit"><td>
                <a href="${ctxa}/sys/area/form.do?id={{row.id}}">修改</a>
                <a href="${ctxa}/sys/area/delete.do?id={{row.id}}" οnclick="return confirmx('要删除该区域及所有子区域项吗?', this.href)">删除</a>
                <a href="${ctxa}/sys/area/form.do?parent.id={{row.id}}">添加下级区域</a>
            </td></shiro:hasPermission>
        </tr>
    </script>
</body>
</html>
2.logisticsAreaList.js
$(document).ready(function() {
        var tpl = $("#treeTableTpl").html().replace(/(//<!--)|(//-->)/g,"");
        var data = ${fns:toJson(list)}, rootId = "0";
        addRow("#treeTableList", tpl, data, rootId, true);
        $("#treeTable").treeTable({expandLevel : 5});
    });
    function addRow(list, tpl, data, pid, root){
        for (var i=0; i<data.length; i++){
            var row = data[i];
            if ((${fns:jsGetVal('row.parentId')}) == pid){
                $(list).append(Mustache.render(tpl, {
                    dict: {
                        type: getDictLabel(${fns:toJson(fns:getDictList('sys_area_type'))}, row.type)
                    }, pid: (root?0:pid), row: row
                }));
                addRow(list, tpl, data, row.id);
            }
        }
    }
————————————————
版权声明:本文为CSDN博主「cl11992」的原创文章,遵循 CC 4.0 BY-SA 版权协议,转载请附上原文出处链接及本声明。
原文链接:https://blog.csdn.net/cl11992/article/details/77052471
最近接触使用了 Mustache 模板引擎,发现非常好用,故稍微记录一下我。
mustache的github地址:mustache
mustache用法很简单,大概就以下三步:
1. 拿到渲染模板
var template = $('#tmpl').html();
- 1
- 2
2. 将数据渲染到模板上
Mustache.render(template, data);
- 1
- 2
3. 将渲染后的模板放到想放的dom中
$dom.html(template)
- 1
- 2
很好理解,就是mustache通过内部方法解析html字符串模板,然后将数据渲染上去形成新的html字符串,最后你就可以把它放入页面dom中。
这里记录一些基本语法:
- 基本
data:
{
    "name": "Chris",
    "company": "<b>GitHub</b>"
}
- 1
- 2
- 3
- 4
template
*  {{name}}     {{可以理解为这里面放的是键名}}
*  {{age}}
*  {{company}}
*  {{{company}}}  默认情况下,所有变量都是HTML转义的。如果要渲染未转义的HTML,使用三重括号:{{{}}}
*  {{&company}}   可以使用 & 来取消转义。

*  {{=<% %>=}}  不解析输出
   {{company}}
   <%={{ }}=%>
- 1
- 2
- 3
- 4
- 5
- 6
- 7
- 8
- 9
output
* Chris
*         (因为不存在 age, 所以这里啥也没有)
* <b>GitHub</b>
* <b>GitHub</b>
* <b>GitHub</b>
* {{company}}
- 1
- 2
- 3
- 4
- 5
- 6
- if 遍历语法
{{ #weather }}
    {{ city }}
{{ /weather }}
- 1
- 2
- 3
这可以看做代替了 if 语法,可以用来遍历数据 ( 相当于 if ( weather ) {…} )
条件是:weather 存在 且不为 null, undefined, false, 0, ‘’, []
data:
var data = {
    weather: [
        {
            city: '四川',
            sky: '多云'
        },
        {
            city: '河南',
           sky: '晴'
        }
}
- 1
- 2
- 3
- 4
- 5
- 6
- 7
- 8
- 9
- 10
- 11
template:
<div>
    查看城市天气:
    {{#weather}}
        {{city}}:{{sky}}<br/>
    {{/weather}}
</div>
- 1
- 2
- 3
- 4
- 5
- 6
output:
查看城市天气:
        四川:所云
        河南:晴
- 1
- 2
- 3
- 与上一个相反,weather为 false, null, undefined, [], 0 显示
{{ ^weather }}
    显示无数据
{{ /weather }}
- 1
- 2
- 3
- 遍历 字符串数组
{{ #cities }}
    {{ . }}
{{ /cities }}
- 1
- 2
- 3
data:
var data = {
    cities: ['北京','南京','上海','广东','深圳','西安']
}
- 1
- 2
- 3
template:
<div>
    查看其他城市:
    {{#cities}}
        <a href="javascript:;"> {{.}} </a>
    {{/cities}}
</div>
- 1
- 2
- 3
- 4
- 5
- 6
output:
查看其他城市: 北京 南京 上海 广东 深圳 西安
- 1
- 使用函数
data:
{
     weather: {
         city: '四川',
         weather: '<b>多云</b>',
         min_tempe: 20,
         max_tempe: 30
     }
     tempe: function() {
         return this.min_tempe + '~' + this.max_tempe;
     }
}
- 1
- 2
- 3
- 4
- 5
- 6
- 7
- 8
- 9
- 10
- 11
template:
{{#weather}}
    {{tempe}}
{{/weather}}
- 1
- 2
- 3
output:
20 ~ 30
- 1
网上解释:这里的 function 将在每次迭代时在列表中的当前项的上下文中调用。
我理解的就是 function每次的上下文都要在 渲染时才决定,因此 this 的指向要看具体的执行环境。
这里 temp函数是在 weather中执行的,所以function中的this指向的是 weather
- 比较复杂的函数
网上的例子:
If the value of a section key is a function, it is called with
the section’s literal block of text, un-rendered, as its first argument.
The second argument is a special rendering function that uses the current
view as its view argument. It is called in the context of the current view
object.
- 1
- 2
- 3
- 4
- 5
data:
{
  "name": "Tater",
  "bold": function () {
    return function (text, render) {
      return "<b>" + render(text) + "</b>";
    }
  }
}
- 1
- 2
- 3
- 4
- 5
- 6
- 7
- 8
template:
{{#bold}}Hi {{name}}.{{/bold}}
- 1
output:
<b>Hi Tater.</b>
- 1
没看太懂,应该是在函数中定义render渲染视图方法,至今也没用到过。
还有其他的用法等用到了再记录吧。