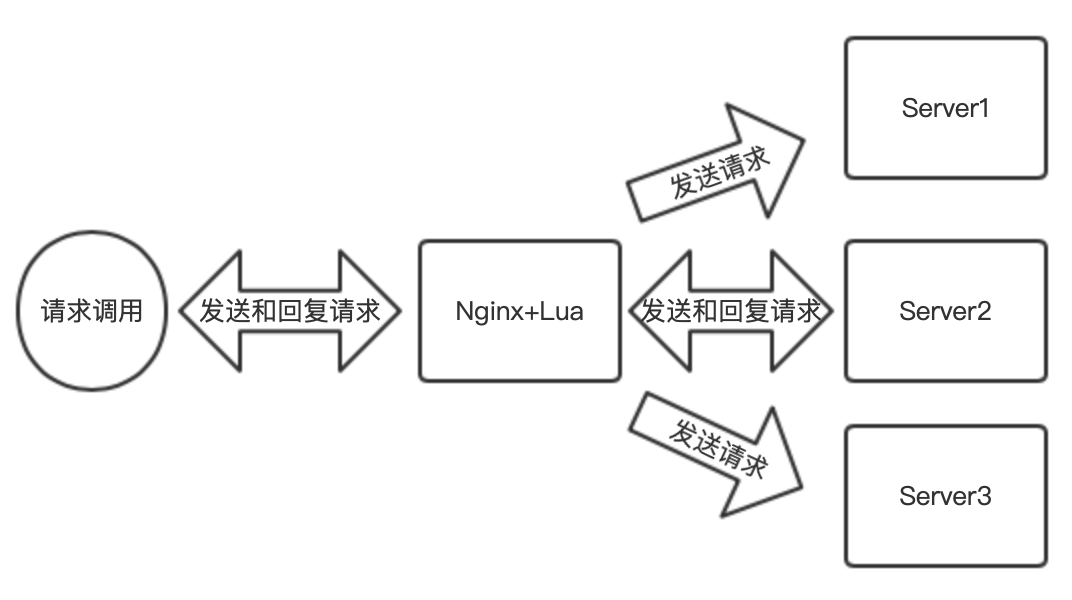
系统版本及需求:
OS:CentOS 7.7.1908
OpenResty:1.15.8.2
描述
lua-nginx-module模块是什么:
It is a core component of OpenResty. If you are using this module, then you are essentially using OpenResty.
By leveraging Nginx's subrequests, this module allows the integration of the powerful Lua threads (known as Lua "coroutines") into the Nginx event model.
Unlike Apache's mod_lua and Lighttpd's mod_magnet, Lua code executed using this module can be 100% non-blocking on network traffic as long as the Nginx API for Lua provided by this module is used to handle requests to upstream services such as MySQL, PostgreSQL, Memcached, Redis, or upstream HTTP web services.
OpenResty的核心组件,将lua线程集成到nginx模型中,且不会阻塞网络流量。
可以通过编译将其安装为Nginx Module。本文直接安装OpenResty,通过lua脚本主要实现以下两个目标:
- 将一份请求转发给多个后端,但仅用其中一个后端回复请求。
- 分析一份请求的参数内容,根据规则将请求分发到不同的后端。
通过以上两个目标,也很容易衍生出其他的可能性,例如通过此模块实现根据请求用户的特征将其调度到不同的服务器:以此来达到目标(比如灰度、就近访问、黑白名单等);根据转发多后端特性,实现完全的真实环境压力测试等。
安装配置
安装openresty
通过源码编译安装,具体步骤如下:
yum install -y pcre-devel openssl-devel gcc curl
mkdir -p /data/pkg/ && cd /data/pkg/
wget https://openresty.org/download/openresty-1.15.8.2.tar.gz
tar xf openresty-1.15.8.2.tar.gz
cd openresty-1.15.8.2
./configure --with-file-aio --with-http_ssl_module --with-http_realip_module --with-http_sub_module --with-http_gzip_static_module --with-http_auth_request_module --with-http_stub_status_module
make -j$nproc
make install
编译时Nginx的大多数选项都支持。如上启动了一些Module,具体根据你的需求选择。
默认安装路径/usr/local/openresty,想更改路径通过--prefix=/path指定。
使用示例
创建一个存放脚本的目录:
cd /usr/local/openresty
mkdir nginx/conf/lua
创建一个lua测试脚本:
vim nginx/conf/lua/hello.lua
local action = ngx.var.request_method
if(action == "POST") then
    ngx.say("Method: POST; Hello world")
elseif(action == "GET") then
    ngx.say("Method: GET; Welcome to the web site")
end
在Server段配置中启用lua脚本:
vim nginx/conf/nginx.conf
在nginx.conf中新增加一个server段,请求路径以/开头的则使用lua脚本进行处理。
server {
    listen 0.0.0.0:8080;

    location / {
        root   html;
        index  index.html index.htm;
       }

    location ~* ^/(.*)$ {
        content_by_lua_file  "conf/lua/hello.lua";  # lua script location
    }
}
测试效果:
使用./bin/openresty -t命令检查配置无误,然后使用./bin/openresty命令启动服务。
POST和GET请求方式返回不同的相应内容
curl 127.0.0.1:8080
# 返回信息
Method: GET; Welcome to the web site

curl -d "" 127.0.0.1:8080
# 返回信息
Method: POST; Hello world
HTTP请求复制
环境准备妥当,现在通过lua脚本程序配合openresty实现对于HTTP请求的复制。
当一个请求来到openresty服务时,把此请求转发给后端的server1、server2等等,但只是用server1或server2的应答消息回复这个请求。
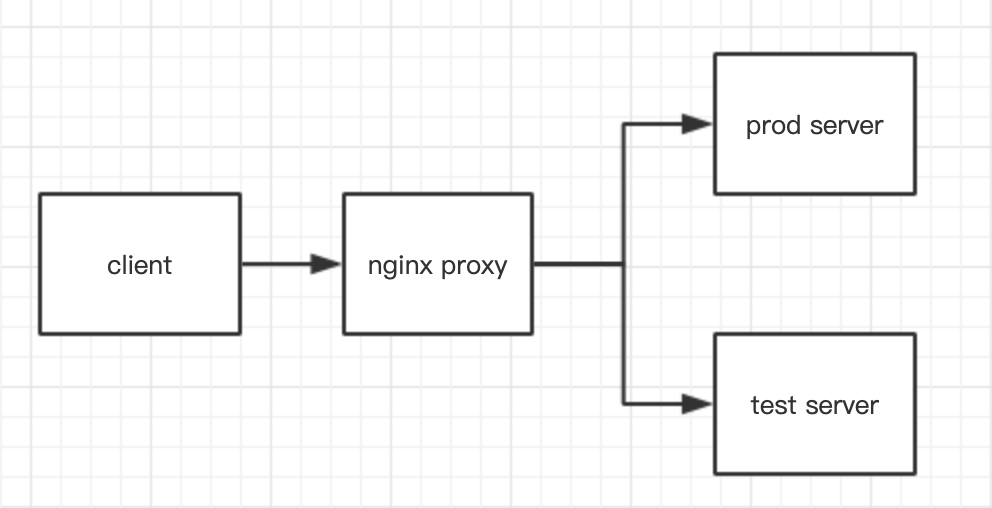
一个简单的示例图:

需求:将请求同时发送到/prod和/test路径后的真实后端,但只使用/prod的后端回复client的请求
lua代码
vim nginx/conf/lua/copyRequest.lua
function req_copy()
    local resp_prod, resp_test = ngx.location.capture_multi {
        {"/prod" .. ngx.var.request_uri, arry},
        {"/test" .. ngx.var.request_uri, arry},
    }

    if resp_prod.status == ngx.HTTP_OK then
        local header_list = {"Content-Type", "Content-Encoding", "Accept-Ranges"}
        for _, i in ipairs(header_list) do
            if resp_prod.header[i] then
                ngx.header[i] = resp_prod.header[i]
            end
        end
        ngx.say(resp_prod.body)
    else
        ngx.say("Upstream server error : " .. resp_prod.status)
    end
end

req_copy()
nginx新建的server段配置如下,且引入vhosts目录下配置文件,nginx/conf/nginx.conf:
server {
    listen 0.0.0.0:8080;
    location / {
        root html;
        index index.html index.htm;
    }
    # 匹配lua文件中/prod+原请求的uri(/copy/*)
    location ^~ /prod/ {
    		# 路径重写后,/prod后端服务器收到的路径为客户端请求路径去掉开头/copy/
        rewrite /prod/copy/(.*)$ /$1 break;
        proxy_pass http://127.0.0.1:8081;
    }
    # 匹配lua文件中/test+原请求的uri(/copy/*)
    location ^~ /test/ {
     		# 路径重写后,/prod后端服务器收到的路径为客户端请求路径去掉开头/copy/
        rewrite /test/copy/(.*)$ /$1 break;
        proxy_pass http://127.0.0.1:8082;
    }
    location ^~ /copy/ {
        content_by_lua_file "conf/lua/copyRequest.lua";
    }
}
include vhosts/*.conf;
创建两个后端主机,模拟代表不同环境:
# nginx/conf/vhosts/prod.conf
server {
    listen       8081;
    server_name  localhost;

    access_log logs/prod_server.log;

    location / {
        return 200 "Welcome to prod server";
    }

    location /api/v1 {
        return 200 "API V1";
    }
}

# nginx/conf/vhosts/test.conf
server {
    listen       8082;
    server_name  localhost;

    access_log logs/test_server.log;

    location / {
        return 200 "Welcome to test server";
    }
}
配置更新后重载服务,然后测试访问:
> curl 127.0.0.1:8080/copy/
Welcome to prod server
> curl 127.0.0.1:8080/copy/api/v1
API V1

# /prod和/test后端的服务都收到了请求
# 查看日志;tail -2 nginx/logs/prod_server.log
127.0.0.1 - - [01/Mar/2020:01:41:12 +0800] "GET / HTTP/1.0" 200 22 "-" "curl/7.29.0"
127.0.0.1 - - [01/Mar/2020:01:41:15 +0800] "GET /api/v1 HTTP/1.0" 200 6 "-" "curl/7.29.0"

# 查看日志;tail -2 nginx/logs/test_server.log
127.0.0.1 - - [01/Mar/2020:01:41:12 +0800] "GET / HTTP/1.0" 200 22 "-" "curl/7.29.0"
127.0.0.1 - - [01/Mar/2020:01:41:15 +0800] "GET /api/v1 HTTP/1.0" 200 22 "-" "curl/7.29.0"
模拟场景图示:

- client访问nginx服务监听的
IP:8080/copy/路径 - lua脚本处理收到的请求,代访问
/prod和/test路径 /prod和/test路径在本地被代理到真实后端- 真实后端接收到请求并返回
- lua脚本仅处理
/prod(resp_prod)后端服务器返回的内容(见lua脚本中代码) - 将/prod后端服务器返回的内容返回给client
HTTP报文解析
需求:将请求报文参数中的userid在某个区间的请求调度到指定的后端服务上。
创建nginx/conf/lua/requestBody.lua代码:
-- post body提交方式为application/x-www-form-urlencoded的内容获取方法
function urlencodedMethod()
    local postBody = {}
    for key, val in pairs(args) do
        postBody[key] = val
    end
    local uid = postBody["userid"]
    postBody = nil
    return tonumber(uid)
end

-- get请求方式为xx.com/?userid=x其params的获取方式
function uriParameterMethod()
    local getParameter = {}, key, val
    for key, val in pairs(args) do
        if type(val) == "table" then
            getParameter[key] = table.concat(val)
        else
            getParameter[key] = val
        end
    end
    local uid = getParameter["userid"]
    getParameter = nil
    return tonumber(uid)
end

-- 获取post body提交的方式;multipart/from-data在此示例中没有实现对其内容的处理
function contentType()
    local conType = ngx.req.get_headers()["Content-Type"]
    local conTypeTable = {"application/x-www-form-urlencoded", "multipart/form-data"}
    local receiveConType, y
    if(type(conType) == "string") then
        for y = 1, 2 do
            local word = conTypeTable[y]
            local from, to, err = ngx.re.find(conType, word, "jo")
            if from and to then
                receiveConType = string.sub(conType, from, to)
            end
        end
    else
        receiveConType = nil
    end
    return receiveConType
end

-- 循环出一些需要的header返回给客户端
function iterHeaders(resp_content)
    local header_list = {"Content-Type", "Content-Encoding", "Accept-Ranges","Access-Control-Allow-Origin", "Access-Control-Allow-Methods","Access-Control-Allow-Headers", "Access-Control-Allow-Credentials"}
    for _, i in ipairs(header_list) do
        if(resp_content.header[i]) then
            ngx.header[i] = resp_content.header[i]
        end
    end
    return resp_content
end

-- 将userid大于等于1小于等于10的请求发送给/prod路径的后端
-- 将userid大于等于11小于等于20的请求发送给/test路径的后端
-- 将userid非以上两种的同时发送给/prod和/test路径的后端,使用/prod后端回复请求
function requestTo(uid)
    local resp, resp_noReply
    if(uid >= 1 and uid <= 10) then
        resp = ngx.location.capture_multi {
            {"/prod".. ngx.var.request_uri, arry},
        }
    elseif(uid >= 11 and uid <= 20) then
        resp = ngx.location.capture_multi {
            {"/test".. ngx.var.request_uri, arry},
        }
    else
        resp, resp_noReply = ngx.location.capture_multi {
            {"/prod" .. ngx.var.request_uri, arry},
            {"/test" .. ngx.var.request_uri, arry},
        }
    end

    local res
    if(resp.status == ngx.HTTP_OK) then
        res = iterHeaders(resp)
    else
        res = "Upstream server err : " .. reps_content.status
    end
    ngx.say(res.body)
end

-- 处理主函数
function main_func()
    ngx.req.read_body()
    local action = ngx.var.request_method
    if(action == "POST") then
        arry = {method = ngx.HTTP_POST, body = ngx.req.read_body()}
        args = ngx.req.get_post_args()
    elseif(action == "GET") then
        args = ngx.req.get_uri_args()
        arry = {method = ngx.HTTP_GET}
    end

    local u
    if(action == "POST") then
        if args then
            local getContentType = contentType()
            if(getContentType == "application/x-www-form-urlencoded") then
                u = urlencodedMethod()
            end
        end
    elseif(action == "GET") then
        if args then
            u = uriParameterMethod()
        end
    end

    if(u == nil) then
        ngx.say("Request parameter cannot be empty: userid<type: int>")
    else
        requestTo(u)
    end
end

main_func()
配置nginx/conf/nginx.conf文件,修改新增的server段内容如下:
server {
    listen 0.0.0.0:8080;
    location / {
        root html;
        index index.html index.htm;
    }
    location ^~ /prod/ {
        rewrite /prod/request/(.*)$ /$1 break;
        proxy_pass http://127.0.0.1:8081;
    }
    location ^~ /test/ {
        rewrite /test/request/(.*)$ /$1 break;
        proxy_pass http://127.0.0.1:8082;
    }
    location ^~ /request/ {
        content_by_lua_file "conf/lua/requestBody.lua";
    }
}
include vhosts/*.conf;
使用上个示例中的两个后端服务,重载服务,测试效果:
> curl -X POST -d 'userid=1' 127.0.0.1:8080/request/
Welcome to prod server
> curl -X POST -d 'userid=11' 127.0.0.1:8080/request/
Welcome to test server
> curl -X POST -d 'userid=21' 127.0.0.1:8080/request/
Welcome to prod server
> curl 127.0.0.1:8080/request/?userid=1
Welcome to prod server
> curl 127.0.0.1:8080/request/?userid=11
Welcome to test server
> curl 127.0.0.1:8080/request/?userid=21
Welcome to prod server
请求过程解析:
- client访问nginx服务监听的
IP:8080/copy/路径 - lua脚本处理收到的请求,根据其请求参数中userid进行对后端请求的调度
- 各路径后的真实后端接受请求并处理返回
- nginx(lua)将后端服务器返回的内容返回给client
总结
tips:
- nginx配置正确性检测不会检测lua脚本的正确性
- lua脚本的错误会记录到error.log中
- 调试时可使用ngx.log方法进行调试
通过使用lua-nginx-module扩展增强nginx处理能力,可以根据自身的业务需求开发脚本,实现针对请求的方式、参数等内容进行按需调度。